 (1).svg)
 (1).png)


 (1).svg)
.svg)
This article builds upon our previous guide for Office 365 Business subscribers on setting up Office 365 Exchange with self-hosted Odoo ERP instances. Beyond self-hosted deployments, Odoo SA offers its own robust cloud platforms, namely Odoo.sh and Odoo Online, for deploying the ERP system.
Odoo.sh is a Platform as a Service (PaaS) fully managed by Odoo SA. It enables the deployment of your own cloud platform with just a few clicks and conveniently includes a pre-configured mail server.
Odoo Online, on the other hand, is a Software as a Service (SaaS) also managed by Odoo SA. Within seconds and a few clicks, your cloud instance will be ready for use anytime, anywhere. Like Odoo.sh, it comes with a pre-configured mail server. The significant advantage of Odoo Online is its inherent simplicity: users are freed from technical considerations, as Odoo handles all underlying complexities.
While these platforms are immensely popular, it is crucial to note that if you intend to utilize Office 365 Exchange instead of the default mail server provided by these platforms, you cannot employ SMTP Relay as an outgoing email server. This is because SMTP Relay typically uses port 25 for connection, a port that is blocked on both Odoo.sh and Odoo Online for enhanced security reasons.
Table of Contents
- Prerequisites
- Configuring Incoming/Outgoing Mailbox in Office 365
- Configuring Outgoing Mail Server in Odoo
- Configuring Incoming Mail Server in Odoo
- Testing Odoo ERP Emailing Setup
- Conclusion
Prerequisites
Before proceeding with the configuration steps, ensure that the following conditions are met to guarantee a smooth setup process:
- This guide assumes you are an existing user of an Office 365 Business subscription that includes Exchange Server capabilities, such as “Office 365 Business Premium.”
- You are already actively utilizing the mailing features provided by Office 365. If you have recently acquired a subscription and have not yet performed the initial setup, you must first complete this process by following the official Microsoft guide. It is particularly important that your custom domain has been properly configured. This Microsoft guide can assist you with domain configuration.
- Individuals performing these steps must possess Administrative access (specifically the Global Administrator role) to https://www.office.com. This level of access is necessary for creating new users and groups within the Office 365 Portal.
- You are either an existing or prospective user of Odoo.sh or Odoo Online. These platforms, according to official documentation, do not permit the direct use of Office 365 SMTP relays, or you are unable to use port 25 or a static IP for your Odoo instance due to other restrictions.
Note: If you operate Odoo on-premise, where port 25 is not blocked and your instance has a static IP address, you can configure your email settings by following the instructions in this dedicated article.
Once all the aforementioned preconditions are successfully met, you are ready to proceed with the subsequent configuration steps.
Configuring Incoming/Outgoing Mailbox in Office 365
For both sending and receiving email messages within Odoo, a single mailbox will be utilized, connecting via SMTP (port 587) and IMAP (port 993) protocols, respectively. Authorization requires only the mailbox name and credentials.
The setup for this dedicated mailbox aligns completely with the instructions provided in the "Configuring Catchall Email in Office 365" section of our related article. Please refer to that section for detailed guidance on creating and configuring this mailbox within your Office 365 environment.
Configuring Outgoing Mail Server in Odoo
An outgoing mail server is essential to enable Odoo to send various messages and notifications to recipient mailboxes, both within and outside your Odoo system. Follow these steps to complete this critical configuration:
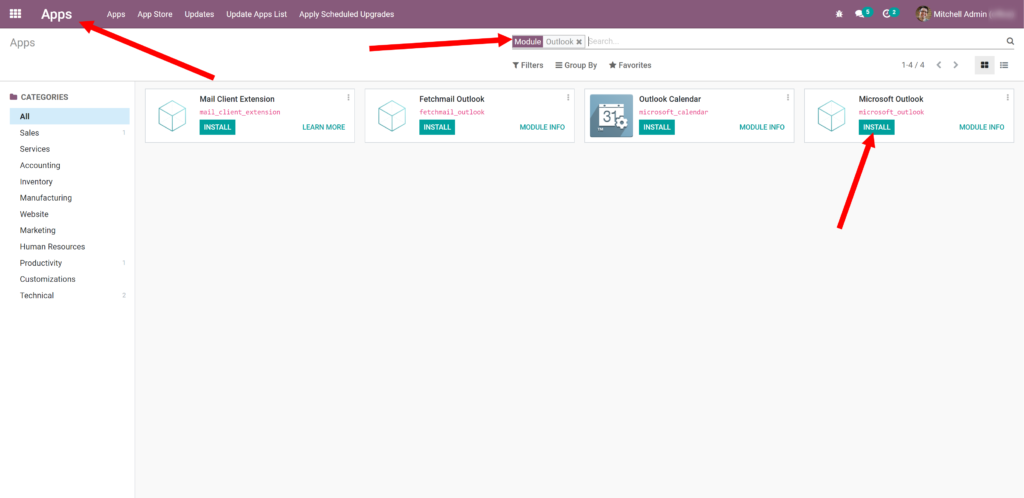
- Login as an Administrator in your Odoo ERP instance. Navigate to the “Apps” menu, locate the “Microsoft Outlook” app, and click “Install.”
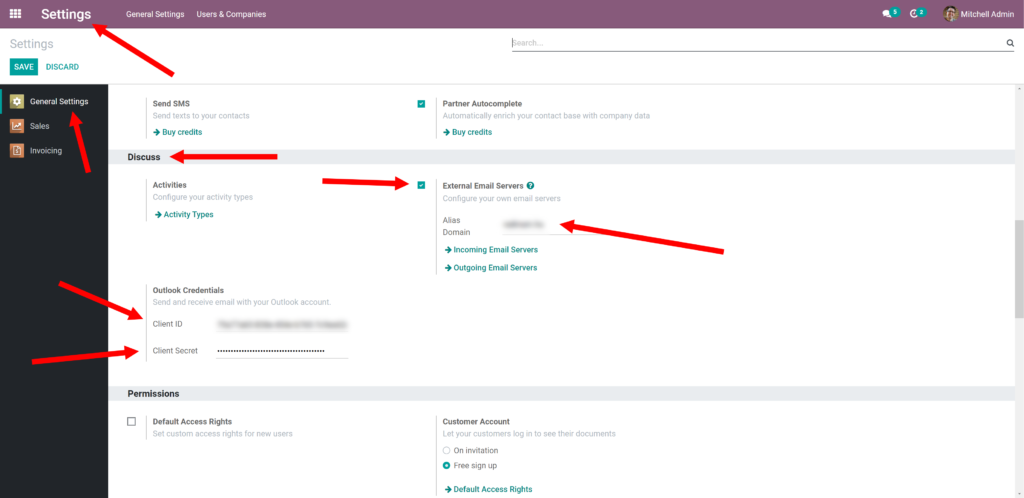
- Next, go to “Settings -> General Settings -> Discuss.” Enter the following values and then click “Save”:
- External Email Servers: Select this option.
- Domain: Use the same domain as configured for your Catchall mailbox (e.g.,
your-domain.com). - Client ID: Input the Client ID obtained from your Azure App. (Refer to this section for details).
- Client Secret: Enter the Secret Value from your Azure App. (Refer to this section for details).
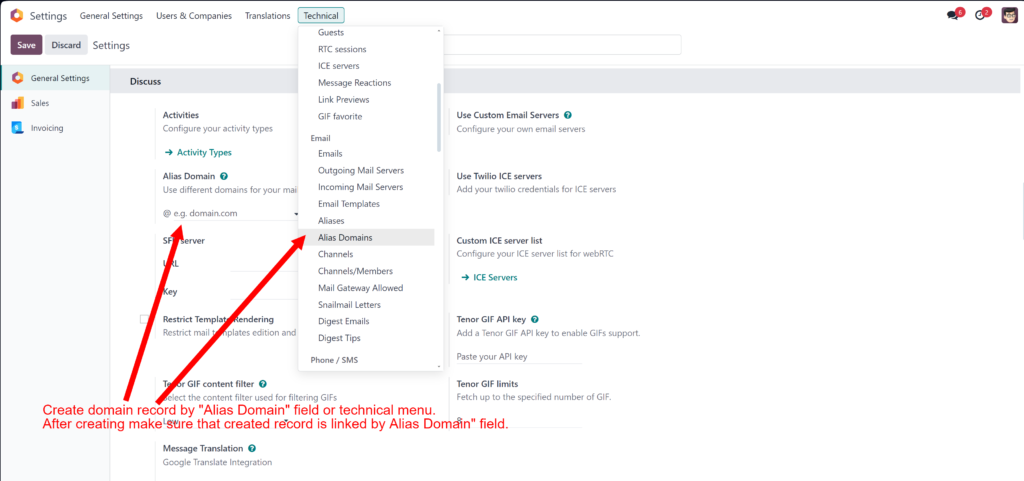
If your Odoo version is v17, you should also add an Alias Domain as follows:
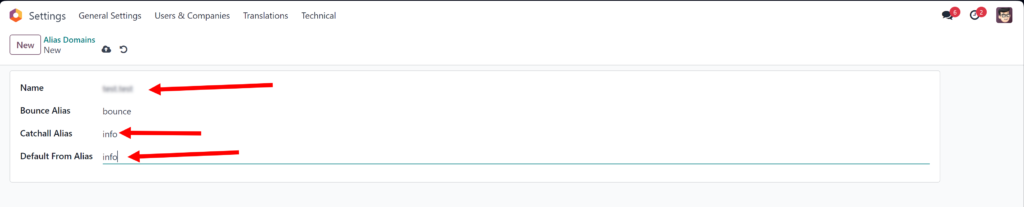
- Name: This parameter should be your domain (e.g.,
your-domain.com). - Catchall Alias: Enter the specific part of the email address you previously configured. For example, if your catchall email is
info@your-domain.com, enter "info." - Default From Alias: This parameter should also be "info" (matching the example
info@your-domain.com). This ensures that all outgoing messages originating from an unknown sender will default to this "From" address.
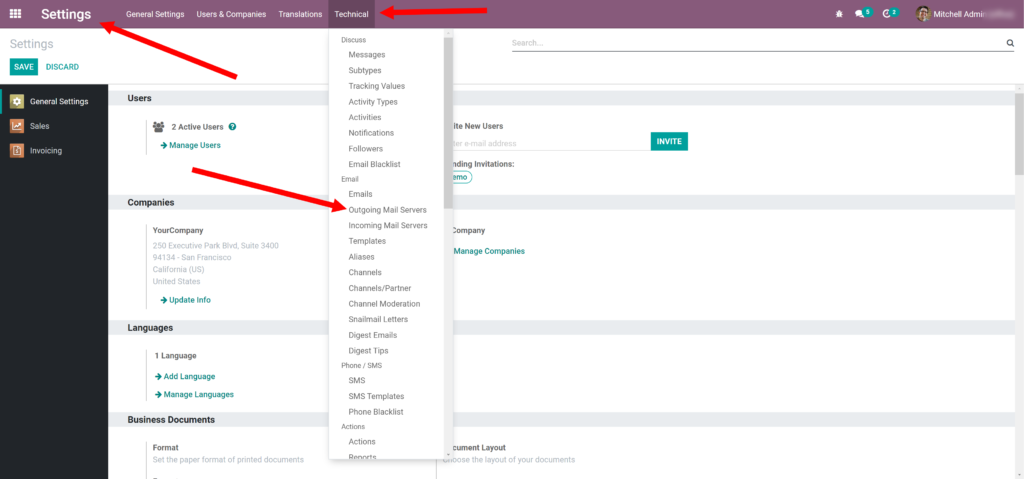
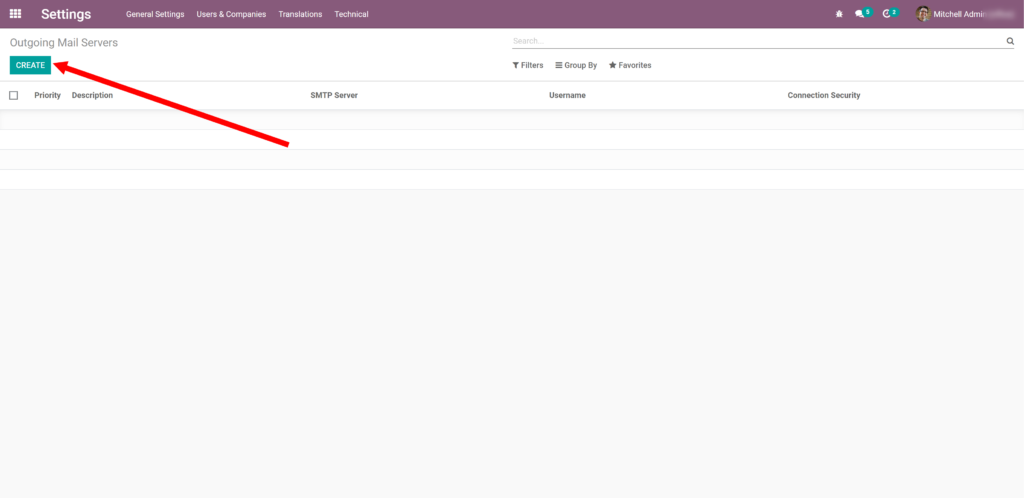
- After saving the settings, proceed to “Settings -> Technical -> Outgoing Mail Servers.” Here, you can either select an existing server to modify it or click “Create” to set up a new one.
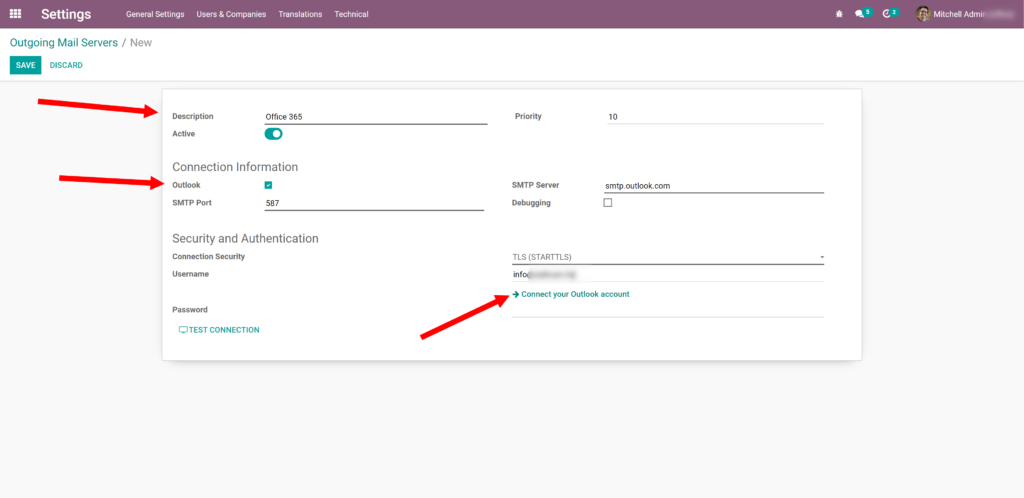
- Now, enter the following values and click “Connect your Outlook account”:
- Description: “Office 365”
- Outlook: Select this option.
- Username: Your Catchall mailbox address (e.g.,
your_catchall_email@your-domain.com).
For Odoo version 15 and higher, you must also add:
- From Filter:
your_catchall_email@your-domain.com– This filter is crucial to ensure that messages are only sent with the specified sender address, matching your catchall mailbox.
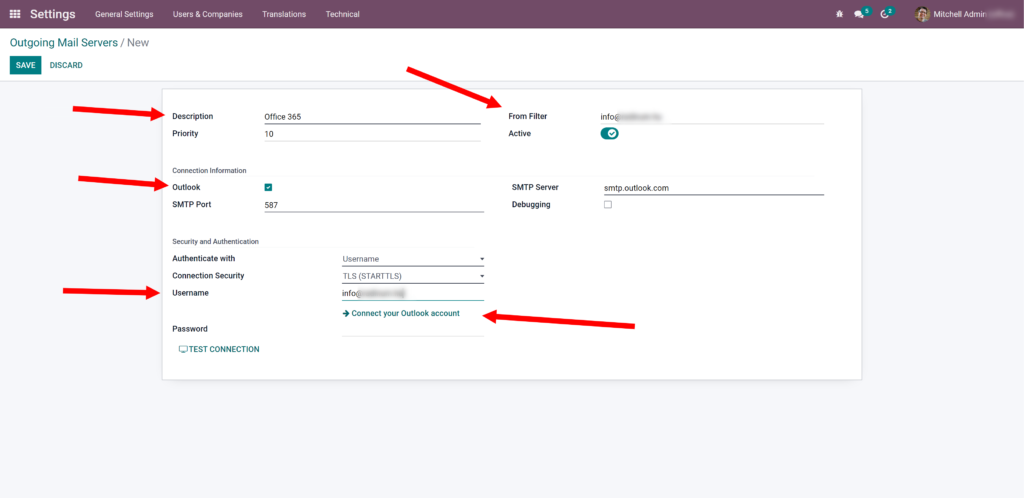
- You will then be prompted to “Login” using your Catchall mailbox user credentials.
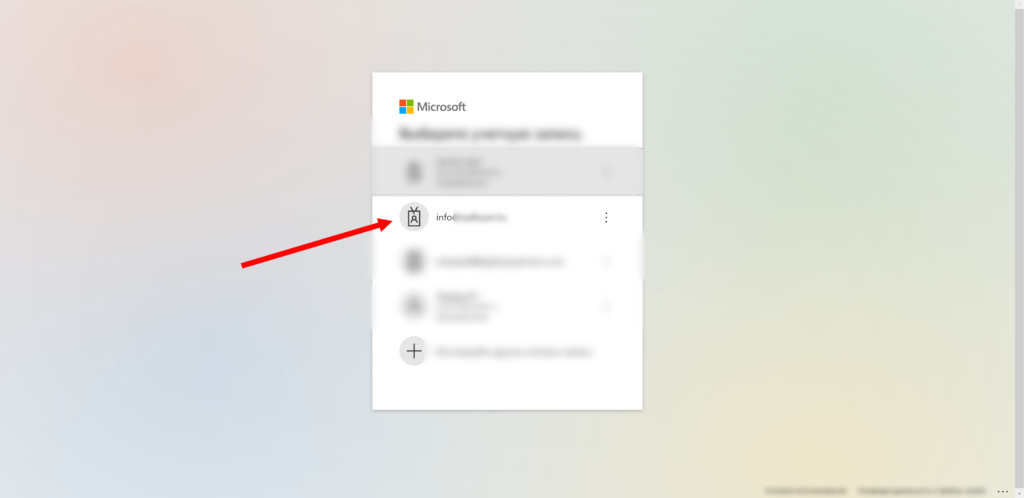
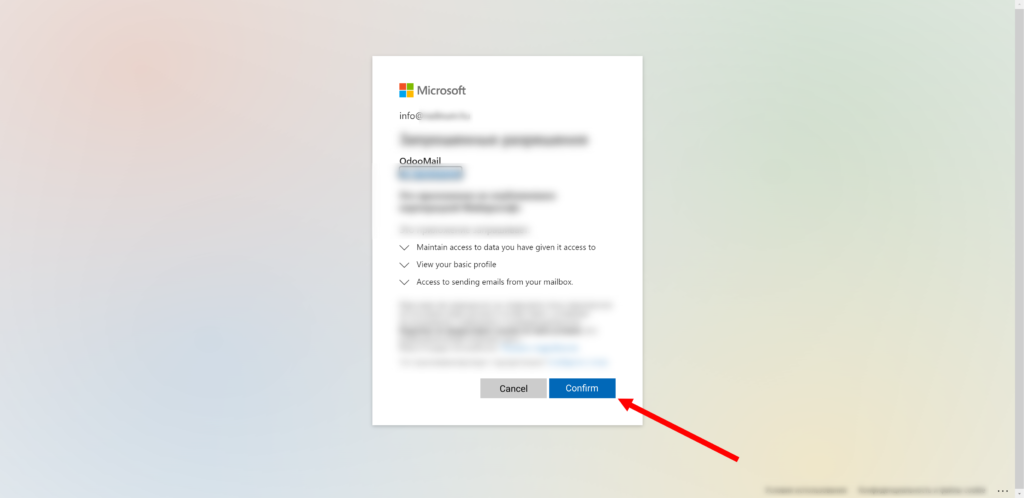
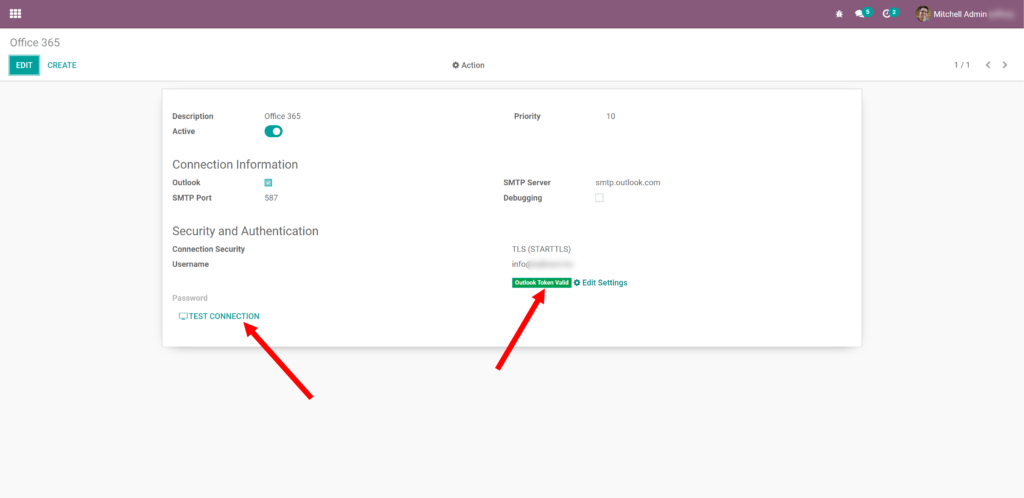
- Upon successful authentication, Odoo ERP will display a “Valid Outlook Token.” Proceed by clicking “Test Connection.”
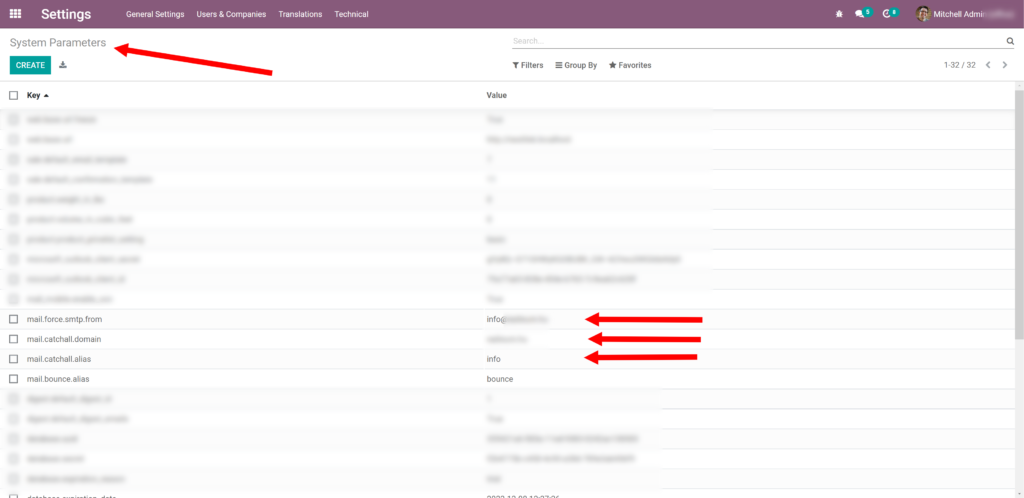
- Finally, navigate to the menu “Settings -> Technical -> System Parameters.” Verify that the following properties are configured correctly based on your Odoo version:
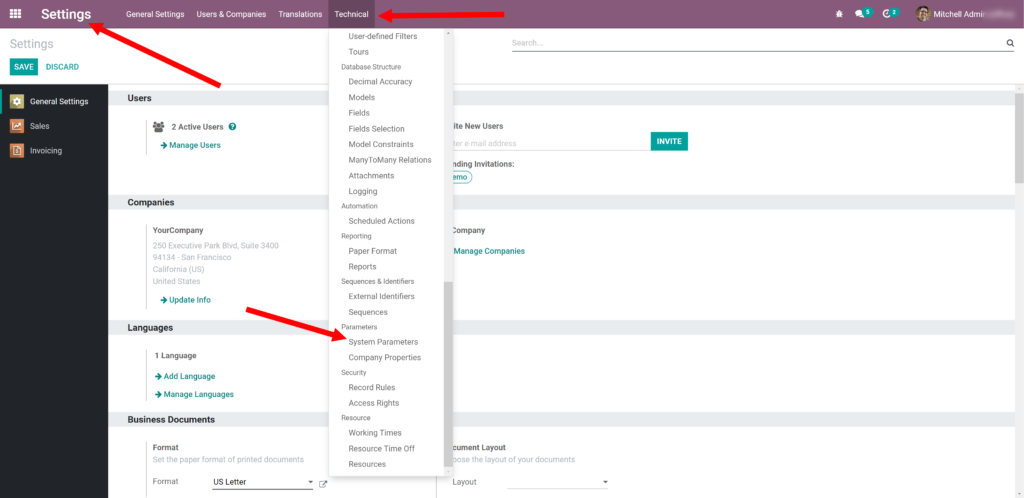
For Odoo version 16 and lower, ensure you have the following properties:
- mail.catchall.domain: This parameter should be your domain (e.g.,
your-domain.com). - mail.catchall.alias: Enter the specific part of the email address previously configured (e.g., "info" for
info@your-domain.com).
For Odoo version 14 and lower, the following property should be set:
- mail.force.smtp.from: This parameter should be your catchall email address (e.g.,
your_catchall_email@your-domain.com). This setting ensures that all outgoing messages consistently use this specific "From" address.
For Odoo versions 15 and 16, ensure you have these properties:
- mail.default.from: This parameter should be the alias (e.g., "info" as previously configured for
info@your-domain.com). It means that all outgoing messages, especially in cases where the sender is unknown, will utilize this default "From" alias.
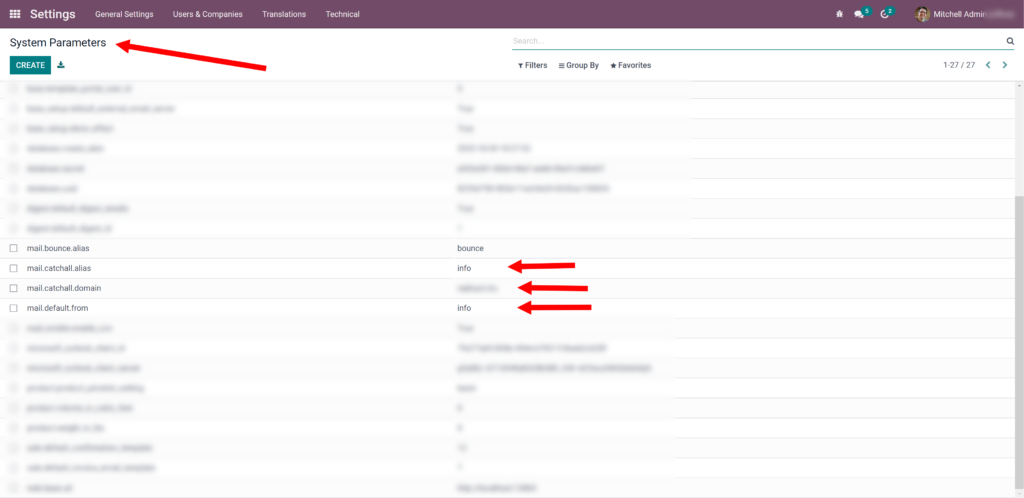
- mail.catchall.domain: This parameter should be your domain (e.g.,
IMPORTANT! How does it work?
In this specific configuration, email transmission is managed through the same mailbox used for reception. As this setup leverages a mailbox rather than an SMTP relay, the sender address is inherently restricted to the mailbox owner (e.g.,
your_catchall_email@your-domain.com). Consequently, all email recipients will observe the sender as "Odoo User or Notification or etc." <your_catchall_email@your-domain.com> instead of a customized sender like "Odoo User or Notification or etc." <user_or_service@email.com>.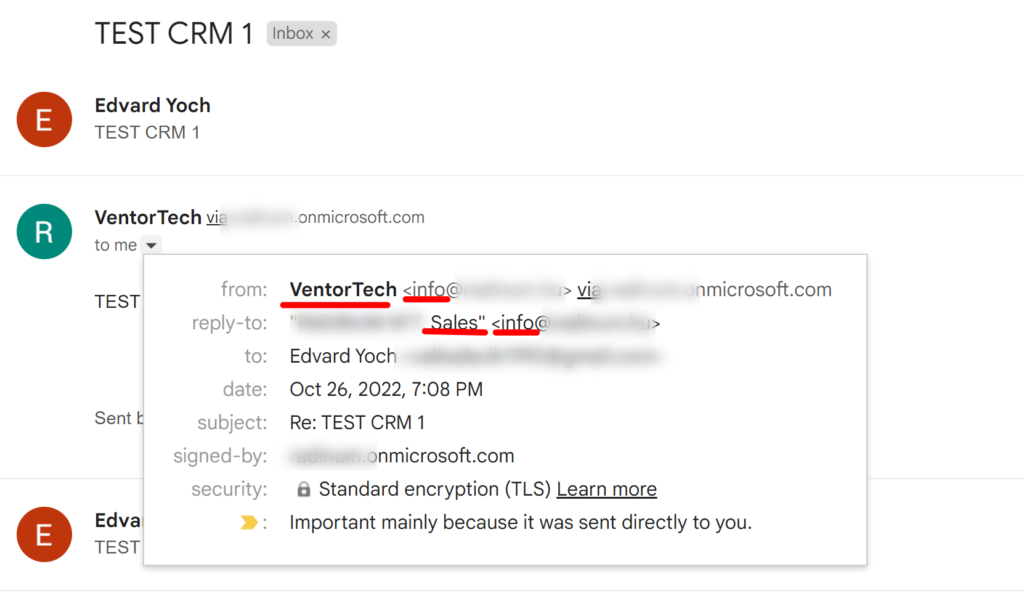
This limitation arises from the specific Office 365 configuration when integrated with Odoo.sh or Odoo Online. It restricts the ability to use different addresses as the email sender. Therefore, it is crucial to consider this aspect when implementing this manual.
If maintaining a distinct sender identity for individual users or services is paramount, requiring unique email addresses, then due to these technical constraints, you would need to consider an alternative Odoo deployment method or explore other email providers beyond Office 365 Exchange.
Configuring Incoming Mail Server in Odoo
The configuration of the Incoming Mail Server within Odoo fully aligns with the instructions detailed in the "Configuring Catchall Email in Office 365" section of our complementary article. Please refer to that section for comprehensive guidance on setting up this component.
Testing Odoo ERP Emailing Setup
Once the outgoing and incoming mail servers are configured, it's essential to test the setup to ensure seamless email communication. Follow these steps to verify your Odoo ERP emailing functionality:
- As an Administrator or any user with sufficient privileges, navigate to the “CRM -> Sales -> Teams” menu. Open the configuration for any sales team. Within the sales team details, enter the following data:
- Email Alias: Enter a suitable alias, for example, “sales” (you can choose any desired alias).
- Accept Emails From: Select “Everyone.”
- Team Members: Add actual users with valid email addresses to this section.
- Followers (in the chatter, optional): Add users who should automatically receive mail notifications whenever a new lead is generated for this team.

- Now, send an email from your personal email address to the mail address specified in the Sales Team’s configuration (e.g.,
sales@your-domain.com). Allow at least 5 minutes for the system to process. This is the standard period Odoo is typically configured to download incoming emails. - After the waiting period, navigate to the “CRM -> Pipeline” menu. You should observe that a new Opportunity has been automatically created from your incoming email, with its name matching the email's subject line. To test the Outgoing Mail Server, initiate a conversation using the chatter feature from this newly created Opportunity. As demonstrated in the example below, you should now be able to both receive and send messages successfully via Odoo.

Congratulations! Your Office 365 and Odoo ERP integration is now successfully configured.
Conclusion
In summary, this guide has walked you through the comprehensive process of integrating Office 365 with Odoo for seamless email sending and receiving. This configuration is particularly beneficial for Odoo deployments on Odoo.sh or Odoo Online platforms, or in any scenario where direct use of port 25 is restricted. By following these steps, you can effectively leverage your existing Office 365 Exchange services as your primary mail provider for Odoo, overcoming common connectivity challenges and ensuring robust email communication within your ERP system. This integration allows your business to maintain consistency in its communication infrastructure while benefiting from Odoo's powerful features.
If you found this article helpful, please consider sharing it on social networks. Your feedback is highly appreciated, and if you require further assistance in configuring Office 365 with Odoo ERP, or if you encounter any issues or errors in the article, please feel free to leave your comments below. We are always happy to assist.
