
 (1).svg)
 (1).png)


 (1).svg)
.svg)
Portal access is a crucial feature in Odoo, designed for users who require the ability to view specific documents or information within an Odoo database without full system access. This functionality is particularly useful for external stakeholders such as customers or vendors.
Common scenarios for providing portal access include enabling customers to securely review or access the following documents and information directly within Odoo:
- Leads and Opportunities
- Quotations and Sales Orders
- Purchase Orders
- Invoices and Bills
- Project details
- Assigned Tasks
- Timesheets
- Support Tickets
- Electronic Signatures
- Subscription details
Note: It is important to understand that portal users are granted read-only access. They can view and retrieve information but are restricted from editing any documents or making changes within the database.
Providing Portal Access to Customers
To grant portal access to your customers, begin by navigating to the Contacts application from your main Odoo dashboard. If the contact record does not yet exist in your database, proceed to click the button, accurately input all relevant contact details, and then save the new record. Alternatively, if the contact already exists, select their record from the list, and then click on the drop-down menu, typically located at the top-center of the interface.
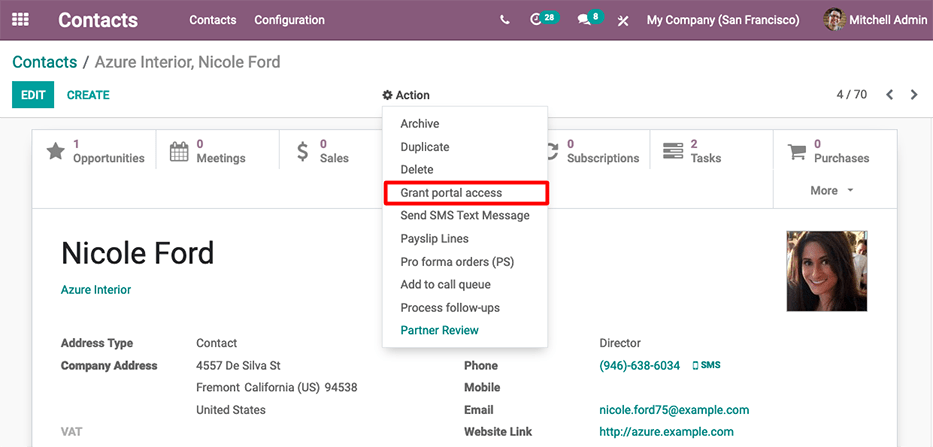
From the menu, select . A pop-up window will subsequently appear, displaying three key fields:
- Contact: This field displays the recorded name of the contact as it appears in your Odoo database.
- Email: This is the email address that the contact will use as their login credential to access the portal.
- In Portal: This checkbox indicates whether the user currently has portal access enabled.
To successfully grant portal access, first accurately enter the contact's email address in the Email field, as this will be their primary login credential. Next, activate portal access by checking the box situated under the In Portal column. You also have the option to personalize the invitation message that the contact will receive. Once all necessary information is provided, click to finalize the process.
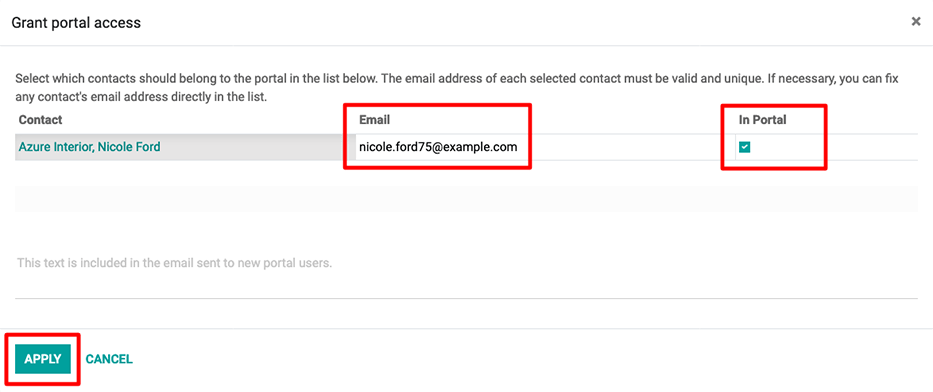
Upon completion, an email notification will be automatically dispatched to the specified email address, formally informing the contact that they have been granted portal user access to your Odoo database.
Tip: For granting portal access to multiple users simultaneously, navigate to a company contact record and then click to view the comprehensive list of all related contacts associated with that company. From this view, you can check the box under the In Portal column for all contacts who require portal access, and then click to process them in bulk.
Note: At any point, portal access can be easily revoked. To do so, simply navigate back to the contact's record, click the button (or equivalent), and then unselect the checkbox located under the In Portal column. Finally, click to confirm the revocation of access.
Changing a Portal Username
Situations may arise where a portal user wishes to modify their login username. This action can only be performed by a user within the Odoo database who possesses administrator access rights. The following procedure outlines the essential steps required to change a portal user's login username.
First, access the configuration within Odoo. Then, apply a filter; you can either select Portal Users directly from the available filters, or alternatively, choose Add Custom Filter and configure it with the following setting: Groups > contains > `portal`. After applying this filter, locate and open the specific portal user record that requires editing.
Next, if the record is not already in edit mode, click the button. Proceed to click into the Email Address field, which serves as the portal login, and make any necessary modifications. This Email Address field is directly utilized for logging into the Odoo portal.
Note: Changing the Email Address (which functions as the login) only alters the username associated with the customer's portal login. It does not update their primary contact email address.
To change the primary contact email, this modification must be performed on the contact template directly within the Contacts application. Alternatively, customers are able to update their own email address directly from their portal account, but they cannot change their login username themselves. For more details, please refer to the section on changing customer information.
Customer Portal Changes
Customers often require the ability to update various aspects of their portal account, including contact information, security settings (such as passwords), or associated payment details. These modifications can be conveniently performed by the customer directly from their portal interface. The following procedures detail how a customer can manage their information.
Changing Customer Information
To access and modify personal details, the customer must first log into their portal user account by entering their username and password on the database login page. Upon successful authentication, a personalized portal dashboard will be displayed, showcasing documents from various installed Odoo applications along with their respective counts.
From the portal dashboard, navigate to the upper-right corner of the interface. Locate and click the button, which is typically situated next to the Details section. Once in edit mode, proceed to update the pertinent information fields as required, and then click to save the changes.
Changing Password
To initiate a password change, the customer needs to log into their portal account using their current username and password on the database login page. A successful login will lead to the display of the portal dashboard.
If a customer wishes to change their password for portal access, they should click on the Edit Security Settings link, which is located beneath the Account Security section. On the subsequent screen, make the necessary changes by accurately typing in the Current Password, then entering the New Password, and finally verifying the new password by re-entering it. Conclude this process by clicking .
Note: If a customer needs to change their login username, as discussed in the previous section, they must contact the Odoo database point-of-contact for assistance. Refer to the documentation above on changing the portal username for more information.
Note: It is important to remember that passwords for portal users and Odoo.com users remain entirely separate, even if the same email address is utilized for both accounts.
Adding Two-Factor Authentication (2FA)
To enable two-factor authentication, the customer must first log into their portal account by entering their username and password on the database login page. A successful login will grant access to the portal dashboard.
Should the customer desire to enable two-factor authentication (2FA) for enhanced portal access security, they should click on the Edit Security Settings link, found below the Account Security section.
Next, click on to activate the 2FA setup process. You will be prompted to confirm your current portal password in the Password field. After entering it, click on . Following this, activate 2FA within a chosen 2FA authenticator application (such as Google Authenticator or Authy) by either scanning the provided QR code or manually entering a verification code.
Finally, click once more to complete the setup and secure your portal account with 2FA.
Changing Payment Information
To manage payment options, the customer must first log into their portal user account by entering their username and password on the database login page. Upon successful login, the portal dashboard will be displayed.
If the customer wishes to manage their payment options, they should navigate to the link, typically located in the menu on the right side of the portal interface. From there, they can add new payment information and select to securely update their payment details.
