 (1).svg)
 (1).png)


 (1).svg)
.svg)
Access rights are fundamental permissions that govern the content and applications users can interact with and modify within Odoo. These permissions can be meticulously configured for individual users or efficiently managed through user groups. Implementing a robust access rights system, where permissions are granted only to those who genuinely require them, is crucial for safeguarding your database. This preventative measure ensures that users do not inadvertently or intentionally alter or delete critical data or configurations to which they should not have access.
It is important to note that the modification of access rights is a highly sensitive operation, exclusively permitted for administrators. This restriction underscores the critical nature of these settings within the Odoo environment.
Caution: Database Impact
Exercising extreme caution when making changes to access rights is paramount, as incorrect modifications can have severe and detrimental impacts on your Odoo database. A particularly critical risk is the phenomenon of impotent admin, a state where no user within the database retains the ability to modify access rights. This scenario can effectively lock administrators out of crucial configuration settings. For these reasons, Odoo strongly advises consulting with an Odoo Business Analyst or contacting their Support Team before implementing any significant changes to access rights.
Tip: Administrator Privileges
For a user to be able to modify another user's access rights settings, they must possess specific Administration access rights configured on their own user profile. To enable this, an existing administrator must navigate to the user's settings and change the 'Administration' field to 'Access Rights'. After making this adjustment, remember to click 'Save' to apply the changes, thereby elevating the user to an administrator with the authority to manage access rights.
Managing User Access Rights in Odoo
The access rights for individual users are typically established when they are first added to the Odoo database. However, these permissions are not static and can be adjusted at any point through the user’s dedicated profile. This flexibility allows for dynamic adaptation to evolving roles and responsibilities within your organization.
To modify a user’s permissions, begin by navigating to the list of users and clicking on the specific user whose profile you wish to edit.
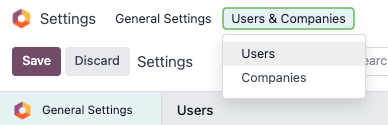
Once on the user’s profile page, locate the 'Access Rights' tab. Within this section, you can scroll down to review the currently assigned permissions for various applications.
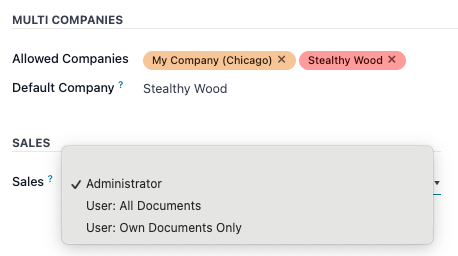
For each Odoo application, a convenient drop-down menu is provided, allowing you to select the appropriate level of permission for that specific user. The available options are tailored to each section, but commonly include choices such as 'Blank/None' (no access), 'User: Own Documents' (access only to documents created or owned by the user), 'User: All Documents' (access to all documents within that application), or 'Administrator' (full administrative control over the application). Additionally, the 'Administration' field within the 'Access Rights' tab presents options like 'Settings' or 'Access Rights', further refining the user's administrative capabilities.
Creating and Modifying User Groups for Efficient Access Management
User groups in Odoo provide a powerful and efficient way to manage common access rights across a large number of users. These are app-specific collections of permissions that streamline the process of assigning roles. Administrators have the capability to either modify existing groups within Odoo or create entirely new ones to precisely define rules for models within a specific application.
To access and manage these groups, you must first activate Odoo’s developer mode. Once activated, navigate to the designated section for group management.
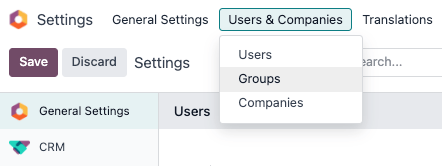
From the 'Groups' page, you can initiate the creation of a new group by clicking the 'Create' button. This will present a blank group form where you can select an 'Application' and then proceed to complete the detailed group form (further elaborated below). Alternatively, to modify an existing group, simply click on its name from the list displayed on the 'Groups' page to open and edit its contents.
When creating or editing a group, you will need to enter a descriptive 'Name' for the group. If this group is intended to manage access rights for sharing data with specific users, ensure to tick the checkbox next to 'Share Group'.
Important: Testing Group Settings
It is critically important to always thoroughly test any changes made to group settings. This ensures that the modified access rights are being applied correctly and effectively to the intended users, preventing unintended access or restrictions.
The group form is comprehensively designed with multiple tabs, each dedicated to managing distinct elements of the group's configuration. Within each tab, you can easily add new rows for users or rules by clicking 'Add a line', and remove existing rows by clicking the 'cancel' icon.
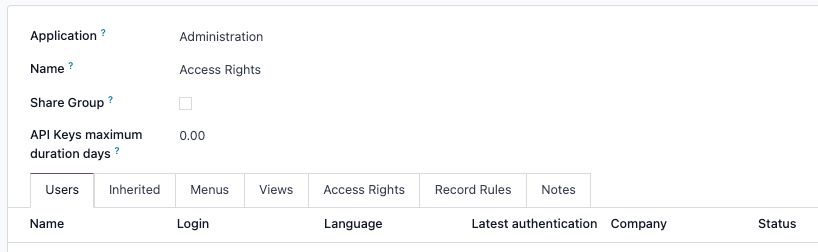
Users Tab
This tab provides a clear overview of the current users who are members of the group. Users displayed in black typically indicate administrative rights within the group, while those appearing in blue do not possess administrative access. To expand the group's membership, click 'Add a line' and select the users you wish to include.
Inherited Tab
The 'Inherited' tab defines a cascade of permissions: any users added to the current group will automatically be granted membership and access rights to the groups listed on this tab. This feature simplifies permission management for complex organizational structures. To add more inherited groups, click 'Add a line'.
Example: Inherited Group Permissions
Consider a scenario where the group 'Sales/Administrator' includes 'Website/Restricted Editor' in its Inherited tab. In this configuration, any user assigned to the 'Sales/Administrator' group will automatically gain access to the permissions and functionalities defined within the 'Website/Restricted Editor' group as well. This streamlines the process of assigning multiple related roles.
Menus Tab
The 'Menus' tab is where you precisely define which models or specific menu items within Odoo the group members will have access to. By carefully selecting these, you can control the navigational visibility and functionality available to users. Click 'Add a line' to include a specific menu.
Views Tab
Similar to the Menus tab, the 'Views' tab allows you to specify which particular views (e.g., list views, form views, kanban views) in Odoo the group will have access to. This offers granular control over how data is presented and interacted with by different user groups. Click 'Add a line' to add a specific view to the group's permissions.
Access Rights Tab
This tab represents the foundational level of rights for the group, primarily dealing with access to Odoo models. The 'Name' column serves as an identifier for the current group’s access configuration to the model selected in the 'Model' column. To establish a new access right for a group, click 'Add a line'. From the 'Model' drop-down menu, select the appropriate model, and then provide a descriptive name for the access right in the 'Name' column. For each model, you can enable specific options to define the group's capabilities:
- Read: Users can view the existing data and values of the object.
- Write: Users are permitted to modify the existing data and values of the object.
- Create: Users have the ability to generate new records or values for the object.
- Delete: Users are authorized to remove existing records or values for the object.
Tip: Naming Access Rights
While there are no strict official conventions for naming access rights, adopting a clear and descriptive naming strategy is highly recommended. A well-chosen name should clearly identify the purpose and scope of the access right. For instance, an access right governing how purchase managers interact with the Contact model could be aptly named
res.partner.purchase.manager. This name effectively combines the technical name of the model (res.partner) with an identifier for the specific group of users in question (purchase.manager).

To ascertain a model’s technical name from your current Odoo view, you can typically enter placeholder text into the 'Name' field, then click on the 'Model' name itself, and subsequently on the (Internal link) icon that may appear. This often reveals the underlying technical identifier.
Record Rules
Record Rules introduce a secondary, more granular layer of editing and visibility permissions. These rules act as powerful filters, either refining or completely overriding the broader access rights defined for a group. They allow for highly specific control over which records users can see or interact with. To add a record rule to a group, click 'Add a line' and then configure the following options as needed for each rule:
- Apply for Read: Determines if the rule affects the visibility of records.
- Apply for Write: Determines if the rule affects the ability to modify records.
- Apply for Create: Determines if the rule affects the ability to create new records.
- Apply for Delete: Determines if the rule affects the ability to delete records.
Important: Understanding Record Rules and Domains
Record rules are constructed using a domain, which consists of specific conditions designed to filter data. A domain expression is essentially a list of these conditions. For example, the expression
[('mrp_production_ids', 'in', user.partner_id.commercial_partner_id.production_ids.ids)]is a record rule engineered to enable MRP consumption warnings specifically for subcontractors. Odoo provides a comprehensive library of preconfigured record rules for common use cases. However, for users who are not familiar with the intricacies of domains and domain expressions, it is strongly advised to consult with an Odoo Business Analyst or the Odoo Support Team before attempting any modifications to record rules, to prevent unintended data exposure or restriction.
Activating Superuser Mode for Advanced Operations
Superuser mode in Odoo is a specialized operational state that grants a user the ability to bypass all standard record rules and access rights. This mode is invaluable for advanced debugging, troubleshooting, and performing critical administrative tasks that require unrestricted access to the database. To activate Superuser mode, you must first enable developer mode. Following this, navigate to the 'debug' menu, which is typically represented by a distinct debug icon located in the top banner of your Odoo interface. Within this menu, towards the bottom, you will find and click the option 'Become Superuser'.
Important: Superuser Mode Access Restrictions
Access to Superuser mode is highly restricted. Only users who have been granted 'Settings' access within the 'Administration' section of their 'Access Rights' profile are authorized to log in as a Superuser. This strict control mechanism is in place to prevent unauthorized individuals from gaining unfettered access to the system.
Caution: Superuser Mode Risks
Given that Superuser mode allows for the circumvention of all record rules and access rights, its use demands extreme caution and responsibility. There is a significant risk that incorrect actions performed in this mode could lead to severe database inconsistencies or even compromise the integrity of the access rights system itself. A particularly critical consequence is the potential for impotent admin, where modifications made in Superuser mode might inadvertently lock all administrators out of the ability to change access rights or critical settings. If such a situation occurs, where users find themselves locked out of the database upon exiting Superuser mode, it is imperative to contact Odoo Support immediately by submitting a new help ticket. The Odoo support team possesses the necessary tools and support login capabilities to assist in restoring access and rectifying any issues.
To safely exit Superuser mode, the most straightforward method is to log out of your Odoo account. Navigate to the upper-right corner of the interface, click on the OdooBot username (or your profile name), and then select the 'Log out' option from the menu. This action effectively deactivates Superuser privileges for the current session.
Tip: Alternative Superuser Login
An alternative and often convenient method to activate Superuser mode directly is to log in as a superuser. To do this, proceed to the Odoo login screen and enter your appropriate Email and Password. Instead of clicking the standard 'Login' button, look for and click the 'Log in as superuser' option. This bypasses the need to first log in normally and then activate developer mode.
