
 (1).svg)
 (1).png)


 (1).svg)
.svg)
The LiteSpeed Cache for WordPress (LSCWP) plugin offers a comprehensive suite of settings designed to significantly enhance your website's performance. For newcomers, the sheer volume of options can initially seem daunting. This guide is crafted to help you navigate the essential features, providing a clear starting point for optimizing your WordPress site with LSCache.
While this guide offers a foundational understanding of the basic cache settings, it's important to remember that the plugin's default configurations are often sufficient to achieve noticeable speed improvements right out of the box. Feel free to enable caching with the default settings, bookmark this page for future reference, and delve deeper into specific configurations as your needs evolve.
Where to Begin with LiteSpeed Cache for WordPress
At its core, the LiteSpeed Cache for WordPress (LSCWP) plugin serves two primary functions: acting as a robust full-page cache for your website's dynamically generated content and providing a suite of advanced site optimization tools. The majority of users install LSCache primarily for its powerful page caching capabilities. While the additional optimization features offer significant benefits, they are entirely optional and can be explored as you become more familiar with the plugin.
Tip: You have the flexibility to enable only the page cache and defer exploring other optimization features until later.
Upon initial activation, you will observe that all caching functionalities are disabled by default. To initiate caching, simply navigate to LiteSpeed Cache > Cache > Cache within your WordPress admin dashboard and set the Enable Cache option to ON. After making this selection, click the Save Changes button.
For many websites, this single step is often enough to achieve substantial improvements in loading speeds. The default settings are meticulously chosen to be compatible with the vast majority of WordPress installations, ensuring optimal performance without requiring extensive configuration. Should you wish to further fine-tune your website's performance beyond these basic settings, continue reading this guide for more in-depth explanations.
Important Warning: Caching Functions Unavailable
Occasionally, you might encounter a warning message similar to the following:
LSCache caching functions on this page are currently unavailable! To use the caching functions you must have a LiteSpeed web server or be using QUIC.cloud CDN.
This message typically indicates one of two scenarios:
- Server Configuration Issue: Your LiteSpeed server's cache module may not be correctly configured. In such cases, we recommend sharing this documentation with your hosting provider and requesting their assistance in enabling caching for your website.
- Non-LiteSpeed Server: You might not be operating on a LiteSpeed server environment. This specific situation falls outside the scope of this beginner's guide. For detailed instructions and further information, please refer to our dedicated documentation on Using LSCache Without a LiteSpeed Server.
LSCache Profiles: Streamlining Your Setup
LSCache Profiles offer a convenient way to apply pre-configured sets of optimization options, designed to enhance the performance of any website utilizing LiteSpeed Cache. For most users, we highly recommend starting with either the Basic or Advanced profile, as these are engineered to provide significant improvements without requiring extensive manual adjustments. For detailed instructions on how to apply an LSCache profile to your WordPress site, please refer to the Toolbox page documentation.
Understanding the Basic Cache Tabs
The Cache section of the LiteSpeed Cache plugin is organized into several tabs, with the first four containing the most fundamental settings for managing your website's cache. Let's explore each of these essential tabs to understand their functions and how they contribute to your site's performance.
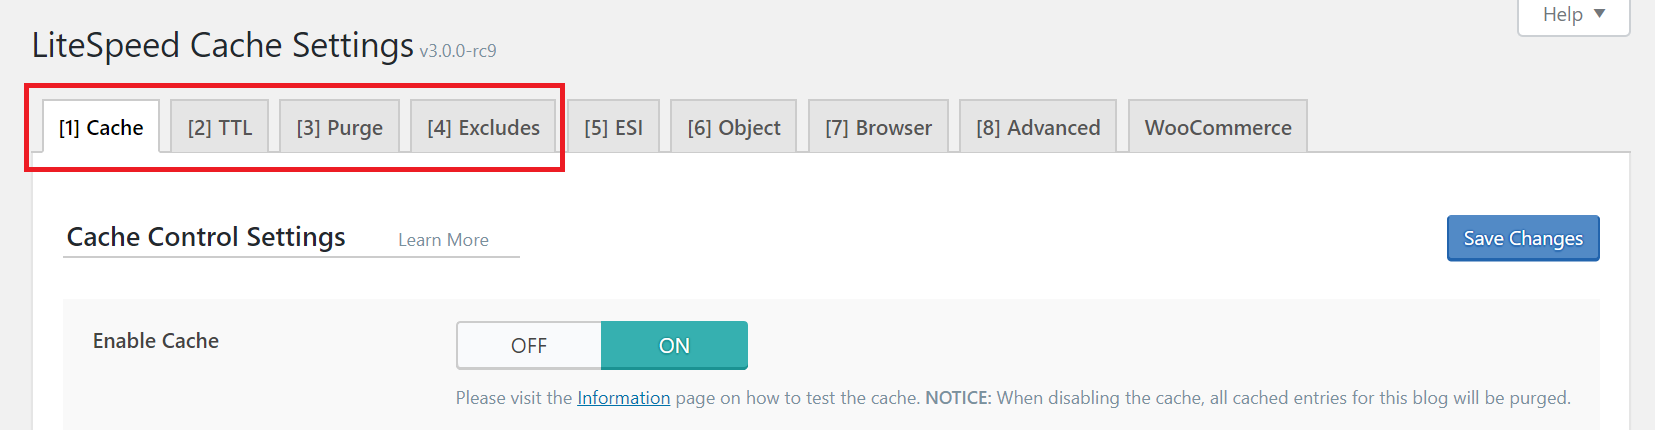
The Cache Tab: Core Functionality
The Cache tab is where you control the overarching caching functionality for your website. The initial option here allows you to simply toggle caching ON or OFF. The subsequent settings provide granular control over which specific types of content will be cached. By default, most content types are enabled for caching, offering optimal performance for a wide range of sites. Unless you have a specific reason or advanced understanding of these settings, it is generally recommended to retain their default configurations to ensure stable and efficient caching.
The TTL Tab: Managing Cache Lifespan
TTL, an acronym for "Time to Live," dictates the duration, in seconds, that a cached page remains fresh before it is considered stale. Once a page's designated TTL expires, it is automatically purged from the cache, making way for new content. The default TTL values provided are carefully selected to be effective for the majority of websites, though you have the flexibility to adjust these durations to better suit your specific content update frequency. For a more comprehensive insight into the mechanics of content caching and purging, we encourage you to review this informative blog post. It offers a high-level overview, allowing you to grasp the fundamental concepts without getting bogged down in technical jargon.
The Purge Tab: Controlling Cache Invalidation
While the TTL tab manages natural cache expiration, there are often scenarios where specific pages or content require immediate purging from the cache, even before their TTL expires. The Purge tab provides the functionality to define rules and triggers for such premature cache invalidation. The default selections on this tab are typically suitable for most websites, but they can be customized to align with your site's unique content management workflow.
If you create a new blog post, assign it a tag such as "brownies," and publish it within the "recipes" category, this action will impact multiple cached pages across your site. These may include the homepage, the recipes category archive page, the brownies tag archive page, your author's archive page, and potentially other pages depending on your WordPress theme's structure.
To prevent the delivery of outdated information, all these affected pages must be purged from the cache to ensure visitors always see the most current content. The settings within the Purge tab empower you to fine-tune these rules, ensuring your cache management aligns perfectly with the dynamic nature of your website.
The Excludes Tab: Defining Cache Exceptions
There might be instances where certain pages or sections of your website should not be cached. The Excludes tab is specifically designed for this purpose, allowing you to define rules to prevent specific parts of your site from being stored in the cache. For the majority of WordPress installations, there will be no necessity to modify these default exclusion settings. However, they are available to provide the flexibility required to create custom exceptions to your overall caching strategy, ensuring sensitive or highly dynamic content is always fresh.
Exploring Advanced Cache Configurations
Beyond the fundamental settings, the LiteSpeed Cache plugin offers several additional tabs within the Cache section. These tabs, which can number four or five depending on whether you have WooCommerce activated, delve into more advanced caching techniques and configurations. While not essential for initial setup, understanding these options can further optimize your site's performance. For comprehensive details on each, you can refer to the Screen-by-Screen Cache section documentation.
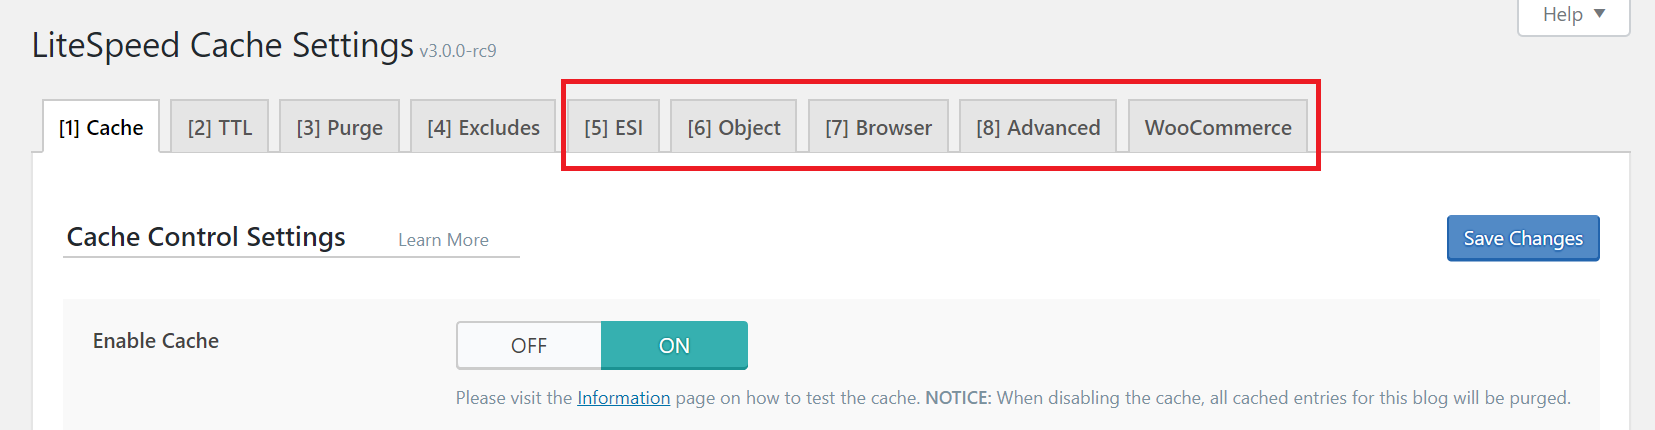
ESI: Enhancing Dynamic Content Delivery
ESI, or "Edge Side Includes," is an advanced caching technique that allows you to designate specific "holes" within publicly cached content. These "holes" can then be dynamically filled with private or uncached content, such as personalized greetings, shopping cart widgets, or user-specific data. While ESI is a powerful feature for delivering highly dynamic experiences within a cached environment, it is disabled by default. For a more thorough understanding, explore our in-depth article on ESI and LiteSpeed Cache. You can also watch a video demonstration explaining What is Edge Side Includes (ESI)?
Object Cache: Optimizing Database Queries
The Object tab provides controls for managing an external object cache. This feature, typically configured and enabled by your server administrator, supports popular object caching systems such as Memcached, LSMCD, or Redis. Implementing object caching can significantly reduce the load on your database by storing the results of database queries, thus speeding up the retrieval of dynamic content.
Browser Cache: Accelerating Client-Side Loading
Browser caching operates at the client level, enabling static files to be stored directly on a user's local device. When browser caching is activated, assets such as images, CSS, and JavaScript files are saved locally upon their initial request. Subsequent visits to your site will then retrieve these static files from the user's local storage, dramatically reducing load times and bandwidth usage, until the browser cache's defined expiration period is reached. The settings within this tab give you comprehensive control over how browser caching functions for your website's static resources.
Advanced Settings: Fine-Tuning for Experts
As its name suggests, the Advanced tab is primarily intended for experienced users who require intricate control over caching behaviors. For most standard WordPress setups, it is unlikely that you will need to adjust these settings. However, this tab becomes particularly useful in specific scenarios, such as resolving conflicts with other caching plugins or implementing highly specialized caching strategies.
WooCommerce Integration: Caching for E-commerce
LiteSpeed Cache is fully compatible with WooCommerce, offering specialized caching optimizations for e-commerce websites. If WooCommerce is installed and active on your WordPress site, this dedicated tab will become visible. It provides a range of settings specifically designed to configure and fine-tune caching for your online shop content, ensuring a fast and seamless shopping experience for your customers.
Beyond Caching: Other Essential Plugin Sections
The LiteSpeed Cache plugin extends its functionality far beyond just caching, offering a comprehensive suite of tools for overall website optimization. There are many more sections within the plugin's interface, each designed to address different aspects of performance. While this guide focuses on core caching, we encourage you to explore these additional sections, which are documented in much greater detail in our Screen-by-Screen documentation. Below, you'll find an overview of each section with links to learn more.
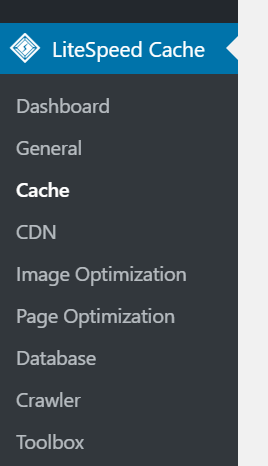
Dashboard: Your Performance Overview
The LiteSpeed Cache Dashboard provides a centralized overview of the status of all your LSCache and integrated QUIC.cloud services. From here, you can quickly monitor the performance of features like Image Optimization, Critical CSS Generation, Low-Quality Image Placeholders, and the Cache Crawler. Additionally, the dashboard allows you to assess your website's current page load time and overall page speed score at a glance. Learn more about the Dashboard.
General Settings: Core Plugin Management
The General settings section allows you to manage fundamental aspects of the plugin's operation. Here, you can control your utilization of QUIC.cloud services, enable or disable the plugin's auto-upgrade feature, and customize which informational messages are displayed on your dashboard. These settings help tailor the plugin's behavior to your preferences and operational needs. Learn more about General settings.
CDN: Accelerating Content Delivery Globally
The CDN section facilitates the integration and configuration of your Content Delivery Network (CDN) with WordPress. A CDN can significantly speed up your website by serving static assets from servers geographically closer to your users. If you are not currently utilizing a CDN, there is no need to adjust these settings, as CDN support is disabled by default. Learn more about CDN configuration.
Image Optimization: Enhancing Visual Performance
LiteSpeed Cache for WordPress includes powerful features for image optimization, designed to reduce file sizes and accelerate their transmission to users. This optimization is managed through a dedicated QUIC.cloud service, which can be configured and controlled within this section of the plugin. Optimizing images is a critical step in improving overall page load times and user experience. Learn more about Image Optimization.
Page Optimization: Advanced Performance Tweaks
Beyond traditional caching, the Page Optimization tab offers a variety of non-cache-related measures to further enhance your WordPress site's speed. These advanced optimizations include CSS and JavaScript minification and combination, HTTP/2 push, and asynchronous and deferred loading of resources. While these terms might sound technical, rest assured that these features are disabled by default, allowing you to explore them at your own pace. Implementing these can lead to significant improvements in front-end performance. Learn more about Page Optimization.
Database Optimization: Keeping Your Site Agile
The Database section provides tools to optimize your WordPress database, a crucial step in maintaining a fast and responsive website. Over time, databases can accumulate unnecessary data, which can slow down query times. LSCWP's Database Optimizer offers a straightforward interface to perform various cleanup and optimization tasks directly within your WordPress database, helping to keep it lean and efficient. Learn more about Database Optimization.
Crawler: Proactively Maintaining Cache Freshness
The LiteSpeed Cache Crawler, which is disabled by default, acts as an intelligent agent that systematically traverses your website. Its primary function is to proactively refresh any cached pages that have expired, ensuring that your visitors always encounter the freshest content. It's important to note that crawling can be a resource-intensive process, and as such, not all hosting providers permit its activation. If your hosting environment supports it, enabling the crawler is an excellent method for maintaining a consistently fresh and up-to-date cache without manual intervention. Learn more about the Crawler.
Toolbox: Essential Utilities and Debugging
The Toolbox section serves as a central hub for various utility and debugging functions. Here, you can manually purge your cache, export your site's LiteSpeed Cache settings for backup or migration, or gather crucial information for troubleshooting. Among its most valuable features is the Environment Report, which provides detailed insights into your server and plugin configuration. Should you encounter an issue and LiteSpeed support requests your Report Number, this is precisely where you would generate and retrieve it. Learn more about the Toolbox.
Effectively Purging Your Cache
The LiteSpeed Cache for WordPress plugin is intelligently designed to automatically manage your cache. When you update or edit a page, the plugin will typically purge that specific page from the cache, along with any related content such as category archives, tag archives, and date-based archives. However, there may be rare instances where you need to manually intervene and clear the entire site cache or a specific page's cache to ensure that the freshest content is immediately served to your visitors.
Purging the Entire Site Cache
Important Note: Purging your entire site cache should not be a frequent task, and ideally, it should rarely be necessary. The LiteSpeed Cache plugin is engineered to manage your cache efficiently without constant manual intervention. If you find yourself regularly needing to clear your entire site cache, we recommend posting a question on our WordPress support forum. Our team can help identify underlying issues and suggest strategies to prevent the need for routine full-site purges.
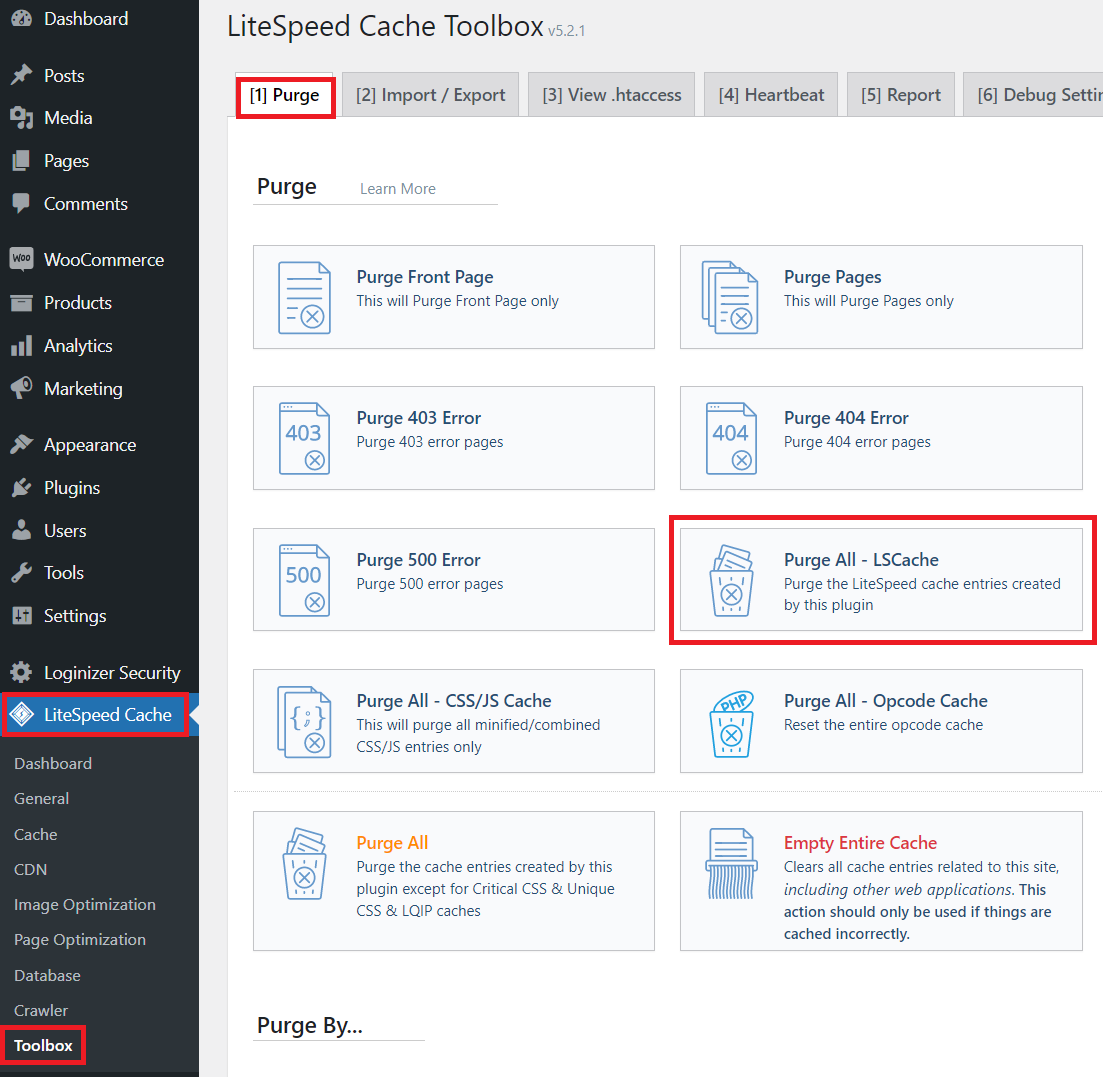
To clear the cache for your entire website, navigate from your WordPress Admin Dashboard to LiteSpeed Cache > Toolbox > Purge. On this screen, locate and click the Purge All LSCache button. This action will effectively clear all cached pages across your site, forcing them to be rebuilt upon the next visit.
While this page presents various other Purge actions, for a basic setup where no advanced optimization features have been enabled, for example, ESI, these can typically be disregarded. For a comprehensive understanding of all available Purge actions and their specific functions, please consult the dedicated Purge documentation.
Purging a Specific Page Cache
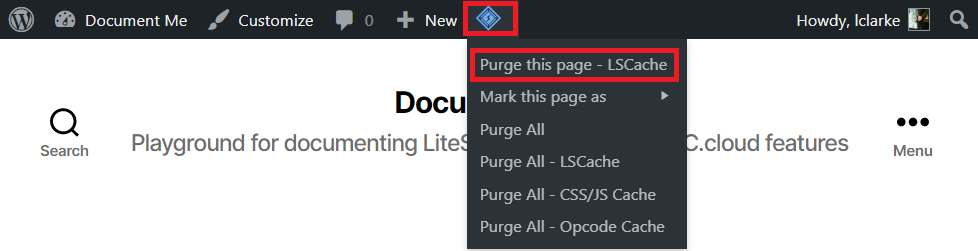
To selectively clear the cache for an individual page, you will utilize the Purge this page - LSCache option, which is accessible from the front end of your website. Follow these steps:
- Log In to WordPress Admin: Ensure you are logged into your WordPress administrative account. This is crucial because the "Purge this page" option appears on the WordPress Admin Bar, which is only visible to logged-in users on the front end.
- Navigate to the Desired Page: In your web browser, visit the specific page on your website for which you wish to clear the cache.
- Access the Admin Bar: Locate the black WordPress Admin Bar at the very top of your page. Hover your mouse cursor over the LiteSpeed Cache icon (which resembles a diamond with a small lightning bolt in its center).
- Select Purge Option: A dropdown menu will appear. The first option in this menu will be Purge this page - LSCache. Click on this link.
Upon clicking, the cache for that particular page will be purged, and the page will automatically reload, displaying the most current, uncached version of your content.
Conclusion
This beginner's guide has walked you through the fundamental aspects of configuring and managing LiteSpeed Cache for WordPress, from initial activation to understanding basic and advanced caching tabs, and exploring other powerful optimization features. By leveraging these capabilities, you can significantly enhance your website's speed, improve user experience, and boost your search engine rankings. Remember, the plugin's default settings provide an excellent starting point, and you can always delve deeper into specific options as your comfort level and optimization needs grow. Continuous learning and iterative optimization are key to maintaining a high-performing WordPress site.
