
 (1).svg)
 (1).png)


 (1).svg)
.svg)
Understanding Access Rights in Odoo 18.0
Access rights are fundamental permissions that govern what content and applications users can view, access, and modify within the Odoo environment. In Odoo, these permissions are granular and can be configured for individual users or efficiently managed through user groups. Implementing a robust system of access rights is crucial for database security and integrity, ensuring that users only have access to the functionalities and data essential for their roles, thereby preventing unintended modifications or deletions.
It is important to note that only an administrator possesses the authority to modify access rights within Odoo.
Caution: Modifying access rights carries significant risks and can inadvertently lead to severe issues within the database. One critical consequence is the potential for impotent admin, a state where no user in the database retains the ability to alter access rights or system settings. To mitigate such risks, Odoo strongly advises consulting an Odoo Business Analyst or the Odoo Support Team before implementing any changes to access rights.
Tip: For a user to be able to modify the access rights of other users, their own user profile must have specific Administration access rights configured. This ensures a secure chain of command for managing permissions.
Setting Administrator Permissions
To enable a user as an administrator with the ability to manage access rights, navigate to the Settings application, then go to Users & Companies > Users. Select the desired user profile to edit. An existing administrator must then change the setting in the Administration field (within the Access Rights tab) to Access Rights. Once this change is made, click Save to apply the modifications and grant the user administrator privileges.
Managing Individual User Access Rights
Access rights for individual users are typically configured when a new user account is created and added to the database. However, these permissions are not static and can be reviewed and adjusted at any time through the user’s profile. This flexibility allows for dynamic adaptation to changing roles and responsibilities within an organization.
To modify an individual user's access rights, follow these steps:
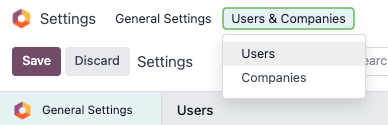
- Navigate to Settings > Users & Companies > Users.
- Click on the specific user’s name from the list to open their profile for editing.
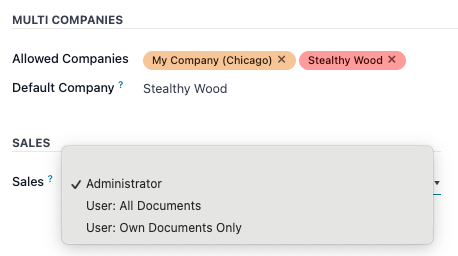
Once on the user’s profile page, locate the Access Rights tab. Scroll down to review the currently assigned permissions for various Odoo applications.
For each Odoo application listed, a drop-down menu is available, allowing you to select the appropriate level of permission for that user. While options may vary slightly per section, the most frequently encountered settings include:
- Blank/None: No access to the application.
- User: Own Documents: Access to the application, but only for documents created or owned by the user.
- User: All Documents: Full user access to all documents within the application, regardless of ownership.
- Administrator: Full administrative control over the application.
Additionally, within the Access Rights tab, the Administration field offers distinct options: Settings or Access Rights. Selecting "Access Rights" grants the user the ability to manage other users' permissions, as described earlier.
Creating and Modifying User Groups
User groups in Odoo serve as powerful tools for managing access rights for multiple users simultaneously. These are app-specific collections of permissions designed to streamline the administration of common access levels across a large user base. Administrators have the capability to either modify existing groups provided by Odoo or create entirely new groups to define granular rules for models within specific applications.
To access and manage groups, first ensure that Odoo’s developer mode is activated. Once activated, navigate to Settings > Users & Companies > Groups.
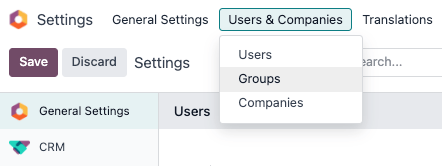
To establish a new group from the Groups page, click the Create button. You will then be presented with a blank group form. Begin by selecting an Application from the available options, and then proceed to complete the various fields and tabs within the form.
For modifying an existing group, simply click on its name from the list displayed on the Groups page. This will open the group’s form, allowing you to edit its contents and associated permissions.
When defining a group, enter a descriptive Name for the group. If this group is intended to facilitate the sharing of data with specific users, remember to tick the checkbox next to Share Group.
Important: Always thoroughly test any changes made to group settings to confirm that the desired permissions are correctly applied to the intended users. Inadequate testing can lead to unintended access or restrictions.
Group Form Details: Tabs for Comprehensive Management
The group form is organized into several tabs, each dedicated to managing a specific aspect of the group's configuration. Within each tab, you can click Add a line to introduce new users, inherited groups, menu items, views, or rules. Conversely, clicking the (cancel) icon (usually an 'x' button) will remove an existing row.
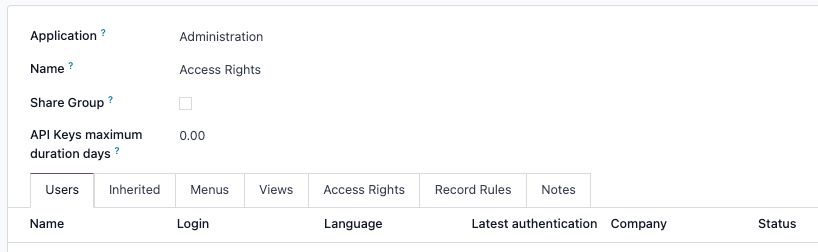
- Users tab: This tab provides a comprehensive list of all current users assigned to the group. Users displayed in black typically possess administrative rights within the group, while those in blue have standard user access. To integrate additional users into this group, simply click Add a line and select the desired user(s).
- Inherited tab: The concept of "Inherited" groups means that any user assigned to the current group will automatically gain membership in all groups listed under this tab. This feature simplifies permission management by allowing for hierarchical access structures. To include additional inherited groups, click Add a line.
Example: Consider a scenario where the _Sales/Administrator_ group has the _Website/Restricted Editor_ group listed in its Inherited tab. In this configuration, any user added to the _Sales/Administrator_ group will automatically acquire access and permissions corresponding to the _Website/Restricted Editor_ group as well, without needing to be explicitly added to both.
- Menus tab: This crucial tab defines which specific menus and, by extension, which Odoo models and functionalities the group members are granted access to. To enable access to a particular menu, click Add a line and select the relevant menu item from the list.
- Views tab: The Views tab allows administrators to specify which particular views within Odoo the group has permissions to access. This can be useful for tailoring the user experience or restricting access to certain data representations. To add a view to the group's access, click Add a line.
- Access Rights tab: This tab is central to defining the fundamental, or first-level, access rights that the group possesses over various Odoo models. The Name column serves to identify the specific access right for the model chosen in the Model column.
To establish a new access right for a group, click Add a line. Then, select the appropriate model from the Model drop-down menu and provide a meaningful name for this access right in the Name column. For each model, you can enable the following options as required:
- Read: Grants users the ability to view the object’s existing data and values.
- Write: Allows users to modify the object’s existing data and values.
- Create: Permits users to generate new instances or values for the object.
- Delete: Authorizes users to remove values or records for the object.
Tip on Naming Conventions: While Odoo does not enforce strict naming conventions for access rights, adopting a clear and descriptive naming strategy is highly recommended to enhance clarity and maintainability. A good practice is to choose a name that distinctly identifies its purpose and the group of users it applies to. For instance, an access right governing how purchase managers interact with the Contact model could be aptly named
res.partner.purchase.manager. This name effectively combines the technical name of the model (res.partner) with a clear identifier for the user group (purchase.manager).
To determine a model’s technical name directly from the current view, you can enter a placeholder text in the Name field, then click on the Model name itself, and finally, click the (Internal link) icon (often represented by a chain link) that appears. This action will typically reveal the model's underlying technical identifier.
- Record Rules: Record rules introduce a crucial second layer of granular editing and visibility controls, effectively refining or even overriding the broader access rights defined in the Access Rights tab. These rules allow for highly specific data access based on conditions. To append a new record rule to this group, click Add a line. For each rule, configure the desired permissions by selecting values for the following options:
- Apply for Read: Determines if the rule affects the ability to read records.
- Apply for Write: Determines if the rule affects the ability to modify records.
- Apply for Create: Determines if the rule affects the ability to create new records.
- Apply for Delete: Determines if the rule affects the ability to delete records.
Important: Understanding Record Rule Domains: Record rules are constructed using a domain, which consists of one or more conditions that act as filters for data. A domain expression is essentially a list of these conditions. For example, the domain
[('mrp_production_ids', 'in', user.partner_id.commercial_partner_id.production_ids.ids)]is designed to enable MRP consumption warnings specifically for subcontractors, by filtering production orders associated with their commercial partners.Odoo provides a library of preconfigured record rules for common scenarios, simplifying their implementation. However, due to the complexity and potential impact of domain expressions, users who are not proficient in their construction are strongly advised to consult an Odoo Business Analyst or the Odoo Support Team before attempting to make changes to record rules.
Utilizing Superuser Mode
Superuser mode is a powerful administrative feature that grants a user the ability to bypass all standard record rules and access rights within Odoo. This mode is typically used for debugging, critical data corrections, or advanced configuration tasks that require unrestricted access.
To activate Superuser mode, follow these steps:
- First, activate Odoo's developer mode.
- Once developer mode is enabled, navigate to the _debug_ menu, which is represented by a (debug) icon (often a small bug or wrench icon) located in the top banner of the Odoo interface.
- Finally, towards the bottom of the debug menu, click the option labeled Become Superuser.
Important: Access to Superuser Mode: Only users whose profiles have _Settings_ access for the _Administration_ section of their _Access Rights_ are authorized to log in to _Superuser mode_. This restriction adds an extra layer of security to this highly privileged function.
Danger: Extreme Caution with Superuser Mode: _Superuser mode_ provides the capability to circumvent all established record rules and access rights. Consequently, its use must be approached with extreme caution and a thorough understanding of its implications. Misuse or incorrect changes made in Superuser mode can lead to severe and potentially irrecoverable database issues. A critical risk is the possibility of causing _impotent admin_, where an administrator loses the ability to modify access rights or system settings, effectively locking them out of critical administrative functions.
Should you find yourself in a situation where you are locked out of the database or encounter an _impotent admin_ issue after exiting Superuser mode due to changes made, it is imperative to contact Odoo Support immediately by submitting a new help ticket. The Odoo support team possesses the necessary tools and support login capabilities to assist in restoring access to your database.
To safely exit _Superuser mode_, simply log out of your Odoo account. This can be done by navigating to the upper-right corner of the interface, clicking on your username (e.g., "OdooBot username"), and then selecting the Log out option from the drop-down menu.
Tip: Alternative Superuser Login: An alternative method to activate _Superuser mode_ exists directly from the login screen. When you navigate to the Odoo login page, enter your appropriate Email and Password as usual. Instead of clicking the standard Login button, look for and click the Log in as superuser option. This provides a direct path to the privileged mode without needing to enter developer mode first from within an active session.
