
 (1).svg)
 (1).png)


 (1).svg)
.svg)
Installation Guide for Odoo Automatic Backup Module
This section provides a detailed guide on installing the necessary Python packages and the Odoo Automatic Backup module. Following these steps will ensure a smooth setup process for your automated backup solution.
Installing Python Packages with pip
Python packages are essential for extending the functionality of your Odoo installation, and they can be efficiently managed using pip, the standard package installer for Python. Adhering to the following instructions will facilitate the installation of required packages for the Odoo Automatic Backup module.
- Open your command-line interface (e.g., Terminal on macOS/Linux, Command Prompt or PowerShell on Windows).
- Verify if pip is already installed by executing the command below:
#!/bin/bash
$ pip --version
If pip is not detected, please refer to the official documentation at https://pip.pypa.io/en/stable/installing/ for installation instructions.
- To install a specific package, use the following command:
$ pip install package\_nameRemember to substitute
package\_namewith the actual name of the Python package you wish to install.Example: To install the
pysftp,dropbox,tqdm, andsimplejsonpackages, execute:$ pip install pysftp dropbox tqdm simplejsonYou can install multiple packages concurrently by listing them separated by spaces.
- To install a particular version of a package, use this command format:
$ pip install package\_name==version\_numberReplace
version\_numberwith the precise version of the package you intend to install.Example: To install version 2.2.0 of the
pysftppackage, run:$ pip install pysftp==2.2.0If no version is specified, pip will automatically install the latest available stable version of the package.
Installing Packages within a Virtual Environment
Utilizing a virtual environment is highly recommended for Python projects as it provides an isolated space to manage package dependencies, preventing conflicts with other projects or the system-wide Python installation. Follow these steps to set up and use a virtual environment for your Odoo Automatic Backup module:
- Create a new virtual environment using the command:
$ python -m venv env\_nameReplace
env\_namewith a descriptive name for your virtual environment. - Activate the newly created virtual environment:
- On Windows:
.\\env\_name\\Scripts\\activate - On macOS and Linux:
source env\_name/bin/activate
Once activated, the command line prompt will typically show the environment's name, indicating that you are now operating within it. Any packages installed via pip will reside within this isolated environment.
- On Windows:
- After the virtual environment is active, you can install packages using pip exactly as described in the preceding section. These packages will be confined to this environment, ensuring no interference with other Python installations on your system.
- To exit and deactivate the virtual environment, simply run the command:
$ deactivateThis action will return you to your standard command-line environment.
Embracing virtual environments is a best practice for maintaining organized and conflict-free package management across diverse projects.
Install Automatic Odoo Backup Module in Odoo ERP
Once the necessary Python dependencies are installed, the next crucial step is to integrate the Automatic Odoo Backup module directly into your Odoo ERP system. This module streamlines the entire backup process, offering robust and reliable data protection.
Open Odoo Apps Page in Odoo ERP
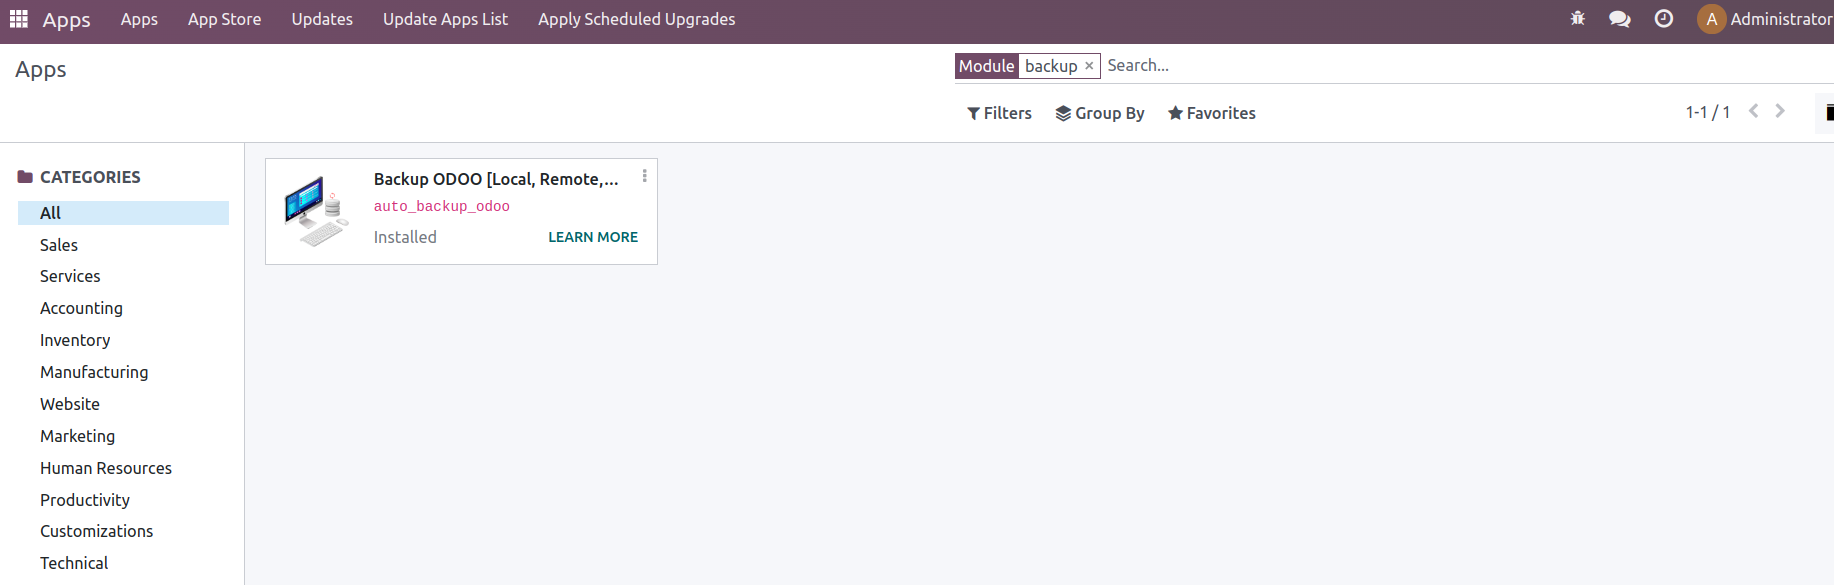
After successfully restarting your Odoo server, navigate to the Odoo Apps page within your Odoo ERP instance. It is essential to utilize the "Update Apps List" menu option to refresh and fetch the most current modules from your configured addons path. Following this, you will be able to locate and proceed with the installation of the automatic backup module.
Automatic Backup Module in Odoo ERP
With the app list updated, the automatic backup module will be ready for installation. Please proceed by clicking on the "Install" button to integrate it into your Odoo environment.
Setup Backup Configurations
Proper configuration is paramount to ensure your Odoo automatic backups function as intended. This section details how to access and set up the module's core configurations within your Odoo instance.
General Settings -> Backup -> Configurations
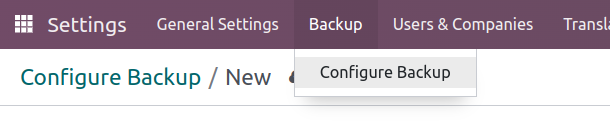
Within your Odoo ERP, navigate to the "General Settings" menu. Here, you will find a dedicated "Backup" section, under which the "Configurations" option is available. This is where all parameters for your automatic backups will be defined and managed.
Configure Database Settings
Accurate database credentials are vital for the automatic backup module to successfully connect and perform backups of your Odoo database. This section outlines how to ensure these settings are correctly configured.
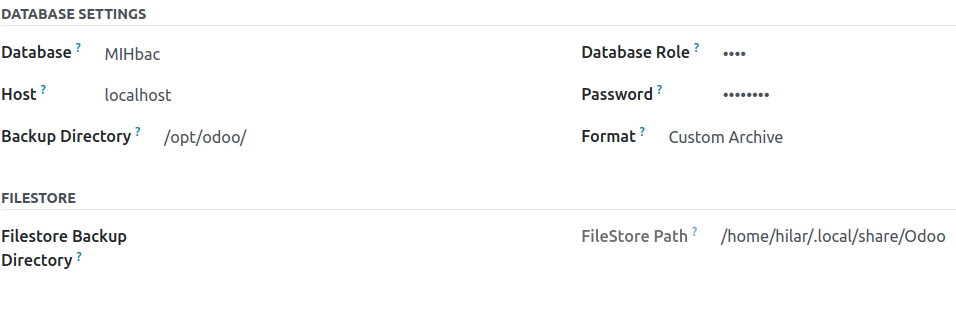
- The database role is specifically determined by the value assigned to the
db_userparameter within your Odoo configuration file. - The corresponding password is set by the value of the
db_passwordparameter in the same Odoo configuration file.
Should the db_password not be configured for your Odoo role, you can establish or update it through the psql terminal by executing the following command:
ALTER ROLE <your Odoo role name> PASSWORD '<desired password>'Example Odoo Configuration File:
Below is an illustrative example of an Odoo configuration file, highlighting the key database parameters:
admin\_passwd = mysupersecretpassword
db\_host = 192.168.1.2
db\_port = 5432
db\_user = odoo
db\_password = pwd
dbfilter = ^mycompany.*$
Backup Formats
The Odoo Automatic Backup module offers a variety of output formats for your database backups, each suited for different restoration needs and database sizes. Selecting the appropriate format is crucial for efficient data recovery.
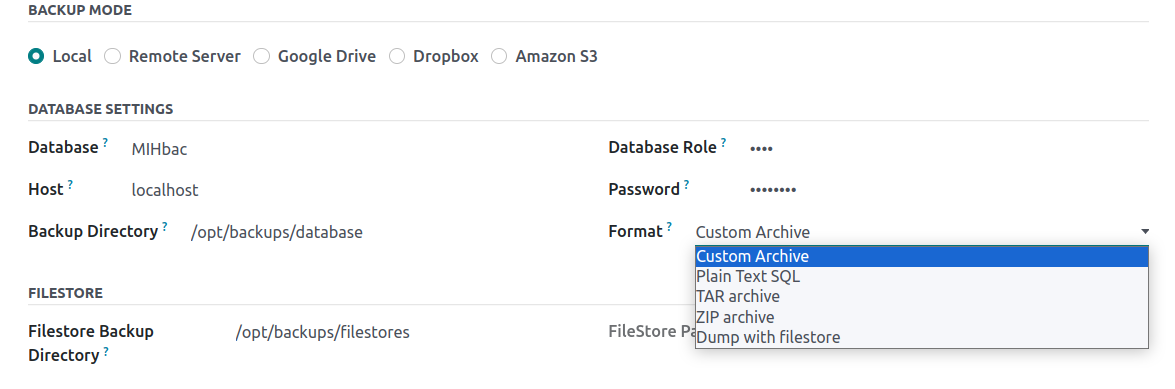
Available Backup Formats:
The module supports the following output formats for your Odoo database backups:
- Plain: This format generates a plain-text SQL script file, which is the default. While suitable for very small databases with minimal objects, it is generally not recommended for larger databases due to potential performance and flexibility limitations during restoration.
- Custom: This is arguably the most versatile format, producing a custom archive optimized for input into
pg_restore. Its key advantage lies in allowing for the reordering and selective definition of objects when restoring the database. By default, it is compressed using gzip (e.g.,test.gz). We highly recommend using this format, especially for larger databases, as it provides the capability to restore individual objects from a comprehensive backup. - Tar: This option generates a tar archive, also compatible with
pg_restore. The tar archive format facilitates the reordering and exclusion of specific database objects during the restoration process. It also enables you to limit the data that is reloaded. This format is also utilized with gzip compression for efficiency. - Dump With Filestore: This option creates a backup that is zipped together with the associated filestore. While convenient, this format is generally not recommended for larger databases because restoring from this comprehensive view can be more challenging and time-consuming.
Backup Modes
The Odoo Automatic Backup module provides flexible options for storing your backups, allowing you to choose the most suitable destination based on your infrastructure and disaster recovery strategy. These backup modes include both local and various remote storage solutions.
- Local Server / Drives
- Remote Server / Remote Paths
- Google Drive
- Dropbox
- Amazon S3
Each mode offers distinct advantages in terms of accessibility, security, and scalability for your Odoo backups.
Local Backups
Storing backups on local servers or designated folder paths offers a quick and readily accessible solution for data recovery. This method is often preferred for its simplicity and speed of restoration within the same network environment.
Backups to Local Drives or Folder Paths
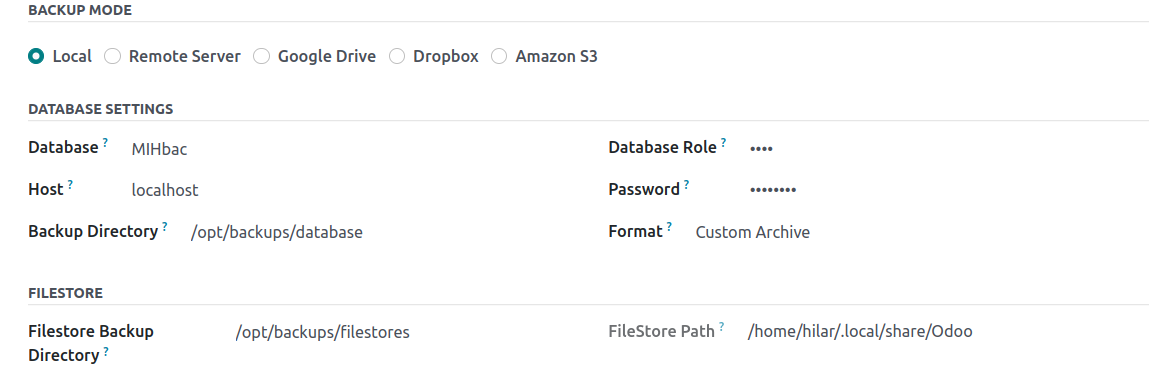
Configuring local backups involves specifying a directory on your server or an attached drive where the backup files will be stored. This ensures that your Odoo database backups are kept within your immediate control, providing a fast recovery option.
Remote Backups
Remote backups are crucial for a robust disaster recovery plan, ensuring your data is safe even if your primary server or local storage fails. This approach involves sending backups to a different geographical location or network resource.
Backups to Remote Drives or Remote Folder Paths
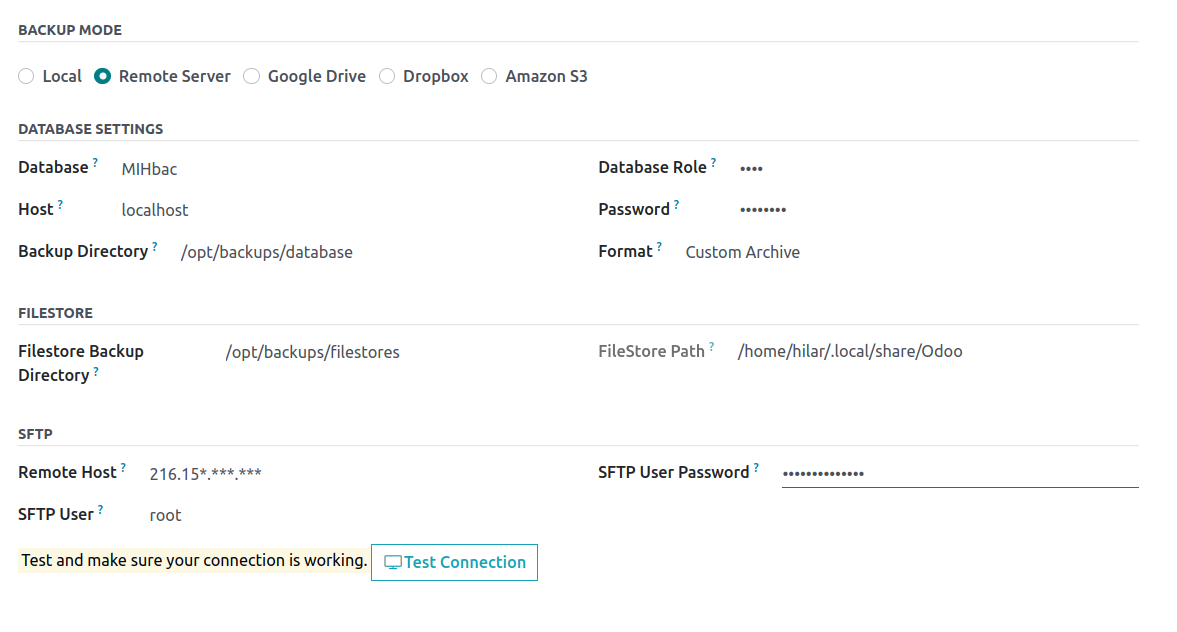
For remote backups, you can configure the module to send your Odoo database backups to remote drives or specified folder paths on networked servers. This provides an additional layer of data protection against localized failures.
Google Drive Backups
Leveraging cloud storage solutions like Google Drive offers a convenient and scalable way to store your Odoo backups, providing off-site data protection with easy accessibility from anywhere.
Integrating Google Drive for Backups
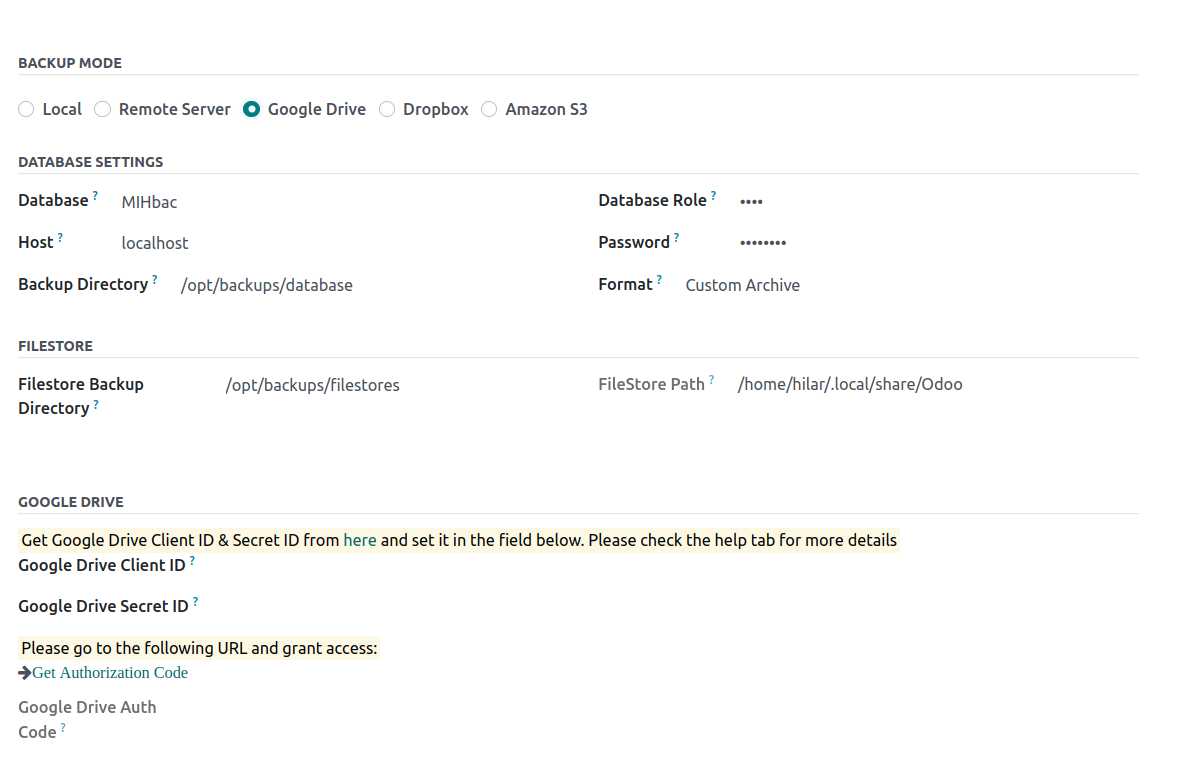
Integrating Google Drive allows for secure, cloud-based storage of your Odoo backups. This feature ensures that your critical data is protected and accessible even in the event of local system failures.
Configuring Google Drive Client Key & Secret Key
To establish a connection with the Google Drive API and enable cloud backups, you must first set up a Google Cloud Platform (GCP) project and enable the Drive API. This involves generating the necessary client credentials.
Follow these detailed steps to set up your Google Cloud Platform (GCP) project and enable the Drive API:
- Navigate to the Google API Console (https://console.developers.google.com/).
- If you do not have an existing project, click the "Create Project" button to start a new one. If you have an existing project, select it from the project drop-down menu at the top of the page.
- Once your project is selected or created, click on the "Enable APIs and Services" button.
- In the search box, type "Google Drive API" and press Enter. Select the "Google Drive API" result that appears and click the "Enable" button to activate the API for your project.
- After the API is enabled, click the "Create Credentials" button. On the "Add credentials to your project" page, choose the "OAuth 2.0 client ID" option.
- Select the appropriate application type (e.g., "Web application"), fill in the required details in the form, and crucially, add the redirect URI as
https://yourdomain.com/drive/authentication. Then, click the "Create" button. - On the "Create client ID" page, you will be prompted to configure the consent screen. Provide the necessary information and click "Save".
- Upon successful configuration of the consent screen, your client ID and client secret will be presented. These credentials are essential for authenticating your application's requests to the Google Drive API.
The client ID is a unique identifier generated when you create an OAuth 2.0 client in the Google API Console. It serves to identify your application when requesting access to a user's Google account. To locate your client ID and Secret Key:
- Go to the Google API Console (https://console.developers.google.com/).
- Ensure you have selected the project associated with your Google Drive API integration.
- Click on the "Credentials" tab located on the left-hand side of the page.
- Your client ID will be prominently listed under the "OAuth 2.0 client IDs" section, along with the corresponding client secret.
Configuring Google Drive Backup Directories
When configuring Google Drive for backups, you need to specify the IDs of the parent folders where the backup files should be stored. If no folder ID is provided during a create request, the file will be placed directly in the user's My Drive. For copy requests, the file will inherit any discoverable parents of the source file. For update requests, use the addParents and removeParents parameters to modify the parents list. An example folder ID might look like: https://drive.google.com/drive/u/0/folders/1vzEwZyIBBthjvgKK97OYiByWAI1u6k4
Dropbox Backups
Dropbox offers another excellent cloud storage option for your Odoo backups, providing reliable file synchronization and sharing capabilities that can be utilized for off-site data preservation.
Integrating Dropbox for Backups
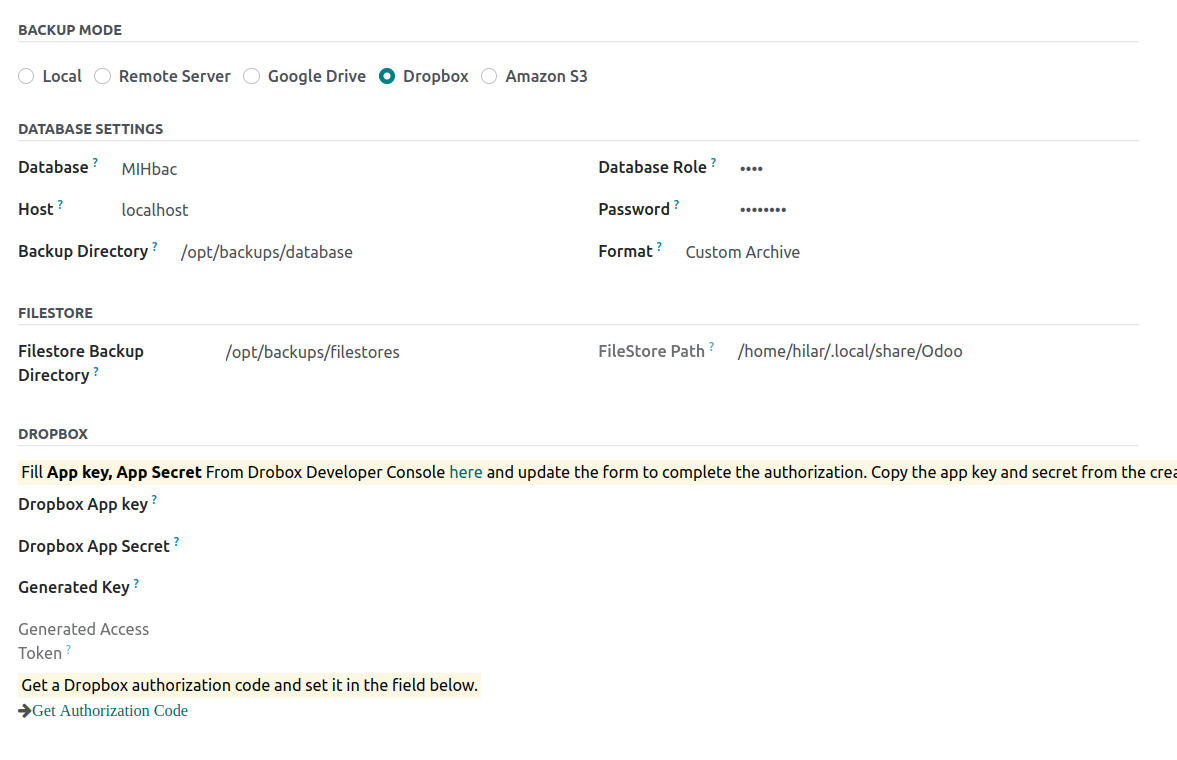
Configuring Dropbox integration allows your Odoo backups to be automatically uploaded to specified folders within your Dropbox account, ensuring secure and easily retrievable off-site storage.
Configuring Dropbox Backup Directories
For Dropbox backups, you need to specify the exact path within your application's folder in Dropbox. If the specified path does not exist, the system will automatically create the necessary folders. For instance, to store backups in a folder named 'DB' inside 'Backups', which is itself inside 'ODOO', the path would be /ODOO/Backups/DB.
Amazon S3 Backups
Amazon S3 (Simple Storage Service) is a highly scalable, durable, and secure cloud storage service, ideal for storing critical Odoo backups. Its robust infrastructure ensures high availability and data integrity.
Integrating Amazon S3 for Backups
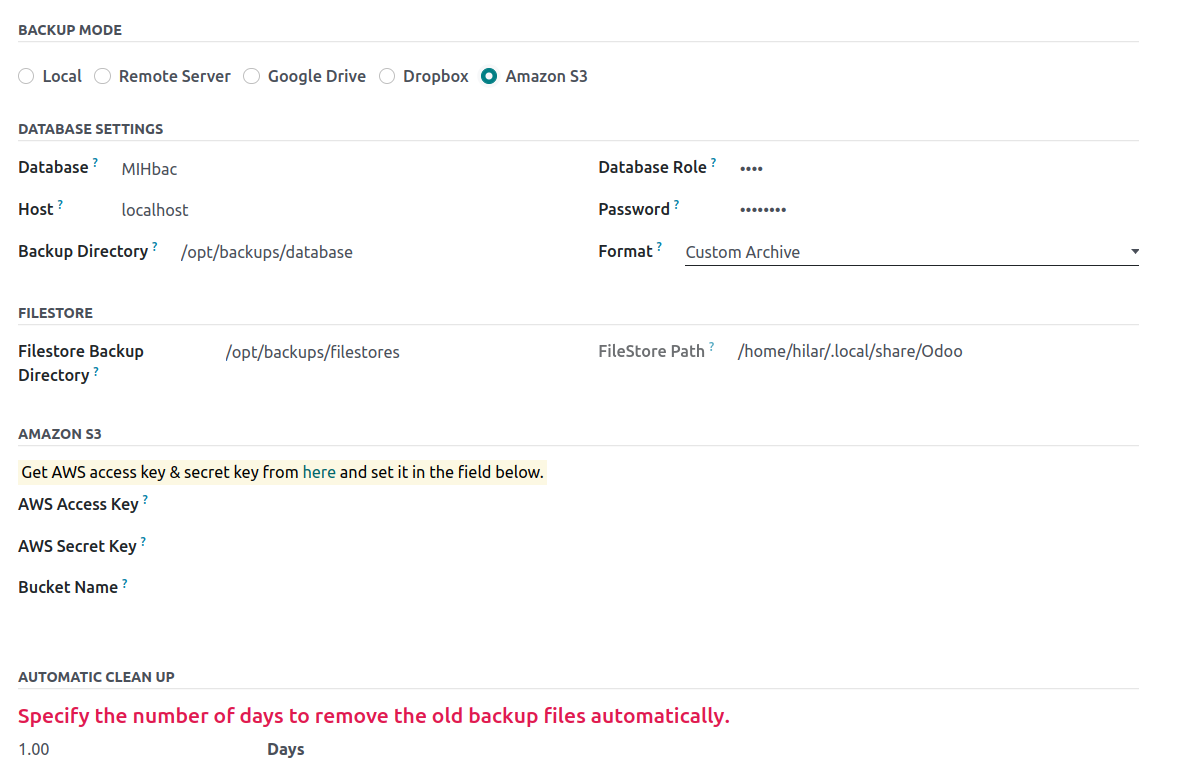
Integrating with Amazon S3 allows for the storage of your Odoo backups in highly reliable S3 buckets. This provides an enterprise-grade solution for off-site data storage and disaster recovery.
To configure Amazon S3 Storage, you can create a credential file. By default, this file is typically located at ~/.aws/credentials. The content of this file should be structured as follows:
[default]
aws\_access\_key\_id = YOUR\_ACCESS\_KEY
aws\_secret\_access\_key = YOUR\_SECRET\_KEY
Alternatively, you can directly input your AWS access key and secret key into the designated fields within the Amazon S3 Key and Secret Key section of the backup configuration form.
Automatic Backup Removal
To efficiently manage storage space and adhere to data retention policies, the Odoo Automatic Backup module includes functionality for the automatic removal of old backups.

This feature allows you to set rules for how long backups should be retained, ensuring that your storage resources are not unnecessarily consumed by outdated backup files.
Deactivating the Module
Should the need arise to temporarily or permanently disable the automatic backup functionality, the module provides a straightforward deactivation process.

Deactivating the module will halt all scheduled backup operations, offering flexibility in managing your Odoo system resources and backup strategy.
Establishing a Backup Routine
A consistent and well-defined backup routine is fundamental to any robust data management strategy. The Odoo Automatic Backup module integrates with Odoo's scheduled actions to allow for flexible and regular backup execution.
- First, enable Developer Mode within your Odoo instance. This mode provides access to advanced technical settings required for scheduling.
- Navigate to General Settings -> Technical -> Scheduled Actions. Within this section, locate the scheduled action named "Dump Current Odoo DB".
- Proceed to set up your desired intervals for backup execution. This could be, for example, every 2 Weeks, every 5 Hours, or every One Month, depending on your data change frequency and recovery point objectives.
- For even greater flexibility, you have the option to duplicate the existing scheduled actions. This allows you to create multiple backup intervals, for instance, a daily backup and a weekly backup. When duplicating, simply modify the "Execute Every Days/Hours/Weeks/Months" field to define the new schedule.
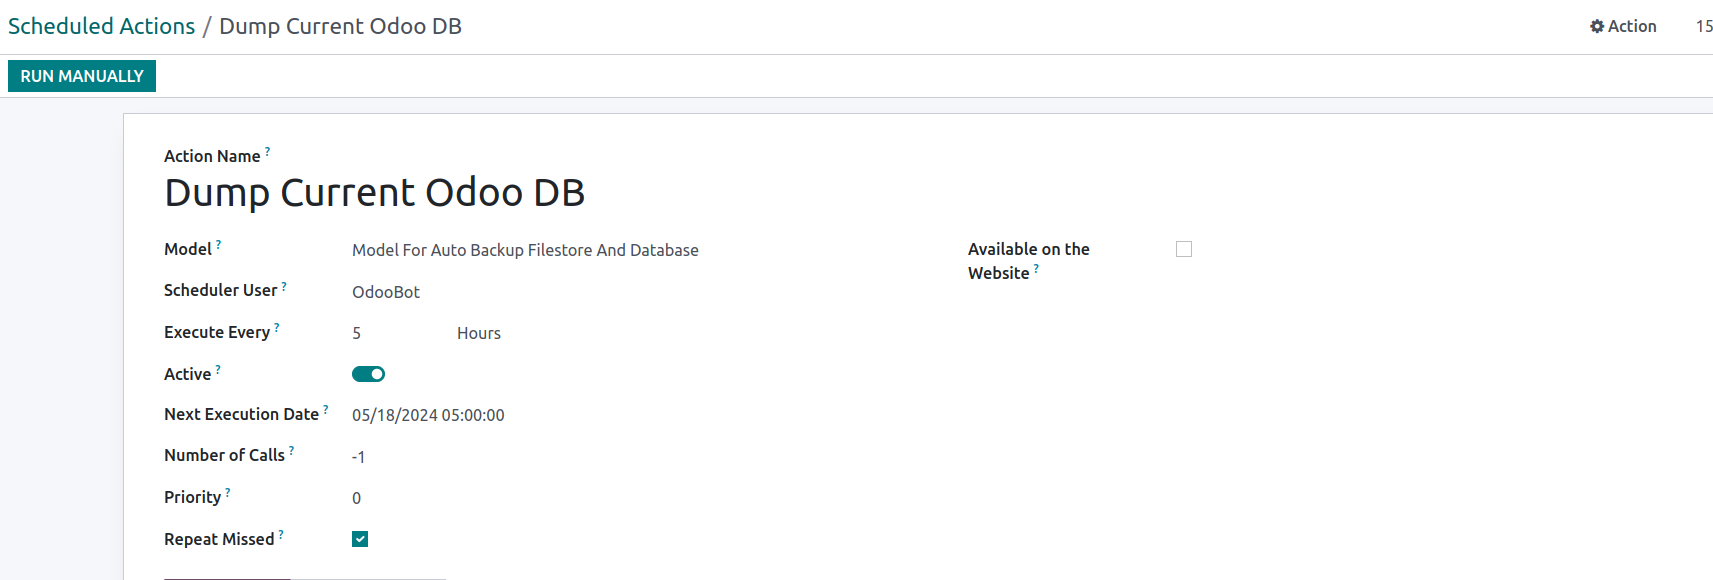
By effectively establishing and managing these scheduled actions, you can ensure that your Odoo database is regularly backed up according to your specific business requirements and disaster recovery policies.
