
 (1).svg)
 (1).png)


 (1).svg)
.svg)
When collaborating on website development or hosting multiple subdomains for different users, establishing separate FTP accounts becomes a crucial aspect of secure and organized management within Plesk Obsidian. These accounts allow you to grant specific individuals or services controlled access to designated parts of your website, enhancing both security and workflow efficiency.
Creating an Additional FTP Account
To provide specific individuals or services with access to designated parts of your website, follow these steps to set up a new FTP account:
- Navigate to the Websites & Domains section within your Plesk control panel, select your specific domain, and then click on FTP.
- Click the Add an FTP Account button to initiate the creation process for a new FTP user.
- Carefully specify the following essential details for the new FTP account:
- FTP account name: Choose a unique and descriptive name for the account. This will serve as the username required for FTP access.
- Home directory: Define the specific directory where the user will land upon successfully connecting to this FTP account. This feature is vital for restricting access to certain parts of your file system, thereby enhancing overall security.
- FTP password: Create a strong, secure password for the account. It is highly recommended to use a combination of uppercase and lowercase letters, numbers, and special symbols to maximize security.
- Hard disk quota (Applicable for Windows hosting environments): To manage server resources effectively and prevent a single user from consuming excessive space, you can limit the disk space this FTP user can occupy. To set a limit, uncheck the Unlimited option and enter the desired disk space limit in megabytes.
- Read permission (Applicable for Windows hosting environments): Enable this option to grant the FTP user the ability to view the contents of their designated home directory and download files from it.
- Write permission (Applicable for Windows hosting environments): Select this checkbox to allow the FTP user to create, modify, rename, and delete directories and files within their assigned home directory.
Important Note for Windows Hosting: If neither 'Read permission' nor 'Write permission' is granted, the FTP user will be able to connect to the account, but they will not be able to view or interact with the contents of the home directory.
- Once all the required details are accurately entered, click OK to finalize the creation of the FTP account.
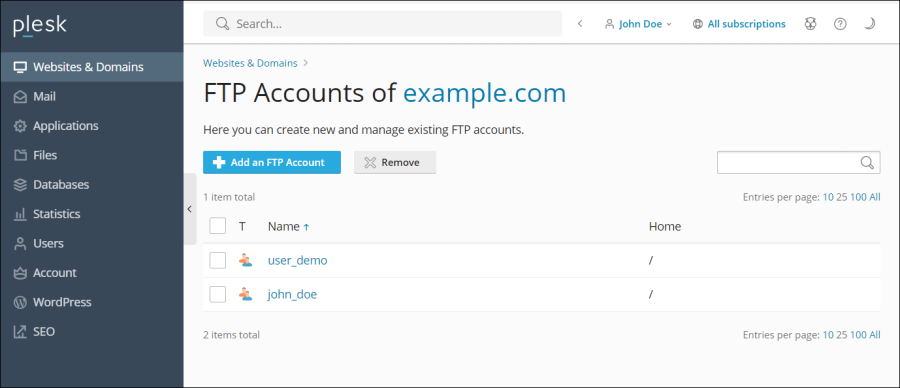
Modifying Existing FTP Account Properties
Should you need to update access rights, change a password, or adjust the home directory for an existing FTP account, follow these straightforward steps:
- Return to Websites & Domains, select your domain, and then click on FTP.
- From the displayed list of FTP accounts, click on the name of the specific FTP account you wish to modify.
- Make the necessary adjustments to the account properties within the editing interface and click OK to save your changes.
Deleting an FTP Account
When an FTP account is no longer needed, it is good practice to remove it promptly to maintain security and streamline your Plesk environment. Here’s how to safely delete an FTP account:
- Access Websites & Domains, navigate to your domain, and then click on FTP Access.
- Locate the FTP account you intend to remove from the list, select the corresponding checkbox next to it, and then click the Remove button. Please be aware that the primary FTP account associated with your subscription cannot be removed.
- A confirmation prompt will appear; click Yes, remove to finalize the deletion of the FTP account.
