
 (1).svg)
 (1).png)


 (1).svg)
.svg)
Module Overview
This module provides a comprehensive guide to managing users on your WordPress website. You will learn the essential steps for adding new users, modifying existing user profiles, and removing accounts, along with understanding the various user roles and their capabilities within WordPress.
Learning Objectives
Upon successful completion of this lesson, you will be able to:
- Update your own user profile effectively.
- Customize the visible columns within the Users table for better organization.
- Create new user accounts with appropriate roles.
- Enable or disable the functionality for users to self-register their accounts.
- Utilize the search, filter, and batch modification tools in the Users table to efficiently manage existing users.
- Assign and revoke permissions (via Roles and Capabilities) for individual users.
- Reset a user's password securely.
- Disable a user's account without permanently deleting their profile.
- Delete a user account from your website.
- Reassign content authored by a deleted user to another active user.
Prerequisite Skills
- Basic familiarity with the WordPress Administrative Dashboard is recommended to follow this module effectively.
Required Assets
- Access to a user account with the “Administrator” Role is necessary to perform the actions outlined in this module.
Screening Questions
- Are you familiar with the WordPress administrative Dashboard interface?
- Do you understand the importance of user accounts and security considerations in a shared technology environment?
- Are you familiar with the typical roles of subscribers, authors, and editors in a content publishing workflow?
Teacher Notes
- Performing a live demonstration while teaching the steps for user management is highly recommended to enhance student comprehension.
- While a sandboxed site isn't strictly necessary, it is strongly advised. Ideally, students should not be modifying permissions or adding/removing real users from a live, actively used website.
- This lesson is best suited for a WordPress site without advanced user management plugins installed (e.g., plugins for custom roles and capabilities).
- Please note that this lesson does not cover the “Super Admin” role, which is specific to the Network Admin Screen in a WordPress Multisite installation.
Hands-on Walkthrough
Introduction: Understanding User Management
Welcome to the User Management section! Today, you will gain practical knowledge on how to add, remove, and update user accounts within your WordPress website. We'll also cover advanced topics such as securely changing a user’s username. Effective user management is crucial for several key reasons:
- You may need to grant access to another individual to contribute to your website without enabling public registration for new accounts.
- It allows you to promote an existing user to a role with greater content creation capabilities, demote a user, or completely remove their account if necessary.
- If your website was initially set up with the default administrator username “admin,” you can learn how to change it to a more secure option, which is a recommended best practice.
- As your website expands and evolves, disabling or removing old and unused accounts is vital for maintaining robust security.
Roles and Capabilities in WordPress
As you delve into User Management, you will frequently encounter various user Roles. While this module focuses on the practical aspects of user management, it is important to be familiar with these roles. The WordPress Codex provides a concise description of each standard role:
Administrator – An individual who possesses full access to all administrative features within a single site.
Editor – An individual capable of publishing and managing posts, including those created by other users.
Author – An individual who can publish and manage their own posts.
Contributor – An individual who can write and manage their own posts but lacks the permission to publish them.
Subscriber – An individual whose capabilities are limited to managing their own profile.
For the purposes of this lesson, the user account you use to access your WordPress site should have the “Administrator” role to ensure you have the necessary permissions. For more in-depth information regarding the specific capabilities associated with each role type, please refer to the complete Roles and Capabilities article in the WordPress Codex.
To efficiently manage users, you will primarily interact with tools located within the Users menu on your Dashboard, in conjunction with the General Settings.
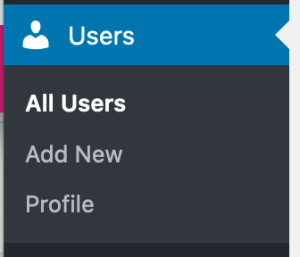
- Users > All Users: The All Users table provides a comprehensive listing of every user within your WordPress site, including your own account. From this table, you can access bulk actions, allowing you to modify multiple users simultaneously.
- Users > Add New: This option allows you to manually create a new user account. This is particularly important if public user registration is disabled and all new accounts must be created by an administrator.
- Users > Your Profile: This section is where you can update and personalize the information within your own user profile. The same URL structure (e.g.,
yourwebsite.tld/wp-admin/profile.php) applies if you are instructing another logged-in user to update their profile. - Settings > General: Within the Settings menu, the General section includes an option to allow users to register their own new accounts. By default, this option is disabled in new WordPress installations. However, for websites with numerous users, you might choose to enable this feature and then only use your administrator account to promote specific users into roles with expanded capabilities.
In the subsequent sections, we will explore each of these screens in detail and cover the important tasks you can perform within them.
All user-related tasks commence with logging into your WordPress administrative area, typically found at: yourwebsite.tld/wp-admin/
Updating Your Own Profile
- On the WordPress Toolbar, hover over your username in the upper-right corner of the screen and select Edit My Profile, or alternatively, from the User menu in the Dashboard, select Your Profile.
- Scroll down to the Name section, where you can complete fields such as your first name, last name, nickname, contact information, biographical details, and profile picture.
Your Display Name
Your display name is the name that will be publicly shown when browsing content on your website. It typically appears as the author attribution on posts and pages, as well as alongside comments. You have the flexibility to display your WordPress username, any combination of your first and last name, or your specified nickname. Please also note:
- If you have not filled in your full name in the First Name or Last Name fields, these specific display options will not be available in the dropdown menu. Similarly, if your chosen nickname is identical to your username, only one of these options will appear.
- It is worth noting that some themes may intentionally hide author information from posts or pages.
Your Profile Picture
By default, the functionality for changing your profile picture is directly linked to your Gravatar account. To learn more about how to set up and use Gravatar, please visit: https://en.gravatar.com/
Your Email Address
Your email address is a mandatory requirement for WordPress. It is essential for receiving system notifications and for facilitating password recovery should you ever need to regain access to your account. Additionally, consider the following:
- If a user's email address is changed, including your own, WordPress will automatically send an email to the previous email address with a “Notice of Email Change” message. This serves as an important security feature, allowing the user to report any unauthorized or suspicious activity.
- When a user’s email address is updated, the associated Gravatar will automatically refresh to display a photo linked to the new email address. If both the old and new email addresses utilize the same photo within Gravatar, you might not observe any visible change.
Adding a New User Account
- From the User menu in the Dashboard, select Add New.
- On the Add New User page, proceed to create a new user by assigning them a unique username (this will be their login credential for WordPress), a valid email address, and any other optional details you deem relevant.
- Select an appropriate role for this new user based on the access and capabilities you wish to grant them. More details about user roles are provided below.
- Once all details have been entered, click the Add New User button at the bottom of the page to save the new user account.
Important: Once a user account has been created, the assigned username cannot be changed.
Password Creation for New Users
By default, the new user’s password will be automatically generated by WordPress and kept hidden from view for security purposes. If you require knowledge of the user’s password, or if you intend to set a custom password, utilize the Show Password button. This step is optional and typically not essential during the standard user creation process. Also, keep in mind:
- A newly created user will automatically receive a welcome email from WordPress containing their new login information, including the generated password. The user will be prompted to log in and encouraged to change their password to one of their preference. Even if you assign a custom password, they will still have the ability and encouragement to update it.
- If you wish to suppress this welcoming email, you can uncheck the “Send the new user an email about their account” option below the password field. While generally not recommended, this feature can be useful if you are adding multiple users in preparation for a website that is not yet ready for public access. Be aware that even without the welcoming email, users can still use their email address to recover their login credentials.
Assigning User Roles
A user’s role dictates their specific abilities and permissions within the WordPress website—for instance, whether they are permitted only to read content or to actively edit it. To gain a deeper understanding of the various user roles, please consult the complete Roles and Capabilities article in the WordPress Codex. Key points to remember about roles include:
- The default role assigned to a new user will typically be “Subscriber,” unless you have modified this preference within Settings > General > New User Default Role.
There are instances where changing an existing user’s role within WordPress becomes necessary. Common scenarios for this include:
- A user account needs to be temporarily suspended without being permanently deleted from the system.
- A valued user is being promoted within the WordPress website, transitioning from a more restricted role, such as Subscriber, to a role that grants content editing capabilities.
To update a user’s role, first locate their profile within the Users table:
- From the User menu in the Dashboard, select All Users.
- In the Users table, a specific user can be found by using the Search Users function, by manually browsing through the listed users, or by filtering the list of users by their assigned role. To filter by role, click on the appropriate role link (e.g., Administrator, Subscriber, or other custom roles) located above the Users table.
- Once the desired user is located, click on their username to access their profile for editing, or simply hover over their name and click the "Edit" link that appears.
- On the profile editing screen, scroll down to the Role dropdown menu to select a new role for the user.
- At the bottom of the page, click the Update User button to apply any changes you have made.
Important Security Note: You are unable to downgrade or otherwise restrict access to your own administrator account while you are currently logged in using that specific account. To modify your own administrator account, you must either create a new administrator account or use another existing administrator account to log in and then adjust the permissions of your primary administrator account.
Disabling an Existing User by Downgrading Their Role
To temporarily disable a user’s access without completely deleting them from the users list, follow the steps for changing a user’s role, but select “No role for this site” as the new role. While this role still permits logging into the WordPress site, it effectively prevents access to the administrative area, thereby freezing their account and access to any content they have authored (which will remain on the website). Please note that:
- When a user’s email address is changed as part of this process, they will receive an automated “Notice of Email Change” message via email. This message will not disclose the new email address, but the user will become aware that their account has been disabled.
- To completely prevent account access and recovery, you would need to change both the user’s email address and password. While changing the password temporarily prevents login, altering the email address will prevent them from regaining access to their account through the password recovery process.
Changing the Role of Multiple Users
From the Users table, you have the ability to modify the role of several users simultaneously. This is achieved by using the checkboxes positioned to the left of each user in the list.
- Select the checkboxes next to all users for whom you wish to change the role.
- Use the “Change role to” dropdown menu located above the Users table to select a new role for these selected users.
- Click the Change button situated to the right of the selected role to apply the modification.
Deleting an Existing User and Reassigning Their Content
When the time comes to remove a user from your WordPress website, you will need to make a decision regarding any content they may have authored. This includes posts, pages, comments, or any other content types. The process is as follows:
- Locate the user you intend to remove, hover over their username, and click Delete.
- On the subsequent screen, you will be prompted to confirm the deletion.
Important Security Note: You will not be able to delete your own administrator account while you are currently logged in using that specific account. To delete your own administrator account, you must either create a new administrator account or use another existing administrator account to log in and then proceed with deleting your primary administrator account.
Reassigning a User’s Content to Another User
If the user being deleted has content (such as pages, posts, or comments) associated with their account, you will need to determine how to reassign this content to another active user as the new author. As part of the deletion screen, you will be presented with two primary options:
- Delete all content – This option will permanently remove any pages, posts, or comments that this user has created. This approach is less common in most website management scenarios.
- Attribute all content to [another user] – This more frequently used option allows you to select another existing user within your WordPress website to attribute all of the deleted user's content to. Choosing this option will change the author of all pages and posts from the deleted user to the user you select from the provided dropdown menu.
Bulk Deletion of Users
Just as you can change the role of multiple users from the Users table, you also have the capability to delete multiple users simultaneously and reassign all of their content to a single designated user.
- From the Users table, select the checkboxes next to each user in the list that you wish to delete. (Remember, you cannot delete your own active user account.)
- Using the Bulk Actions dropdown menu at the top of the Users table, select Delete.
- Click the Apply button to be directed to the delete confirmation screen, where any applicable options will be presented.
- Finally, click the Confirm Deletion button to apply the changes.
You may be presented with the option to reassign all content to an existing user. This selection will apply to all users you have marked for deletion in that specific bulk action. If you require different users' content to be assigned to different existing users, you will need to perform separate bulk actions for each grouping. For example, you would select a group of users to delete and assign their content to User A, then return to the Users table, select another group of users to delete, and assign their content to User B.
Resetting a User’s Password, Including Your Own
To manually reset an existing user’s password, or to change your own password, follow the same initial steps as editing a user’s profile. You have the flexibility to change a user’s password at any time.
- Locate the user whose profile you wish to edit in the Users table.
- Click on their username or hover over it to reveal and click the Edit link.
- Scroll down to the password section and click the Generate Password button to receive a new, randomly generated strong password.
- Optionally, you may customize this password by placing your cursor into the password field and typing a different password of your choice.
- If your new password is flagged as “Very Weak” or “Weak,” it indicates that the password is too simple and may pose a security risk. To proceed with using a Weak password, you will need to enable the “Confirm Password” option. For optimal security practices, a Strong password is highly recommended.
- Click Update User to save your new password.
Additionally, please note:
- When a user’s password is changed, the user will automatically receive an email notification alerting them to this modification. This email will not disclose the old or new password but serves as a crucial security feature to inform the user and provide them with the ability to contact an administrator if they suspect suspicious activity.
- If you are changing your password within your own profile, you will see an additional option to log your account out of all devices except your current one. This is a highly recommended step, especially when updating your password, to ensure account security across all sessions.
Customizing the View of the Users Table
To specify which columns are displayed on the Users table, or to adjust the default number of users listed per page, utilize the Screen Options panel located in the upper-right corner of the screen.
- Click on Screen Options to expand the panel.
- Optionally, uncheck any columns you wish to hide from the Users table for a cleaner view.
- Optionally, modify the number of users to list per page in the paginated results to suit your preference.
- Click Apply to save your changes and update the table view.
You can adjust the Screen Options at any time to reveal previously hidden columns or update the number of users displayed per row. For further modifications to viewing and managing the Users table, a wide array of plugins is available at WordPress.org.
Allowing Users to Create Their Own New Accounts
It is possible to grant visitors to your website the ability to register their own accounts, thereby reducing the administrative burden of manually creating new users. Follow these steps:
- From the Dashboard, navigate to Settings > General.
- On the General Settings page, scroll down to the Membership section.
- Check the box for the “Anyone can register” option.
- Scroll to the bottom of the page and click Save Changes.
- Instruct potential users to visit
yourwebsite.tld/wp-login.php?action=registerto create their own account.
Additionally, please note:
- Depending on your active theme, there may already be a “Register” link automatically displayed somewhere on your website (e.g., in your footer or within a sidebar widget) that directs visitors to the registration URL.
- If you are currently logged into WordPress with any account, including your own, you will typically not see the “Register” link presented on the public-facing website when previewing it. To verify the presence of the “Register” link, either log out of your account or browse to your WordPress website using a different web browser where you are not logged in.
- If you enable users to register their own accounts, it is highly recommended that their default user role be set to “Subscriber,” unless new users are specifically intended to be allowed to create and publish content within your WordPress website immediately upon registration.
Crucial Security Warning: Under no circumstances should you allow new users to be automatically assigned an administrator role upon registration, as this would grant them full control and the ability to potentially disable or delete your own administrator account.
Quiz Your Knowledge
Which account role is required for managing user accounts in WordPress?
- Editor
- Administrator
- Manager
- Any authorized account
Correct Answer: 2. Administrator
Which one of the following statements is false?
- An editor can manage the pages and posts of other users.
- You can delete a user account and assign their posts and pages to another user.
- You cannot change the display name of your account on posts and pages.
- You can force a reset of a user’s password.
Correct Answer: 3. You cannot change the display name of your account on posts and pages.
What happens if you change the email address for a user account?
- WordPress sends a “Notice of Email Change” message.
- The username will be changed to match the email account.
- The user will not be able to login with their old username.
- You cannot change the email on an account.
Correct Answer: 1. WordPress sends a “Notice of Email Change” message.
If visitors are allowed to register for their own accounts, what should their default role be?
- Subscriber
- Editor
- Administrator
- It depends on the level of engagement I’d like them to have
Correct Answer: 4. It depends on the level of engagement I’d like them to have (and Administrator should not be the default)
