
 (1).svg)
 (1).png)


 (1).svg)
.svg)
JetBackup offers a comprehensive suite of settings designed to help you customize and optimize its operations to perfectly align with your server environment and specific preferences. This guide provides an in-depth look at each configurable option, enabling you to fine-tune your backup solution for maximum efficiency and reliability.
General Settings
The General Settings section allows for the fundamental configuration of your JetBackup installation, influencing how the system operates at a core level.
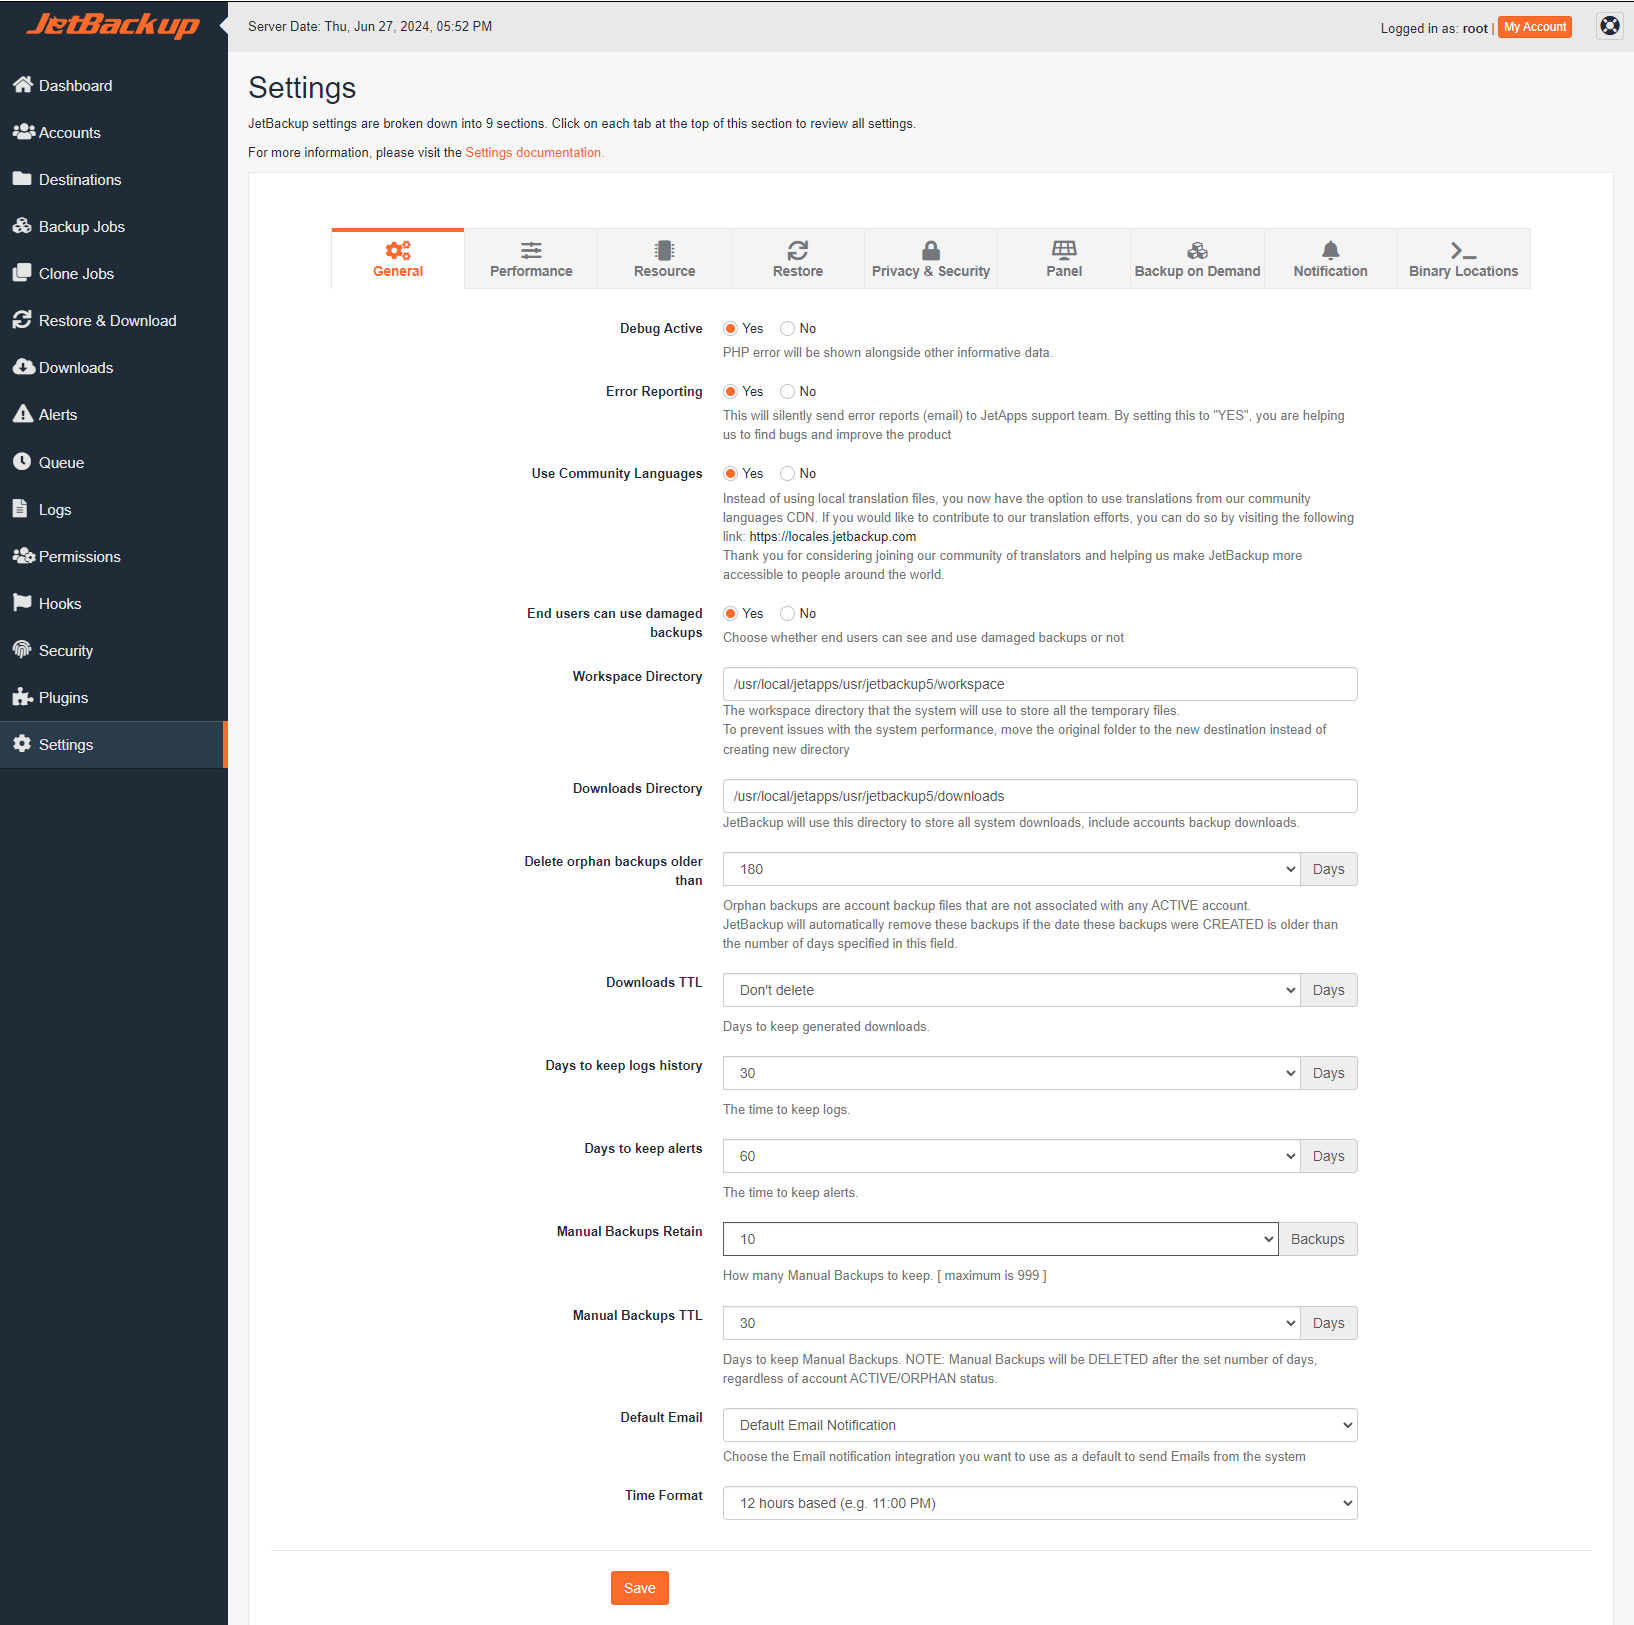
Debug Active
Activating this option instructs JetBackup to produce highly detailed logs. These logs are enriched with additional informative data and PHP error messages, which can be invaluable for troubleshooting and diagnostics.
Error Reporting
When Error Reporting is enabled, JetBackup will automatically and silently transmit error reports via email to the JetApps support team. By opting to enable this feature, you actively contribute to the ongoing improvement of JetBackup by assisting us in identifying and rectifying software bugs promptly.
End Users Can Use Damaged Backups
Enabling this setting grants end users the ability to view and utilize backups that have been marked as damaged. It\'s important to note that while these backups will be flagged as "damaged" within the administrator interface, this status will not be visible to end users, maintaining a seamless experience on their side.
Community Languages CDN
Enable this feature to leverage translations from our community languages CDN, rather than relying on local translation files. This can provide access to a broader range of up-to-date translations. For further details, please click here.
Workspace Directory
This setting specifies the directory where JetBackup stores all its temporary files during various operations. The default location is /usr/local/jetapps/usr/jetbackup5/workspace. To ensure optimal system performance and prevent potential issues, it is strongly recommended to move the original workspace folder to your desired new destination rather than simply creating a new, empty directory.
Download Directory
Specify the directory JetBackup will use to store all file and directory downloads generated for any accounts. The default path is /usr/local/jetapps/usr/jetbackup5/downloads. For best system performance, it is advisable to create a new directory at the target destination and to not move the original folder.
Note for Plesk Installations: When modifying the download directory, it is crucial that the
pssaadmuser possesses the necessary permissions to access this new directory, enabling the successful download of backups via JetBackup.
Delete orphan backups older than
Orphan backups are defined as account backup files that no longer have an association with any active account. Upon termination of an account, all its corresponding backups are transitioned to an orphan status. JetBackup is configured to automatically remove these orphan backups if their creation dates (the date they were originally generated) predate the number of days specified in this field. The default retention period is 180 days.
Downloads TTL
This setting allows you to specify the preferred number of days for JetBackup to retain generated downloads. The default value is 0 days, which signifies that downloads will not be automatically deleted.
Days to keep logs history
Configure the duration, in days, for which JetBackup will preserve its logs. The default setting is 30 days, ensuring a month\'s worth of historical logging data.
Days to keep alerts
Determine the number of days JetBackup will retain alerts within its system. The default retention period for alerts is 60 days.
Manual Backups Retain
Specify the maximum number of manually generated backups that JetBackup will maintain for each individual backup job. The maximum permissible value for this setting is 99, with a default retention of 14 backups.
Manual Backups TTL
Set the time-to-live (TTL), in days, for manually generated backups. A default value of 0 days indicates that these backups will not be automatically deleted based on their age.
Time Format
Select the desired time display format for the JetBackup user interface, choosing between a 12-hour or 24-hour based system. The default setting uses a 12-hour format (e.g., 11:00 PM).
Performance
The Performance section allows you to fine-tune how JetBackup utilizes server resources, ensuring optimal operation for backup, restore, and other critical tasks.
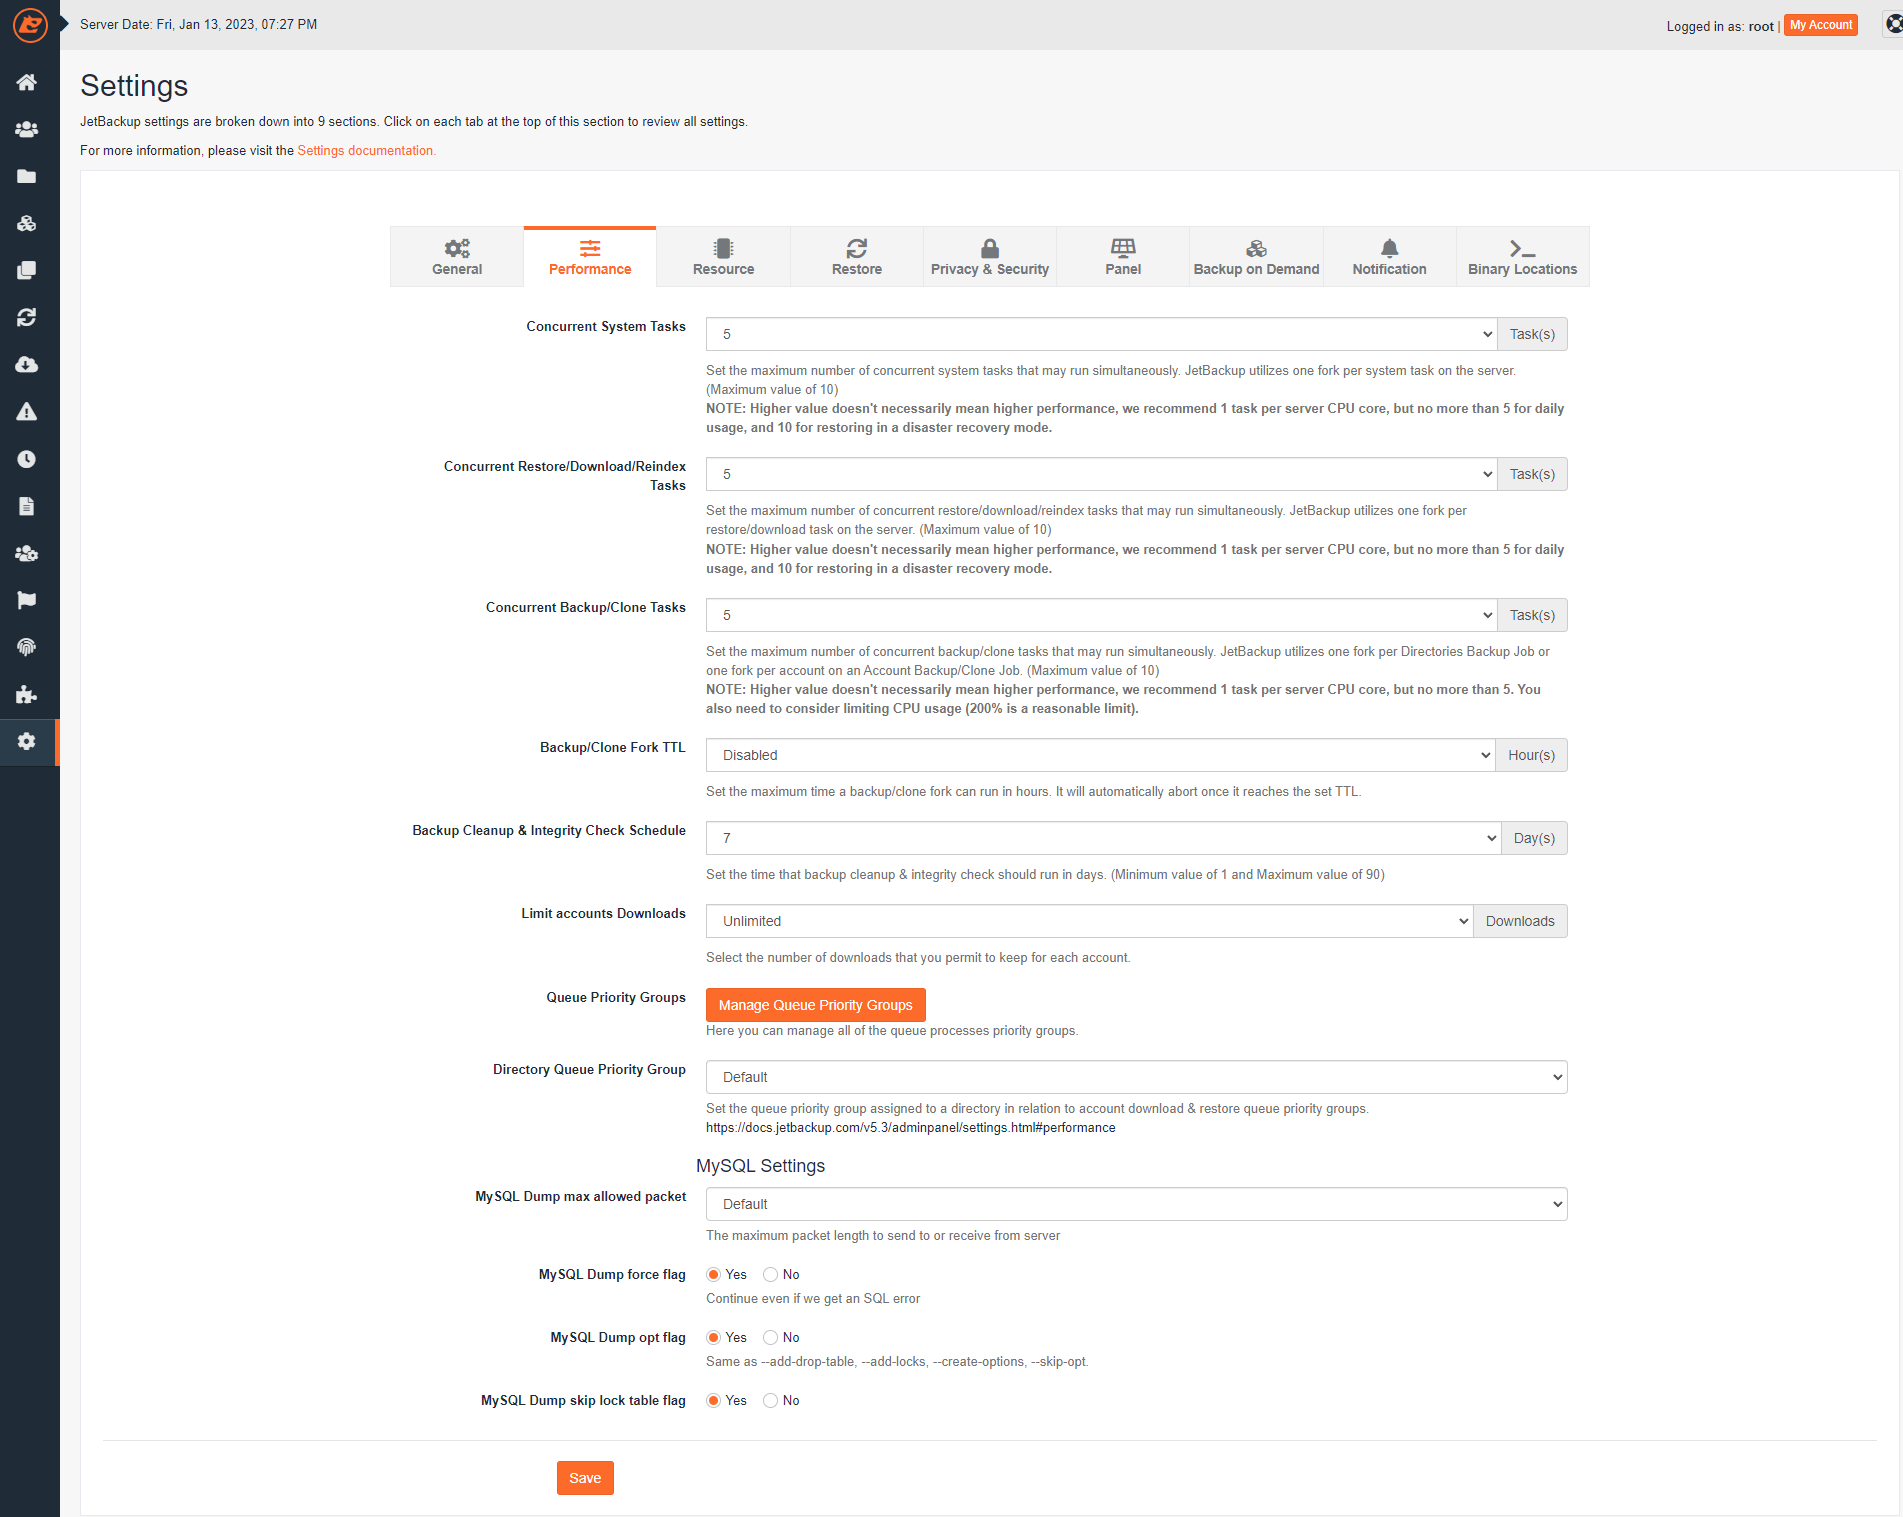
Concurrent System Tasks
This setting defines the maximum number of system tasks, such as Backup Cleanup or System Integrity Checks, that are permitted to run simultaneously. It\'s important to understand that JetBackup initiates a fork on the server for each account being processed during these tasks. The maximum allowable concurrency is 10 accounts.
Concurrent Restore / Download / Reindex Tasks
Configure the maximum number of simultaneous account restores, downloads, or destination reindex tasks. Similar to system tasks, JetBackup creates a fork on the server for each account being restored, downloaded, or for each destination being reindexed. This setting can be adjusted up to a maximum of 10 concurrent tasks.
Concurrent Backup / Clone Tasks
Specify the maximum number of account backups or account clone tasks that can run simultaneously. For every account involved in a backup or clone operation, JetBackup will initiate a fork on the server. This value can be set for up to 10 concurrent accounts. It is crucial to note that concurrent threads and destination workers function in tandem to enhance the speed and reliability of backups. This collaboration enables multiple connections to the storage destination, significantly accelerating the data transfer process. Destination workers are instrumental in managing these connections, ensuring data is transmitted smoothly and efficiently. When configuring these settings, always consider your storage provider\'s rate limits. If you observe that your backup job transfer speeds are consistently being throttled, consider reducing your threads and workers settings to 1 and then gradually increasing them to determine the optimal configuration for your specific destination.
Backup Fork TTL
Set the maximum duration, in hours, for which a Backup Fork is allowed to run. Once this specified Time To Live (TTL) is reached, the fork will automatically abort, irrespective of its current operational status.
Only enable this setting if you have a clear understanding of the time required for the largest account on your server to complete its backup. Setting this value too low could lead to the premature abortion of some account backups.
Backup Cleanup & Integrity Check Schedule
Define the frequency, in days, for the execution of the backup cleanup and integrity check task. This essential task is responsible for cleaning up files marked for deletion and verifying the integrity of backups stored on the remote destination. Any empty account backup directories identified will also be removed.
Should any issues with backup integrity be detected, the affected snapshot(s) will be marked as "damaged" within the user interface. This ensures that any missing data from the damaged snapshot(s) is re-uploaded during the subsequent scheduled backup run. In instances of an invalid index file, JetBackup will attempt to rectify it using the snapshot index files. If these snapshot index files are either missing or corrupted, the entire snapshot directory, along with any associated export files, will be deleted. The minimum frequency for this task is once per day, with a maximum interval of every 90 days. The default schedule is set to run every 7 days.
Limit Accounts Downloads
This setting allows you to control the number of downloads that each account is permitted to retain within the system. This helps manage server resources and storage efficiently.
Queue Priority Groups
Queue priority groups provide a powerful mechanism to categorize and group accounts by their priority, offering granular control over how JetBackup prioritizes tasks such as backups, restores, and downloads for each account. To effectively manage and create these priority groups, navigate to and click on the "Manage Queue Priority Groups" option.
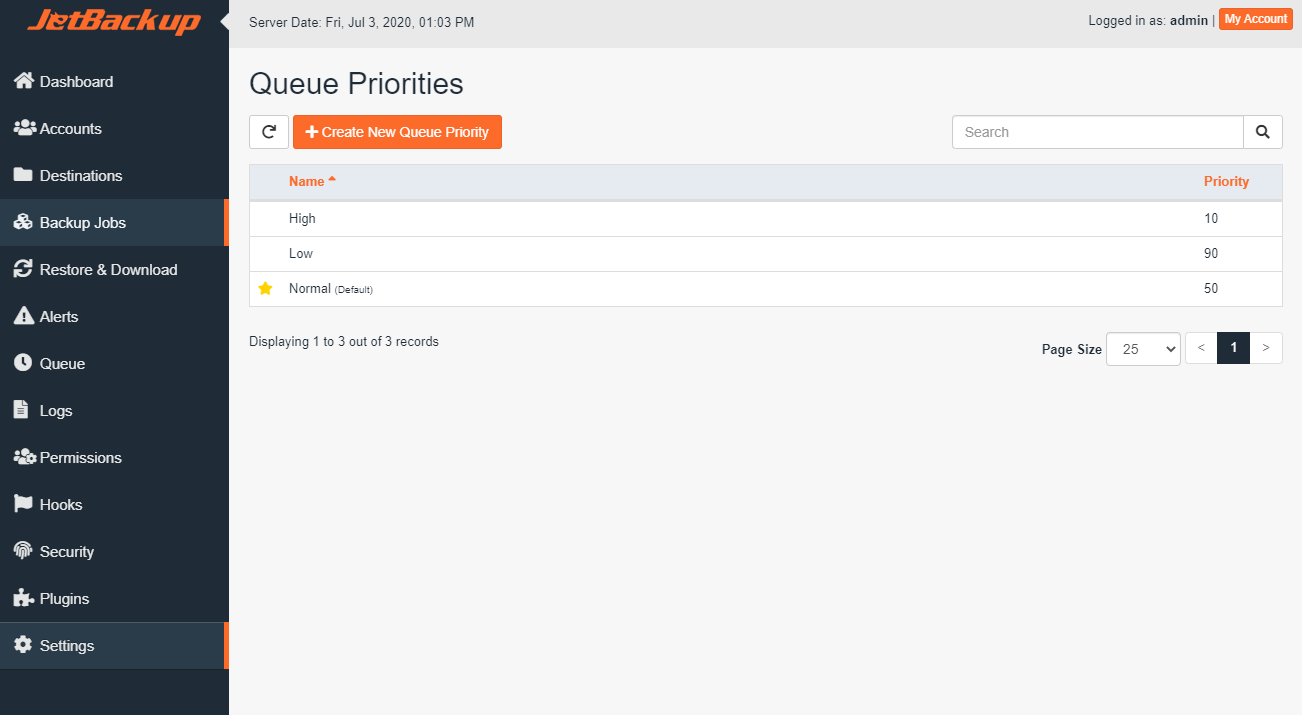
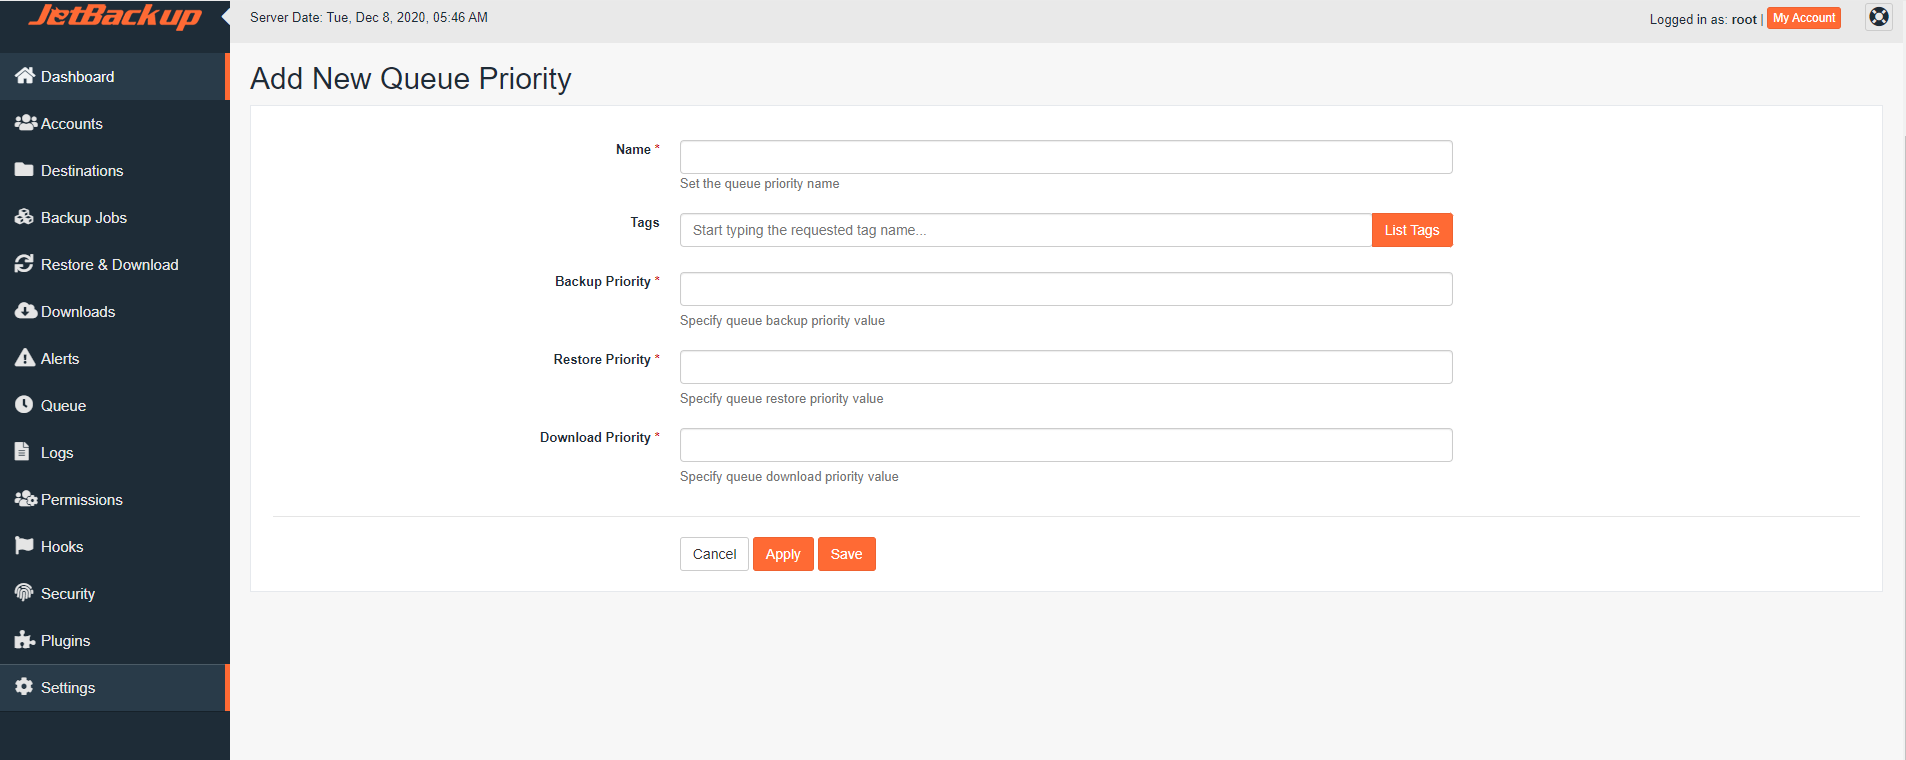
To establish a new queue priority group, click the "+Create New Queue Priority" button. On the subsequent configuration page, you will need to specify a unique name for the queue priority group and assign a corresponding priority value. A lower numerical value indicates a higher priority. After entering the desired details, click "Save" to apply your changes.
For detailed instructions on how to assign queue priority to individual accounts, please refer to the Manage Account documentation.
Queue Priority Settings
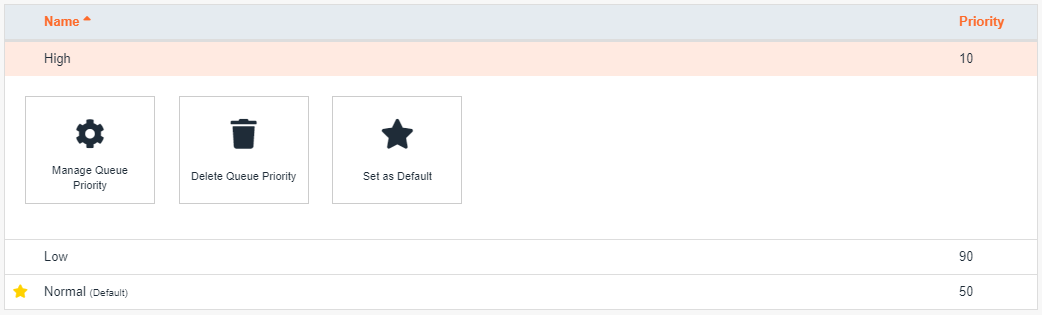
- Manage Queue Priority: Click this option to modify the existing settings for a queue priority group.
- Delete Queue Priority: Use this to remove a queue priority group from the system.
Ensure that the queue priority group is not currently assigned to any accounts and is not designated as the default priority group before attempting to delete it.
- Set as Default: This action designates the selected priority group as the system\'s default value for new accounts or those without specific assignments.
Directory Queue Priority Group
This setting enables you to define the queue priority group for directory-based tasks, establishing their precedence in relation to account queue priority groups. This ensures that directory operations are processed efficiently according to your defined priorities.
MySQL Settings
These settings govern how JetBackup interacts with MySQL databases during backup and restore operations.
- MySQL Dump max allowed packet: Defines the maximum permissible packet length for data sent to or received from the MySQL server during dump operations.
- MySQL Dump force flag: When enabled, this flag instructs the MySQL dump process to continue its operation even if it encounters an SQL error.
- MySQL Dump opt flag: This option is equivalent to enabling
--add-drop-table,--add-locks,--create-options, and disabling--skip-opt. It\'s a shorthand for a common set of dump parameters. - MySQL Dump skip lock table flag: Enabling this flag allows the MySQL dump process to proceed even if it encounters an error related to locking tables, helping to ensure the backup continues where possible.
Resource
This section allows you to precisely manage server resource limits for JetBackup processes using CGROUPS. It\'s important to remember that 100% CPU usage typically corresponds to one CPU core. For a deeper understanding of how to analyze your current server load, you can refer to the Load WIKI.
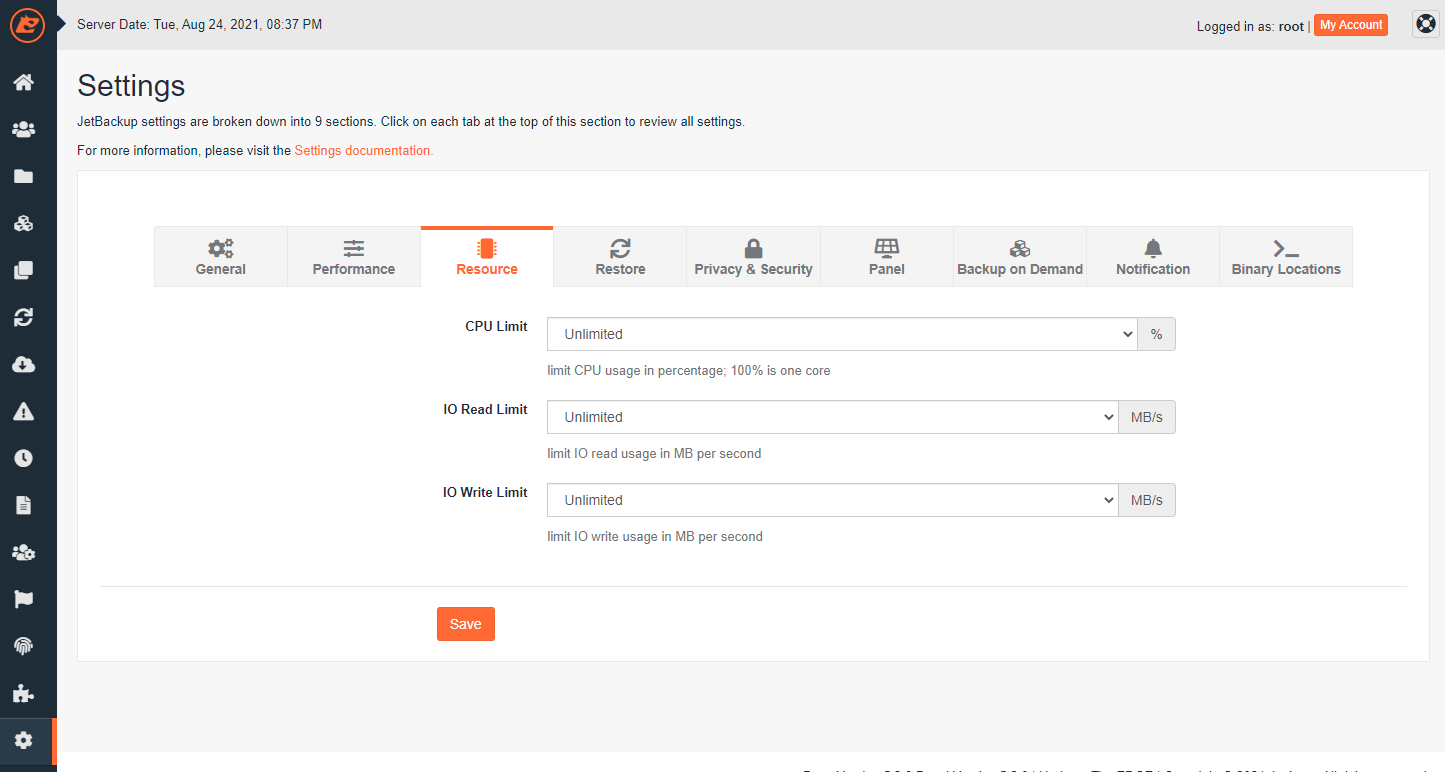
CPU Limit
Set a specific limit on the CPU usage by JetBackup processes. The minimum allowable limit is 5%, while the default configuration allows for unlimited CPU usage, utilizing available resources as needed.
IO Read Limit
This setting enables you to impose a limit on the Input/Output (IO) read usage of JetBackup processes. By default, IO read usage is unlimited.
IO Write Limit
Control and limit the Input/Output (IO) write usage of JetBackup processes. Similar to the read limit, the default setting permits unlimited IO write usage.
NOTE: Paradoxically, directly limiting IO read/write can, in certain scenarios, indirectly lead to an increased overall IO usage. On IO constrained servers it is recommended to adjust other backup settings (rsync bandwidth limit, concurrent tasks/threads) before setting IO limits.
Restore
The Restore section provides critical configurations for managing how backups are restored, including user conditions, file permissions, and various operational parameters.
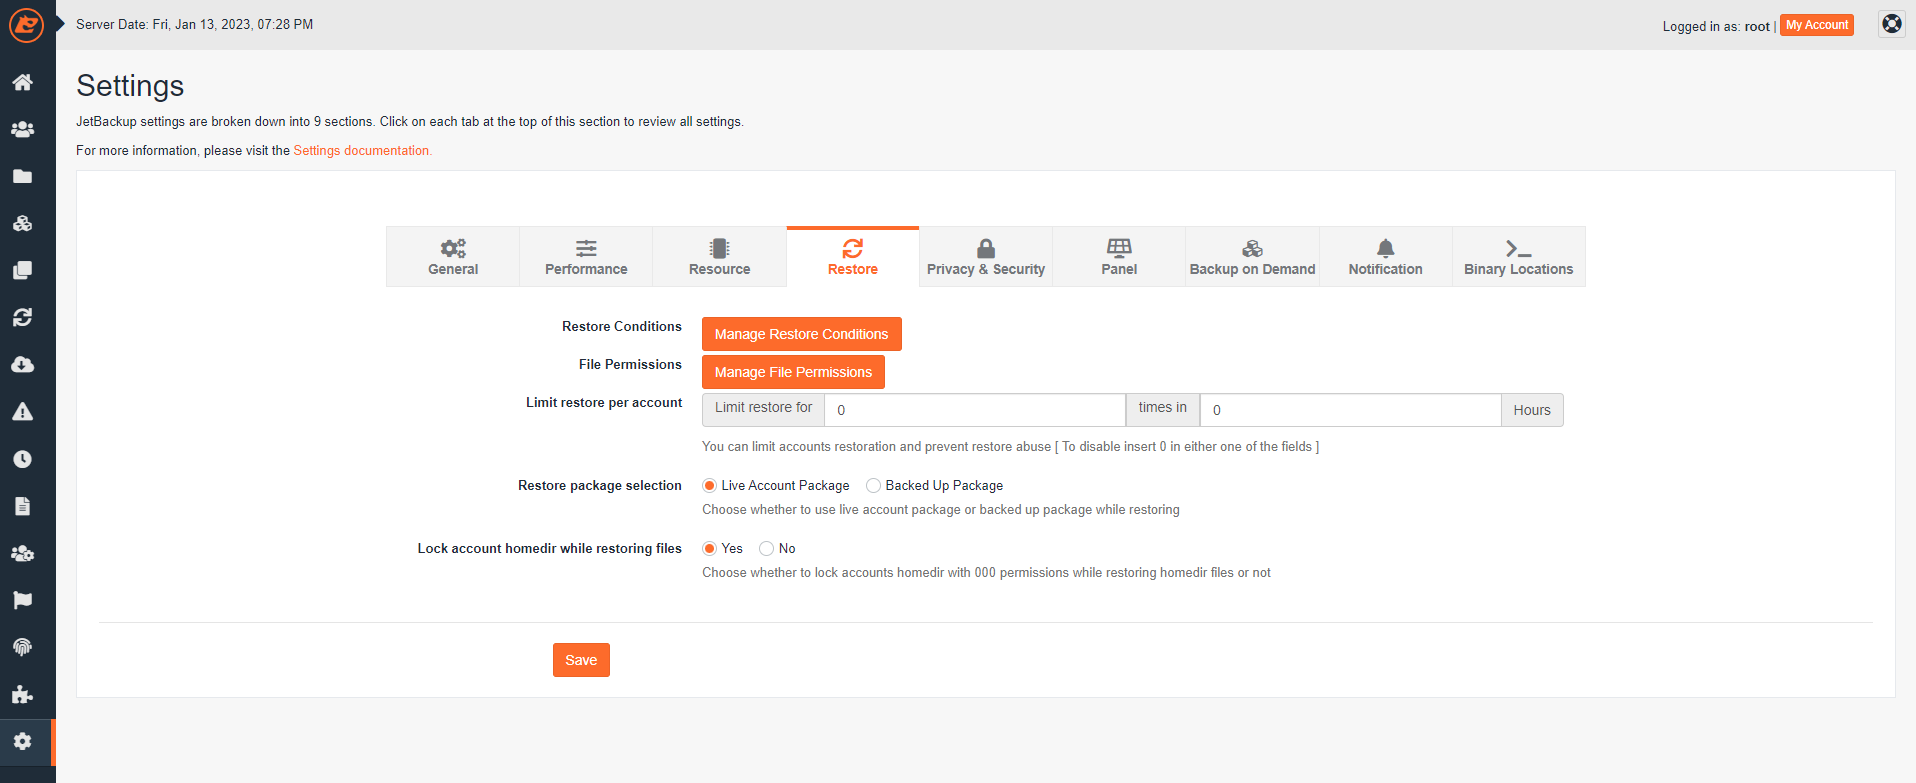
Restore Conditions
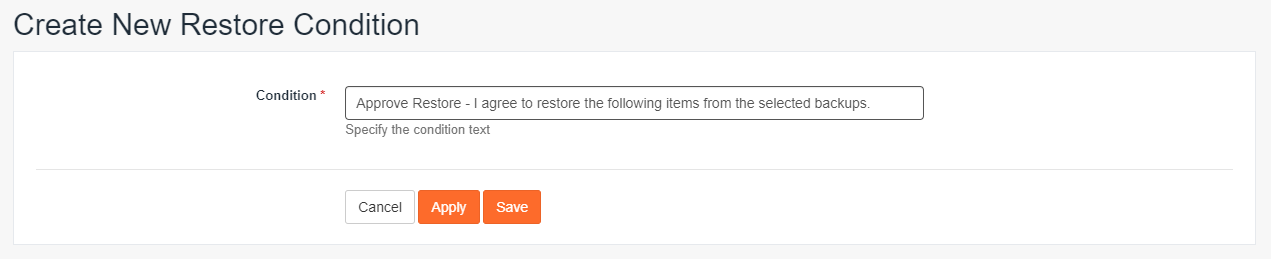
This feature allows you to establish specific conditions that users must explicitly accept before proceeding with any backup restore operation. This can be useful for outlining terms of service or important disclaimers.
To define a new restore condition, click on "Manage Restore Conditions," and then select "Create New Restore Condition" on the subsequent page.
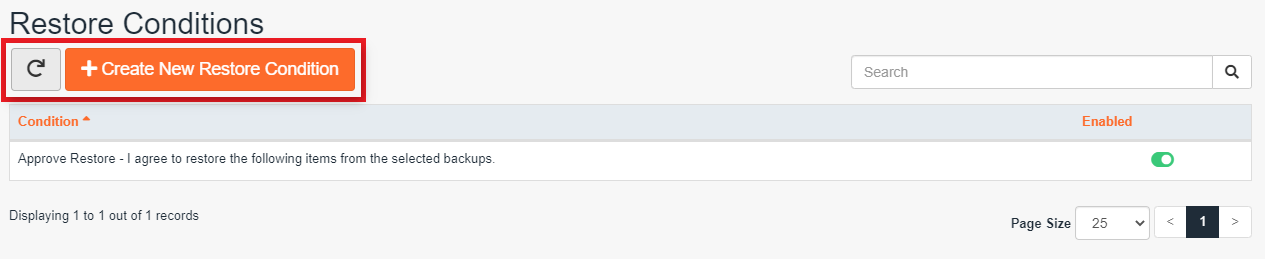
Enter the precise condition text you wish to display within the Restore Action Pane, then click "Save" to implement the new condition.
File Permissions
Configure specific file permission rules that will be applied when restoring Homedir (home directory) and Email files and folders. This ensures that restored data maintains appropriate access controls.
To create a new File Permission rule, click on "Manage File Permissions," and then select "Create New File Permission" on the following page.
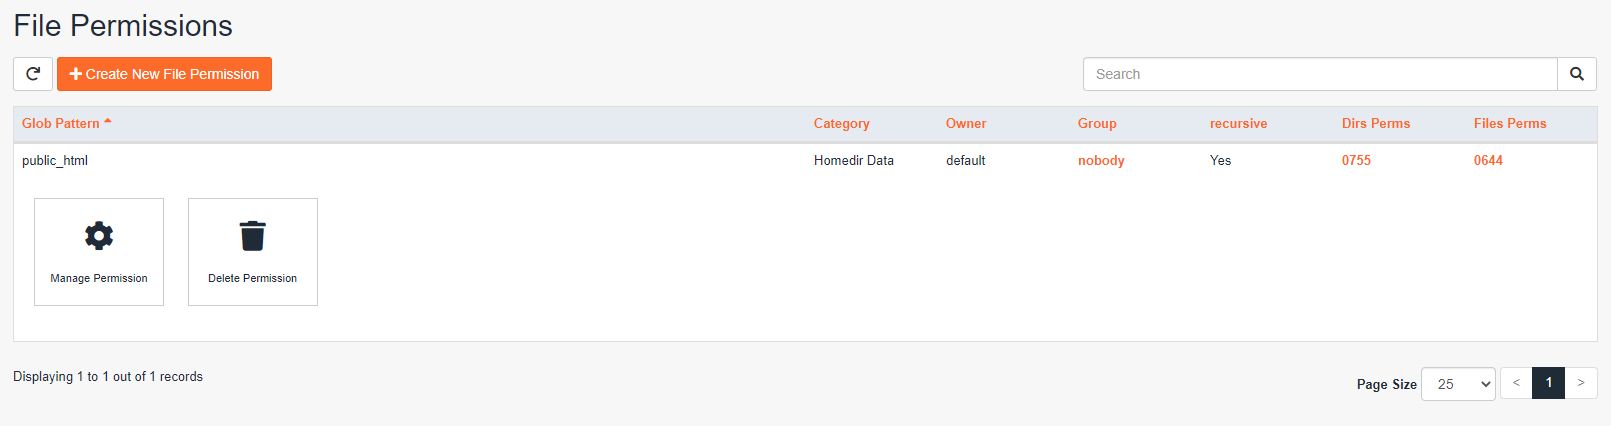
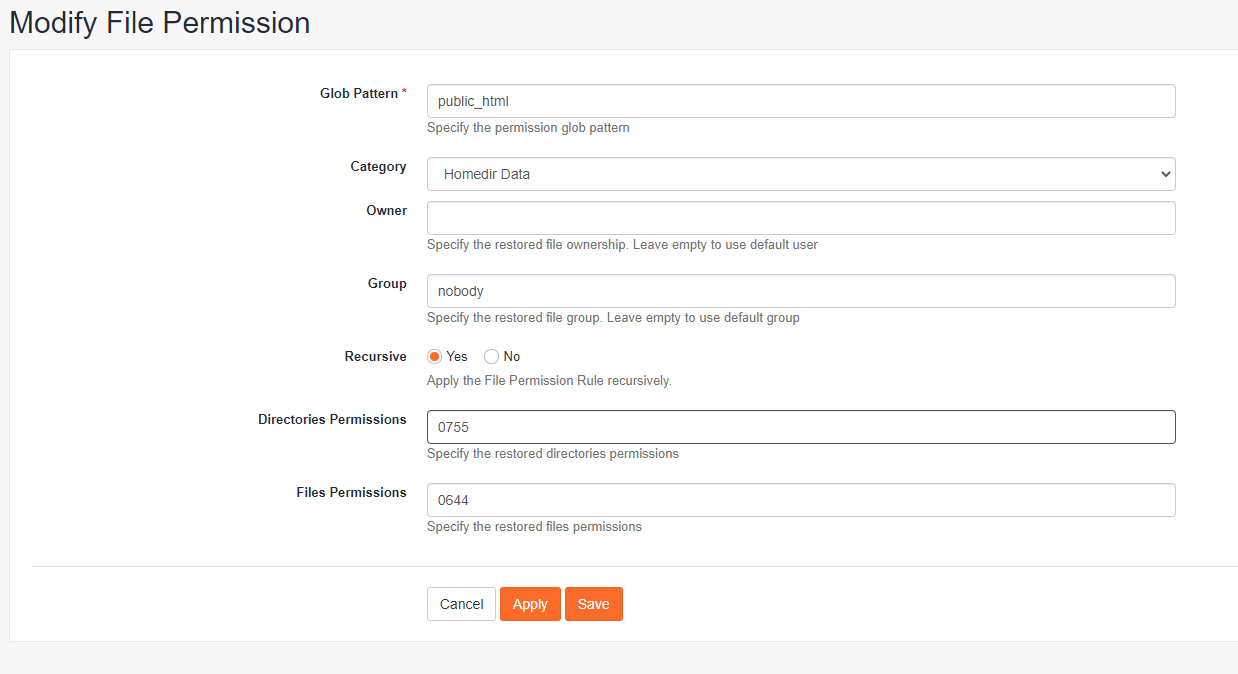
Specify the permission glob pattern, the file category, and the desired ownership (owner and group) and permissions (file and directory) to be applied to the restored files and directories. You can also choose whether to apply this permission rule recursively. Once configured, click "Save."
Limit Restore per account
This setting enables you to impose a limit on the number of restore operations an individual account can perform within a specified time period. To disable this limitation, simply enter \'0\' in either of the fields. By default, this feature is disabled.
Restore package selection
Choose whether JetBackup should utilize the Live Account Package (the package currently assigned to the account) or the Backed Up Package (the package the account was using when the backup was generated) when performing account restores. The default behavior for a full account restore is to retain the currently assigned live package, rather than re-assigning the package from the backup. This maintains consistency with current hosting plans.
Lock account homedir while restoring files
Select whether to apply a restrictive lock (000 permissions) to the entire account home directory during a Home Directory restore, or if only the specific directories and files being restored should be locked via umask. Locking the home directory comprehensively prevents other processes from reading or writing to it while the restore is actively in progress, ensuring data integrity.
NOTE: For large home directory or file restores, locking the entire home directory for an extended duration might lead to various "permission denied" errors within the control panel while the restore is ongoing. If you encounter such errors during a restore, it is recommended to disable the home directory lock.
Privacy & Security
This crucial section addresses the confidentiality and protection of your data, offering settings for encryption, user agreements, and data retention policies.
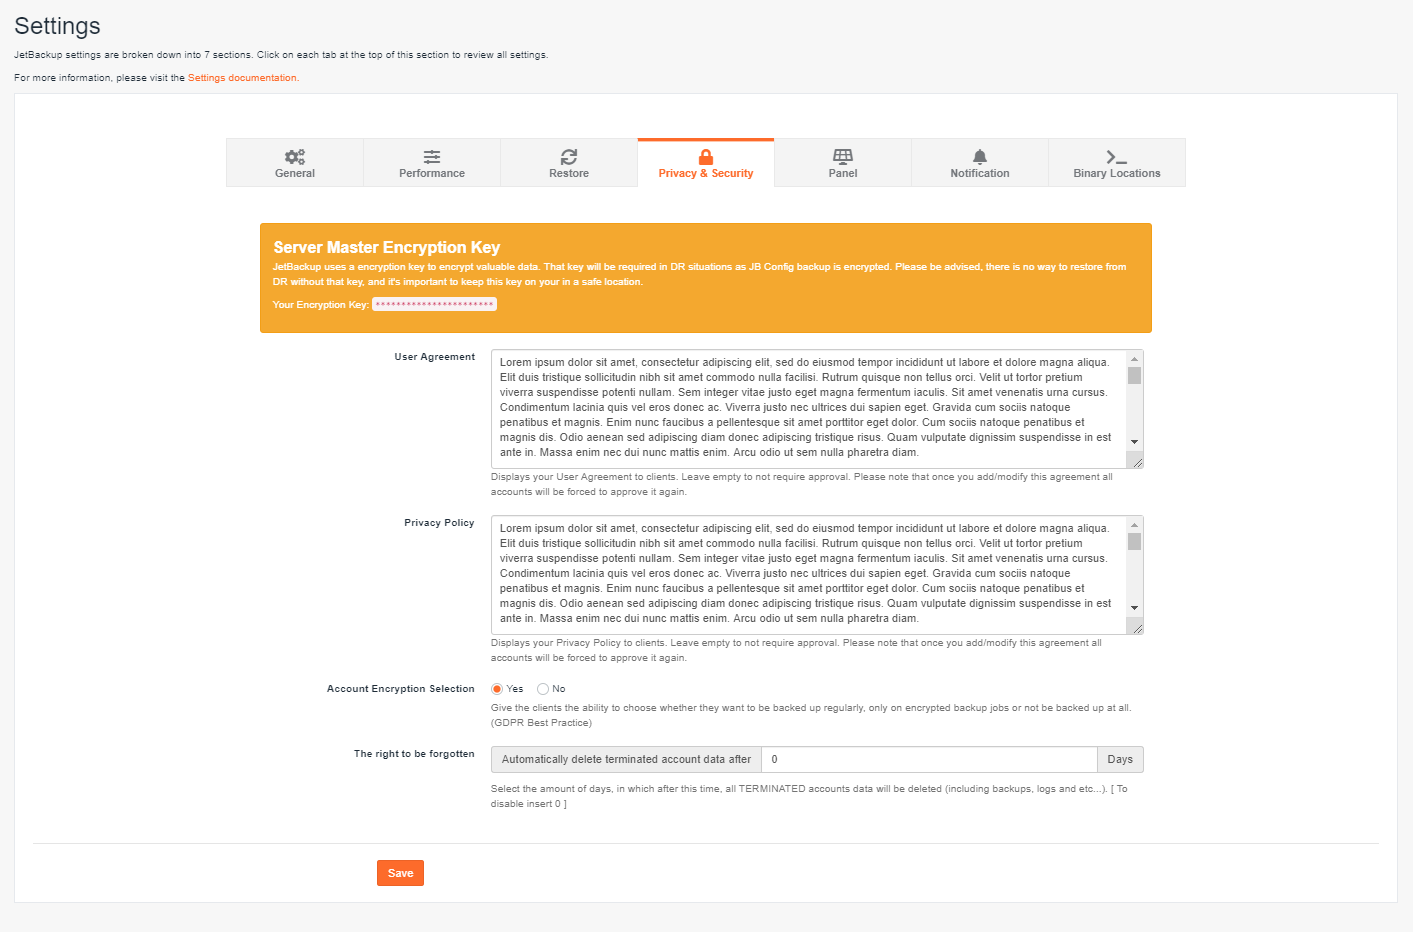
Server Master Encryption Key
JetBackup employs a robust encryption key to safeguard highly sensitive data. This key is absolutely essential during any Disaster Recovery scenario, as it is required to successfully decrypt and import JB Config backups. It is imperative to understand that without this key, disaster recovery operations cannot proceed. Therefore, it is of utmost importance to store this key securely in a remote, protected location.
User Agreement
This setting enables you to display your User Agreement to clients. Ensuring transparency and legal compliance, the user agreement outlines the terms and conditions for using the backup services.
Privacy Policy
This option facilitates the display of your Privacy Policy to clients. For clients who are subject to GDPR regulations, it is also necessary to provide detailed information about your backup destination within this section.
Account Encryption Selection
Enabling Account Encryption Selection empowers clients and users with the flexibility to choose their preferred Backup Type, allowing for greater control over their data\'s security posture.
NOTE: A backup job will be automatically aborted if all clients/users assigned to that job select a preferred backup type (e.g., "Only encrypted" or "No backups") that results in the exclusion of all accounts from that specific job. When this option is disabled, Encrypted Backups for each account will have their associated Encryption Key stored locally, simplifying key management.
The right to be forgotten
Specify the number of days JetBackup will retain backups for TERMINATED accounts. After this defined period, ALL DATA associated with the account, including backups, logs, and other related information, will be automatically and irrevocably deleted. Entering \'0\' in this field will disable this feature, meaning data for terminated accounts will not be automatically purged.
Panel
The Panel settings allow for deep integration and configuration specific to your control panel environment, including API access and database authentication.
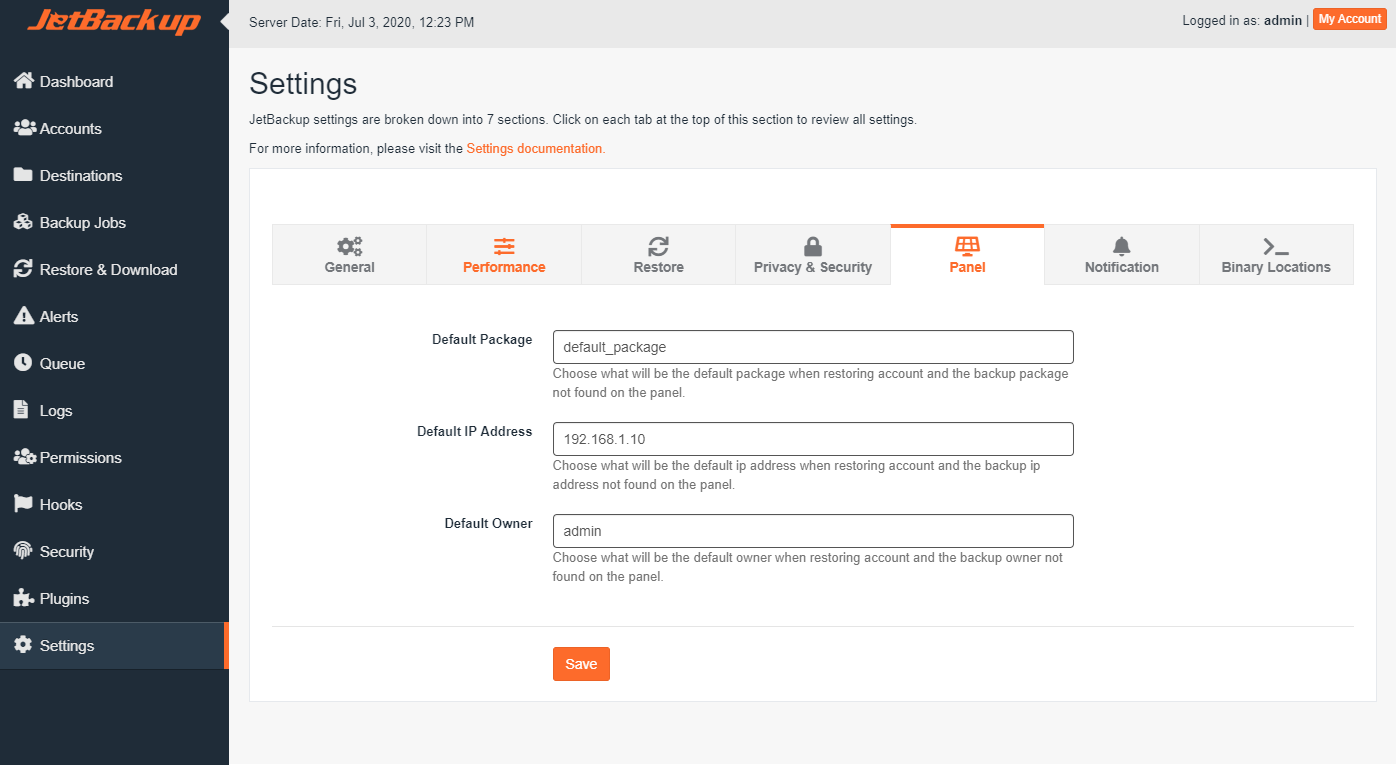
Panel Options
The available panel options are dynamic and can differ significantly based on the specific control panel software you are currently utilizing. Refer to the "Control Panels" column for clear indications of which panels a particular setting applies to. For instructions on how to generate API Access Tokens specifically for the Linux Panel, please consult the API Access Tokens (Linux) section below.
| Setting Name | Description | Category | Control Panel(s) | Default Value | ||||||||||||
|---|---|---|---|---|---|---|---|---|---|---|---|---|---|---|---|---|
| Default Package | Specify the default package JetBackup will assign when restoring an account if the package information on the account\'s backup is not found on the panel. | cPanel & WHM, DirectAdmin | None | |||||||||||||
| Default IP Address | Specify the default IP address JetBackup will assign when restoring an account if the IP address information on the account\'s backup is not found on the panel. | cPanel & WHM, DirectAdmin, Plesk, Linux | None | |||||||||||||
| Default Owner | Specify the default owner JetBackup will assign when restoring an account if the owner information on the account\'s backup is not found on the panel. | cPanel & WHM, DirectAdmin, Plesk, Linux | None | |||||||||||||
| API Timeout | Specify the default API timeout for DirectAdmin API calls. | DirectAdmin | 30 Seconds | |||||||||||||
| Default Databases Backup Account | Specify the default account to backup ALL databases to. See Manage Databases documentation to auto-assign or manually assign databases to accounts. | Settings | Linux | None | ||||||||||||
| MySQL Authentication Details | Specify your MySQL Authentication credentials to backup MySQL Databases. | Databases Auth | Linux |
|
||||||||||||
| MongoDB Authentication Details | Specify your MongoDB Authentication credentials to backup MongoDB Databases. Be sure to specify the Auth Database where the specified Username has been created. | Databases Auth | Linux |
|
||||||||||||
| PostgreSQL Authentication Details | Specify your PostgreSQL Authentication credentials to backup PostgreSQL Databases. | Databases Auth | Linux |
|
API Access Tokens (Linux)
To establish communication with the JetBackup API on Linux (Standalone) servers, the initial step involves creating an API Access Token. Once the Token is generated, you can transmit it within the request header to authenticate and execute API commands on your server, enabling seamless programmatic interaction.
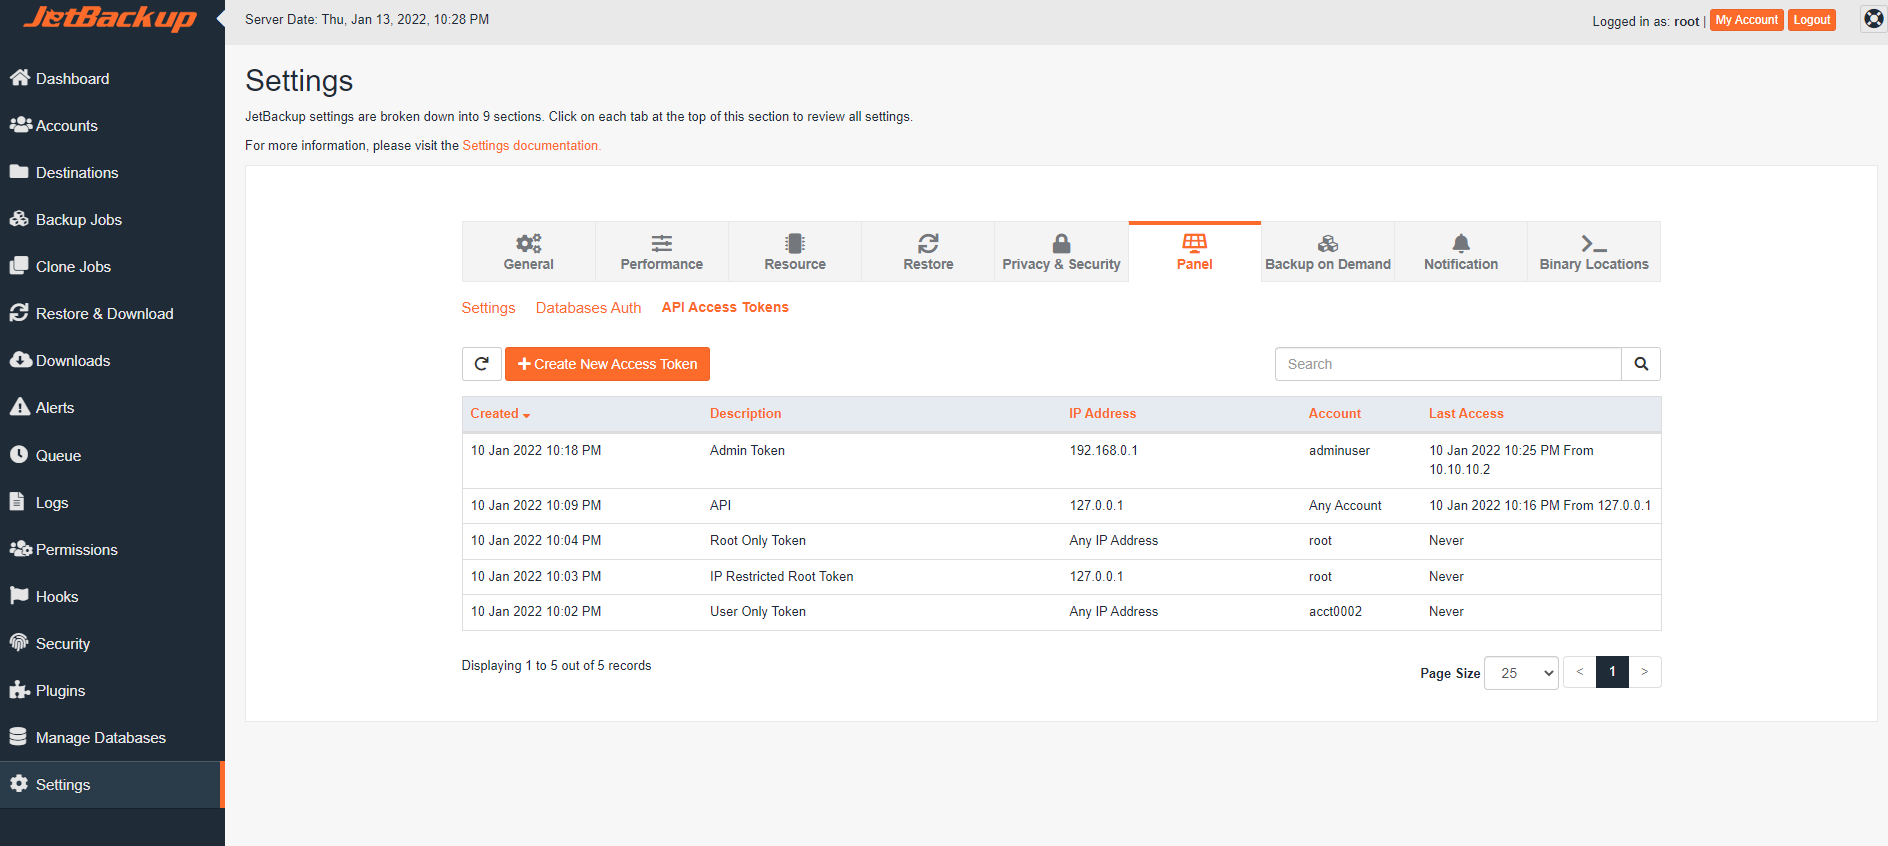
API Access Tokens can be generated with various configurations to suit your security requirements:
- Any user allowed from a defined IP address.
- Any user allowed from any IP address.
- A specific user allowed from any IP address.
- A specific user allowed from a defined IP address.
When an API command is executed as a particular user, it will inherently utilize that user\'s assigned permissions. For information on how to assign or modify permissions for an account, please consult the Permissions documentation. It is highly advised to exercise caution when creating an unrestricted token, and to ensure that the token is stored in a secure location. For enhanced security, restricting access by both account and IP address is strongly recommended.
curl -kv -H "Authorization: Bearer user1:oXBbdPuFmEtJZGYV6XQlLaxGdWm4InOQ" "https://HOST_NAME:3035/?api=1&function=getMyAccount"Create New Access Token
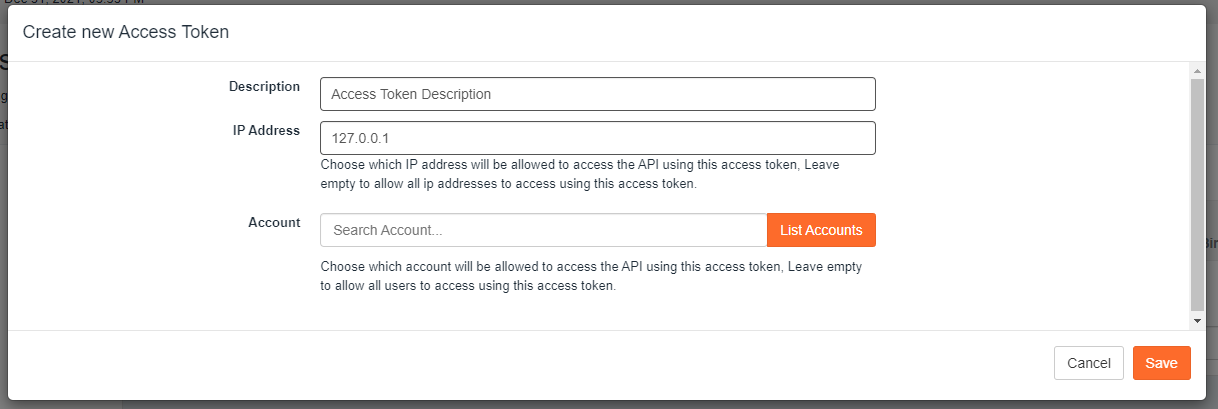
- Description: Provide a descriptive label for the Access Token. This is used internally for your convenience and is a required field.
- IP Address: Enter a specific IP Address to limit the use of this token exclusively to that IP. Leaving this field blank will permit access to the API using this token from any IP address.
- Account: Restrict the Access Token to function only for a specific account. This can also include the root account.
If this field is left blank, the token allows you to execute API commands as the user, utilizing that account\'s permissions. Please refer to the Permissions documentation for guidance on assigning or modifying permissions for an account.
Access Token Details
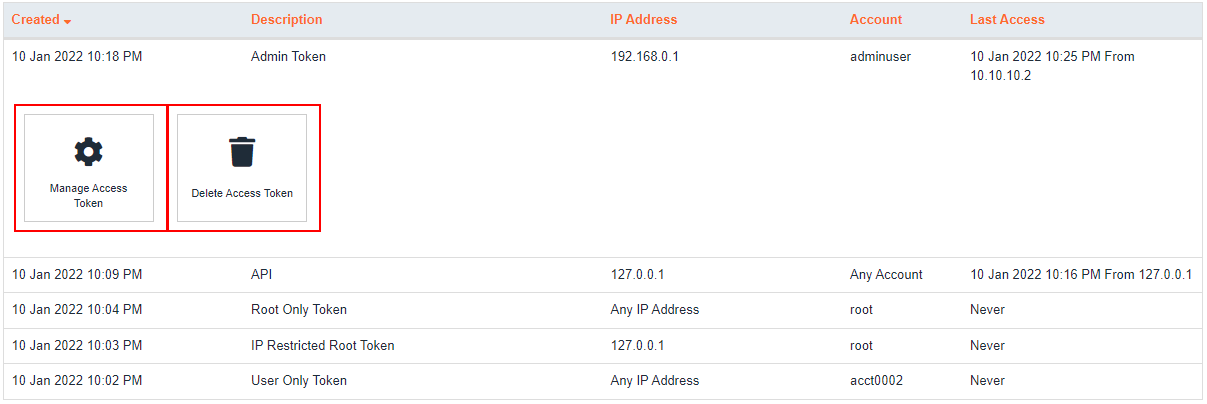
- Delete Access Token: This option allows you to permanently remove the selected access token from the system.
- Manage Access Token: Use this function to modify the details of the selected Access Token.
- Created: Displays the exact date and time when the token was initially generated.
- Token: This field shows the access token itself, which is vital for authenticating remote API calls, along with a brief description. Note that this token will only be displayed once during its creation for security reasons.
- IP Address: Indicates the IP address of the machine from which the user will be making remote API calls.
- Account: Specifies the account the API token is restricted to for performing remote API calls.
- Last Access: Provides information on the most recent date, time, and IP address from which the token was utilized.
Backup on Demand
Backup on Demand empowers your users with the flexibility to create immediate, point-in-time full account snapshots of their data. These on-demand backups are particularly valuable prior to making significant alterations to a user\'s website, email configurations, databases, or other critical components. Should any issues arise, users can conveniently revert to a recent on-demand backup, providing a quick and efficient recovery alternative to relying solely on the last scheduled backup.
The following parameters are used to configure the global settings for Backup on Demand across your JetBackup installation.
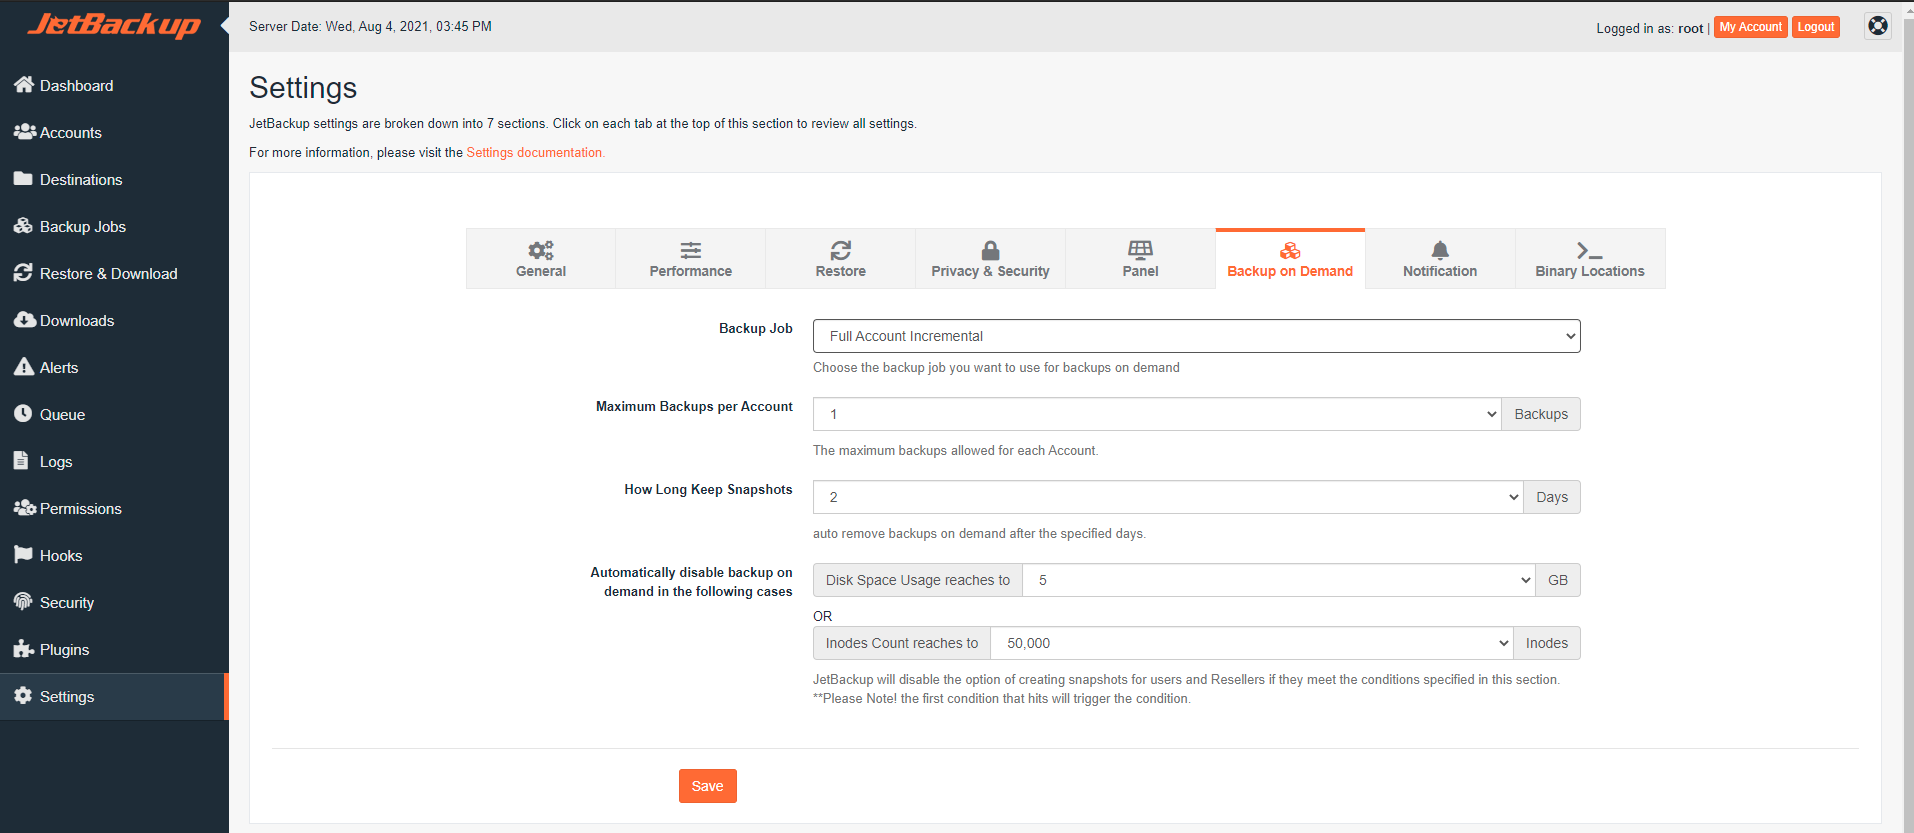
Backup Job
Select the specific backup job that will be used for all on-demand backup operations. It is crucial that the chosen backup job is enabled to be available for selection.
Maximum Backups per Account
This setting defines the global maximum number of On Demand backups that are permitted for each individual account. The maximum configurable value is 99. You have the flexibility to adjust account-specific Backup on Demand settings under the Manage Account section, allowing for tailored policies.
How Long Keep Snapshots
Specify the duration, in days, for which on-demand backup snapshots will be retained on their respective destinations. This helps manage storage usage and compliance requirements.
Automatically disable backup on demand in the following cases
JetBackup includes intelligent mechanisms to automatically disable the option for Users and Resellers to create snapshots if they meet certain predefined conditions. It\'s important to note that the first condition met will trigger the disablement of the feature.
- Disk Space: If an account\'s disk space usage is greater than or equal to the specified Disk Space limit, the user will be prevented from generating a Backup on Demand.
- Inodes: If an account exceeds the set Inode limit, the user will similarly be unable to generate a Backup on Demand.
Ensure that your server is properly configured to report Disk Space Usage and Inodes for each account accurately. For JetBackup 5 Linux users, please refer to: Disk Usage/Inode Usage N/A on JetBackup 5 for Linux. Panel versions of JetBackup will typically retrieve these details directly from the Panel API.
Notification
The Notification section enables you to configure how JetBackup communicates alerts and important information, ensuring you stay informed about your backup system\'s status.
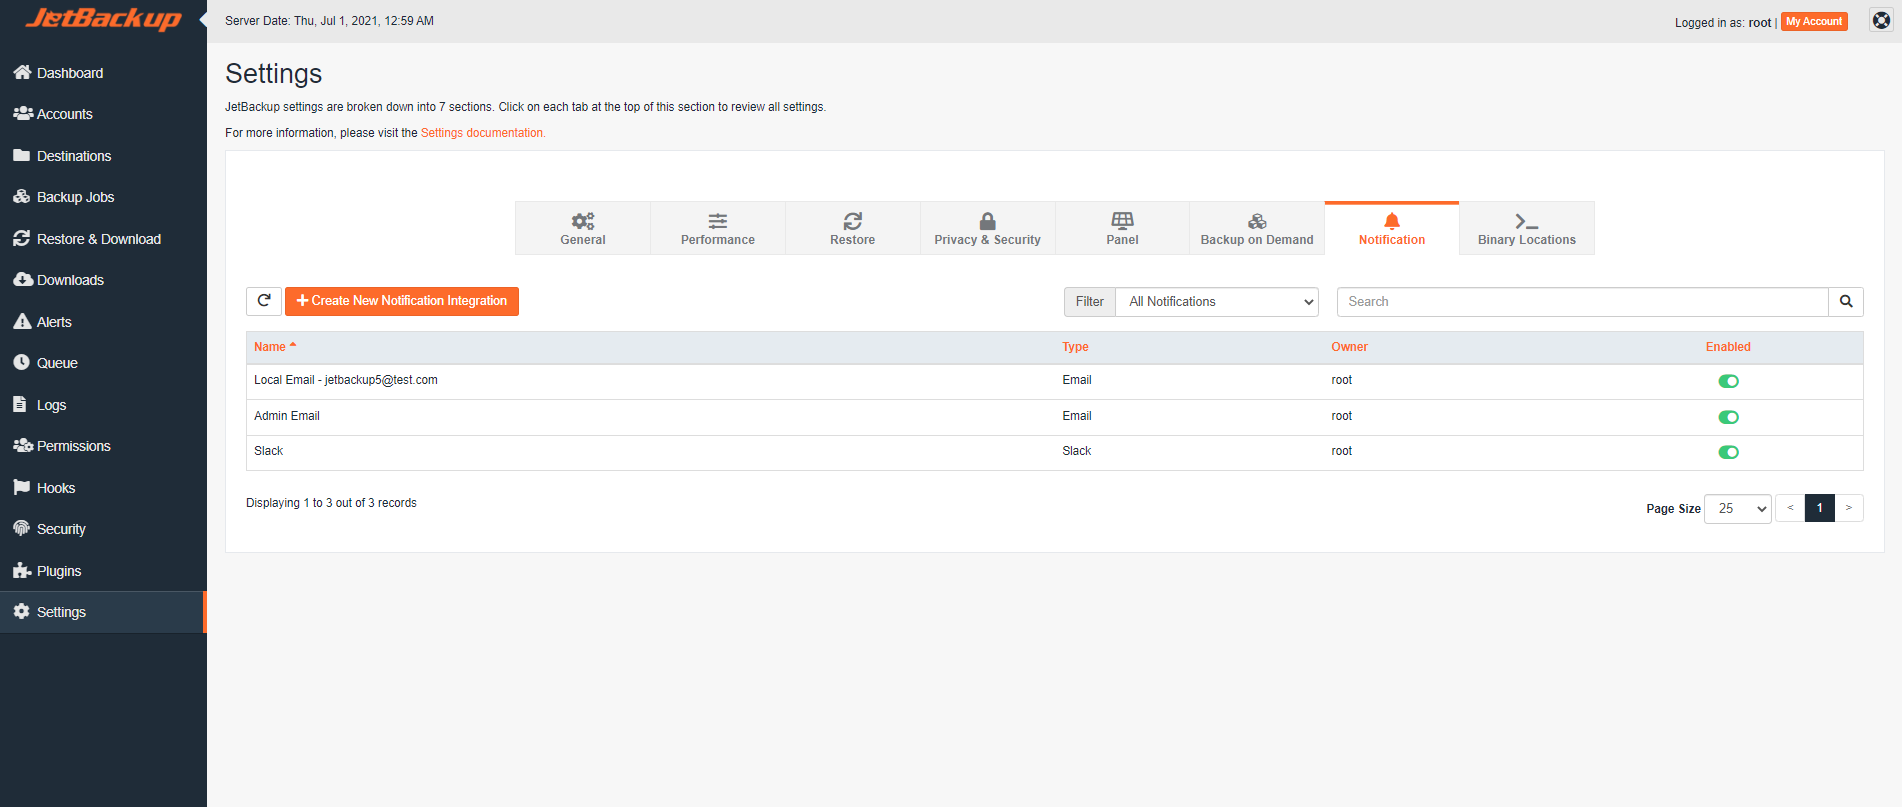
To begin setting up your notifications, click on "+ Create New Notification Integration." Within the Integration Type field, you will be able to select the specific Notification Plugin you wish to utilize for sending JetBackup alerts. By default, JetBackup comes pre-installed with the Email Notification Integration. A sample configuration for an Email Integration is detailed below:
Create New Notification Integration (Email)
This subsection outlines the process of configuring a new email-based notification integration within JetBackup.
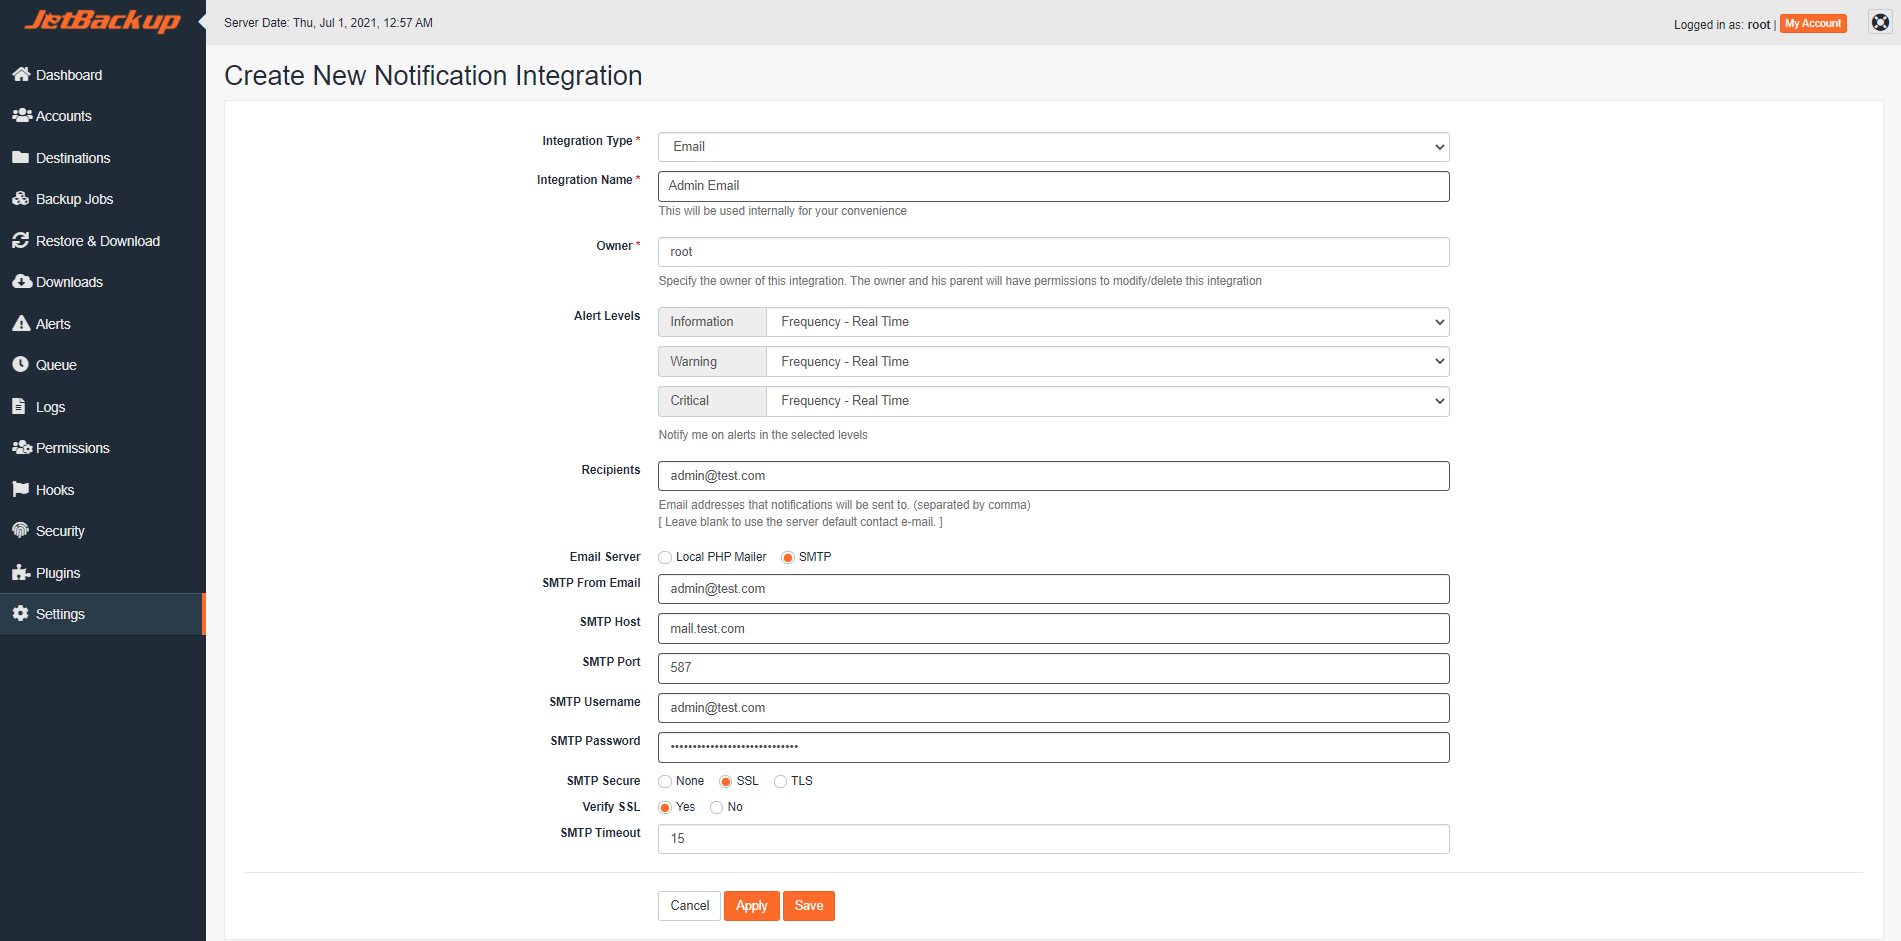
- Integration Type: This field specifies the particular type of Notification Integration you intend to set up.
- Integration Name: Provide a unique identifier for your Notification Integration. This name is used internally for your convenience and helps in distinguishing different notification setups.
- Owner: Assign an owner for this Notification Integration. The owner, along with any parent accounts, will be granted permissions to modify and delete this specific integration.
- Alert Levels: Select the desired alert types (Information, Warning, Critical) and their corresponding frequency (Real Time, Once a Day) for which you wish to receive notifications. For more comprehensive information regarding alert types, please visit the Alerts documentation.
- Recipients: Specify the email address(es) to which you prefer to send these notifications. If this field is left blank, notifications will be sent to the default server contact email address.
- Email Server: Choose whether to utilize the Local PHP Mailer or an external SMTP server for sending JetBackup notifications.
SMTP Settings:
- SMTP From Email: Define the reply-to email address that will be used for notifications sent via SMTP.
- SMTP Host: Enter the hostname of your SMTP email server.
- SMTP Port: Specify the port number used by your SMTP email server.
- SMTP Username: Provide the username required for authenticating with your SMTP server.
- SMTP Password: Enter the password associated with the SMTP username.
- SMTP Secure: Select the encryption protocol for your SMTP connection (options typically include None, SSL, or TLS).
- Verify SSL: Enable or disable SSL verification during the SMTP connection.
- SMTP Timeout: Set the maximum duration, in seconds, for the authentication connection attempt before it times out.
Notification Plugins
In addition to standard email notifications, JetBackup offers the capability to install and activate supplementary notification plugins, enabling integration with a wider array of communication platforms. Click Here to view a comprehensive list of notification plugins that are available by default, along with detailed instructions on how to set up each one to enhance your alert system.
Binary Locations
This section provides a clear overview and configuration options for the absolute paths to various essential binaries that JetBackup relies upon for its operations. Ensuring these paths are correctly set is critical for the proper functioning of backup, restore, and other system tasks.
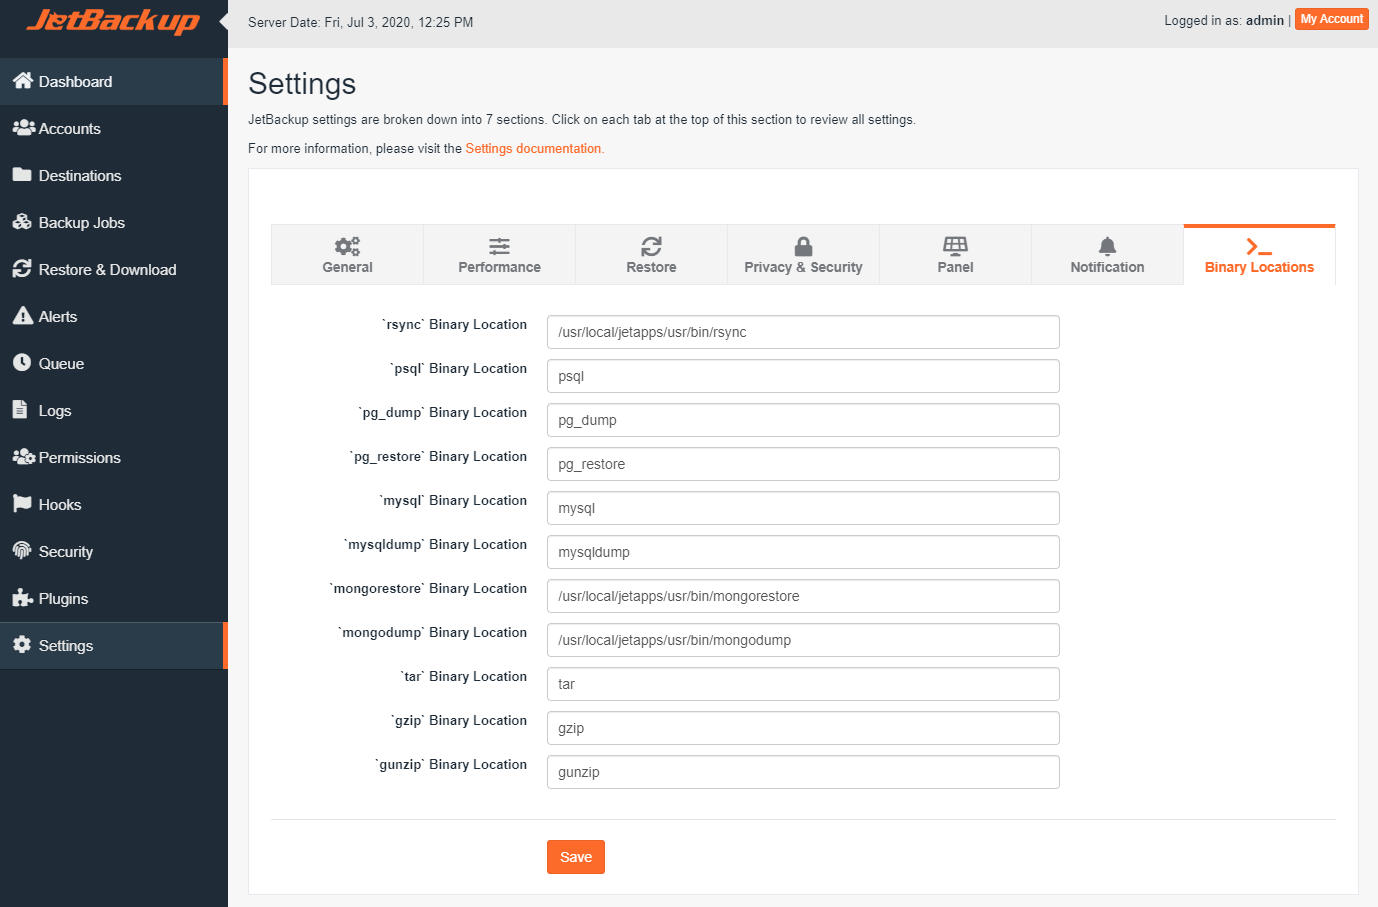
rsync Binary Location
Specify the full path to the rsync executable: /usr/local/jetapps/usr/bin/rsync
psql Binary Location
Specify the full path to the psql executable: psql
pg_dump Binary Location
Specify the full path to the pg_dump executable: pg_dump
pg_restore Binary Location
Specify the full path to the pg_restore executable: pg_restore
mysql Binary Location
Specify the full path to the mysql executable: mysql
mysqldump Binary Location
Specify the full path to the mysqldump executable: mysqldump
mongorestore Binary Location
Specify the full path to the mongorestore executable: /usr/local/jetapps/usr/bin/mongorestore
mongodump Binary Location
Specify the full path to the mongodump executable: /usr/local/jetapps/usr/bin/mongodump
tar Binary Location
Specify the full path to the tar executable: tar
gzip Binary Location
Specify the full path to the gzip executable: gzip
gunzip Binary Location
Specify the full path to the gunzip executable: gunzip
