
 (1).svg)
 (1).png)


 (1).svg)
.svg)

An effective way to boost user engagement and establish clear communication on your WordPress website is through a well-designed contact form. These forms are more than just a means for visitors to reach out; they serve as a crucial bridge connecting you to your audience, fostering interaction and building stronger relationships. Whether you are an experienced WordPress user or just starting, integrating a contact form is a fundamental step towards enhancing interactivity and strengthening connections with your users.
In this comprehensive guide, you will discover the significant advantages of WordPress contact forms and learn practical, step-by-step instructions to seamlessly integrate them into your site. Let’s begin this journey to empower your website with better communication tools.
Understanding WordPress Contact Forms and Their Advantages
What Is a WordPress Contact Form?
A WordPress contact form provides visitors with an effortless method to communicate directly with website owners. These digital forms are highly versatile and can be customized to suit a variety of specific needs. From straightforward designs intended for basic inquiries to more sophisticated configurations capable of gathering detailed information, contact forms can be precisely tailored to your requirements.
The ability to customize WordPress contact forms empowers you to create an invaluable tool for effectively connecting with and gaining insights into your audience. Furthermore, many form solutions are adaptable, allowing them to evolve alongside your website's growing demands and changing communication objectives.
Why Should You Use a Contact Form?
Let’s explore several compelling reasons why incorporating a contact form on your website is highly beneficial:
- Improve Engagement with Website Visitors: Contact forms fundamentally bridge interactions between a website owner and its visitors. They offer a simple, intuitive, and user-friendly method for visitors to get in touch, ask questions, or provide invaluable feedback. This ease of use and accessibility actively encourages personal and meaningful conversations, effectively transforming passive site users into engaged community members who feel heard and valued.
- Reduce Spam: Directly displaying an email address on your website can unfortunately make you vulnerable to spambots and a deluge of unwanted messages. By utilizing contact forms instead, website owners gain superior spam protection. Integrating robust anti-spam measures, such as CAPTCHA or similar verification methods, ensures that the majority of contact form submissions are genuine inquiries. This significantly reduces the volume of junk mail, allowing you to concentrate on authentic visitor queries and meaningful feedback.
- Organize Data Efficiently: Implementing a contact form on your WordPress site naturally leads to better organization of incoming visitor data. These form fields can be meticulously customized to collect specific types of information, ranging from essential contact details to more elaborate user feedback and preferences. By tailoring all the form fields to gather precisely the information you need, you can quickly analyze and strategically utilize this data for various operational and marketing purposes, making your outreach more targeted and effective.
- Enable Automation: Integrating contact forms with Customer Relationship Management (CRM) systems or other digital marketing tools can significantly streamline your marketing processes through powerful automation. Automating these routine processes frees up valuable time and resources, allowing you to focus more on strategic planning and less on repetitive administrative tasks. This also makes lead generation and customer relationship management much more efficient, as you will be able to effortlessly track, nurture, and convert potential leads throughout their journey.
Before adding contact forms to your WordPress website, selecting the right hosting plan is paramount. Robust WordPress hosting plans can significantly enhance the performance and overall management of your website. These plans are specifically designed to maximize your WordPress site’s potential by offering seamless integration, enhanced security features, and robust operational capabilities.

Step-by-Step Guide: Creating Your WordPress Contact Form
1. Install a WordPress Contact Form Plugin
A WordPress contact form plugin allows you to effortlessly create and manage multiple contact forms without requiring extensive coding knowledge. For this guide, we will use WPForms, widely recognized as one of the most user-friendly and versatile WordPress form plugins available. To install the WPForms drag-and-drop form builder, follow these straightforward steps:
- Log in to your WordPress dashboard.
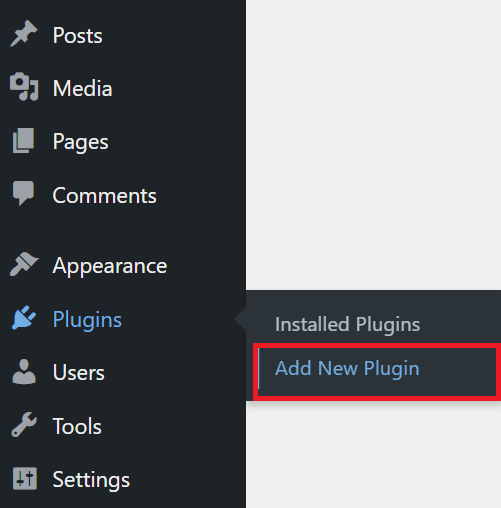
- Navigate to Plugins → Add New.
- In the search bar, type WPForms, and press Enter.
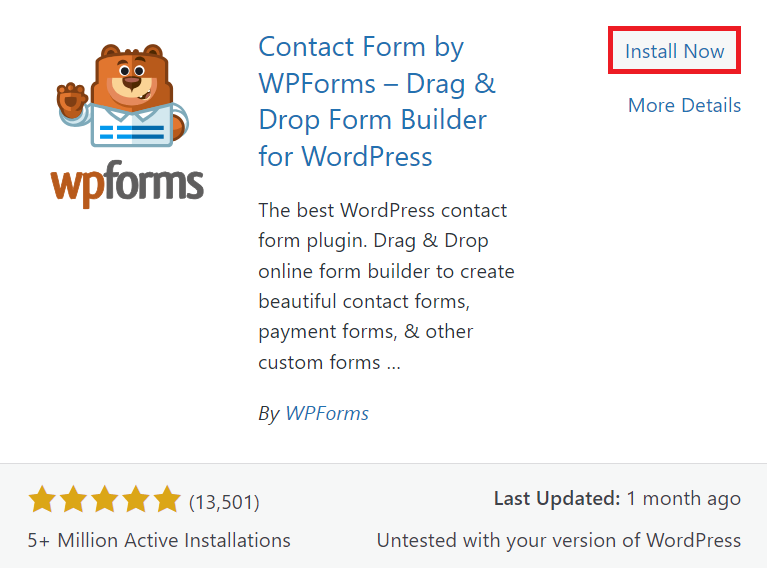
- Locate WPForms in the search results and click Install Now.
- Once the plugin installation is complete, click Activate to enable the plugin on your site, making its features immediately available.
2. Create a New Contact Form
After WPForms has been successfully activated, the next step is to create your very first contact form. This process is remarkably simple, largely due to WPForms’ intuitive and user-friendly interface.
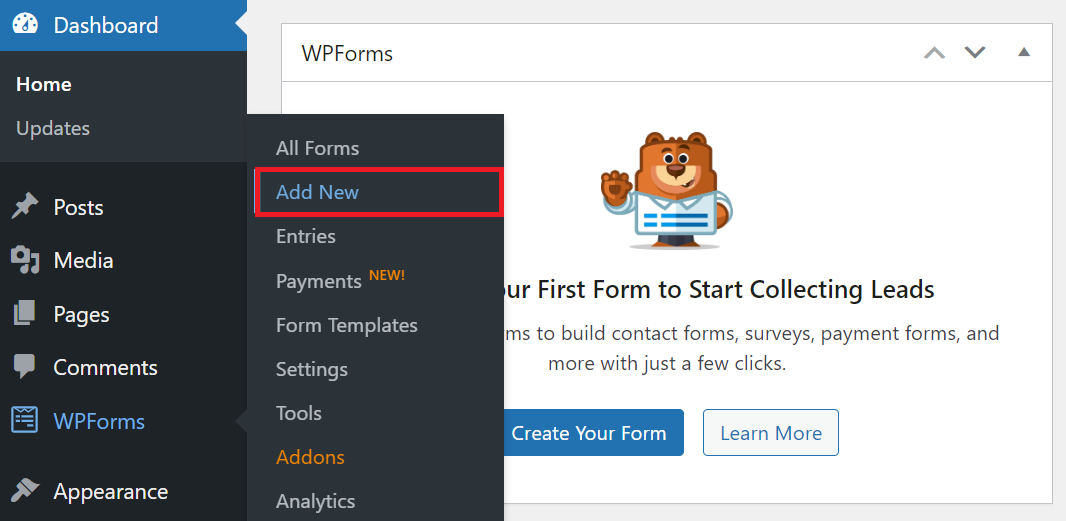
To begin, navigate to WPForms → Add New from the left sidebar of your WordPress dashboard.
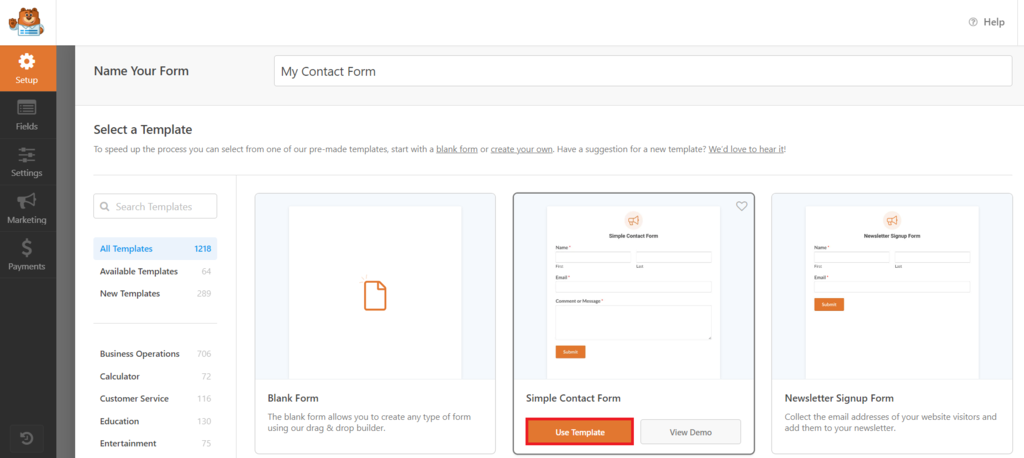
You will then be presented with a variety of pre-made templates, each tailored for different purposes and designed to streamline your workflow. These templates come with predefined styles and default settings, significantly simplifying the form creation process.
Enter a descriptive name for your form and choose a contact form template that best fits your needs, or alternatively, opt for a blank form if you prefer to build it entirely from scratch. Once your selection is made, click Use Template to proceed.
3. Customize the Contact Form
Having selected your template, you can now personalize the form using WPForms’ intuitive drag-and-drop builder. This powerful tool offers a comprehensive range of options, whether you aim to create a simple contact form or a more advanced, multi-field solution.
Adding Fields
To incorporate a new form field, simply drag it from the WPForms field menu on the left and drop it into your desired position within the form preview area.
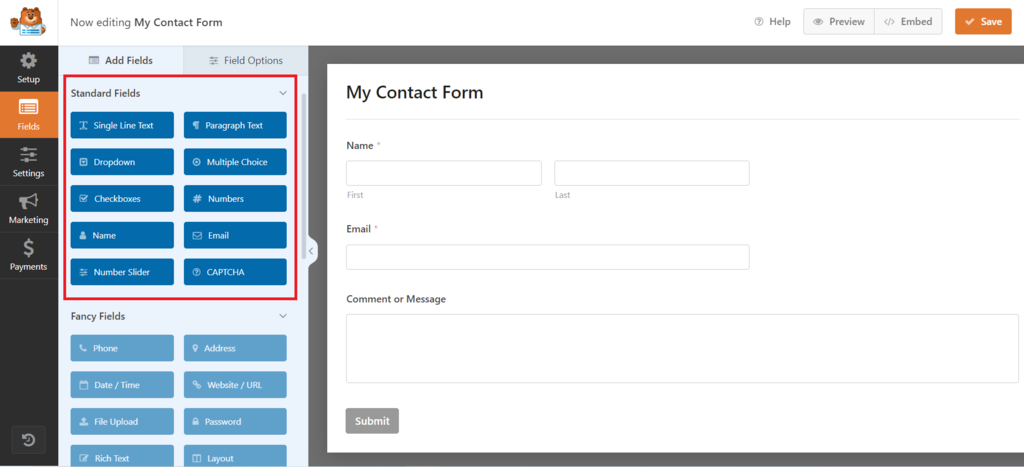
Removing Fields
To remove an existing form field, select the field directly within your form preview, and then click the Delete Field option, typically represented by a trash can icon.
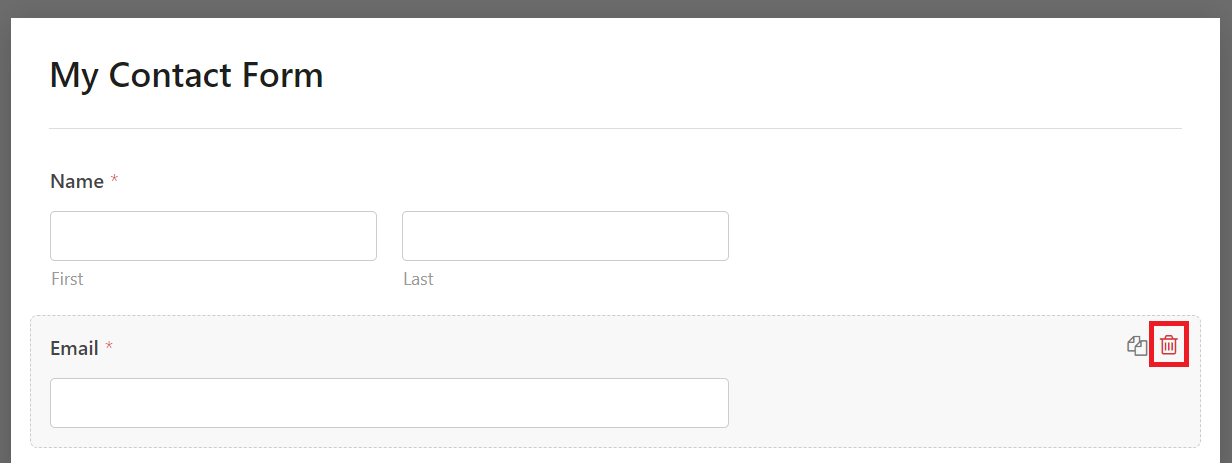
Rearranging Fields
Effortlessly reorder your form fields by clicking and dragging a field to your preferred position. This allows you to match your desired flow of information and improve user experience.
Customizing Field Properties
Each field comes equipped with a set of customizable properties. To access these, click on a field within your form. The properties panel will appear in the left column, allowing you to adjust its size, placeholder text (the text that appears before a user types), and default value. This level of customization enables you to guide your visitors’ input more effectively and ensure you gather the precise information needed.
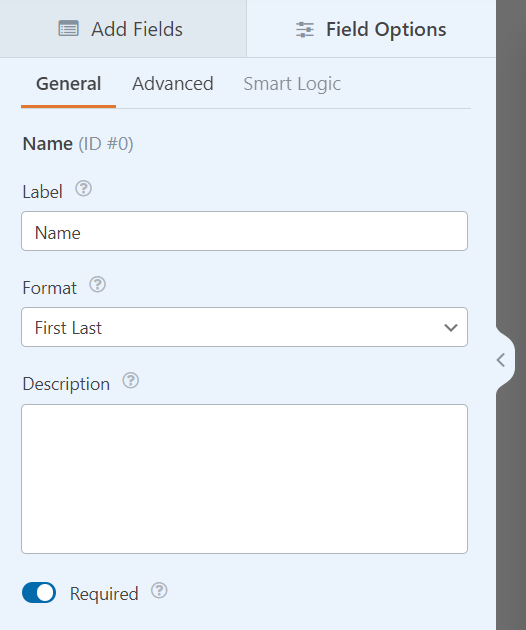
Leveraging Advanced Features
This powerful contact form builder also supports advanced options, such as smart conditional logic. This feature enables you to create dynamic forms that adapt in real-time based on user input, making them significantly more interactive, personalized, and efficient for both you and your visitors.
4. Set Up Form Confirmation
After a website visitor successfully submits a form, it is crucial to provide them with clear confirmation. This can be achieved through a simple confirmation message or by redirecting them to a specific page. Here’s how to configure form confirmation using WPForms:
Once your form design is complete, navigate to Settings → Confirmations within the WPForms form builder interface.
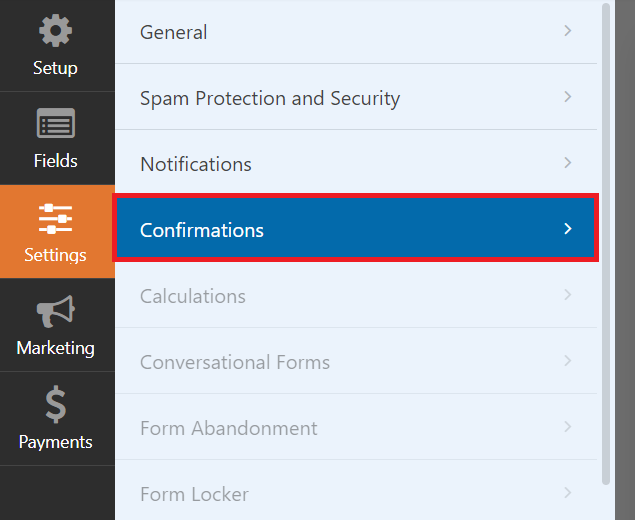
Choose the Message option and enter the specific text you wish to display to the user, such as “Thank you for contacting us! We will be in touch soon.” This provides immediate reassurance that their submission was received.
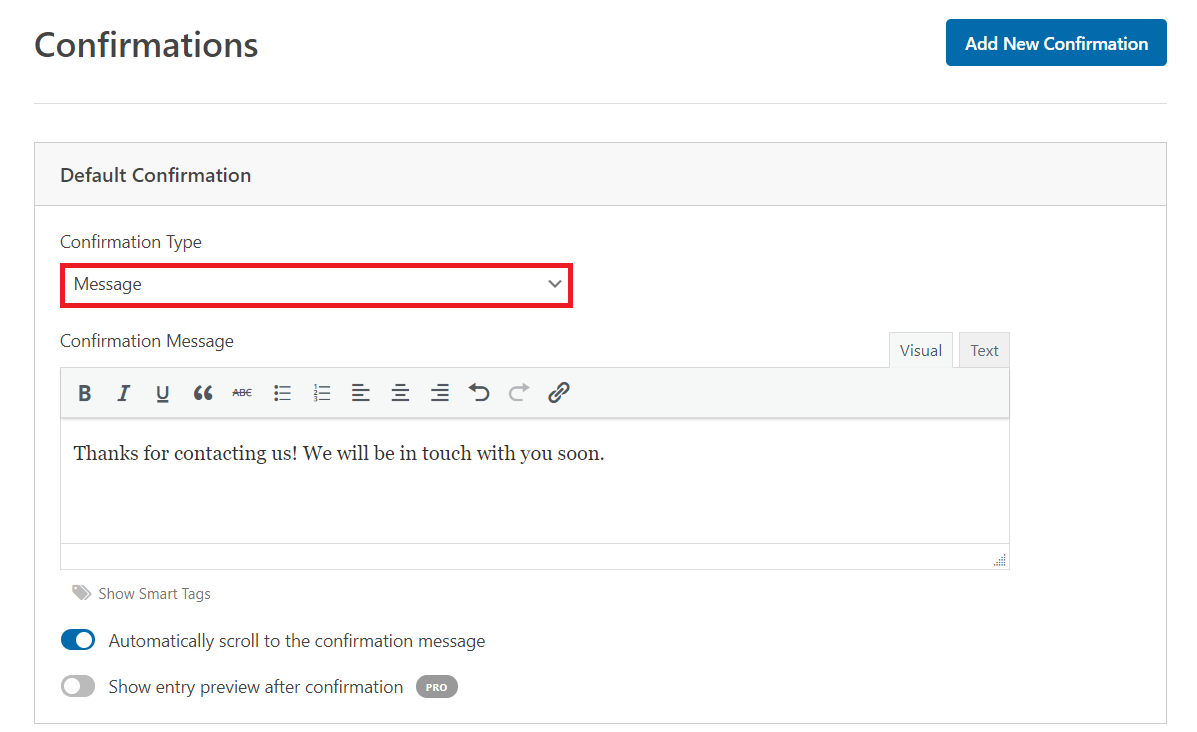
If you prefer to direct users to a dedicated page after submission, select the Show Page option. You can then easily choose the desired page from the dropdown menu, such as a custom "Thank You" page or a relevant section of your website.
5. Configure Form Notifications
Email notifications are vital for keeping track of every form submission and responding promptly. By default, WPForms automatically sends a notification to the administrator email address associated with your WordPress site. However, you have the flexibility to customize these form notification settings to better suit your workflow and team communication needs.
Follow these steps to configure your WPForms notifications:
- Navigate to Settings → Notifications within the form builder.
- To modify the recipient, click the Send to Email Address field and input the desired email address where notifications should be sent. You can add multiple email addresses, separated by commas, if you need several team members to receive submission alerts.
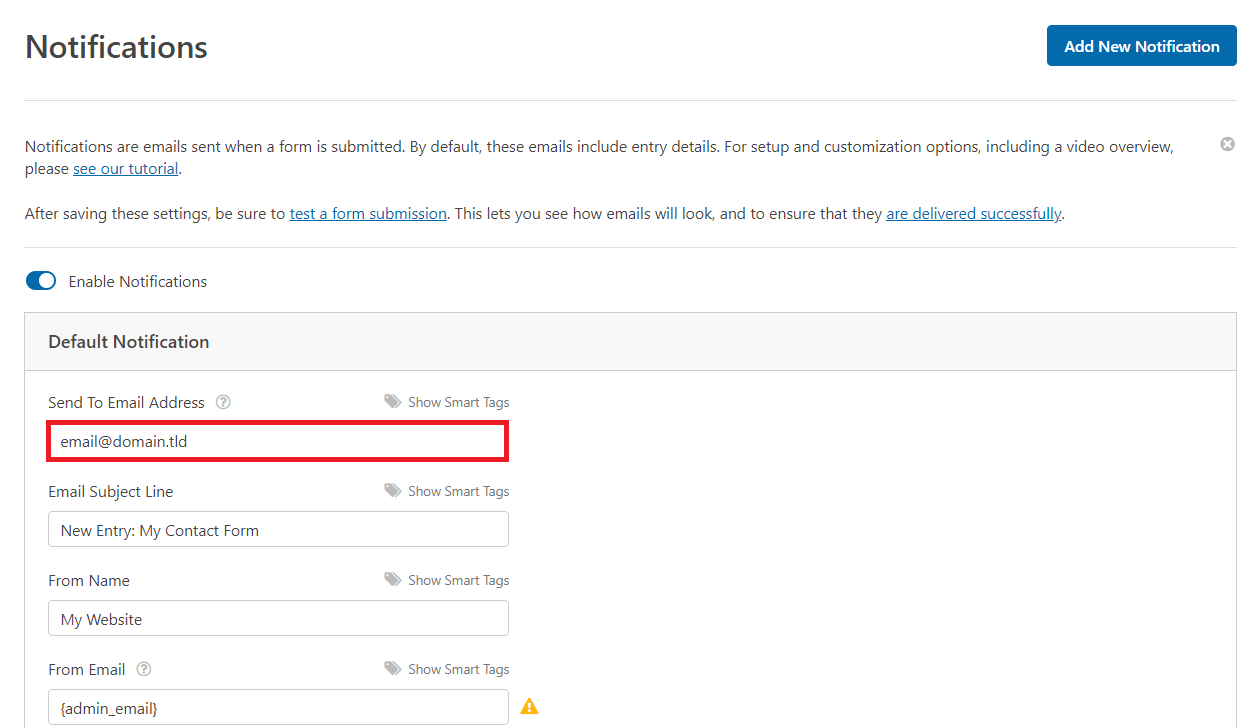
- Customize the Email Subject Line to make notifications easily identifiable and prioritized in your inbox. A clear subject line, like "New Contact Form Submission - [Form Name]", helps you quickly understand the nature of the email.
- Personalize the email notification’s content according to your preferences. You can include specific details from the submitted form data using smart tags, which dynamically insert user input into the email. This significantly enhances the efficiency of your response, as all relevant information is readily available.
6. Embed the Contact Form
Once your contact form is designed and configured, the final step is to embed it onto your WordPress site. There are several versatile ways to achieve this, catering to different WordPress editor environments and desired display locations.
Embedding a Contact Form on a WordPress Page
Follow these steps to embed a WPForms contact form on a WordPress page using the block editor (Gutenberg):
- Open the WordPress page in the block editor. This can be an existing page you wish to update or a brand-new page specifically created to host your contact form.
- In the page editor, locate and select the WPForms block. You can typically find it by clicking the '+' icon to add a new block and searching for "WPForms".
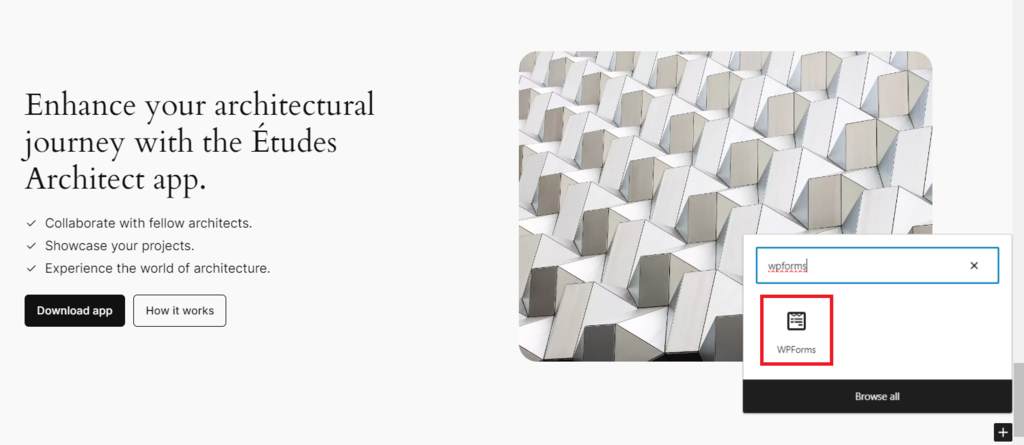
- From the dropdown list within the WPForms block settings, select the specific form you want to embed. WPForms will automatically generate and display a shortcode for your chosen form. Alternatively, if you prefer, you can manually enter the WPForms shortcode into a dedicated Shortcode block.
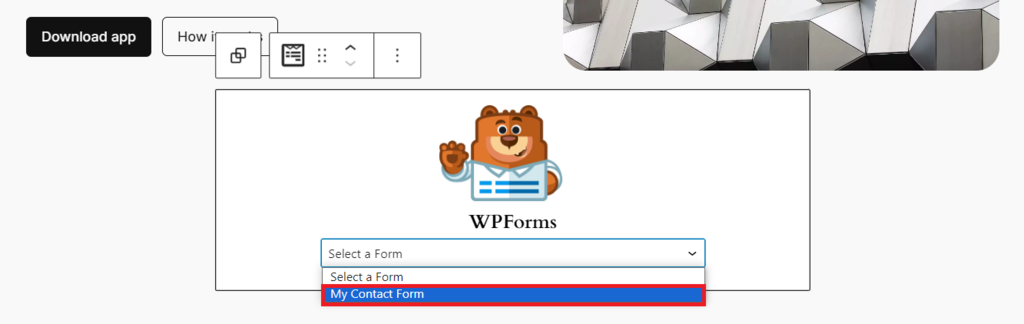
- After adding the form, it is always a good practice to preview the page to ensure the contact form appears and functions exactly as expected on your live site.
Embedding a Contact Form in a Widget Area
You can also embed a contact form in a WordPress widget area, such as a sidebar or footer. This method is particularly suitable for classic themes that actively support and utilize widgets:
- From your WordPress admin panel, go to Appearance → Widgets.
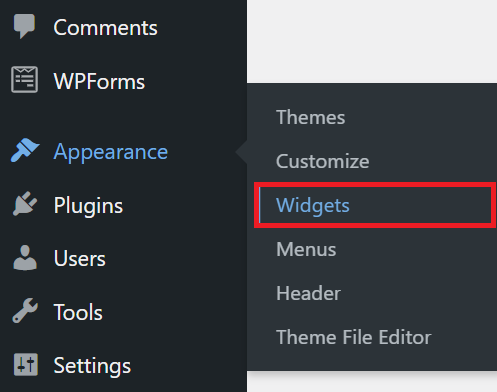
- In the Widgets area, choose the specific location where you want your contact form to appear, such as the 'Sidebar' or 'Footer' widget zones.
- Find the WPForms widget among the available widgets, then select the specific contact form you wish to display from its dropdown options.
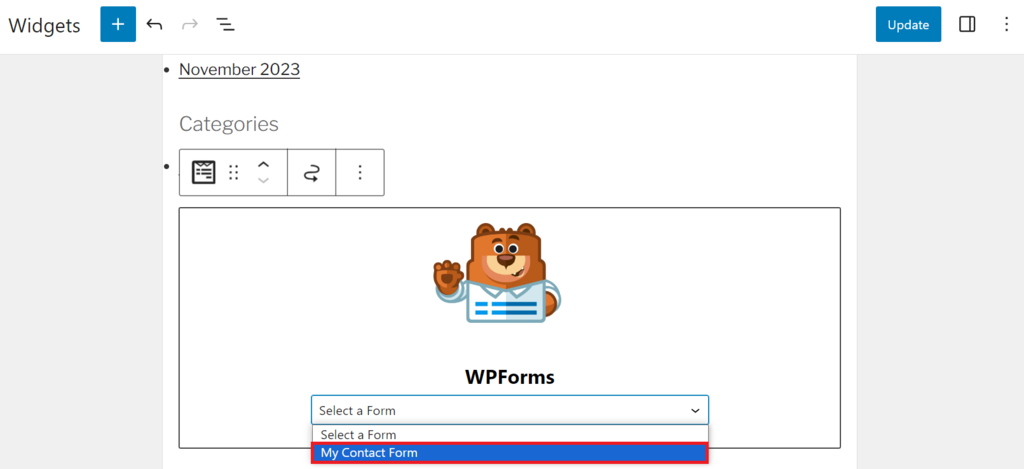
- After selecting and configuring the form within the widget, click Save to apply the changes and make your contact form visible in the chosen widget area.
Embedding a Contact Form in a Template Part
For those utilizing block themes, embedding a contact form in a template part is efficiently managed via the Site Editor. Follow these detailed steps:
- From the dashboard, navigate to Appearance → Editor.
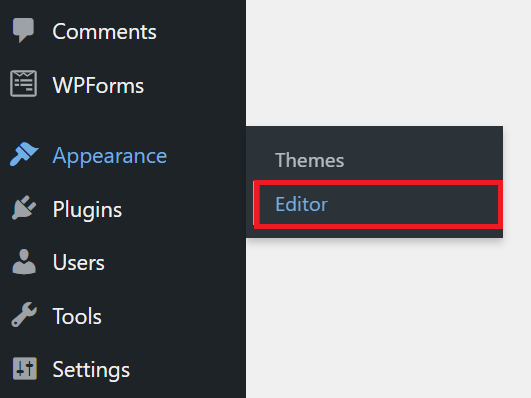
- Navigate to the specific template part where you intend to embed the contact form, such as the header, footer, or any other customizable section of your theme.
- Click on the exact area within the template part where you wish to add the form, and then select Add block (represented by a '+' icon).
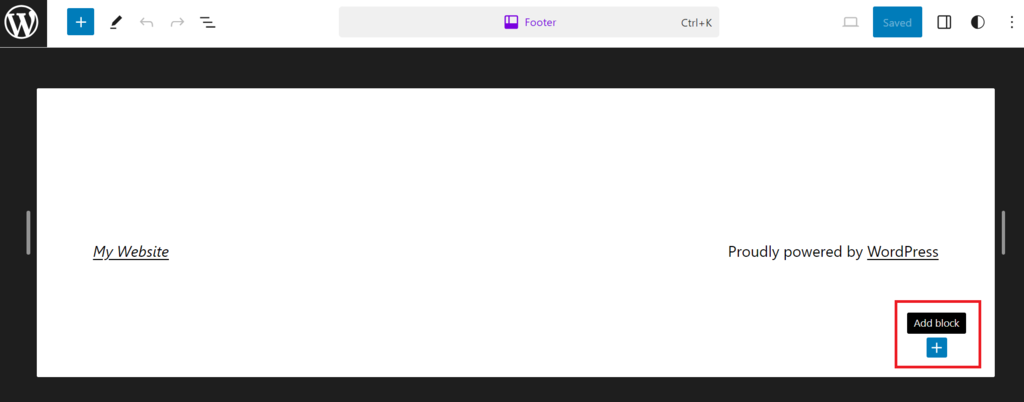
- Search for the WPForms block and select the contact form you wish to embed from the available options. If you are working with smart or multi-page forms, take a moment to ensure their layout and settings are correctly configured within the block editor.
- After carefully placing and configuring your form, click Save to apply your contact form customization across the selected template part.
Embedding a Contact Form Using the Classic Editor
For those who prefer or are still utilizing the WordPress Classic Editor, here’s a straightforward method to embed a WPForms contact form:
- Open the post or page where you want to add the form in the Classic Editor.
- Click the Add Form button, which is conveniently located directly above the text editor. If you have multiple form plugins installed, ensure you select WPForms from any presented options.
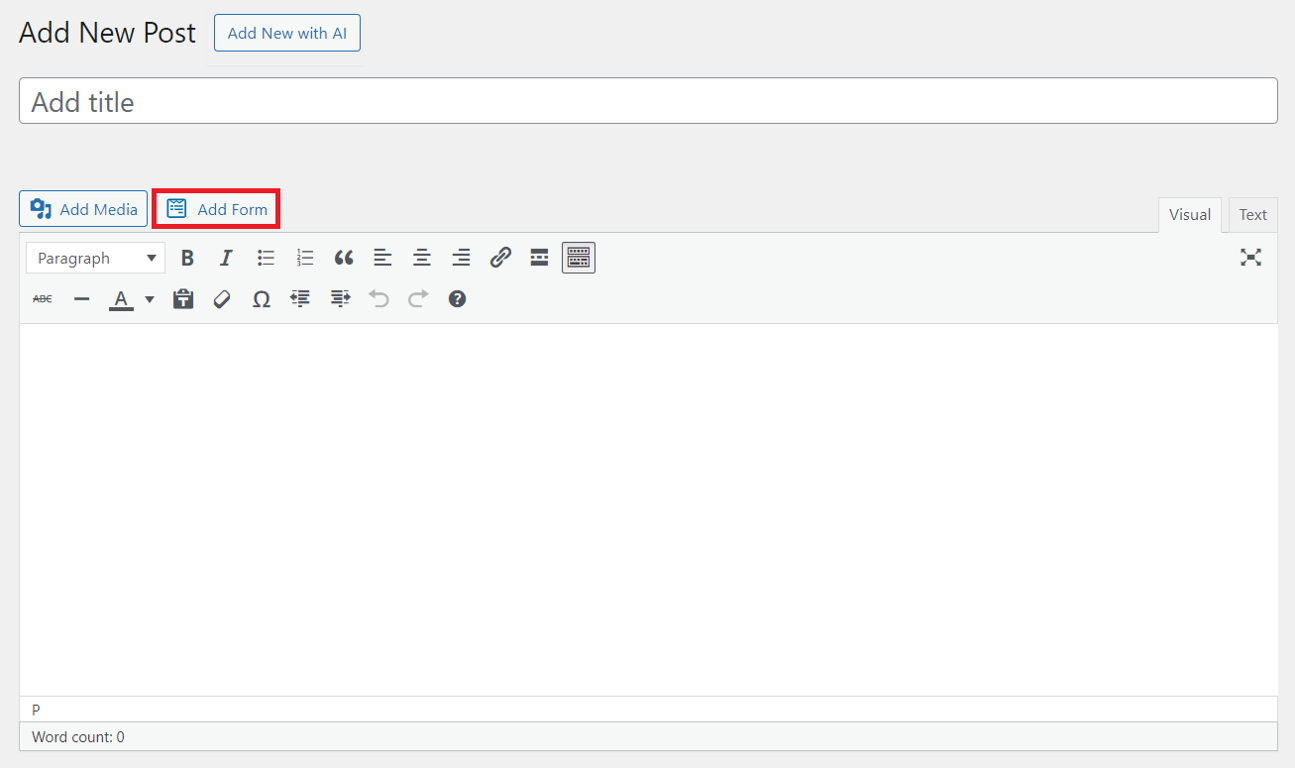
- A popup window will appear; from the dropdown list, select the specific form you want to embed. You also have the option to include the form’s title and description directly above it, if desired.
- Finally, click Add Form to seamlessly insert a shortcode of your chosen form directly into the editor. The form will then render on the frontend of your website.
Pro Tip: We highly recommend testing your embedded contact form thoroughly in a private test page or a dedicated staging environment before making it live. This crucial step helps ensure that the contact form appears correctly, functions flawlessly, and integrates as intended without any unexpected issues on your public-facing site.
Conclusion
A WordPress contact form stands as an indispensable tool for fostering clear and efficient communication with your website visitors. Regardless of the desired complexity, from simple inquiry forms to advanced data collection tools, WPForms empowers you to customize contact forms precisely to your specific requirements and aesthetic preferences.
This comprehensive guide has thoroughly explored the multifaceted aspects of WordPress contact forms, covering everything from fundamental design principles to advanced integration methods across various WordPress environments. By following the detailed steps provided, you can now confidently create, customize, and implement custom forms that effectively engage users, streamline communication channels, and enhance the overall functionality of your website.
Frequently Asked Questions About WordPress Contact Forms
How Do I Create a Contact Form in WordPress?
To create a contact form in WordPress, the most straightforward method is to install a dedicated plugin like WPForms. Once installed, you typically choose a pre-designed template, customize its fields using a drag-and-drop builder, and then embed your completed form onto a page, post, or widget area using a shortcode or block editor.
Can I Create a WordPress Contact Form for Free?
Yes, it is entirely possible to create a functional WordPress contact form for free. Many popular plugins, such as WPForms Lite, offer a free version that provides essential features for creating a simple yet effective contact form. If your needs evolve and you require more advanced functionalities or integrations, upgrading to a premium version is often an option.
Can I Create a WordPress Contact Form Without a Plugin?
While technically possible, creating a WordPress contact form without a plugin can be significantly more challenging, especially for individuals without extensive technical skills or coding expertise. This approach would require manual coding of the form’s HTML, CSS, and potentially JavaScript for validation and submission, followed by complex integration into your site’s theme files. In contrast, using a plugin simplifies the process immensely, allowing you to create sophisticated contact forms with just a few clicks and minimal technical effort.
Are WordPress Contact Forms GDPR Compliant?
WordPress contact forms can indeed be made GDPR compliant, but achieving this largely depends on the specific plugin chosen and the meticulous setup of the form itself. To ensure compliance with GDPR regulations, it is crucial to include explicit consent checkboxes (e.g., for privacy policy agreement), provide clear links to your website’s privacy policy page, and ensure that all collected data is handled and stored responsibly according to legal requirements.
