
 (1).svg)
 (1).png)


 (1).svg)
.svg)
Images play a crucial role in enhancing user engagement, adding visual appeal, and effectively breaking up extensive blocks of text. While indispensable, images can also present challenges, particularly due to their file size. Large image files are a common culprit for slow page load speeds, a factor that negatively impacts both user experience and search engine rankings. Given that search engines like Google prioritize fast-loading websites, mitigating this issue is paramount.
The solution lies in effective image optimization. This guide will thoroughly explain what image optimization entails, how it functions, and provide actionable strategies for optimizing images on your WordPress website, whether through manual methods or by utilizing specialized plugins. By implementing these techniques, you can ensure your website remains visually rich without compromising on performance.
What Is Image Optimization?
Image optimization is the process of reducing the file size of your images while maintaining an acceptable level of visual quality. The primary goal is to display high-quality images across your website without burdening pages with excessively large files that can impede loading times. This practice is fundamental for any website owner, as it stands out as one of the most effective strategies for significantly improving overall website speed.
A key advantage of image optimization is its accessibility; it typically does not demand advanced development skills, making it achievable for individuals with varying levels of technical expertise. Website owners have two main approaches: either meticulously managing and resizing each image manually before or after uploading, or leveraging an automated plugin to handle the optimization process efficiently for all images on the site.
Benefits of Optimizing Images
The practice of optimizing images offers several compelling advantages for any website. Fundamentally, it involves reducing image file sizes while carefully balancing this reduction against the preservation of visual quality. The overarching aim is to present stunning, high-quality visuals without the detriment of slow page loads caused by large files. This makes image optimization a crucial technique for boosting website performance.
Beyond technical improvements, optimized images deliver tangible benefits including faster page load times, an enhanced user experience, and significant improvements in search engine optimization (SEO).
Improves Page Load Times
As previously highlighted, a vast majority of web users prefer websites that load quickly. This preference is particularly pronounced among the growing demographic of mobile internet users. In today's fast-paced digital environment, users have minimal tolerance for sluggish web pages. Studies consistently demonstrate a direct correlation between page load speed and user behavior. For instance, pages that load in under two seconds tend to exhibit an average bounce rate of approximately 9%, whereas pages requiring five seconds to load can see bounce rates soar to 38%. Such significant increases in bounce rate directly translate into reduced user engagement and, ultimately, lower conversion rates for your website.
Enhances the User Experience
Swift page load times are crucial for enabling users to access content quickly and engage with your website without delay. Prolonged waiting periods can lead to user frustration, potentially causing visitors to abandon your site and seek alternatives. For websites designed to drive conversions, generate leads, or facilitate sales, every lost visitor is a missed opportunity and potential revenue loss. A seamless and responsive browsing experience is key to retaining visitors and guiding them through your desired user journey.
Improves Website SEO
Optimizing your images also significantly contributes to an improved search engine optimization (SEO) ranking. This is largely due to search engine algorithms, particularly Google's. As early as 2010, Google officially integrated page speed as a critical factor within its ranking algorithm. Consequently, websites with slower loading times face a considerable disadvantage in achieving top positions in Search Engine Results Pages (SERPs).
Even over a decade later, page speed remains an exceptionally vital metric in how search engines evaluate and rank websites. The principle is straightforward: faster-loading pages tend to achieve higher rankings, while slower pages are likely to rank lower. Fortunately, image optimization can be performed either manually through careful adjustments or by utilizing automated tools that streamline the entire process. This guide will further explore how you can efficiently optimize WordPress images, thereby enhancing your site's performance and search visibility without requiring extensive manual effort.
Types of Image Optimization
To achieve optimal performance for your website's images, there are three primary methods of optimization: selecting the appropriate file format, applying effective image compression, and adjusting the image dimensions. Each of these techniques plays a distinct role in reducing file size and improving load times.
Change Image File Format
Images are typically encountered in three principal file formats: PNG, JPEG, and GIF. While all of these can function on web pages, each is optimally suited for specific types of imagery.
- PNG (.png) files are excellent for images requiring high quality and transparency, such as logos, icons, or graphics with sharp edges. However, they generally result in larger file sizes. This format is often best utilized for lower resolution images like banners, infographics, or screenshots where clarity and detail are paramount.
- JPEG (.jpg or .jpeg) files are exceedingly common across the internet, primarily because they can undergo significant compression without a drastic loss in perceived quality, leading to much smaller file sizes. JPEGs are particularly well-suited for photographs, complex images with gradients, and detailed visuals found in website headers, blog posts, and product galleries.
- GIF (.gif) files represent another prevalent online format, most frequently employed for simple images, animations, or short video clips. Their limitation to an 8-bit color palette restricts their capacity for extensive color and fine detail. GIFs are effective for adding illustrative images within content, basic graphics, or short, looping animations.
Image Compression
Image compression is a technique that employs algorithms to decrease the overall file size of an image. The specific method of compression, whether lossy or lossless, dictates how the algorithm reduces data within the image file. Generally, this involves identifying and removing unnecessary data.
- Lossy compression significantly reduces file size by permanently discarding certain image data. While this can lead to a noticeable reduction in file size, it also means some loss of image quality, though often imperceptible to the human eye.
- Lossless compression, conversely, compresses the image data without removing any information from the file. This method allows the image to be restored to its exact original quality, making it ideal for images where absolute fidelity is critical. However, the file size reduction achieved through lossless compression is typically less dramatic than with lossy methods.
Both PNG and JPEG formats can utilize either lossy or lossless compression, depending on the specific tools and settings used, as well as the nature of the source image. GIF files, by their design, inherently use lossless compression.
Changing Image Dimensions
Adjusting the dimensions of an image represents another fundamental method for effective image optimization. Fundamentally, a larger image contains more pixel data, directly resulting in a larger file size. Therefore, scaling an image down to precisely the dimensions required for its display on a web page is an efficient way to minimize its file size. This ensures that browsers do not load an unnecessarily large image only to display it at a smaller size.
It is generally recommended to resize your images to their intended display dimensions using an image editing software before uploading them to your WordPress site. This proactive approach can significantly reduce initial file sizes. However, it's also possible to optimize and compress images both before and after they have been uploaded to your media library.
How to Optimize Images for WordPress
This guide will explore two primary methods for optimizing images within a WordPress environment, allowing you to choose the approach that best suits your needs and technical comfort level.
- Optimizing WordPress images manually, providing granular control over each visual asset.
- Optimizing images using a specialized WordPress plugin, offering automated and streamlined solutions.
Let's delve into these techniques to enhance your website's performance.
How to Optimize Images for Web Performance
With a foundational understanding of image optimization established, let's now transition to practical implementation. This section will guide you through manual image optimization techniques, including detailed steps for using professional software like Photoshop, and convenient online tools.
Optimize Images Manually
For those who prefer a hands-on approach, manually optimizing images before uploading them to your WordPress website offers precise control. This involves meticulously resizing and cropping images to their appropriate dimensions. A crucial first step is to ascertain the maximum display size for images on your site to ensure you don't upload files larger than necessary. The maximum display size refers to the largest resolution at which an image will be rendered on a web page. While recommendations can vary, a common guideline suggests dimensions around 1200 x 628 pixels for header images and between 640 x 480 and 1024 x 768 pixels for standard in-content images.
Optimizing Images with Photoshop
Adobe Photoshop stands as a leading professional image editor, making it an excellent tool for manual image optimization. Here's a step-by-step guide to optimize an image using Photoshop:
- Open Photoshop and navigate to File > Open.
- Select the image you wish to optimize to load it into Photoshop.
- From the top menu, choose Image > Image Size.
- Adjust the desired height and width for your image, ensuring it aligns with your website's display requirements.
- In the same Image Size menu, set the Resolution (typically 72 pixels/inch for web).
- Proceed to File > Export > Save For Web (Legacy).
- In the 'Save For Web' dialog, select JPEG as the file format.
- Set the image quality value to a range between 40 and 60. This often requires some experimentation to find the optimal balance between file size and visual fidelity.
- Ensure the Progressive and Embed Color Profile options are selected.
- Convert the image to sRGB color profile if prompted, then save the optimized file.
Optimizing Images with Online Tools
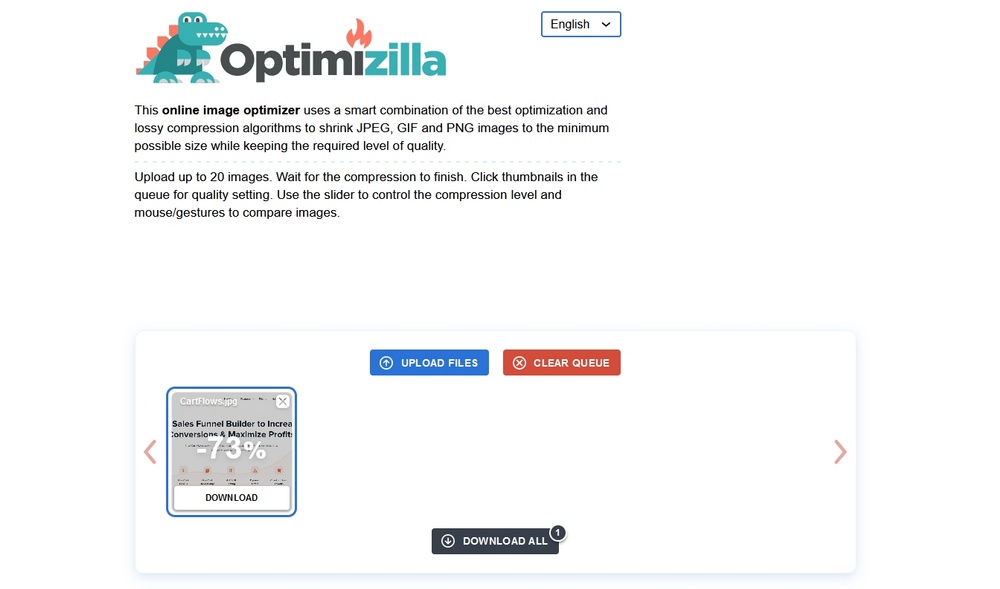
For those without access to professional image editing software, or who prefer a more streamlined process, numerous online tools offer efficient image optimization services. These platforms are typically user-friendly, providing a quick and hassle-free alternative to manual editing. Many operate by allowing you to upload an image, which then undergoes automatic compression and optimization.
An example of such a tool is Optimizilla. Here's how to use it:
- Navigate to the Optimizilla website.
- Simply drag and drop your image file into the designated area in the center of the page. The optimization process will commence automatically.
- Once optimization is complete, select the 'Download' option associated with your image to retrieve the compressed file.
During or after the optimization, you will often see a percentage indicating the extent to which the file size has been reduced. A higher percentage signifies a greater reduction in file size, leading to faster loading times.
Use a WordPress Plugin to Optimize Images
For users who prefer an automated and less labor-intensive approach, installing a dedicated WordPress image optimization plugin is an excellent solution. These plugins are designed to handle various optimization tasks automatically, often performing functions equivalent to or beyond manual methods. While a specific plugin is used for demonstration in this guide, it's worth noting that many reputable image optimization plugins are available, each offering similar core functionalities with potentially varying features and interfaces.
Installing an Image Optimization Plugin
Installing an image optimization plugin is a straightforward process. For example, a popular choice typically requires registration with an email address for activation, but its general usage is very intuitive. A free version is often available, which is sufficient for many users and can be used for demonstration purposes. Here’s a general outline of the installation steps:
- Log into your WordPress website’s administration dashboard.
- Navigate to Plugins and then click on Add New from the side menu.
- Use the search box, usually located at the top right, to search for your chosen image optimization plugin (e.g., "image optimizer").
- Once located, click Install Now and then Activate when those options appear.
Upon activation, you will likely be prompted to sign up for an API key, which is essential for the plugin to function correctly. This key facilitates communication between your website and the plugin's optimization services.
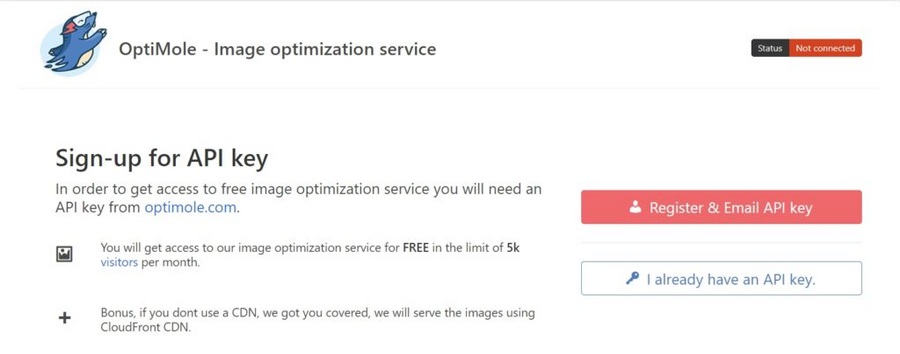
- Follow the on-screen instructions to register and receive an API key via email.
- Paste the received API key into the designated field within the plugin's setup window and confirm.
- If the setup window doesn't automatically appear, you can usually access it by navigating to Media > [Plugin Name] in your WordPress dashboard.
After successfully entering the API key, you will typically see a connection screen as the plugin syncs with its services. Once this process is complete, you should be ready to utilize the available features to begin optimizing your website's images.
Optimizing Images with a Plugin
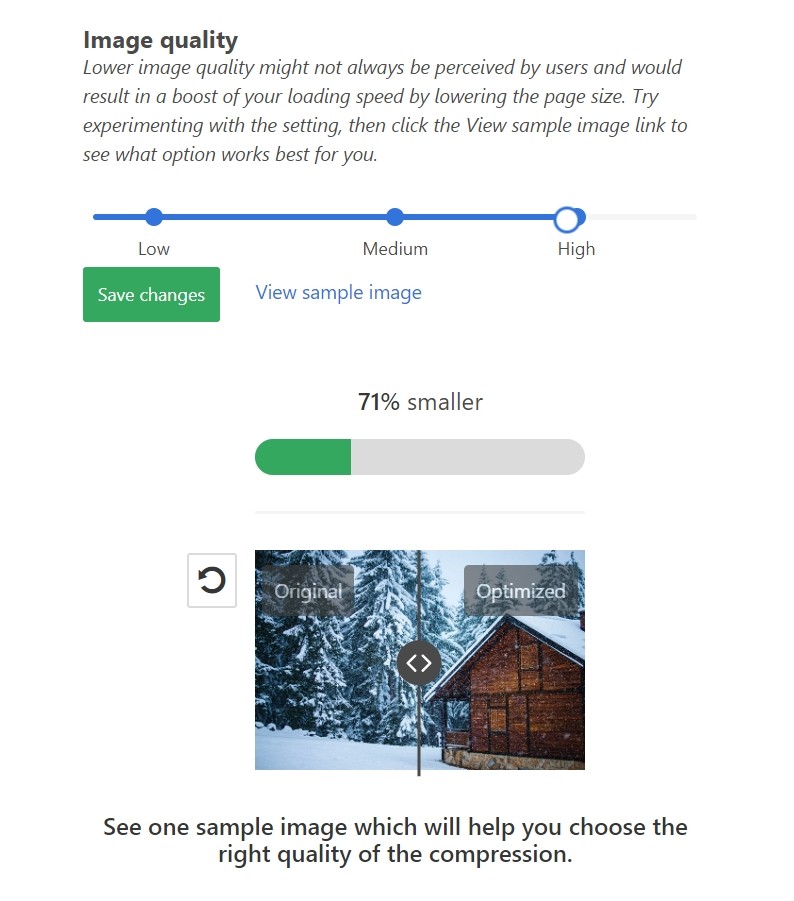
Once an image optimization plugin is successfully installed and configured, the process of optimizing your website's visuals becomes highly automated. A significant advantage is that many plugins will automatically optimize any new images you upload. This means you can continue your regular content creation workflow, and the plugin will seamlessly scan and optimize these images in the background without requiring further manual intervention.
For existing images already present on your WordPress site, these plugins typically handle optimization dynamically rather than all at once. For instance, images might be optimized "on-the-fly" when a page or post containing them is first visited by a user. This strategy prevents overloading the server and allows for a more gradual and efficient optimization process.
Furthermore, such plugins often transfer your original images to a cloud-based service, replacing their initial links with optimized versions. These optimized images are then frequently delivered through a Content Delivery Network (CDN), which significantly speeds up their delivery to users worldwide. When inspecting an image on a page, you might notice that its URL reflects this custom, optimized path.
While the default settings of most image optimization plugins are often quite effective, you usually have the flexibility to adjust them. This can typically be done within a dedicated settings menu, often found under Media > [Plugin Name] > Settings tab in your WordPress dashboard. Within this settings interface, you can fine-tune various options. Free versions may offer limited customization, but premium subscriptions usually unlock a comprehensive suite of general and advanced configuration choices, allowing for highly tailored optimization strategies.
Benefits of Image Optimization Plugins
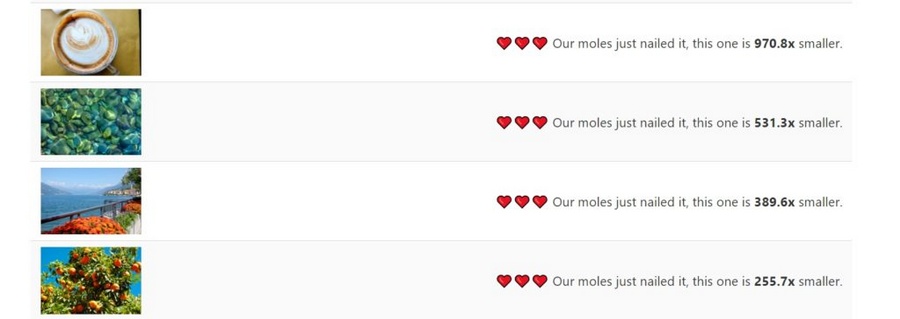
Image optimization plugins offer a multitude of advantages, primarily centered around their ability to significantly reduce image file sizes, thereby improving page load speeds. While manual optimization is a viable option, as discussed, these plugins automate the arduous task of compressing and resizing every image. The convenience of having a plugin handle this 'heavy lifting' automatically eliminates the need for repetitive manual adjustments, freeing up valuable time and effort.
An additional, notable benefit offered by many image optimization plugins is their integration with a Content Delivery Network (CDN). A CDN functions by hosting copies of your website's static assets, including images, on servers strategically located across the globe. Through intelligent routing, the CDN selects the server geographically closest to each visitor to deliver the content. This distributed delivery mechanism drastically reduces latency and wait times, leading to a much faster and more responsive browsing experience for users, regardless of their location.
Image Optimization Tests – Before and After

To illustrate the effectiveness of automatic image optimization, let's conduct a series of tests. While WordPress inherently downscales high-resolution images to some extent, we will demonstrate how a dedicated image optimization plugin can achieve even more substantial reductions. This section presents a clear before-and-after comparison using the same set of images to highlight the impact of optimization.
Results Before Image Optimization
For this initial test, a fresh WordPress instance was set up using a default theme. Several high-resolution photographs of varying original file sizes, sourced from a stock photo library, were uploaded and embedded within a standard blog post using a gallery block. This setup allows us to observe WordPress's default image handling.

Upon examining the images in their enlarged state, it was observed that WordPress automatically performs a degree of resizing. The original large files were reduced as follows:
- Original Size: 7.47 MB > Display Size: 676 KB
- Original Size: 12.3 MB > Display Size: 762 KB
- Original Size: 11.2 MB > Display Size: 384 KB
- Original Size: 8 MB > Display Size: 794 KB
When the first image (originally 7.47 MB) was uploaded to a standard post without the option for users to enlarge it, its display size was further reduced to 452 KB. This demonstrates WordPress's native capability to scale images for optimal display within content.

Significantly, when the same blog post was accessed from a mobile device, the image was automatically scaled down even further, to a mere 92.61 KB. These results highlight the inherent, default image resizing functionalities that WordPress applies when content is viewed on different devices and contexts.
Results After Plugin Image Optimization
Now, let's observe the impact of an image optimization plugin on image compression. Mirroring the initial test, a gallery block was created using the same set of unoptimized pictures. Many plugins offer various compression levels, typically ranging from 'High Quality' to 'Low Quality'. A 'High Quality' setting aims to preserve as much visual fidelity as possible, while a 'Low Quality' setting implements more aggressive compression, leading to greater file size reductions.
Upon visiting the post on the live website with the plugin active, it dynamically takes over, generating compressed alternatives for each image. With a high-quality compression setting, the same images from the previous test were significantly reduced:
- Original Size: 7.47 MB > Optimized Size: 557 KB
- Original Size: 12.3 MB > Optimized Size: 548 KB
- Original Size: 11.2 MB > Optimized Size: 220 KB
- Original Size: 8 MB > Optimized Size: 547 KB
When switching to a low-quality compression setting, the reductions become even more pronounced:
- Original Size: 7.47 MB > Optimized Size: 251 KB
- Original Size: 12.3 MB > Optimized Size: 269 KB
- Original Size: 11.2 MB > Optimized Size: 124 KB
- Original Size: 8 MB > Optimized Size: 302 KB
To visually compare the impact of these settings, here's how the first image appears after both levels of compression:
High-quality level (557 KB)

Low-quality level (251 KB)

Remarkably, to the unaided eye, the perceived quality of the image remains largely consistent across both compression levels, demonstrating the efficiency of these tools.
Furthermore, when an image is embedded into a blog post without an enlargement option, the plugin will automatically resize and optimize it to the maximum display dimensions required for that context. For instance, the aforementioned 7.47 MB image, when displayed in a single blog post, was automatically converted to a mere 75.3 KB using high-quality compression:

Single post image compressed to 75.3 KB
580 x 387 pixels

This intelligent handling ensures that your server only loads the appropriately sized image, rather than the full-resolution version when a smaller display is sufficient. This benefit extends significantly to mobile users. For mobile screens, these plugins intelligently create and deliver even smaller, optimized alternative versions of images. This means that a user accessing your site on a smartphone won't be burdened with loading a desktop-optimized image, which, even if optimized, might still be too large for a mobile device. Instead, the plugin serves a dedicated mobile-optimized image. For example, the same image in the blog post that was 7.47 MB originally was reduced to a mere 20.15 KB for mobile users.

These plugins typically employ both lossless and lossy compression methods, with the choice often dictated by the selected compression level. Lossless optimization ensures that images retain all their original data during compression, appearing identical to the source image post-optimization. While this preserves perfect quality, the reduction in file size is usually less dramatic. Conversely, lossy optimization achieves substantial file size reductions by carefully discarding data that is largely imperceptible to the human eye. If your objective is to significantly lighten your database and improve loading times without a noticeable drop in visual quality for your visitors, lossy optimization is often the preferred choice.
Other Ways to Optimize Images
Beyond the fundamental techniques of resizing and compression, several advanced methods exist to further enhance image delivery, providing lighter files to your visitors and significantly improving your website’s loading performance.
Lazy Loading
Lazy loading is a powerful technique that prevents images from impeding your website's speed, especially on content-rich pages. Instead of loading all images simultaneously when a page loads, lazy loading defers the loading of off-screen images until the user scrolls them into the viewport. This means that initial page load times are significantly reduced because the browser only fetches the images that are immediately visible. As the user scrolls down, new batches of images are loaded just before they become visible on the screen. This approach optimizes server requests, enhances overall responsiveness, and conserves bandwidth, resulting in a smoother and faster browsing experience.
SVGs and Vector Images
Scalable Vector Graphics (SVGs) represent a distinct category of image formats, differing fundamentally from raster-based images like PNGs and JPEGs. Unlike raster images, which are composed of pixels, SVGs are vector images defined by mathematical equations. This intrinsic design allows SVGs to be infinitely scaled up or down to any size without any loss of quality or introduction of pixelation, all while maintaining relatively small file sizes.
This scalability makes SVGs exceptionally versatile and ideal for responsive web design, as a single SVG file can be perfectly rendered across diverse screen sizes and resolutions without distortion or blurriness. Furthermore, SVGs generally require fewer HTTP requests to load, contributing to faster page rendering. They are also text-based and readable by search engines, offering a minor but valuable SEO advantage, especially for icons, logos, and intricate illustrations.
Use a Content Delivery Network (CDN)
A Content Delivery Network (CDN) is a distributed network of servers designed to serve website content, including images, to users from the server geographically closest to them. This dramatically reduces the physical distance data has to travel, directly translating into significantly faster loading times for your website visitors. Many image optimization plugins often include an integrated CDN service specifically for images, functioning automatically once configured.
Beyond image-specific CDNs, independent services are available that provide comprehensive CDN capabilities for your entire website database. These services cache your site's content across their global network, ensuring that all aspects of your site, not just images, are delivered with optimal speed and efficiency to users around the world. Implementing a CDN is a powerful strategy for enhancing global website performance and user experience.
Convert GIFs to Video
To further conserve disk space and ensure lighter files for your visitors, converting Graphics Interchange Format (GIFs) to video formats is an effective strategy. Some image optimization plugins offer a feature that automatically converts uploaded GIF files into more efficient video formats like MP4 or WebM. The plugin typically intelligently selects the most suitable and efficient video format for each specific GIF during the conversion process.
Alternatively, numerous online tools are available that allow you to manually convert GIFs to MP4 or other video formats before uploading them to your WordPress site. The rationale behind this conversion is simple yet impactful: video formats are inherently more efficient and result in significantly smaller file sizes compared to traditional GIF formats, leading to faster loading times and better performance.
Smart Cropping
Smart cropping refers to the intelligent process of trimming an image to eliminate superfluous space or background elements, thereby focusing exclusively on the primary subject or "point of interest." This technique can be performed manually using image editing software, requiring careful judgment from the user.
However, more advanced image optimization plugins often integrate smart cropping functionalities. These tools leverage algorithms to automatically identify and prioritize the most important areas within an image, then intelligently remove unnecessary surrounding parts. This automated approach ensures that your visuals remain impactful and concise, contributing to smaller file sizes and a more polished presentation without manual effort.
Wrapping Up
Image optimization, whether executed manually or through the convenience of a plugin, is a relatively straightforward technique with a profound impact on website performance. The critical takeaway is not how you optimize your images, but that you commit to doing it consistently. Neglecting image optimization can have serious repercussions, as excessively large files invariably lead to sluggish web pages.
Such slow loading times are detrimental in multiple ways: search engines like Google will penalize your site's ranking, and more importantly, impatient users will quickly abandon a slow-loading site. In today's highly competitive online landscape, every advantage counts. Given that image optimization is both highly effective and surprisingly simple to implement, it is an indispensable strategy for any website owner looking to enhance user experience and improve search engine visibility.
