 (1).svg)
 (1).png)


 (1).svg)
.svg)
WordPress plugins offer an incredible array of features and functionalities, making them indispensable tools for enhancing any website. However, despite their utility, plugins are frequently the root cause of site errors, bugs, crashes, performance degradation, and even critical issues like the infamous white screen of death.
Indeed, if you've managed to avoid experiencing a white screen of death or logging in to find visual glitches where your gallery slider or buttons should be—all due to a plugin issue—then you're among the fortunate few!

It's widely acknowledged that poorly coded or incompatible plugins can create significant problems. Numerous resources exist to guide users on selecting appropriate plugins, maintaining regular updates, and addressing issues when plugins don't function as expected.
However, what remains less clear for many are the intricacies of plugin conflict scenarios and the most effective ways to resolve them.
Since plugins are developed by various individuals and teams, guaranteeing that the code of one plugin will not conflict with another plugin, a theme, or even the core WordPress version is virtually impossible. Consequently, if your website utilizes a range of plugins, it's almost inevitable that a conflict will eventually lead to visual or functional errors on your live site. This makes it crucial to be prepared.
Therefore, even if your website is currently running smoothly, adopting both preventive measures and developing strong troubleshooting skills is vital to effectively tackle conflicts when they inevitably arise.
What Are Plugin Conflicts and Why Do They Happen?
As the term implies, plugin conflicts occur when two or more WordPress plugins clash with each other. Additionally, conflicts can arise between a plugin and your active theme, or sometimes even with your specific version of WordPress itself.
Generally, the more intricate or critical the components involved in the conflict, the greater the potential impact on your website. If a primary plugin or your main theme is embroiled in a significant conflict, the outcome is likely to be substantial visual or functional disruption.
Why Do Plugin or Theme Conflicts Occur?
Technically speaking, a conflict happens when different pieces of code attempt to execute commands that either restrict or directly contradict one another. Although every plugin and theme is designed for distinct purposes, conflicts can arise for several reasons:
- A resource conflict might emerge between two complex plugins, such as those managing e-commerce inventory and billing, due to their extensive codebases.
- Poorly written code in one plugin could inadvertently restrict the functionality of others, causing widespread issues across the site.
- An updated version of a plugin might prove incompatible with your current theme.
- An automated batch update could initiate a functional disagreement between two or more plugins, where each tries to execute conflicting commands affecting the same operational part of your live website.
This list is not exhaustive. In essence, conflicts can stem from a multitude of factors, ultimately depending on the quality of the code behind each plugin or theme and the efforts made by their developers to prevent potential incompatibilities.
Recognizing Conflicts: What Do Conflict Errors Look Like?
Given the diverse reasons plugin conflicts can occur, the errors they trigger can manifest in a wide variety of forms. From causing parts of a website to display incorrectly or behave erratically, to unleashing the dreaded white screen of death, plugin conflicts are frequently the underlying cause of such issues.
While plugin conflicts are a common reason for errors on WordPress sites, identifying a conflict solely by examining the error message can be challenging. Therefore, instead of fixating on the error itself, for troubleshooting purposes, it's more productive to assess the level of access and control you retain over your website.
In other words, conflicts typically impact your website in two primary ways:
- They cause errors on your live website but still allow you to access your admin panel and the rest of your site.
- They trigger the White Screen of Death (WSOD), leading to a complete site crash and locking you out of your admin panel.
It's important to remember that both these types of errors can also be caused by other factors. For example, a series of visual bugs might result from an outdated plugin or an incompatible theme. Similarly, a WSOD could occur because your server has reached its memory limit. Nevertheless, whenever something breaks on your website and initial troubleshooting steps prove ineffective, it's highly probable that a plugin conflict is the underlying culprit.
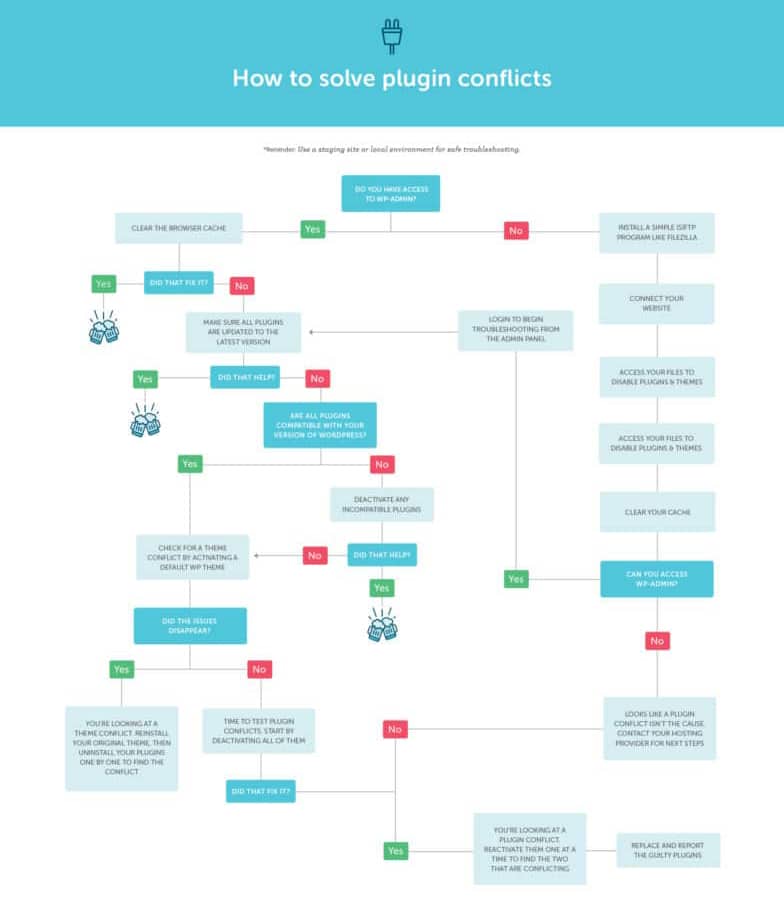
How to Fix Conflicts When You Have Access to Your Admin Panel
Regardless of the specific issues you're encountering on your website, retaining access to your admin panel means the situation is far from insurmountable. The following troubleshooting steps will guide you through identifying conflicts, pinpointing the problematic plugins (or theme), and resolving the errors—all directly from your WordPress admin panel. Below is a quick summary of the process, followed by more detailed explanations for each step.
To fix plugin conflicts while you have access to your admin panel:
- Clear your browser cache.
- Ensure all your plugins are updated.
- Determine if the issue is a plugin conflict by ruling out compatibility problems with your WordPress version or active theme (a staging site is highly recommended for this).
- Identify the specific plugins causing the conflict, either by using your browser console or by manually deactivating and reactivating each plugin one by one.
- Consider replacing one or both of the conflicting plugins, and report the bug to their respective developers.
1. Clear Your Browser Cache
It's common for your browser's cache to store older code, preventing it from reflecting new changes, especially after plugin updates. Clearing your cache ensures you're viewing the most current version of your site.
If you're using Chrome, press ‘Ctrl+Shift+Del’ (Windows/Linux) or ‘Cmd+Shift+Del’ (Mac) → Select ‘Cached images and files’ → Click ‘Clear data’. On Safari, press ‘Option+Command+E’ → Select ‘Empty’.
2. Ensure All Your Plugins Are Updated
Log in to your admin area and verify that all your installed plugins are updated to their latest available versions. Developers often release updates to fix bugs and improve compatibility.
3. Check for Plugin vs. WordPress Version Conflicts
First, you'll want to confirm if your active plugins are compatible with your current WordPress version. You can do this in two ways:
- Utilize a plugin designed to pinpoint compatibility issues, highlight important pending updates, and more. Search the WordPress plugin repository for "plugin compatibility checker".
- Manually check by visiting the plugins section in your WordPress dashboard and reviewing each plugin’s compatibility information one by one.

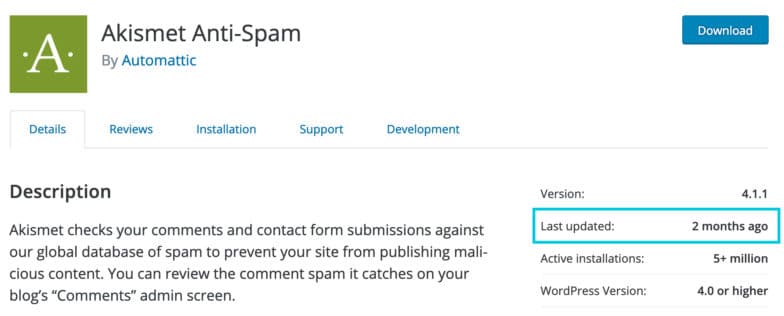
Manually checking compatibility for each plugin.
Deactivate any incompatible plugins you find. Then, return to your website and check if everything has returned to normal. If the issues are resolved, it clearly indicates that a conflict between a plugin and your WordPress version was the cause. If the errors persist, proceed to the next step.
4. Check for Plugin vs. Theme Conflicts
Next, you’ll need to ensure that there are no compatibility issues between your plugins and your active theme. To begin detecting a theme conflict, switch your site’s theme (preferably on a staging environment) to a default WordPress theme.
From your admin page, navigate to ‘Appearance’ → ‘Themes.’ Once there, ‘Activate’ a popular default theme, such as one of the "Twenty" series themes. Now, check your website. If the issues disappear after changing the theme, then you have identified a theme conflict. For the time being, switch your live website’s theme to a default one as well.
To pinpoint the conflicting plugin, revert to your staging site, reactivate your previous theme, and then deactivate your plugins one by one until the error vanishes. If it does, you will have successfully isolated the problematic plugin.
At this point, you have a choice: you can decide whether to keep the plugin or the theme. In either scenario, it’s advisable to contact the developers to report the issue; they might be able to provide a fix or guidance.
Conversely, if the errors persist even after switching themes, then your original theme is likely not the cause. In this situation, your website is most probably experiencing a conflict between two plugins. If this is the case, reactivate your preferred theme and move on to the next step.
5. Check for Plugin vs. Plugin Conflicts
Now that you have ruled out potential theme and WordPress version conflicts, your focus should shift to your installed plugins. Begin by deactivating all of them.
Go to the Plugins page in your dashboard. Select all plugins by checking the box next to ‘Plugins’. From the ‘Bulk actions’ drop-down menu, select ‘Deactivate’ and apply.
Return to your website and verify if the issues are still present.
If the error disappears after deactivating all plugins, then congratulations! You have successfully identified a plugin conflict. If the error persists, however, it’s safe to conclude that none of your plugins are at fault. In this rare case, you might need to investigate .htaccess errors or reach out to your hosting provider and development team for further assistance.
6. Find the Guilty Plugins
If your browser console doesn’t provide helpful clues, you’ll need to manually identify the problematic plugins. For this, you will reactivate your plugins one by one, carefully checking when the issue reappears.
Instead of starting randomly, begin by reactivating your essential plugins first, or those that seem directly related to the issue you’re experiencing. Reactivate one plugin at a time and continuously check your staging site’s behavior.
The moment the issue reappears, you have identified one of the conflicting plugins.
To find the other, keep the first identified conflicting plugin activated. Then, deactivate the previously reactivated plugins, again one at a time. In this process, when the issue disappears upon deactivating another plugin, that specific plugin is clearly the second conflicting party.
7. Replace and Report the Guilty Plugins
Once you have identified the conflicting plugins, you can choose to either deactivate both or the less essential one. You might also explore finding alternative plugins or custom code snippets that can provide similar functionality without causing conflicts.
In parallel, it’s highly recommended to contact the developers of both plugins via email or support forums. Share detailed information about the conflict, including screenshots of your troubleshooting steps. Most plugin and theme developers strive to improve their products, so they should be receptive to resolving the issue or at least providing valuable insights.
How to Fix a Conflict That Causes Your Site to Crash
The infamous white screen of death or a complete site crash is undoubtedly one of the most dreaded scenarios for WordPress site owners. What makes it particularly alarming is that site crashes often result in losing access to the admin panel, which can feel quite frightening.
However intimidating this situation may seem, the good news is that there are several proven methods to regain access to your website and admin panel, even when they appear to be entirely down. The following steps outline one such method: the Secure File Transfer Protocol (SFTP) approach. This method is accessible even for users with limited technical expertise, allowing them to access their website files and resolve conflicts with relative ease. Below is a quick summary of what you need to do, followed by detailed instructions for each step.
To fix plugin conflicts when you do not have access to your admin panel (or see a white screen):
- Install an SFTP program, such as a popular client like FileZilla.
- Connect to your website using SFTP.
- Access your site files via SFTP to temporarily disable themes and plugins.
- If you regain site access, log in to your admin panel to continue troubleshooting as described in the previous section.
- If your site remains down, contact your hosting provider for further assistance.
1. Install a Simple SFTP Program
SFTP clients, such as a widely used one like FileZilla, enable you to access your site’s files remotely from your computer. This is typically done by downloading a standalone software application and logging in with your website’s credentials.
Visit the website of your chosen SFTP client and install the latest version.
2. Connect Your Website
Upon opening your SFTP program, you will usually find a QuickConnect option. Click on it and enter your site’s credentials to establish a connection and gain access to its files. You will typically need:
- Your host name
- Your username
- Your password
This information should have been provided by your hosting provider when you initially set up your website. If you cannot locate it, your hosting provider’s support team will be able to assist you.
3. Access Your Files to Disable Plugins and Themes
Once your website is connected through the SFTP client, you will see a ‘Remote Site’ panel, usually on the right-hand side. Navigate to the ‘public_html’ folder. This directory contains your website’s core files and other directories on the server.
Within ‘public_html’, locate the ‘wp-content’ folder. This is where you will find both your plugins and themes files. To deactivate all your plugins at once, simply rename the ‘plugins’ folder to something else, such as plugins-deactivated or plugins-renamed. Do the same with the ‘themes’ folder to temporarily disable your current theme.
Your website will automatically revert to a default theme and no activated plugins. Clear your browser cache and check your website again. If a plugin or theme conflict was the cause of the site crash, your website and admin panel should now be accessible!
Once you regain access to your WordPress admin area, you can proceed with troubleshooting as if you had access all along, by following the steps outlined in the previous section. If, despite deactivating your plugins and themes, your site remains down, then another factor is behind the site crash. In this scenario, it is advisable to contact your hosting provider, as you might have exceeded your server’s memory limit or encountered another server-side issue.
Prevention Tips: How to Avoid Plugin Conflicts
Now that you are equipped with the knowledge to troubleshoot your way out of a plugin conflict, you’ll naturally want to prevent such issues from recurring. While it might be challenging to completely avoid conflicts if you're managing numerous plugins, adopting certain preventive measures can significantly reduce their frequency and impact.
To prevent WordPress plugin conflicts and the white screen of death:
- Implement regular website backups.
- Never make direct changes to your live website.
- Keep plugins updated and avoid using outdated ones.
- Exercise caution with batch or auto-updates.
- Limit the number of plugins you use to only those that are truly essential.
1. Establish a Healthy Backup Practice
Consider website backups as crucial fail-safes against any form of disaster on your live site. By consistently creating regular backups of your website, you automatically gain a significant advantage in mitigating the impact of any potential conflict error.
For your backup strategy, you can choose to:
- Select a reliable backup service offered by your hosting provider.
- Install a reputable third-party backup plugin.
- Manually back up your site files and database.
It goes without saying that having an accessible backup allows you to easily restore your website whenever something goes wrong, minimizing downtime and data loss.
2. Never Make Changes to Your Live Website
When it comes to installing or updating plugins, themes, or your WordPress core version, the temptation to perform these actions directly on your live website can be strong, especially if you haven't encountered issues previously. However, to truly prevent conflicts and maintain site stability, it is highly recommended to set up a staging or local site. This is essentially a clone of your live production site where you can safely implement changes and test them thoroughly before deploying them to your live environment.
This process is often simpler than it sounds, and many hosting providers offer built-in staging environments or tools to facilitate this.
3. Stay Updated and Avoid Outdated Tools
While new updates can occasionally introduce unforeseen bugs (which is precisely what a staging environment helps detect!), running older versions of your plugins, theme, or even your WordPress core version poses a far greater risk. Not only is it vital for the general health and security of your site, but keeping everything updated also helps prevent bugs and conflicts.
This principle also means you should actively avoid outdated plugins or those that haven't received any recent updates, for instance, in the past six months or more. Such plugins may contain security vulnerabilities or compatibility issues with newer WordPress versions.
4. Avoid Running Batch and Auto-Updates
Automation can be appealing, and scheduling or selecting a batch of plugin updates to run simultaneously might seem like a time-saver. However, this practice comes with its own drawbacks. Conflicts are most frequently triggered following batch updates. Moreover, if a conflict does occur, you'll face the time-consuming challenge of identifying which specific plugins are at fault.
To minimize conflicts, it’s advisable to update each plugin individually and carefully check for any signs of errors after each update. This methodical approach allows you to immediately pinpoint which plugin, if any, is causing a conflict.
5. Less Is More
One of the most effective strategies to prevent plugin conflicts is, quite simply, to minimize your reliance on plugins. While it may not be entirely feasible to avoid plugins altogether, you should only consider keeping those that are absolutely essential for your website’s functionality.
In many other situations, the functionality provided by a plugin can be achieved through small code snippets or custom development. Consulting with a developer to implement these solutions is often a more robust and conflict-resistant approach than depending on numerous third-party plugins.
Wrapping Up
To summarize, while plugins are invaluable assets for WordPress websites, they do come with their own set of potential challenges. Hopefully, this article has provided you with the necessary tools and understanding to successfully isolate and resolve plugin conflicts on your website, as well as a deeper insight into why they occur.
Furthermore, by continuously honing your troubleshooting skills and adhering to these best practices, you are taking significant steps toward maintaining a more stable and error-free website environment.
