 (1).svg)
 (1).png)


 (1).svg)
.svg)
cPanel
cPanel is a web-based control panel designed to simplify website management. It offers an extensive suite of features, allowing users to control virtually every aspect of their online presence. This platform provides a user-friendly and intuitive dashboard, regularly updated with improvements and robust security measures. For a deeper understanding, explore what cPanel entails.
Utilizing cPanel, you gain the ability to effortlessly connect domain names to your hosting account, establish personalized email accounts, and install popular Content Management Systems like WordPress. It also facilitates essential tasks such as website backups, file and image uploads, monitoring bandwidth and usage statistics, adjusting security configurations, and installing various add-on applications.
For new cPanel users, a dedicated introductory video series is available. These resources are designed to guide you through the initial steps of setting up and managing your cPanel account. The series covers fundamental topics such as logging into your cPanel interface, navigating its main features, and performing common tasks like creating email accounts or uploading files. These videos are also integrated into the comprehensive cPanel Tutorials playlist.
Watch Our Video About cPanel Hosting Services
cPanel Basics Playlist
cPanel Tutorial Playlist
The comprehensive cPanel Tutorial Playlist offers a collection of videos designed to assist both new and experienced users in effectively managing their cPanel account features. This playlist delves into topics such as how to log in to your cPanel account, navigating the main cPanel interface, and executing various simple and advanced tasks across cPanel's diverse functionalities.
The cPanel Interface
Logging In to cPanel
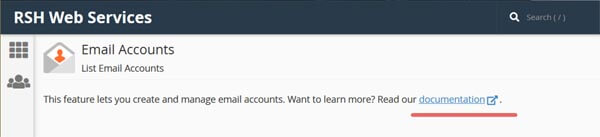
To access your cPanel, navigate to the provided URL and enter your designated cPanel username and password. Should you require further assistance, comprehensive documentation is readily available directly within the cPanel interface, typically accessible from the top section of each page. For example:
Upon successful login, you will be presented with a screen similar to the image below:
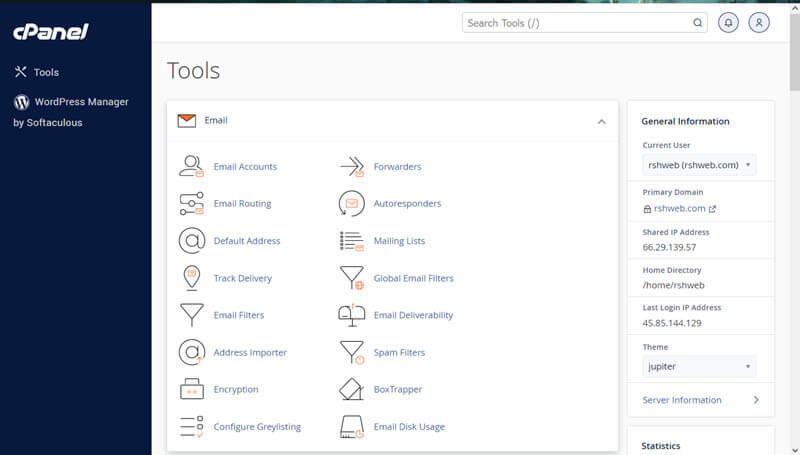
This interface represents the latest version of cPanel, featuring the modern Jupiter theme.
Navigation Bar
Positioned in the top right corner of the screen, the navigation bar provides quick access to essential features. It includes a convenient search field, a link to manage your user preferences, a notification bell, and a prominent logout option.

The integrated search field offers a streamlined method for locating specific functionalities within cPanel, significantly enhancing navigation efficiency.
The user preferences link enables you to modify your password, select your preferred language, update your contact information, and even reset page settings with a single click, allowing for personalized control over your cPanel experience.
The notification bell serves as a central hub for receiving important updates regarding your hosting environment and relevant service messages.
The logout link provides a straightforward exit from your session. For enhanced security, it is highly recommended to always log out of cPanel once you have completed your tasks.
Reorganizing cPanel's Homepage
To optimize your view, you have the flexibility to collapse individual sections on the cPanel homepage by simply clicking the up or down arrow located in the top right corner of each module.
Furthermore, cPanel allows you to personalize your dashboard by dragging and dropping entire sections, enabling you to position frequently used tools and information prominently at the top for quick access.
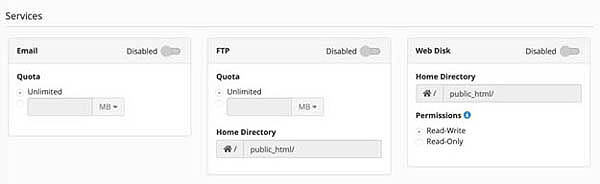
When managing user permissions, you'll encounter options for Email, FTP, and Web Disk. Email settings enable you to activate or deactivate email accounts for specific users and allocate a maximum storage quota for each. FTP permissions allow you to control user access to your hosting environment via File Transfer Protocol. Here, you can define which directories a new user can access and impose storage limits. Web Disk permissions are generally recommended for top-level administrative accounts due to their comprehensive nature. "Read Write" access grants users full authority within a designated directory, including the ability to delete files, whereas "Read Only" access restricts users to merely reading, downloading, and listing files.
Managing Domain Names
The Domains section within cPanel serves as your central hub for all domain-related management. Here, you can effortlessly add new domain names, oversee your existing domains, configure subdomains, and even establish simple web pages for your domains.
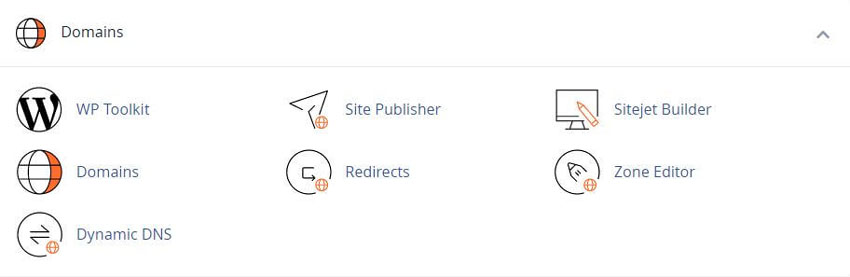
Adding a New Domain Name
To integrate a new domain name into your cPanel account, navigate to the "Add-on Domains" section and click on it.
An add-on domain effectively allows you to host multiple fully functional websites under a single cPanel account, providing a convenient way to manage several online presences from one central control panel.
Upon reaching the Add-on Domains screen, you will be prompted to input your new domain name along with a few other essential configurations.
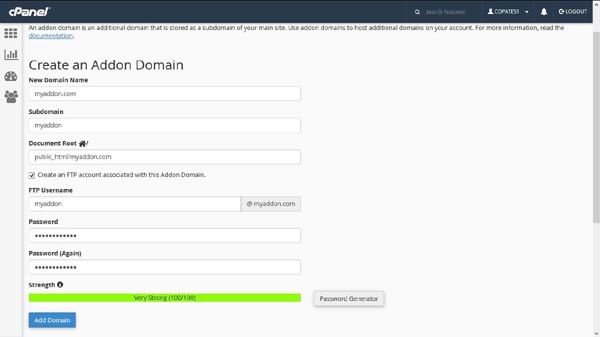
You will typically encounter the following fields:
- New Domain Name: Enter the precise domain name you have already registered. Note: The "www" prefix, often associated with domain names, is generally not part of the domain itself. Therefore, avoid adding "www" when configuring your domains in cPanel.
- Subdomain: This field will automatically populate once you enter your new domain name. cPanel utilizes this for internal routing purposes.
- Document Root: This specifies the server location where your new domain's files will reside. While it is automatically filled, you have the option to modify it if necessary to suit your specific setup.
Once all details are entered, click "Add Domain" to finalize the process.
Email Accounts and Settings
One of the most valuable features of a cPanel-enabled website is the capability to create personalized email accounts using your own domain name.
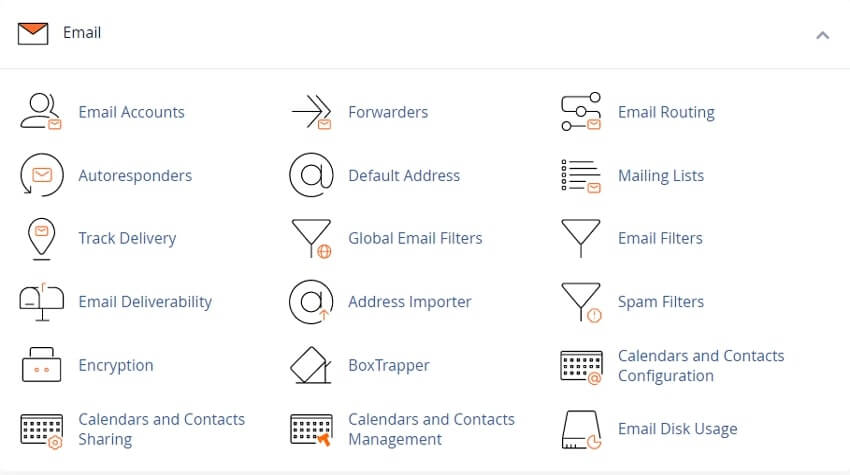
Within this section, you can efficiently create new email addresses, set up email forwarders and autoresponders, and manage spam filtering, among other comprehensive email management functions.
Setting Up an Email Account
To establish a new email account, navigate to and click on "Email Accounts." This will present you with the "Add Email Account" screen.
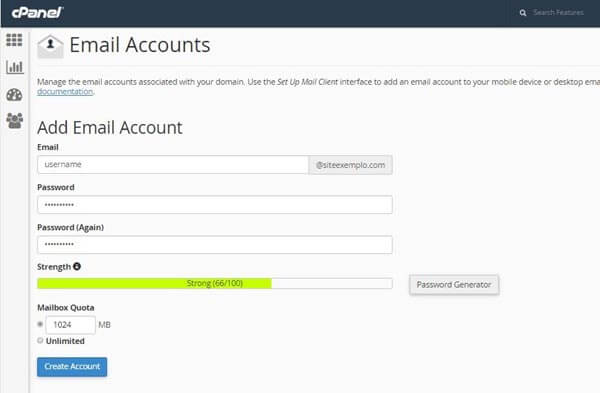
You will need to provide the following information:
- Email: Enter the desired username for the email account (e.g., "admin" or "your_name").
- Domain: Select the appropriate domain name from the provided drop-down menu.
- Password: Create a strong and secure password for the email account.
- Mailbox Quota: Define the storage limit for this mailbox. It is important to remember that email accounts consume space on your website's server. While unlimited access might be appealing, a reasonable allocation, such as 0.5 GB (500MB), is often sufficient and helps manage server resources effectively.
Once successfully created, the new email account will appear in the list under the "Email Accounts" tab, alongside any other existing accounts.
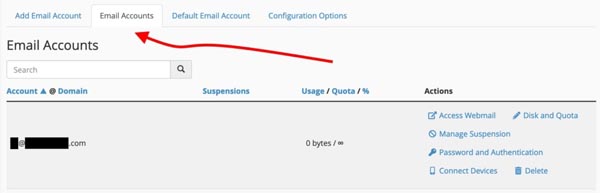
From this list, you retain full control to manage various aspects of each email account, including modifying passwords, adjusting storage quotas, and updating other relevant details.
Using Your Email
Once your email account is established, you have two primary methods for accessing and managing your communications:
- Configure the Email in a client: Integrate your new email account with popular desktop or mobile email clients such as Gmail, Apple Mail, Outlook, or Thunderbird.
- Use Webmail: Access your email directly through a web browser using cPanel's built-in webmail interface.
Configure Your Email Locally
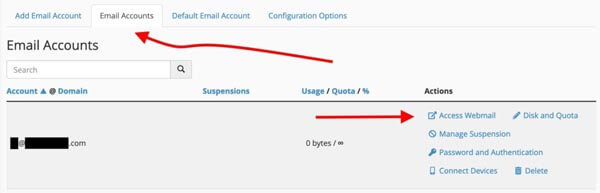
To configure your email with a local client, locate and click the "Access Webmail" link positioned next to your email address within the "Email Accounts" tab.
This action will direct you to a new panel. Scroll down until you find the section clearly labeled "Mail Client Automatic Configuration Scripts," which will present options similar to the following:
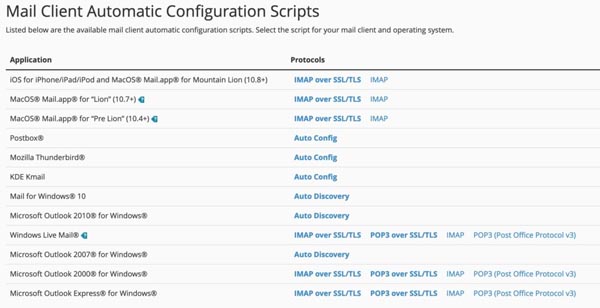
Here, you will find links providing either detailed instructions or ready-made configuration scripts for many popular email clients. If your preferred client is listed, simply click on the corresponding link and follow the provided guidance to complete the setup.
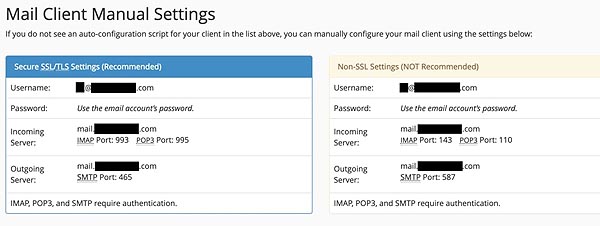
Alternatively, if your client is not listed, or if you prefer to configure your email manually, a dedicated section titled "Mail Client Manual Settings" is available directly below this area.
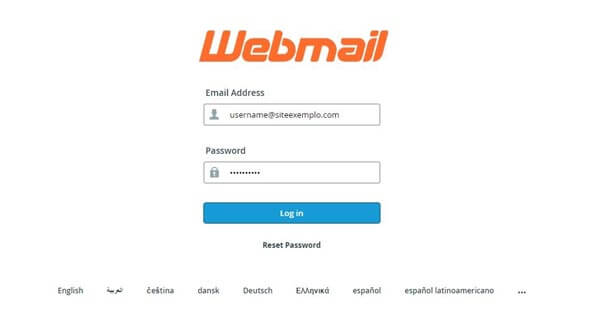
Accessing Your Webmail
To access your Webmail interface, click on the "Access Webmail" link located adjacent to your email address within the "Email Accounts" tab.
Next, select one of the available webmail clients. You also have the option to install alternative webmail clients via Softaculous. A popular choice among users is RainLoop Webmail.
Additionally, Webmail can be accessed directly through any web browser. Simply navigate to your domain followed by "/webmail" (e.g., yourdomain.com/webmail), and you will be presented with the login screen.
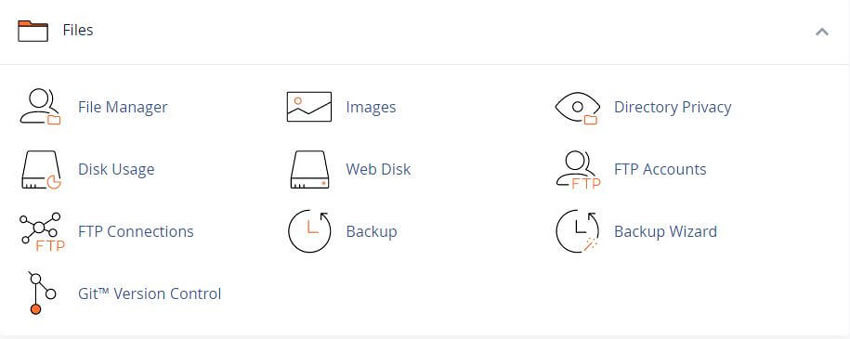
Managing Your Files
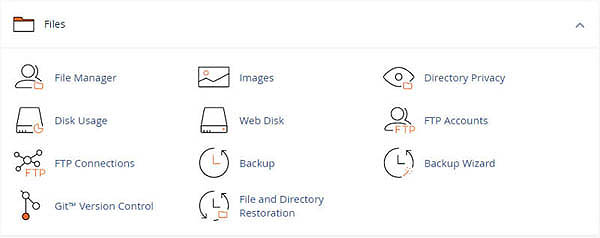
The "Files" section within cPanel is your dedicated area for managing all aspects of your website's files. This includes functionalities such as uploading new files, creating comprehensive website backups, and overseeing your files through FTP (File Transfer Protocol).
You have the option to utilize a dedicated FTP program to manage the files associated with your website. Alternatively, you can employ the convenient File Manager, detailed in the following section. Accessing an FTP program typically uses the same login credentials as your cPanel account.
To verify your FTP accounts, click on "FTP Accounts" within the "Files" section. Scroll down to the "Special FTP Accounts" area, where your primary FTP account should be listed.

By default, your main FTP account is configured with access to the server's root folder. When uploading files, it is crucial to navigate into the designated "WWW" or /home/user_name/public_html directory to ensure your website content is correctly accessible.
Using the File Manager
The File Manager provides a powerful and convenient way to manage all your website's files directly within the cPanel interface, eliminating the need for external third-party FTP clients.
To get started, click on the File Manager icon, which is visible in the preceding screenshot. This action will open the central panel of the File Manager, where you can begin your file operations.
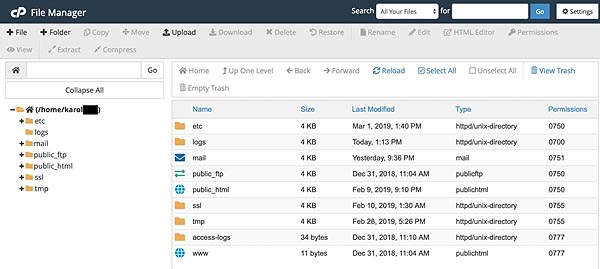
Within this interface, you have the capability to view, edit, and delete all files on your website. It is imperative to proceed with extreme caution when making any modifications to prevent accidental data loss or website issues. The File Manager interface typically divides into two main areas: on the left, you will observe your root (main) folder along with its subfolders; the central portion of the screen displays the contents of the currently selected folder.
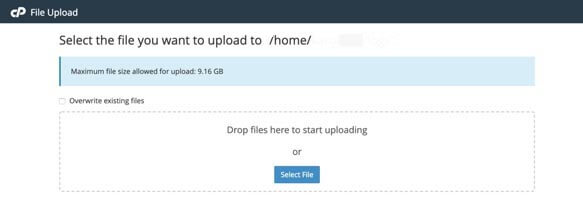
Uploading Files Using File Manager
To add or upload a file, first select the destination folder within the File Manager where you intend to place the file. Following this, click the "Upload" button located in the top menu bar.

You will then be prompted to either drag and drop the desired file into the designated area or browse and select it directly from your local drive. After uploading, it may be necessary to refresh both the File Manager page and your website in your browser to view the newly added files.
One-Click Installs with Softaculous
One of cPanel's most valuable features is the ability to easily install a wide array of popular web applications, including WordPress, through a streamlined "one-click" process. This functionality grants you access to an extensive library of over 350 applications, simplifying the deployment of various tools and platforms.
To begin, locate the "Softaculous Apps Installer" section within your cPanel dashboard.
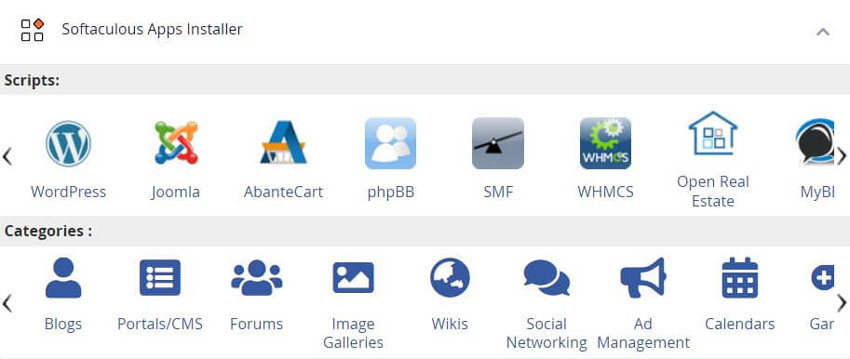
Softaculous boasts an impressive collection, aiming to include virtually every available web application. The sidebar categorizes installers for a diverse range of platforms, including blogs, microblogs, forums, wikis, e-commerce solutions, and numerous other powerful tools. We encourage you to explore the extensive offerings; you'll likely be impressed by the vast selection.
Installing Applications
For this demonstration, we will use WordPress as our example. Locate and click on the WordPress logo within the Softaculous interface.
This action will present you with a screen similar to the one below.
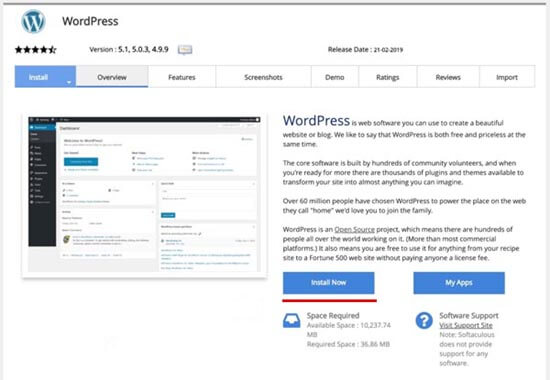
To initiate the installation, click the prominent blue "Install Now" button. Softaculous will then display a configuration form.
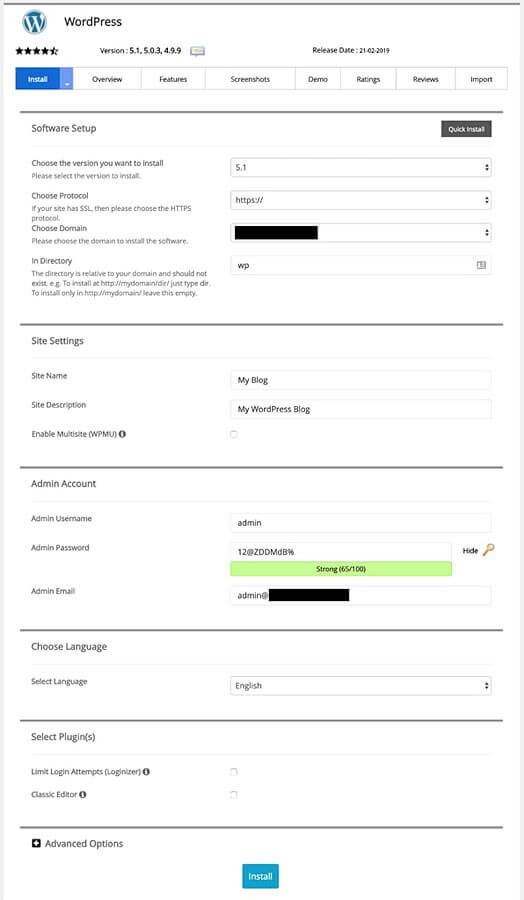
Software Setup
The Software Setup section, relevant for all applications, includes:
- Choose the Version: It is highly recommended to always select the latest stable version available for optimal performance and security.
- Choose Protocol: Opt for HTTPS if an SSL certificate is available for your site, as this encrypts communication and is crucial for website security. If HTTPS is not yet set up, HTTP will function.
- Choose the Domain: Select the specific domain name from the drop-down list where you wish to install WordPress.
- Directory: Leave this field empty if you intend to install WordPress directly into your domain's root directory (e.g., yourdomain.com). If you wish for it to be accessible as a subdirectory (e.g., yourdomain.com/blog), enter the desired directory name, such as "blog" or "wordpress".
Site Settings
The Site Settings section allows for initial configuration:
- Site Name: Provide a descriptive name for your website. This can be easily modified later from within the WordPress dashboard.
- Site Description: This field can be left blank initially. You have the flexibility to adjust this setting within WordPress at any time.
- Enable Multi-site: Typically, this option should be left unchecked. It is specifically designed for users planning to host multiple WordPress installations under a single domain in a multi-site network configuration.
Admin Account
In the Admin Account section, configure your administrator credentials:
- Admin Username: This is a critical setting. While "admin" is often the default, it is highly recommended to choose a unique and more complex username for security reasons.
- Admin Password: It is crucial to create a very strong password, incorporating a combination of uppercase and lowercase letters, numbers, and special characters. The installer often provides a utility to suggest or generate a secure password for you.
- Admin Email: Verify that the administrative email address entered is accurate and accessible, as it will be used for important notifications and password recovery.
Select Plugins
The Select Plugins section is optional. Here, you have the choice to install several useful plugins directly through Softaculous during the initial setup. Keep in mind that plugins can always be easily added or removed from within WordPress after the installation is complete.
Advanced Options
For most standard installations, there is generally no immediate need to modify the settings within the Advanced Options section.
Select Theme
In the Select Theme section, you might find an option to choose a WordPress theme for immediate installation on your site. However, it is often more practical and straightforward to select and customize your theme after WordPress has been fully installed. Once you have configured all the necessary options above, click the "Install" button to finalize the application installation process.
Within a few moments, Softaculous will confirm the successful installation of your WordPress application. You will then be provided with convenient links to access and log in to your newly deployed WordPress site.
