 (1).svg)
 (1).png)


 (1).svg)
.svg)
This guide will walk you through the process of installing the widely used WordPress Content Management System (CMS). We will focus on installation using the Softaculous Apps Installer, a common feature in many hosting environments. This method allows you to quickly achieve a secure and robust WordPress setup, ready for immediate content creation, with just a few simple clicks. Both new and experienced users will find this streamlined installation method highly convenient for launching their new WordPress projects efficiently.
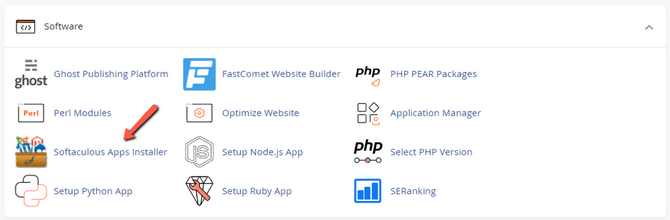
Accessing Softaculous
The initial step to installing WordPress via the Softaculous Apps Installer involves locating it within your cPanel account. Typically, you will find it under the Software section, making it easily accessible.
Upon opening Softaculous, you will be presented with its home page. This interface provides an overview of various applications available for installation. Take a moment to familiarize yourself with its layout, as it serves as your gateway to a multitude of popular web applications.
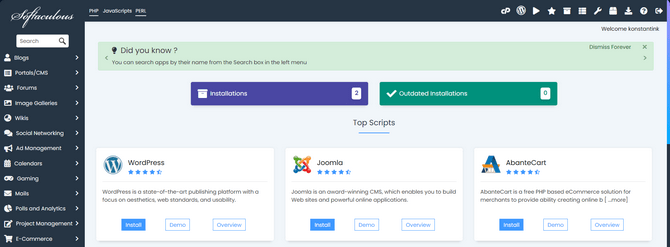
The next crucial step is to locate WordPress. Given its immense popularity, WordPress is usually prominently displayed on the Softaculous home page, often appearing in the main list or featured applications, as depicted in the screenshot. Alternatively, you can utilize the search bar located in the top-left corner of the interface to find it, or navigate to the Blogs section where it is also categorized. To initiate the installation process, simply click the Install button. For those who wish to gather more information before proceeding, options like Demo or Overview are available, providing insights into the software's features and functionalities.
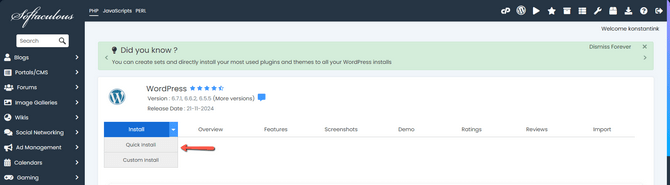
Regardless of your chosen method for finding WordPress, you will ultimately arrive at its dedicated installation page. Here, you'll be presented with two primary installation paths. By clicking on the drop-down menu adjacent to the Install button, you will see options for Quick Install and Custom Install. The Quick Install offers the fastest route to getting started, with a simplified set of customization options. Conversely, the Custom Install provides a more detailed approach, allowing you to predefine a wider array of settings and aspects for your new website.
Configuring Your WordPress Installation
Now, it's time to select your preferred installation method: either a Quick Installation or a Custom Installation. It's important to note that while the configuration options differ, the core WordPress software deployed will be identical for both. The primary distinction lies in the level of control and pre-configuration you desire; the Custom Installation offers the flexibility to modify more specific aspects of your website and even pre-install certain plugins. To ensure you make an informed decision, we will elaborate on the details of both installation types.
Quick Install
The Quick Install method is designed for speed, allowing you to launch a functional WordPress website in mere seconds. With its minimal customization options, you are just a few clicks away from a brand new WordPress site. However, it's worth remembering that this will result in a relatively barebones installation, meaning you will need to undertake further customization and setup from within the WordPress dashboard once the installation is complete.
Here’s a breakdown of the fields and options presented during the Quick Install process, with an explanation for each section:
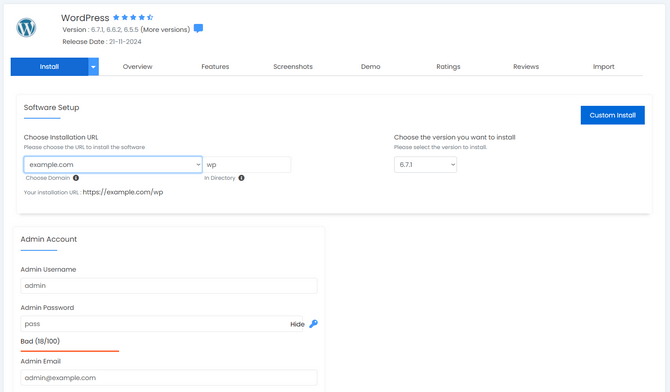
- Choose Installation URL: This setting allows you to select the domain where WordPress will be installed. This will be the address visitors use to access your new WordPress website. You have the option to install it in a subdirectory (as shown in the screenshot, within the wp subdirectory) or directly in the root directory of your domain. For most users and for ease of access, installing in the root directory is generally recommended.
- Choose the Version you Want to Install: Here, you select the specific WordPress version you wish to install. It is highly recommended to always choose the latest available version. Newer versions typically include crucial security patches, performance enhancements, and new features, ensuring your website remains secure, efficient, and up-to-date.
- Admin Username: This is where you define the username for your administrative account. This username, along with your password, will be used to log into your WordPress dashboard to manage your website.
- Admin Password: Enter a strong, unique password for your admin user here. The strength indicator below the field will guide you; aim for a "Strong" rating to maximize your website's security. Utilizing a reputable online password generator is an excellent way to create a complex and secure password.
- Admin Email: Provide the email address for your administrative user. This email will be used for important notifications regarding your website, including updates, comments, and security alerts.
Once you are satisfied with your chosen settings, click the Install button at the bottom of the page. The installation process usually takes only a few seconds. During this time, Softaculous efficiently downloads and installs the core WordPress software into your specified directory. Concurrently, it also creates a dedicated database for your website and configures WordPress's essential configuration file to seamlessly connect and utilize this new database.
However, if you require more granular control, such as the ability to explicitly name your database or customize other advanced options, the Custom Install method, detailed next, will be more suitable for your needs.
Custom Install
The Custom Install method encompasses all the options found in the Quick Install, but it significantly expands upon them by providing a wider range of advanced configuration choices. These options are conveniently organized into several sections, each designed to give you precise control over different aspects of your WordPress installation. Here's a detailed look at what each section offers:
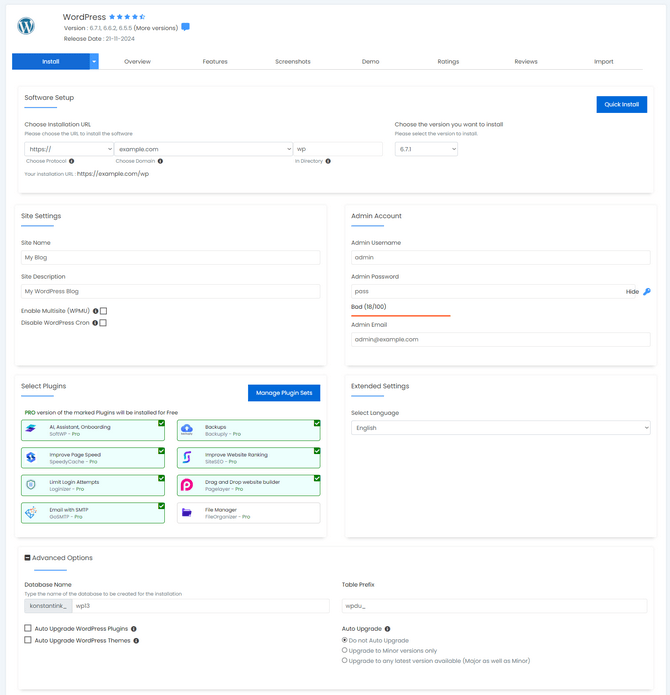
- Choose Protocol: This critical setting determines how your website will be accessed. If your site is equipped with an SSL certificate and uses HTTPS, you should select https:// or https://www. as the protocol. It is generally not recommended to select http:// unless you are working in a local testing environment, as securing your website via an SSL certificate is essential for data encryption, user trust, and improved search engine rankings.
- Choose Domain: Similar to the Quick Install section, here you select the domain that will serve as the primary access point for your new WordPress website. You can opt to place the installation in a subdirectory within the domain or directly in its root directory, depending on your website's structure and purpose.
- Site Name: This field is where you define the name of your website. While Softaculous may automatically generate a default name, you have complete freedom to enter any title that accurately represents your website's brand or content.
- Site Description: Provide a concise yet informative description for your website in this field. This description often appears in search engine results and helps convey the purpose of your site to visitors.
- Enable Multisite (WPMU): By ticking this checkbox, Softaculous will configure your WordPress platform with WPMU (Multiuser) enabled. This advanced feature is only necessary if you intend to host and manage multiple independent WordPress websites from a single WordPress installation, such as a network of blogs or sub-sites.
- Disable WordPress Cron: Selecting this option will deactivate the native WP-Cron functionality. The WordPress cron job is responsible for automating various scheduled tasks, such as checking for core, plugin, and theme updates, as well as publishing scheduled posts. If disabled here, Softaculous typically adds an alternative cron job to your cPanel, which will execute these tasks at regular intervals (e.g., twice an hour). Disabling WP-Cron can sometimes be beneficial for performance on very high-traffic sites, but it requires proper configuration of a server-side cron job.
- Admin Username: Specify the desired username for your administrative account. Choose a username that is not easily guessable for enhanced security.
- Admin Password: Enter a strong and complex password for your admin user. It is imperative to use a password that registers as "Strong" according to the built-in strength indicator to protect your website from unauthorized access. Consider using a password manager or generator for optimal security.
- Admin Email: This field requires the actual email address where you wish to receive all important notifications and communications concerning your WordPress website.
- Select Language: Choose the default language for your website's front-end and administrative dashboard from the available options.
- Select Plugins: In this section, you can select specific plugins from a provided list to be installed automatically alongside the core WordPress software. While convenient, if the particular plugin you need is not listed, remember that you can always easily install any plugin directly from within the WordPress dashboard after the initial installation is complete.
- Database Name: Softaculous will automatically suggest a database name. However, you have the option to change this to a name that is more recognizable or aligns better with your organizational structure, especially if you manage multiple databases.
- Table Prefix: If you plan to host multiple WordPress installations within the same database, each installation will require a unique table prefix to maintain distinct separation between their data tables. If you are only installing a single WordPress site, there is generally no need to modify this default setting.
- Auto Upgrade: This option enables the Softaculous installer to automatically apply updates to the WordPress core whenever new versions become available, based on your chosen preferences. While automatic upgrades offer convenience, it is often advisable to exercise caution and perform manual upgrades instead. Manual upgrading provides users with greater control over the process, allowing for backups and compatibility checks before applying updates, thereby minimizing potential website instability.
- Auto Upgrade WordPress Plugins: Checking this box will allow your installed plugins to be automatically upgraded when a new platform version or plugin update is released. Again, for stability and compatibility reasons, it is generally recommended against enabling automatic upgrades for WordPress plugins; manual review and updates are usually safer.
- Auto Upgrade WordPress Themes: Ticking this checkbox will enable automatic theme upgrades when new versions are available. Similar to plugins and the core, you should typically avoid automatically upgrading any WordPress components. Manual updates allow you to confirm compatibility and prevent unexpected issues with your website's design and functionality.
Once all your desired WordPress installation settings have been carefully configured, proceed by clicking the Install button located at the bottom of the page. This action will initiate the comprehensive installation process.
Completing the Installation Process
Upon the successful completion of the installation process, regardless of whether you opted for the Quick or Custom method, you will be presented with a confirmation page similar to the one shown below.
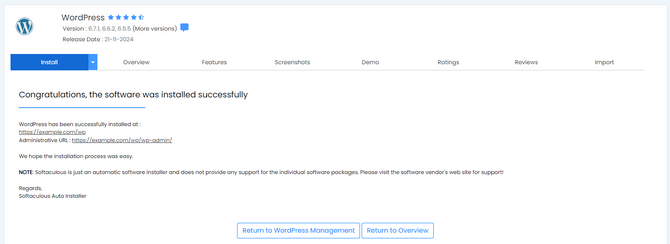
Congratulations! Your WordPress application has been successfully deployed using the Softaculous Apps Installer. The confirmation page will typically provide two important links. The first link will direct you straight to your newly installed WordPress website, allowing you to see it live. The second link will lead you to your website's administrative dashboard, which is the control panel where you can use your previously set admin username and password to log in and begin customizing your site, creating content, and adding functionality.
