 (1).svg)
 (1).png)


 (1).svg)
.svg)
Many modern web and email hosting solutions include cPanel, a powerful control panel that offers a wide array of tools for managing your online presence. While many users may not frequently log in, one of its most valuable features is the Auto-Responder. This functionality allows you to automatically send a pre-written email response to anyone who contacts you, which is incredibly useful for managing expectations when you are unavailable. Furthermore, cPanel auto-responders offer the convenience of scheduling their activation and deactivation, ensuring your communications are always timely and professional. This guide will walk you through the process of setting up an auto-responder in your cPanel account.
1. Access Your cPanel Account
The first step in configuring your auto-responder is to log into the cPanel interface associated with the email account you wish to manage. You will typically access cPanel through a specific URL provided by your hosting provider, usually involving your domain name followed by /cpanel or a dedicated port. Enter your username and password to gain access to your control panel dashboard.
2. Navigate to Auto Responders
Once logged into cPanel, locate the "Mail" section on your dashboard. Within this section, you will find an icon labeled "Auto Responders." Click on this icon to proceed to the auto-responder management page. This page is where you can view existing auto-responders and set up new ones.

3. Initiate Auto Responder Setup
On the auto-responder management page, you will see a button, typically labeled "Add Auto Responder." Click this button to begin the setup process for a new automated email reply. This action will take you to a new page where you'll be prompted to fill in various details for your auto-responder.
4. Configure the Interval Setting
The "Interval" setting is crucial for preventing your auto-responder from sending multiple replies to the same sender within a short period. This value, specified in hours, determines how long the system will wait before sending another automated response to an email address that has already received one. For instance, if you set the interval to 12 hours and a contact emails you at 9 AM, they will receive an immediate auto-response. However, if that same contact sends additional emails within the next 12 hours, they will not receive further automated replies until the 12-hour period has elapsed (i.e., after 9 PM). This ensures a professional communication flow without overwhelming the sender with redundant messages.
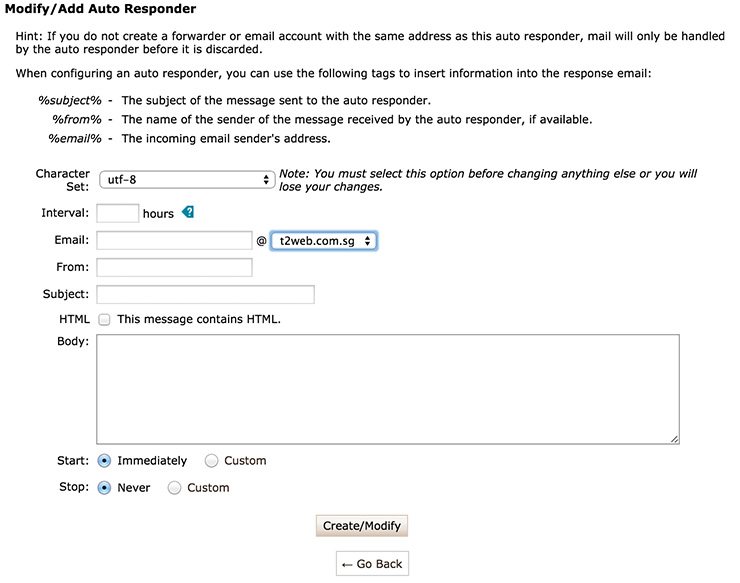
5. Complete Required Auto Responder Details
Proceed to fill in the essential fields for your auto-responder:
- Email: Select the email address for which this auto-responder will be active. This is the address that will receive incoming emails.
- From: Specify the name that will appear as the sender of the automated reply. This helps recipients identify who the message is from.
- Subject: Enter the subject line for your auto-response. A common practice is to include "Auto-Reply" or "Out of Office" in the subject.
- Body: Compose the actual message content of your auto-responder. This is where you can inform senders of your unavailability, provide an expected return date, or direct them to alternative contacts.
Ensure these compulsory fields are accurately completed to ensure your auto-responder functions as intended and conveys the correct information.
6. Define Start and Stop Times
cPanel provides flexible options for controlling when your auto-responder is active. You can choose from two main settings:
- Immediately: The auto-responder will become active as soon as you save it and will continue indefinitely until manually disabled.
- Custom: This option allows you to precisely schedule the start and stop dates and times for your auto-responder. This is particularly useful for planned absences, such as vacations or public holidays. For example, if you plan to be out of the office from Monday, April 27th at 9 AM and return on Thursday, April 30th at 9 AM, you can configure these exact start and stop times. The system will automatically activate the auto-responder at the specified start time and deactivate it at the designated stop time, ensuring that regular email communication resumes without any manual intervention required upon your return.
Carefully selecting your start and stop times helps maintain professional communication and ensures that senders receive appropriate responses only when necessary.
7. Finalize and Activate Your Auto Responder
After meticulously configuring all the settings—the interval, email details, and start/stop times—review your entries to ensure everything is accurate. Once satisfied, click the "Create/Modify" or "Save" button (the exact label might vary slightly depending on your cPanel version) to activate your auto-responder. With your auto-responder successfully set up, you can now enjoy peace of mind, knowing that your email communications are being professionally managed, even when you are away from your inbox. This automation ensures that your contacts are always informed, allowing you to focus on other priorities with confidence.
