
 (1).svg)
 (1).png)


 (1).svg)
.svg)
Cron is a fundamental utility in UNIX-like operating systems that enables users to schedule commands or scripts to run automatically at specified intervals. WordPress, in turn, incorporates its own similar system known as WP-Cron. This built-in feature simulates the functionality of a traditional UNIX cron system, designed to automate various essential tasks within your website. These tasks often include checking for updates, publishing scheduled posts, managing comment moderation, and executing other routine, time-based operations.
For any WordPress site administrator, understanding how to effectively set up and manage WP-Cron events is invaluable. It streamlines administrative workflows, ensures the timely execution of critical site functions, and generally makes managing a WordPress installation much more efficient.
This comprehensive guide will walk you through the process of setting up and managing the WordPress cron system using two primary methods: a dedicated WordPress plugin and the powerful WP-CLI (WordPress Command Line Interface). Additionally, we will delve into the advantages and potential drawbacks of relying solely on WP-Cron, compare its functionality with that of a traditional system cron job, and provide insights into optimizing your site's scheduled tasks.
What is a WordPress Cron Job?
A WordPress cron job refers to the mechanism within WordPress that emulates the behavior of a UNIX cron system. Its primary purpose is to automate the scheduling and execution of various time-sensitive tasks. Unlike a true system cron, which runs continuously in the background at fixed intervals, WP-Cron operates by triggering scheduled events whenever a user visits your website. This "on page load" activation allows WordPress to perform critical automated functions, such as publishing posts and pages at predetermined times, checking for available updates for themes, plugins, and the core software, and managing other backend processes that require periodic execution.
Benefits and Potential Drawbacks of Using WordPress Cron
The WP-Cron system offers several distinct advantages, making it a popular choice for managing scheduled tasks within WordPress. One of its most significant benefits is its ease of setup and accessibility. Unlike configuring a traditional UNIX cron job, which typically requires familiarity with command-line interfaces and server-level commands, WP-Cron can be managed directly from your WordPress dashboard or through user-friendly plugins. These plugins often provide intuitive interfaces that simplify the entire setup and management process, making it readily accessible even for users without extensive technical expertise.
Furthermore, the ability to schedule repetitive tasks at custom time intervals is a considerable time-saver, allowing site administrators to focus on content creation and other crucial aspects of site development rather than manual maintenance. An additional advantage of WP-Cron is its inherent resilience; it can help ensure that scheduled tasks eventually run, even if they are missed initially. If a task's scheduled time passes without a page load to trigger it, WP-Cron will execute it on the next subsequent page visit, preventing data loss or critical tasks from being entirely overlooked—a feature not inherently guaranteed by a strict system cron.
Despite its convenience, WP-Cron does come with certain limitations and potential drawbacks. The most notable is its dependency on user visits; WP-Cron events are only triggered when a user accesses your website. This means that on low-traffic WordPress sites, scheduled jobs might be delayed or even completely missed if there isn't sufficient page activity to trigger them. This can lead to issues such as pending cache buildup, which can negatively impact the site's load time and overall performance.
Conversely, for high-traffic websites, WP-Cron can also present challenges. Such sites are particularly susceptible to race conditions and long-running processes. A race condition occurs when numerous simultaneous visits to the website cause WP-Cron to initiate the same scheduled task multiple times concurrently. This can lead to an inefficient buildup of job queues, consuming excessive server resources and ultimately resulting in degraded site performance and slower loading times for visitors. Understanding these limitations is crucial for deciding whether WP-Cron is the optimal solution for all your scheduled tasks.
Managing WordPress Cron Jobs with a Plugin
The most straightforward approach to setting up and effectively managing WordPress cron jobs is by utilizing a dedicated cron job management plugin. For the purpose of this tutorial, we will demonstrate the process using WP Crontrol, a widely recognized and free plugin that offers all the essential features needed for comprehensive cron management. However, there are various other excellent plugins available; you are free to choose any that best suits your specific requirements and preferences.
1. Installing the WP Crontrol Plugin
To begin, you'll need to install and activate the WP Crontrol plugin on your WordPress site. Follow these straightforward steps:
- Navigate to Plugins → Add New directly from your WordPress administrative dashboard.
- In the search bar, type "WP Crontrol" to locate the plugin. Once found, click Install Now.
- After the installation process is complete, click Activate to enable the plugin on your site.
Once activated, you can view all the cron jobs currently configured and running on your WordPress site by navigating to Tools → Cron Events within your dashboard.
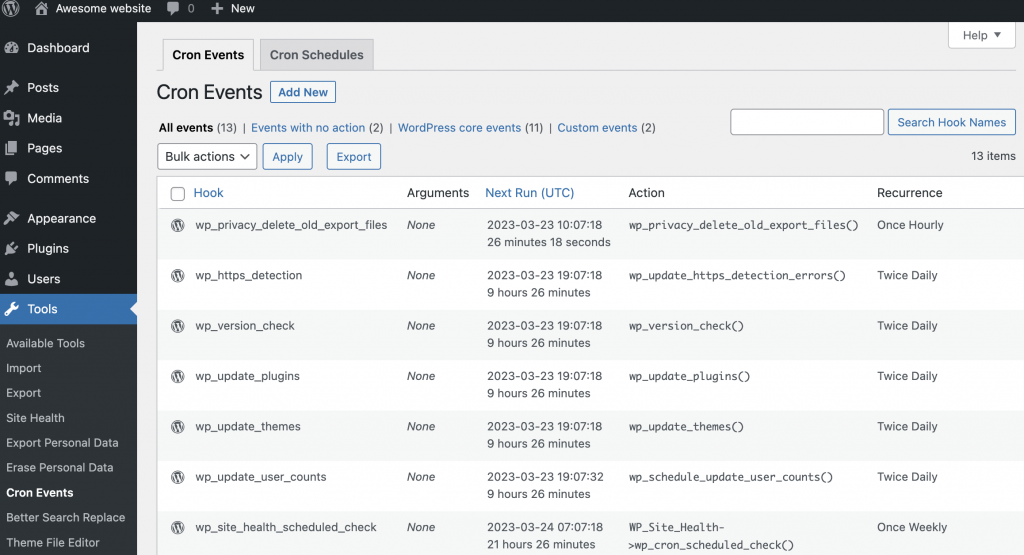
It is crucial to note an important caution: Do not delete any default WordPress cron jobs. These system-generated tasks are typically prefixed with "wp_" and are essential for the core functionality and stability of your WordPress installation. Removing them could lead to significant disruptions in your site's operations.
2. Adding a New Cron Event
With the WP Crontrol plugin now active, you are ready to configure new cron events. Here’s a detailed guide on how to add a custom cron event:
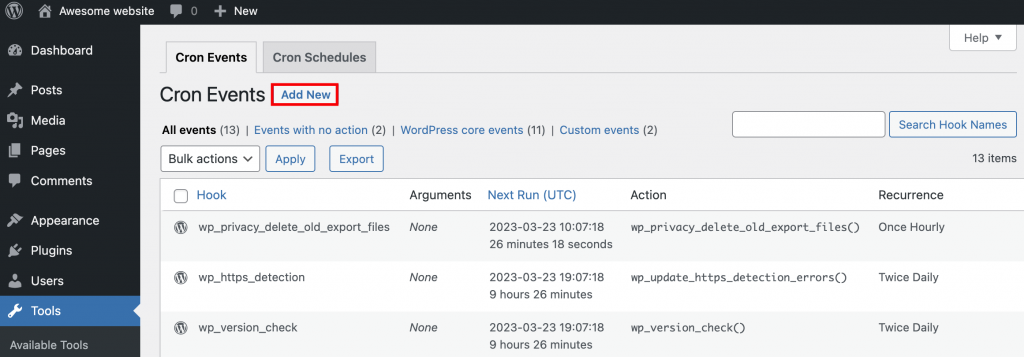
- Begin by accessing the Cron Events sub-menu within the Tools section of your WordPress dashboard. At the top of the page, click the Add New button.
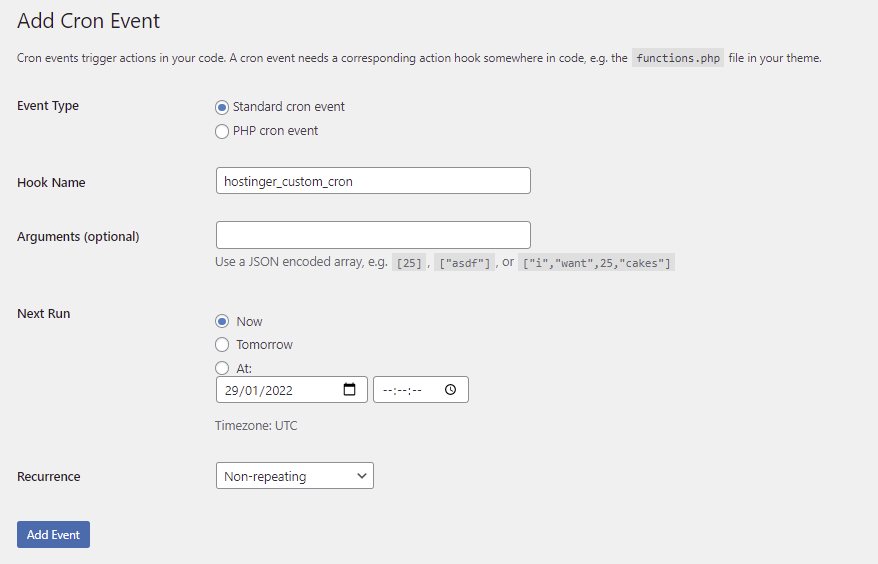
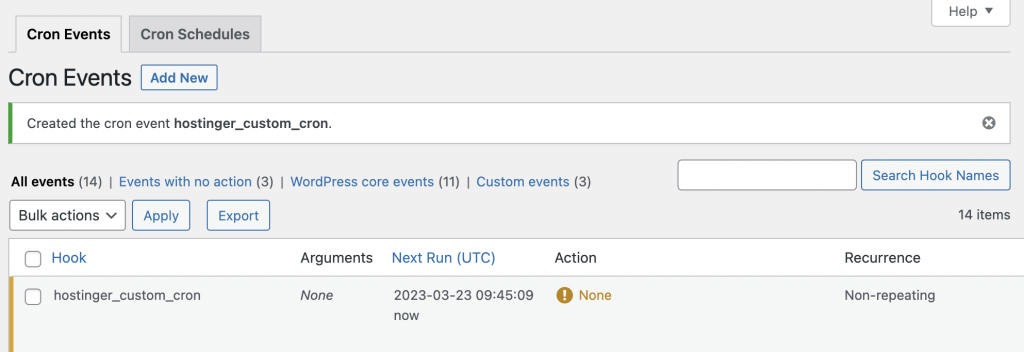
add_action( 'your_custom_cron_hook', 'your_custom_cron_function' );
function your_custom_cron_function() {
  wp_mail( 'recipient@example.com', 'Automatic Email Subject', 'This is an automatic scheduled email from WordPress to test cron functionality.');
}
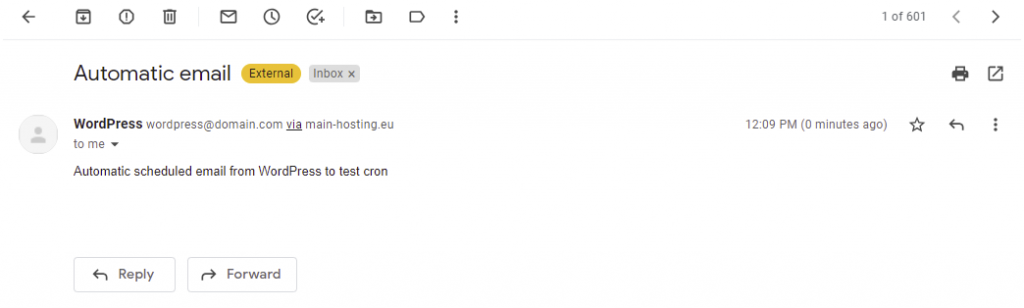
In this example, we utilize the wp_mail() function to send an email when the cron event runs, serving as a simple test. Remember to replace 'your_custom_cron_hook' with the exact hook name you created in WP Crontrol, 'your_custom_cron_function' with a unique function name, and 'recipient@example.com' with a valid email address where you wish to receive the test email.
3. Customizing Cron Schedules
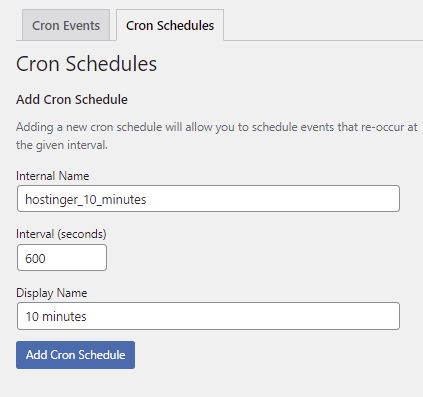
While WP Crontrol offers a selection of standard time intervals for cron events, it also empowers users to define and add their own custom scheduling intervals. This flexibility is particularly useful for tasks that require precise timing not covered by the default options. Here's how to create a new custom cron schedule:
- From your WordPress dashboard, navigate to Settings → Cron Schedules.
- In the Add Cron Schedule section, you will find fields to define your new interval. For this example, let’s set the interval to
600seconds, which corresponds to10minutes. Ensure that the interval name you create follows standard PHP naming conventions for consistency.

4. Editing an Existing Cron Event
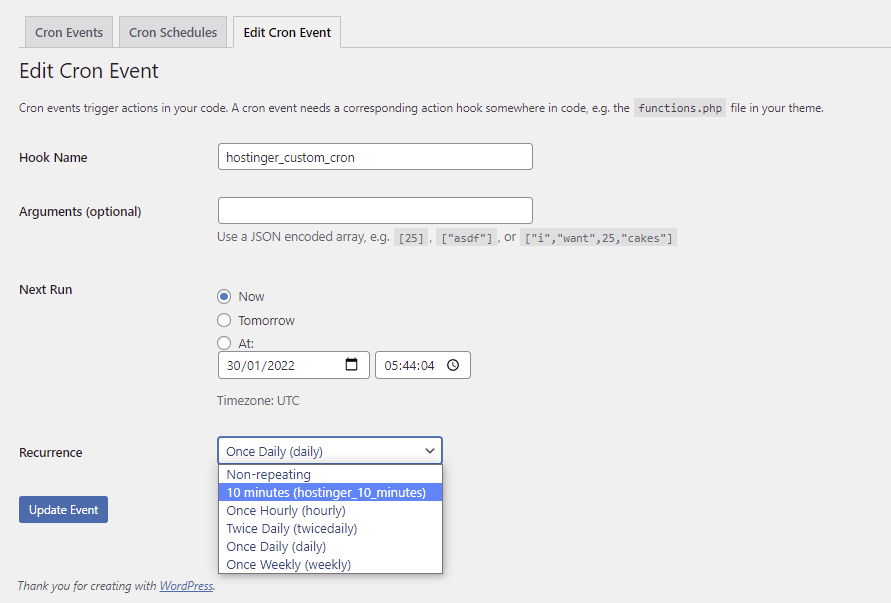
Once you have created a custom interval, you can easily apply it to any of your existing cron events. This allows for greater precision in task scheduling. Here’s how to modify an existing cron event to use a new recurrence:
- Return to Tools → Cron Events within your WordPress dashboard. Locate the specific cron event you wish to modify and click the Edit link positioned beneath its entry.
- On the "Edit Cron Event" page, find the Recurrence dropdown menu. Open it and select the newly created 10 minutes option (or whatever custom interval you defined).
Setting Up WordPress Cron Jobs with WP-CLI
Beyond using plugins, a more advanced and powerful method for managing WordPress cron jobs is through WP-CLI (WordPress Command Line Interface). WP-CLI is a command-line tool that enables you to administer your WordPress site directly from a terminal, offering granular control over various aspects, including cron events.
Many modern hosting providers offer environments where WP-CLI is pre-installed, simplifying its adoption. To utilize WP-CLI, you will typically need to connect to your hosting account via SSH (Secure Shell). Consult your hosting provider's documentation for specific instructions on how to establish an SSH connection.
Once connected via SSH, you can interact with your WordPress cron system using specific WP-CLI commands. For instance, to retrieve a comprehensive list of all existing cron events currently scheduled on your WordPress site, simply execute the following command in your terminal:
wp cron event list
If you require assistance or wish to explore the full range of WP-CLI commands available for cron management and other WordPress functions, you can always use the help command:
wp help
This will display a detailed overview of command structures and options, empowering you to manage your site efficiently from the command line.
Implementing a Real System Cron Job
The WP-Cron system, while convenient, relies on the wp-cron.php file to execute scheduled tasks. Although this design ensures cron jobs run regardless of the server's operating system, it can sometimes be susceptible to performance issues or, in rare cases, conflicts with certain caching plugins. Implementing a real system cron job directly on your server can offer a more robust and efficient alternative, preventing the wp-cron.php file from being constantly executed on every page load.
Before configuring a system cron, it is essential to disable the default WordPress cron behavior to prevent tasks from being run twice. To achieve this, you need to add a specific code snippet to your wp-config.php file. Locate this file in the root directory of your WordPress installation and insert the following line of code just above the line that reads “/* That’s all, stop editing! Happy blogging. */”:
define( 'DISABLE_WP_CRON', true );
Once WP-Cron is disabled, the next step involves setting up a genuine system cron job to handle WordPress's scheduled tasks. The exact procedure for this will depend on your specific hosting provider and their control panel interface. However, the general steps typically involve accessing a "Cron Jobs" or "Scheduled Tasks" section within your hosting control panel. Here's a generalized example of how this might be configured:
- Access your hosting control panel dashboard and navigate to the Cron Jobs section, often found under an "Advanced" or "Tools" category.
- Within the cron job configuration interface, you will typically find a field labeled "Command to run" or similar. Enter the following command into this field:
wget -O /dev/null -o /dev/null https://yourwebsite.com/wp-cron.php?doing_wp_cronImportant: Remember to replace
https://yourwebsite.comwith the actual URL of your WordPress website. This command useswgetto silently access thewp-cron.phpfile, effectively triggering the WordPress cron system without consuming unnecessary resources for output.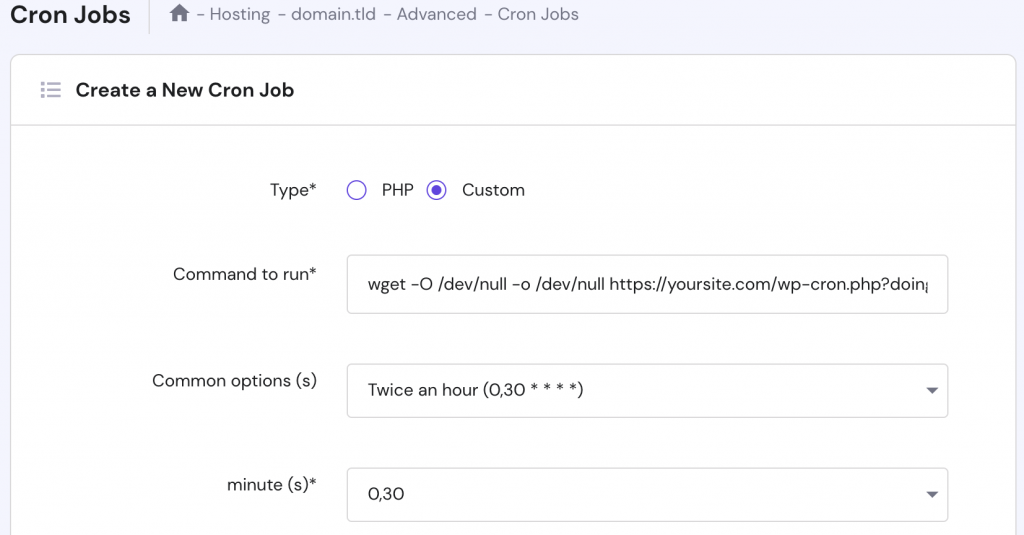
- Your control panel will usually provide a range of predefined interval options for cron job execution. A common and recommended starting point for WordPress tasks is twice an hour, or every 30 minutes. However, you can adjust this frequency based on your site's specific needs and traffic patterns.
- Finally, click the Save or Add Cron Job button to activate your new system cron job. This setup ensures that your WordPress scheduled tasks run reliably at fixed intervals, independent of user visits, leading to more consistent performance.
Conclusion
In summary, the WordPress cron job system offers a convenient and flexible way to automate various administrative tasks and content scheduling on your website. While WP-Cron, the default implementation, provides ease of use and resilience, it also presents certain limitations, particularly concerning performance on both very low and very high-traffic sites. Understanding these nuances and knowing when to leverage a dedicated plugin like WP Crontrol, the command-line power of WP-CLI, or even a direct system cron job, empowers you to manage your site's automated processes with greater efficiency and control.
We trust that this guide has provided you with a clear understanding of WordPress cron job functionality and equipped you with the knowledge to set up and manage these essential tasks effectively. By optimizing your cron setup, you contribute significantly to the overall stability and performance of your WordPress site. Implementing these best practices will undoubtedly enhance your site administration experience.
What is the Difference Between WP-Cron and System Cron?
WP-Cron is WordPress's built-in scheduling system, designed to mimic the functionality of a traditional UNIX cron. The fundamental difference lies in their execution triggers: WP-Cron events are initiated only when a user visits your website, relying on page loads. In contrast, a system cron (often referred to as a "real cron") is a server-level utility that runs continuously in the background at precise, fixed intervals, regardless of website traffic, typically checking for tasks every minute.
When to Use System Cron Versus WP-Cron?
For basic WordPress core tasks and sites with moderate traffic, WP-Cron is often perfectly adequate and straightforward to manage. However, if your website experiences high traffic, if you have numerous or resource-intensive scheduled tasks, or if precise timing is critical, migrating to a system cron job is generally recommended. This approach can significantly improve site performance by preventing the overhead and potential race conditions associated with WP-Cron's page-load-dependent execution.
How to Stop a Cron Job in WordPress?
To stop a cron job in WordPress, particularly one that is no longer needed, the most direct method is to delete it. This can often be done through a cron management plugin like WP Crontrol. If you prefer a command-line approach, or if the cron job was manually added, you can delete specific cron events using WP-CLI. For instance, to remove a cron job associated with a particular hook, you would execute:
wp cron event delete hook_name
Remember to replace hook_name with the actual name of the cron hook you wish to delete. Alternatively, you can modify the time interval of an existing job if you only need to reduce its frequency rather than removing it entirely.
Locating Cron Jobs in WordPress
WordPress cron jobs can be identified and managed through several avenues. For core WordPress cron settings, you might check the wp-config.php file, especially if DISABLE_WP_CRON has been defined. More typically, scheduled events are visible and manageable via dedicated cron management plugins like WP Crontrol or Advanced Cron Manager, which provide a user-friendly interface within your WordPress dashboard. For server-level cron jobs, you would consult your hosting provider's control panel or SSH access.
How to Manually Run a Cron Job in WordPress?
While WordPress cron jobs are designed to run automatically, there are times you might need to trigger them manually or set them up programmatically. To schedule a new cron job using code, you can utilize the wp_schedule_event() function within your theme’s functions.php file or a custom plugin. For example, a basic setup might look like:
if ( ! wp_next_scheduled( 'my_custom_daily_event' ) ) {
    wp_schedule_event( time(), 'daily', 'my_custom_daily_event' );
}
add_action( 'my_custom_daily_event', 'my_custom_function_to_run' );
function my_custom_function_to_run() {
    // Your code to execute goes here
}
Alternatively, for easier management without coding, plugins like WP Crontrol or Advanced Cron Manager offer intuitive interfaces to set up, modify, and even manually trigger cron events directly from your WordPress dashboard, providing a user-friendly solution for managing your scheduled tasks.
