
 (1).svg)
 (1).png)


 (1).svg)
.svg)
This tutorial will guide you through the process of installing the widely used WordPress Content Management System. We will focus on installation via the Softaculous Apps Installer, a common feature in many hosting environments. With just a few straightforward steps, you can achieve a secure and robust WordPress installation, fully prepared for content creation. This installation method is designed to be convenient for users of all experience levels, providing a quick start for your new WordPress project.
Accessing Softaculous
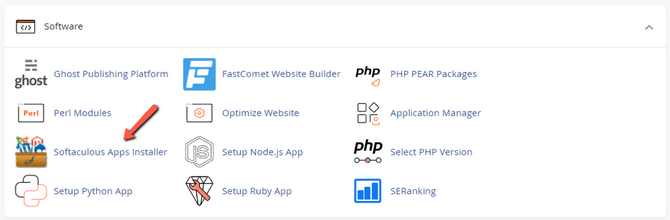
The initial step for installing WordPress through the Softaculous Apps Installer is to locate it within your cPanel account. Typically, you will find it under the Software section.
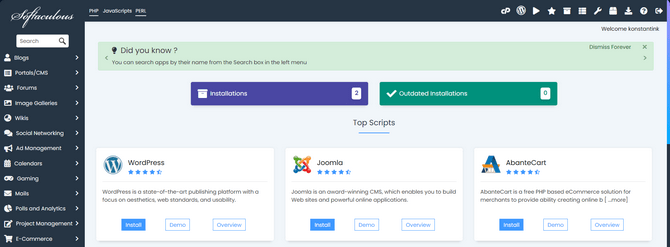
Upon opening Softaculous, you will be presented with its home page. This page provides an overview of various applications and options available for installation.
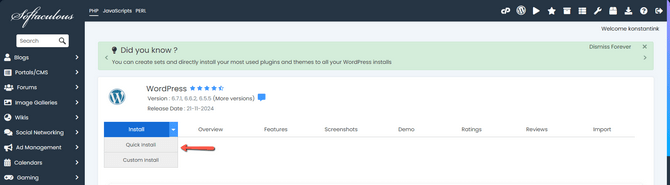
Next, you need to locate WordPress. Given its popularity, WordPress is usually prominently displayed on the Softaculous home page, as shown in the screenshot. Alternatively, you can use the search bar located in the top left corner, or find it listed under the Blogs section. To commence the installation process, click the Install button. You also have the option to explore the Demo or Overview buttons for additional information about the software.
Regardless of the method chosen, you will be directed to the application's installation page. Here, you will typically find two main options: Quick Install and Custom Install. The Quick Install provides the fastest way to get started with fewer customization choices. The Custom Install, conversely, offers more extensive options to predefine various aspects of your website during the setup.
Configuring Your WordPress Installation
Now, it's time to select your preferred installation type: Quick or Custom Installation. Both methods will install the identical core WordPress software. The primary distinction lies in the Custom Installation offering more opportunities to adjust website settings and even pre-install certain plugins. For your convenience, we will detail both installation types.
Quick Install
The Quick Install method is designed for rapid deployment, allowing you to establish a functional website in moments. With minimal customization requirements, a new WordPress website is just a few clicks away. Bear in mind that this method provides a basic installation, meaning you will handle most of the customization from your WordPress dashboard.
Here is an overview of the options presented during the Quick Install process, with further explanation for each section:
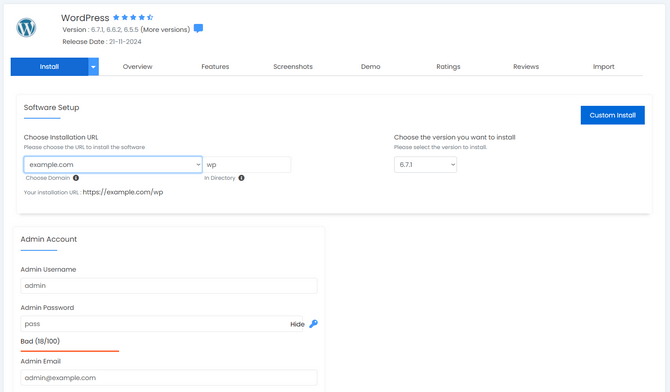
- Choose Installation URL: This section allows you to select the domain where WordPress will be installed. This will be the primary URL used to access your WordPress website. You can opt to install it in a subdirectory (e.g., in a 'wp' subdirectory, as sometimes shown), or directly in the root directory of your domain. Installing it in the root directory is generally recommended for easier access and management.
- Choose the Version you Want to Install: Select your preferred starting WordPress version. It is always advisable to choose the latest available version, which often includes the most recent security patches and performance enhancements.
- Admin Username: Define the username for your administrative account. This username will be used to log into your WordPress dashboard.
- Admin Password: Set a strong password for your admin user. Ensure the password meets strong security criteria, typically indicated by a strength meter. Utilizing a password generator can help create a highly secure password.
- Admin Email: Provide the email address for your administrative user. This email will receive important notifications and updates regarding your website.
Once you are satisfied with your chosen settings, click the Install button at the bottom of the page. The process typically takes a few seconds, during which Softaculous will download and install the WordPress software into the designated directory. Additionally, it will create a database and configure WordPress to utilize this new database.
However, if you wish to have more control, such as naming your database and other advanced settings, the Custom Install method would be more suitable.
Custom Install
The Custom Install option encompasses all the features found in the Quick Install, alongside several additional configurations. These options are typically organized into distinct sections to simplify the setup process. Here’s a breakdown of what each section provides:
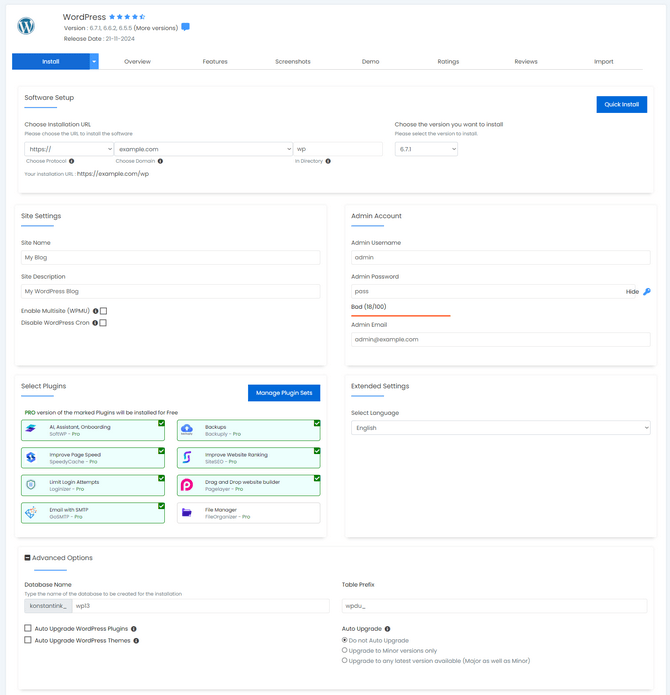
- Choose Protocol: If your site is secured with an SSL certificate and uses HTTPS, you should select https:// or https://www. as the protocol. It is generally recommended to avoid http:// unless you are working in a local testing environment, as securing your website via an SSL certificate is crucial for user trust and SEO.
- Choose Domain: Similar to the Quick Install section, here you select the domain that will host your new WordPress website. You can opt to install it in a subdirectory or the main root directory of your chosen domain.
- Site Name: Enter the desired name for your website. Softaculous may generate a default name, but you can customize this to reflect your brand or content.
- Site Description: Provide a brief description of your website. This often appears in search engine results and helps visitors understand your site's purpose.
- Enable Multisite (WPMU): Ticking this checkbox will enable WordPress Multisite (WPMU). This feature is only necessary if you plan to manage multiple WordPress websites from a single WordPress installation.
- Disable WordPress Cron: Activating this option will deactivate WordPress's native WP-Cron functionality. WP-Cron automates various WordPress tasks, such as checking for core, plugin, or theme updates. If disabled here, a corresponding cron job will typically be added to your cPanel to execute these tasks at regular intervals, often twice an hour.
- Admin Username: Specify the username for your administrative account.
- Admin Password: Create a strong password for the admin user. It's crucial to use a robust password to protect your site.
- Admin Email: Enter the active email address where you wish to receive website notifications and administrative alerts.
- Select Language: Choose the default language for your WordPress website.
- Select Plugins: This section allows you to choose from a list of plugins to be installed alongside the core WordPress software. If a specific plugin you need isn't listed, you can always install it later directly from your WordPress dashboard.
- Database Name: Softaculous typically assigns a default value here, but you have the option to rename the database to something more descriptive or recognizable for your records.
- Table Prefix: If you are hosting multiple WordPress installations within the same database, each installation will require a unique table prefix to prevent conflicts and maintain data separation. Otherwise, you usually do not need to modify this setting.
- Auto Upgrade: This option enables the Softaculous installer to automatically apply updates to your WordPress core whenever new versions are available, based on your chosen preferences. Generally, it is advisable to exercise caution with automated core upgrades, as some updates might occasionally introduce minor instabilities. Manual upgrades offer more control over the process, allowing you to create backups and test compatibility first.
- Auto Upgrade WordPress Plugins: Selecting this will allow plugins to be automatically upgraded when platform version updates occur. Similar to core upgrades, it is often recommended to manage plugin updates manually to ensure compatibility and stability.
- Auto Upgrade WordPress Themes: Ticking this checkbox will enable automatic theme upgrades whenever the installation script is updated. As with other components, it is generally prudent to avoid automatically upgrading WordPress themes without prior checks.
Once you have configured your WordPress installation to your precise requirements, click the Install button at the bottom of the page to initiate the process.
Completing the Installation Process
Upon the successful completion of the installation process, regardless of whether you chose the Quick or Custom method, you will be presented with a confirmation page similar to this:
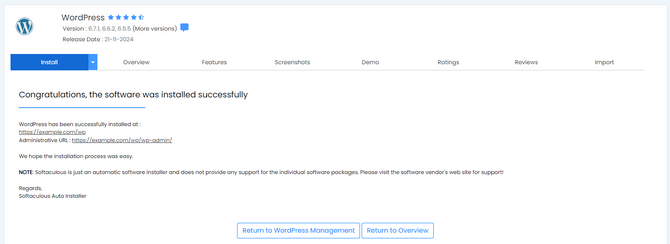
Congratulations! Your WordPress application has been successfully deployed using Softaculous. You will typically see two links: one to access your newly created website directly, and another that will take you to your website's administrative dashboard. Using the admin username and password you set during installation, you can log in and begin customizing your WordPress site and creating content immediately.
