
 (1).svg)
 (1).png)


 (1).svg)
.svg)
Starting with a new Odoo installation or trial often leads to the question of how to begin utilizing its powerful features. At the core of every Odoo implementation is the database, which serves as your company's central digital workspace. This database securely stores all your essential business information, applications, user profiles, and system configurations. This comprehensive guide will walk you through the process of setting up your very first Odoo database, clarifying its fundamental role, and helping you confidently navigate the Odoo interface.
Understanding the Odoo Database
In Odoo, a database is a completely self-contained environment designed to hold all your company's operational data. This includes everything from product inventories and customer records to financial invoices, employee details, and much more. The first action you take when engaging with Odoo is typically to select an existing database or create a new one. Consider it the digital "filing cabinet" that organizes and houses the entirety of your business operations.
A significant advantage of Odoo is the flexibility to host multiple databases within the same Odoo instance. This capability is particularly useful for:
- Setting up a dedicated environment for thoroughly testing new customizations or experimental features without impacting live data.
- Maintaining a separate, pristine database for production use, containing your actual, active business information.
It's important to remember that whenever you log into Odoo, you are always operating within the confines of one specific database, ensuring data isolation and organization.
Creating Your Odoo Database
Once Odoo has been successfully installed and is running locally on your system, open your web browser and navigate to your local database manager. This is typically accessed via the following address:
http://localhost:8069/database/manager

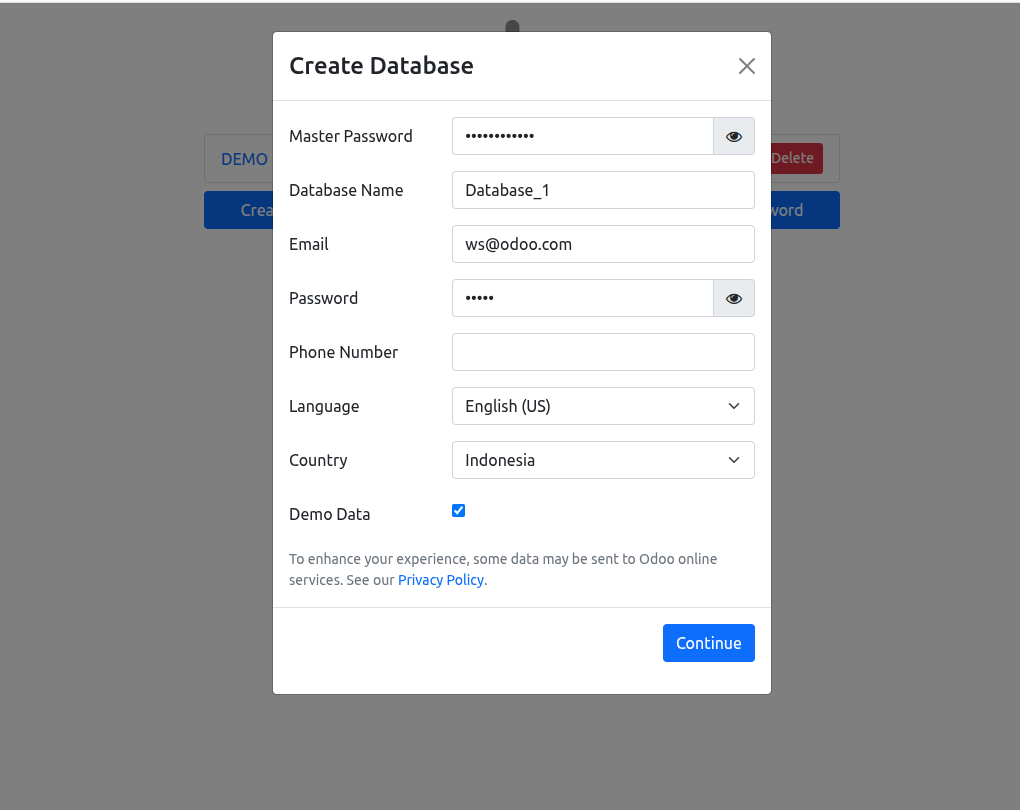
Upon arrival, you will be presented with the "Create Database" form, which prompts you to define the foundational elements of your new Odoo environment.

Carefully complete the following fields to configure your database:
- Master Password: Input the Master Password that was established during your Odoo installation process. If you are unsure, this password can typically be found within your
odoo.conffile. - Database Name: Select a clear and descriptive name for your database, such as "my_company_production" or "testing_environment". This name helps in easily identifying the database.
- Email: This email address will serve as the primary administrator login for your new database.
- Password: Choose a strong and unique password for your administrator account to ensure security.
- Language: Select your preferred language for the Odoo interface.
- Country: Specify your country, which helps Odoo apply relevant localization settings and financial configurations.
- Load Demo Data: This selection is particularly important, especially for first-time users:
- ☑ Check this box: Activating this option will populate your new Odoo database with a comprehensive set of sample data. This includes example products, customer profiles, sales orders, and more. For those new to Odoo, checking this box is highly recommended as it provides a practical environment to explore and understand how various modules function with pre-filled examples, making the learning curve much smoother.
- ☐ Uncheck this box: If this box is left unchecked, the database will be created completely empty, without any sample data. This option is ideal for preparing a clean production database once you are fully acquainted with Odoo's functionalities and are ready to input your actual business data.
Finalizing Setup and Logging In
Once all the required fields in the form have been accurately filled, click the "Create Database" button (or "Continue" as it might appear). After this, you will need to wait a few moments as Odoo diligently performs the following actions:
- Initiates the creation of a new, empty PostgreSQL database, named exactly as you specified.
- Proceeds to install the fundamental Odoo schema into this newly created database, laying the groundwork for its operations.
- If you opted to "Load Demo Data," the system will then populate your database with the designated sample records, providing a rich environment for exploration.
This entire process may take a few minutes to complete, during which you will typically observe a loading screen. Upon successful completion, you will be automatically redirected to the login page of your newly established Odoo database.
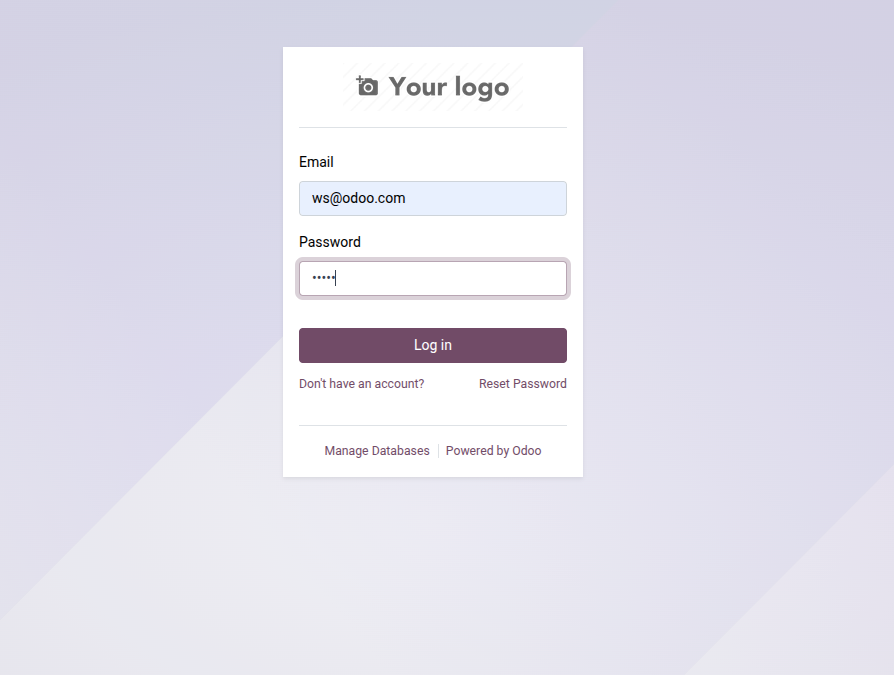
Enter the email address and password you configured earlier during the database creation process. After clicking "Log In," you will be welcomed by the Apps menu, which serves as your gateway to installing and configuring your initial suite of business applications.
Navigating the Odoo Dashboard
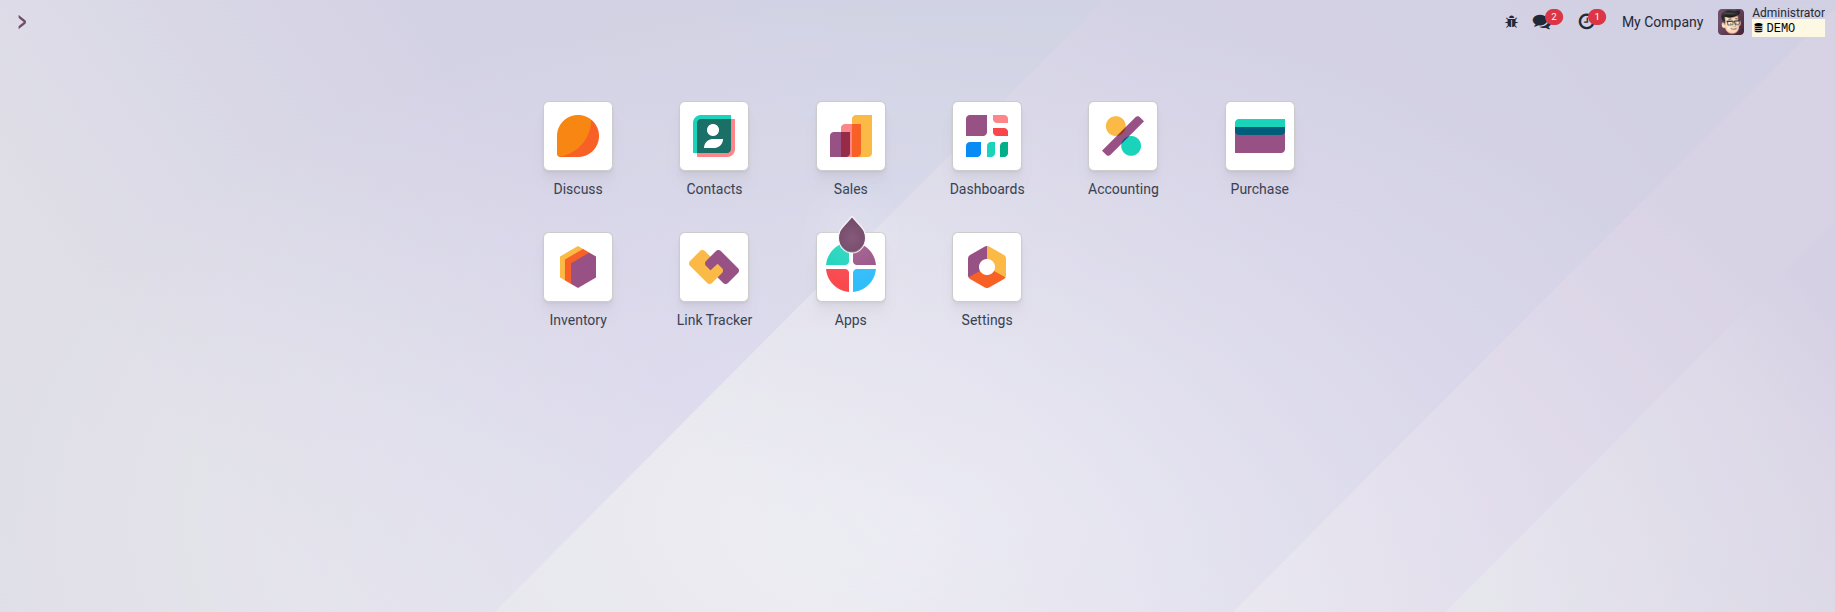
Immediately after your database setup is complete, you will arrive at the Odoo Apps Dashboard. This central hub presents a curated selection of popular business modules designed to streamline various aspects of your operations. Here, you'll discover essential applications such as:
- ???? Inventory Management: For tracking stock, managing warehouses, and optimizing supply chains.
- ???? Accounting: To handle financial transactions, generate reports, and manage budgets.
- ???? Sales Management: For processing orders, managing customer relationships, and tracking sales performance.
- ???? Invoicing: To create and manage invoices, bills, and payments efficiently.
- ???? Website Builder: For developing and maintaining a professional online presence.
To integrate any of these powerful applications into your Odoo environment, simply click on the desired app icon. Odoo is designed to automatically configure everything for you, eliminating the need for complex additional setup steps. For those beginning their journey with Odoo, a practical approach is to start by installing and exploring modules like Sales or Inventory. This allows you to quickly grasp how Odoo’s integrated, modular system functions and how different aspects of your business can be managed cohesively.
Troubleshooting Common Local Setup Issues
While the local database setup process is generally straightforward, users may occasionally encounter specific challenges. Here are some common pitfalls and their effective solutions:
- Error: "Database creation error."
- Cause: This error frequently arises if a database with the identical name you are trying to create already exists on your system.
- Solution: Return to the Database Manager page (typically
/web/database/selector). From there, you can either select the existing database to manage it or, more simply, choose a unique and distinct name for your new database.
- Issue: I forgot my Master Password!
- Solution: The Master Password is crucial for database management. You will need to locate your Odoo configuration file, usually named
odoo.conf. Within this file, search for the lineadmin_passwd = your_master_password. If the line is missing or you cannot find the file, you may need to stop the Odoo service, manually set a new master password within a newly created or existing config file, and then restart the Odoo service to apply the changes.
- Solution: The Master Password is crucial for database management. You will need to locate your Odoo configuration file, usually named
- Issue: The page
http://localhost:8069won't load.- Cause: This typically indicates that the Odoo server application is not currently running on your local machine.
- Solution: Open your terminal or command prompt. Navigate to the directory where your Odoo installation resides. From there, manually start the server. This can often be done using a command like
./odoo-bin(for Linux/macOS) or by using your operating system's service manager if Odoo was installed as a system service.
Conclusion
Establishing a database on a local Odoo installation provides users with unparalleled control and flexibility, laying a robust foundation for in-depth customization and development. While this method involves a few more technical steps compared to a cloud-hosted version, the process is inherently logical and manageable once you are familiar with the necessary procedures. By meticulously following the instructions outlined in this guide, you have successfully set up the fundamental infrastructure for your powerful, self-hosted business management system, ready for further configuration and growth.
