
 (1).svg)
 (1).png)


 (1).svg)
.svg)
Plesk serves as a comprehensive platform for deploying and managing websites and applications in cloud environments. It offers valuable functionalities beneficial to a wide range of users, from web developers and system integrators to hosting providers.
Developers can concentrate on innovating and enhancing applications without concerns about the underlying infrastructure. With its dynamic capabilities, Plesk Onyx—the latest version—introduces advanced features for developers and web professionals. It empowers them to build and run powerful, secure applications, thanks to integrations like Git and robust Docker support.
Docker is recognized as one of the fastest-growing and most successful open-source platforms designed for containerizing distributed applications.
Plesk incorporates Docker as a core component, enabling users to run and manage containers based on specific Docker images. This functionality extends beyond the local host, allowing deployment on defined remote machines. The Docker support within Plesk, provided as an extension, includes:
- Access to a diverse range of modern technologies such as MongoDB, Redis, and Memcached.
- Direct deployment and management of Docker containers directly from the Plesk interface.
- Simplified installation to any local environment or a node registered within Plesk.
- Availability of an extensive catalog of Docker images, with the added flexibility to upload custom images.
Management of Docker Containers and Running Applications with Plesk
The Plesk Docker extension streamlines the deployment and management of Docker containers, facilitating the execution of web applications within them.
Docker containers are founded on a sharing paradigm, where each container leverages the underlying resources of the Docker host. Developers typically create a specific image of their application and then scale it according to demand.
Utilizing the Docker Extension
The Docker extension is readily available with Plesk. Users can select it during the initial Plesk installation. If it wasn't installed initially, it can be easily enabled by navigating to: Home > Tools & Settings > Updates & Upgrades.
Once enabled, access Docker from the left-hand navigation panel to begin its use.
Exploring the Docker Image Catalog
To access the available images, navigate to Docker > Docker Image Catalog.
Here, Plesk presents a catalog of default images sourced from https://hub.docker.com/explore. Users can expand their search or filter for specific images from the Docker Hub by utilizing the icon located near the search box. Simply enter the desired image name or repository to locate it.

After selecting a particular Docker image:
- If a specific application version is required, select it by clicking the arrow next to the Run button.
- To run the latest available version, directly click Run. (Images already stored locally will display Run (Local) on the button).
Plesk offers the ability to define specific container settings before initiating its operation. To modify these settings, navigate to Settings or Details > Settings.
Automatic Start After System Reboot
Enabling the automatic start option for your container ensures that any associated websites or applications will remain operational 24/7, eliminating the need for manual intervention after a system reboot.
Automatic Port Mapping
By default, this option is activated, meaning the container's internal port is automatically mapped to a random available port on the host system.
Should you need to assign a specific external port, uncheck this option and manually specify the desired port.
Volume Mapping
Volume mapping is a crucial practice for data persistence. It allows data to be stored securely outside the container, ensuring its availability even if the container itself is deleted. This approach aligns with best practices and is particularly beneficial for applications like WordPress hosting, especially during site migrations.
When configuring volume mapping, specify the following:
- In the left box: Provide the server directory path that needs to be mounted within the container.
- In the right box: Indicate the corresponding directory path inside the container.

The newly created container will then appear in the containers' list, located at the top of the Docker catalog page.
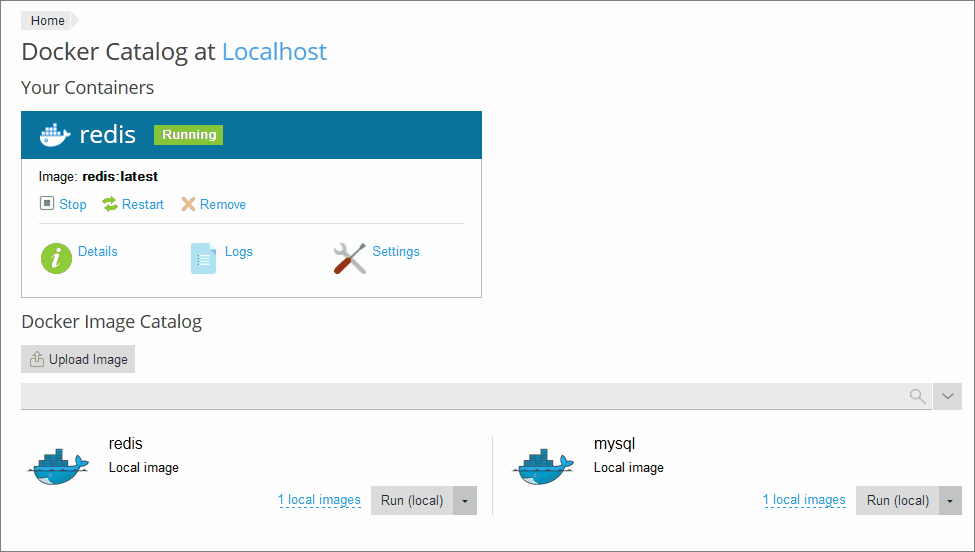
It's also possible to adjust configuration settings after a container has been created. Plesk will then recreate the container to apply the new settings.
Managing Deployed Containers
Plesk provides a comprehensive set of tools for managing your Docker containers:
- You can easily Stop, Restart, or Recreate containers as needed.
- Detailed information such as resource consumption and operational logs can be viewed.
- Container settings can be modified to meet evolving requirements.
- Any container can be effortlessly recreated using its existing image or a completely new image.
- Snapshots of containers can be taken (accessible via Details >> Download a container).
- Containers can also be removed when they are no longer needed.
Recreating Containers
Container recreation is typically necessary when updating an application to a newer or different version. To ensure data integrity, it is essential to specify Volume mapping prior to recreation.
To recreate a container:
- Navigate to Docker and select Details beneath the specific container you wish to recreate.
- Within the container settings, select Recreate. Here, you can specify the desired image version and confirm whether default environment variables should be utilized.
Utilizing Remote Docker Services
While Plesk defaults to using Docker installed as a component within its environment, it also supports the use of one or more external Docker services (though only one can be active at a time). Configuring a remote server is a prerequisite for using it with Plesk.
To use a remote Docker service (applicable for both Linux and Windows environments):
- In Tools & Settings, locate and select Docker under Server Management.
- Choose Add Server and configure the necessary settings.
- Select "Set Active" to enable and begin utilizing this remote service.

Managing Local Docker Images
Local images are immediately available in the catalog and do not require special downloading. These images are automatically saved when you select any version or tag of an image and either proceed to run it or cancel the operation. Plesk also offers an option to upload images directly into the image catalog. Furthermore, images built using command-line interfaces will also appear here.
All custom-created images are also stored locally within the catalog itself. (Refer to the next section to learn how to create custom images.)
Creating Custom Docker Images
When modifications are made to a container, you have the option to save it as a new image. By doing so, the system captures a snapshot of these changes, and this new image will then be displayed in your catalog.
You can further customize the name and version of the image. By default, the system generates a new name for the image and typically saves the latest version only.
Thanks to Plesk, creating applications and running them within Docker containers is a straightforward and efficient process.
Key Limitations
- Plesk supports Docker on specific operating systems: RedHat 7, CentOS 7, Ubuntu 18.04, Debian 9, AlmaLinux 8.x, and Rocky Linux 8.x. For Windows environments, Docker must be installed on a remote machine. Docker is compatible only with x64 systems.
- Plesk does not extend Docker support to Windows Server 2008.
- It is not possible to use Docker that has itself been deployed within a Docker container via Plesk.
- Docker containers cannot be directly migrated or backed up within Plesk. However, Plesk does allow for the backup of data utilized by containers (refer to Volume Mapping section) and the downloading of container snapshots.
- Virtuozzo 7 is supported from Update 1 Hotfix 1 (version 7.0.1-686) or later. It's important to note that with this update, new containers based on CentOS 7 are built with a firewall enabled by default to enhance security. The Plesk administrator is responsible for manually configuring the firewall to ensure that all necessary ports for operation are open.
