 (1).svg)
 (1).png)


 (1).svg)
.svg)
Secure Sockets Layer (SSL) is a fundamental cryptographic protocol designed to establish communication security between web clients and web servers over potentially insecure networks. It ensures that data transmitted between a user's browser and a server remains private and integral. While commercial SSL certificates are signed by trusted Certificate Authorities (CAs) to verify a server's identity, self-signed certificates serve a different, yet valuable, purpose.
Self-signed certificates are security certificates that are generated and signed by the creator of the certificate itself, rather than by a recognized and trusted Certificate Authority. This means they are not automatically trusted by web browsers, often leading to security warnings. However, for specific use cases such as development environments, internal applications, or testing scenarios where the identity verification aspect is less critical than the need for encrypted communication, self-signed certificates offer a practical and cost-effective solution.
This guide will walk you through the process of configuring self-signed SSL certificates specifically for Nginx, which can then be used to secure your Odoo instance. While these certificates provide robust encryption, remember that their lack of third-party validation means they are generally not suitable for public-facing production websites.
Prerequisites for Configuration
Before you begin configuring self-signed SSL certificates, ensure your system meets the following requirements:
- A non-root user with
sudoprivileges is configured on your server. - The Nginx web server is installed and operational.
1. Creating the Certificate Using OpenSSL
The initial step involves generating an SSL certificate and a corresponding self-signed key pair using OpenSSL, a robust toolkit for managing cryptographic artifacts.
Execute the following command to create both the certificate and the private key:
sudo openssl req -x509 -nodes -days 365 -newkey rsa:2048 -keyout /etc/ssl/private/nginx-selfsigned.key -out /etc/ssl/certs/nginx-selfsigned.crtLet's break down the command parameters:
openssl req -x509: This indicates that you are creating a new X.509 certificate request and signing it yourself.-nodes: This ensures that the private key will not be encrypted with a passphrase, simplifying automated server restarts.-days 365: Sets the validity period of the certificate to 365 days. You can adjust this value as needed.-newkey rsa:2048: Generates a new RSA private key of 2048 bits.-keyout /etc/ssl/private/nginx-selfsigned.key: Specifies the output path for the private key file.-out /etc/ssl/certs/nginx-selfsigned.crt: Specifies the output path for the generated certificate file.
After executing the command, OpenSSL will prompt you for several pieces of information related to your server. It is crucial to provide accurate details for your country name, state or province, locality, organization name, organizational unit name, common name, and email address. Among these, the Common Name is particularly important, as it should match the domain name or public IP address that users will use to access your server.
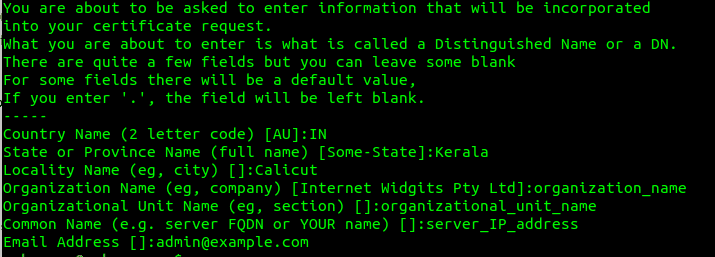 Figure 1: OpenSSL prompts for certificate details
Additionally, for enhanced security, it is recommended to create a strong Diffie-Hellman group. This is used for perfect forward secrecy, ensuring that even if your server's private key is compromised, past communications remain secure. Use the following command:
sudo openssl dhparam -out /etc/nginx/dhparam.pem 4096This command will generate a 4096-bit Diffie-Hellman parameter file, which may take several minutes to complete.
2. Configuring Nginx to Use SSL
With your self-signed certificate and Diffie-Hellman parameters ready, the next step is to configure Nginx to utilize these for secure connections. This involves creating two configuration snippets and then updating your main Nginx server block.
2.1. Configuration Snippet for SSL Key and Certificate
First, you need to create an Nginx configuration snippet that points to your newly created SSL certificate and private key files. This helps in organizing your Nginx configuration and makes it easier to manage.
Create a new snippet file at /etc/nginx/snippets/self-signed.conf:
sudo nano /etc/nginx/snippets/self-signed.confAdd the following lines to this file, ensuring the paths correctly point to your certificate and key:
ssl_certificate /etc/ssl/certs/nginx-selfsigned.crt;
ssl_certificate_key /etc/ssl/private/nginx-selfsigned.key;
Figure 2: Nginx self-signed SSL configuration snippet
2.2. Creating a Configuration Snippet with Strong Encryption Settings
Next, create another snippet to define robust SSL settings. These settings help to secure your server by specifying preferred protocols, ciphers, and other security-related parameters, protecting against various vulnerabilities.
Create the file /etc/nginx/snippets/ssl-params.conf:
sudo nano /etc/nginx/snippets/ssl-params.confPopulate this file with the following advanced SSL configurations:
ssl_protocols TLSv1.2 TLSv1.3; # Enable strong protocols
ssl_prefer_server_ciphers on; # Server prefers its own cipher order
ssl_dhparam /etc/nginx/dhparam.pem; # Path to your Diffie-Hellman parameters
ssl_ciphers ECDHE-RSA-AES256-GCM-SHA512:DHE-RSA-AES256-GCM-SHA512:ECDHE-RSA-AES256-GCM-SHA384:DHE-RSA-AES256-GCM-SHA384:ECDHE-RSA-AES128-GCM-SHA256:DHE-RSA-AES128-GCM-SHA256; # Strong cipher suite
ssl_ecdh_curve secp384r1; # Requires nginx >= 1.1.0
ssl_session_timeout 10m;
ssl_session_cache shared:SSL:10m;
ssl_session_tickets off; # Requires nginx >= 1.5.9
ssl_stapling on; # Requires nginx >= 1.3.7
ssl_stapling_verify on; # Requires nginx >= 1.3.7
resolver 8.8.8.8 8.8.4.4 valid=300s; # Google DNS resolvers
resolver_timeout 5s;
# Disable strict transport security for now. You can uncomment the following
# line if you understand the implications.
# add_header Strict-Transport-Security "max-age=63072000; includeSubDomains; preload";
add_header X-Frame-Options DENY; # Prevent clickjacking
add_header X-Content-Type-Options nosniff; # Prevent MIME sniffing
add_header X-XSS-Protection "1; mode=block"; # Enable XSS filter
These parameters specify secure TLS versions, prefer server-side cipher order, enable session caching for performance, and include various security headers to protect against common web vulnerabilities.
3. Adjusting the Nginx Server Block Configuration
Now, you need to modify your main Nginx server block to incorporate these SSL settings and manage traffic redirection from HTTP to HTTPS. For this example, we'll assume your server block configuration file is located at /etc/nginx/sites-available/example.com.
3.1. Backup Your Configuration
Before making any changes, it is always a good practice to back up your current Nginx configuration file:
sudo cp /etc/nginx/sites-available/example.com /etc/nginx/sites-available/example.com.bak3.2. Modify the Nginx Server Block
Open your Nginx configuration file for editing:
sudo nano /etc/nginx/sites-available/example.comYou will need to create two server blocks: one for handling HTTP (port 80) requests and redirecting them to HTTPS, and another for serving content over HTTPS (port 443).
First, configure the HTTP server block to redirect all incoming traffic on port 80 to the secure HTTPS port 443. This ensures that all connections are encrypted, even if users initially try to access your site via HTTP:
server {
    listen 80;
    listen [::]:80;
    server_name example.com www.example.com; # Replace with your domain or IP
    return 301 https://$server_name$request_uri; # Permanent redirect to HTTPS
}
Next, create the HTTPS server block that will listen on port 443, enabling SSL, and include the two snippets you created earlier for the certificate, key, and strong encryption settings:
server {
    listen 443 ssl;
    listen [::]:443 ssl;
    include snippets/self-signed.conf; # Include SSL certificate and key
    include snippets/ssl-params.conf;  # Include strong SSL parameters

    server_name example.com www.example.com; # Replace with your domain or IP
    root /var/www/example.com/html; # Adjust to your website's root directory
    index index.html index.htm index.nginx-debian.html;

    # Other Nginx configurations for your Odoo instance or web application
    # ...
}
Ensure that you replace example.com and www.example.com with your actual domain name or public IP address, and adjust the root directive to point to your web application's document root if it differs.
4. Enable Nginx Changes
After modifying the Nginx configuration, you must test for syntax errors and then restart the Nginx service for the changes to take effect.
4.1. Test Configuration for Syntax Errors
Run the following command to check your Nginx configuration files for any syntax errors:
sudo nginx -tIf your configuration is error-free, you should see output similar to this, possibly with a warning about ssl_stapling for self-signed certificates:
nginx: [warn] "ssl_stapling" ignored, issuer certificate not found
nginx: the configuration file /etc/nginx/nginx.conf syntax is ok
nginx: configuration file /etc/nginx/nginx.conf test is successful
4.2. Restart Nginx Service
If the configuration test is successful, restart the Nginx service to apply the new SSL settings:
sudo systemctl restart nginx5. Testing Your SSL Server
Now that Nginx is configured, it's time to test your SSL server in a web browser. Open your browser and navigate to your server using HTTPS:
https://server_domain_or_IPSince you are using a self-signed certificate, which is not issued by a trusted Certificate Authority, your browser will likely display a security warning. This is expected behavior and indicates that the browser cannot automatically verify the identity of your server. The specific message may vary by browser, but it will generally inform you that the connection is not private or that the certificate is untrusted.
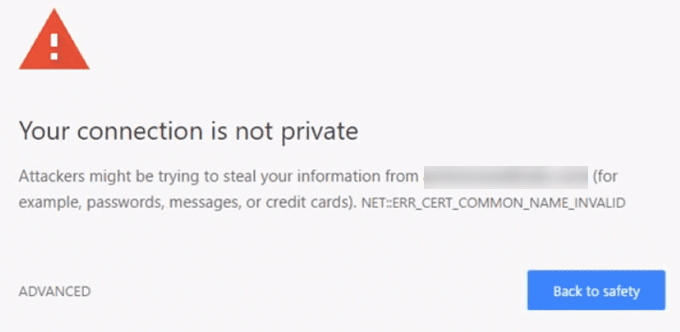 Figure 3: Browser security warning
To proceed, you will typically need to click on an "ADVANCED" or "More Information" option and then choose to "Proceed to [your domain]" or "Accept the Risk and Continue."
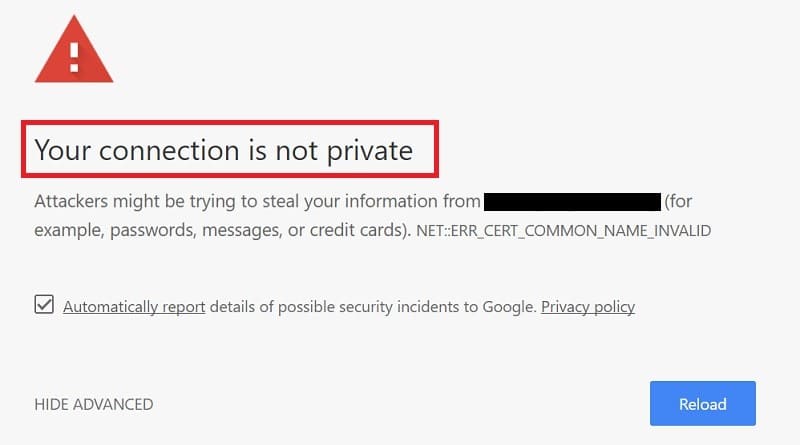 Figure 4: Option to proceed
Upon accepting the warning, you will be directed to your website. In the address bar, you might observe a lock symbol with an 'x' or a similar indicator, signifying that while the connection is encrypted, the certificate itself is not trusted by your browser. This confirms that the self-signed certificate is successfully encrypting your connection, fulfilling its primary purpose for internal or development use.
6. Implementing a Permanent Redirect (Optional but Recommended)
To ensure that all users are always directed to the secure HTTPS version of your site, it is highly recommended to implement a permanent redirect. This is done by modifying the HTTP server block to use a 301 Moved Permanently status code.
Re-open your Nginx configuration file:
sudo nano /etc/nginx/sites-available/example.comEnsure that your HTTP server block (listening on port 80) uses a return 301 directive. If you initially set it to return 302, change it to 301:
server {
    listen 80;
    listen [::]:80;
    server_name example.com www.example.com;
    return 301 https://$server_name$request_uri; # Ensure this is 301 for permanent redirect
}
After making this change, again, check for syntax errors and restart Nginx:
sudo nginx -t
sudo systemctl restart nginx
This final step solidifies your Nginx configuration to exclusively serve traffic over HTTPS, enforcing strong encryption for all client connections to your Odoo instance or other web applications.
By following these steps, you have successfully configured Nginx to use self-signed SSL certificates, providing encrypted communication that is essential for protecting data, even in environments where commercial certificates might not be practical. This setup is ideal for development, staging, or internal network applications where the primary goal is secure data transmission rather than public trust validation.
