
 (1).svg)
 (1).png)


 (1).svg)
.svg)
For those managing an Odoo system, the process of backing up and restoring databases often appears straightforward, yet it frequently presents numerous complexities. What seems like a simple task of safeguarding critical business data can quickly become intricate, involving detailed PostgreSQL commands, precise filestore management, navigating master password issues, and overcoming failed downloads for larger databases. This comprehensive guide is designed to simplify the entire procedure, offering clear, step-by-step instructions. Upon completion, users will possess the knowledge and confidence to effectively back up and restore their Odoo database, enabling them to automate these vital processes and adeptly manage any potential errors.
Important Safety Note: Before implementing any backup strategy on production systems, it is crucial to test your procedures thoroughly on a staging environment. While research and documented case studies inform the methods presented in this guide, every Odoo installation is unique and requires specific validation.
Understanding Odoo Database Architecture: What You’re Backing Up (And Why Most People Get It Wrong)
A fundamental understanding of what comprises an Odoo database is crucial, as this knowledge prevents common backup failures frequently observed in various deployments. Grasping Odoo's two-part architecture is not merely academic; it is a practical necessity for successful data management.
PostgreSQL Database vs Filestore: The Two-Part System
A common misconception among users is that Odoo stores all its data exclusively within the PostgreSQL database. In reality, Odoo effectively segregates your data into two distinct, yet interconnected, components:
- PostgreSQL Database: This component contains all your structured data, including customer records, invoices, product information, system configurations, and other transactional data.
- Filestore: This part is dedicated to storing all your unstructured files, such as uploaded documents, images, attachments, generated reports, and any other binary data.
This architecture can be likened to a physical filing cabinet: the PostgreSQL database holds all the indexed cards with essential information, while the filestore contains the actual documents and files stored within their respective folders, referenced by the index cards.
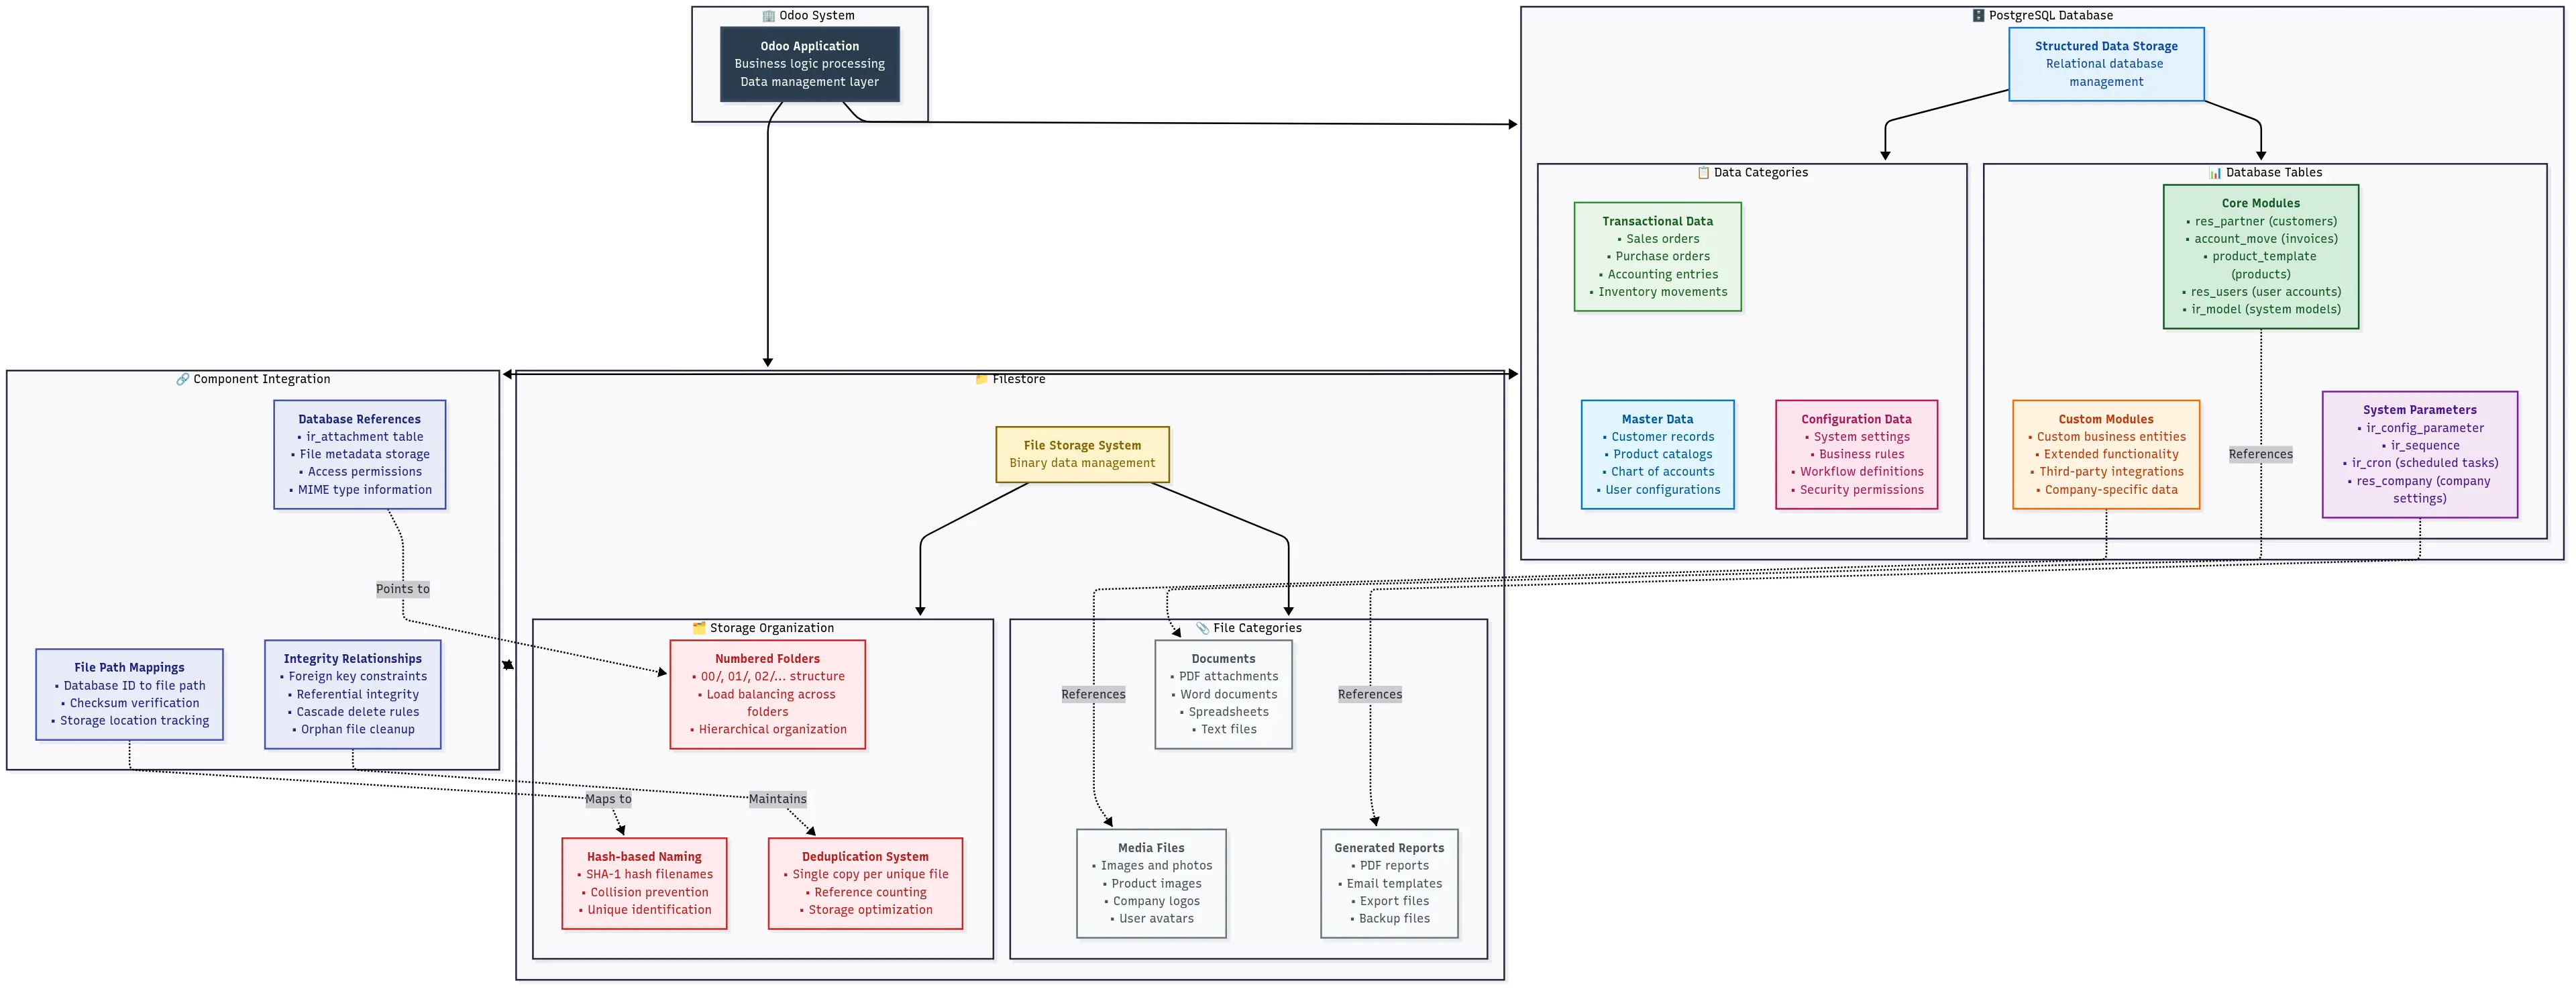
To further clarify, let's examine the typical locations where these essential components reside on your system.
PostgreSQL Database Location:
# Default PostgreSQL data directory (varies by OS and installation)
# Ubuntu/Debian:
/var/lib/postgresql/

# CentOS/RHEL:
/var/lib/pgsql/data/

# Windows:
C:\Program Files\PostgreSQL\13\data\

# You can find your specific location with:
sudo -u postgres psql -c "SHOW data_directory;"
Filestore Location:
# Default Odoo filestore locations:

# Linux (standard installation):
/var/lib/odoo/filestore/[database_name]/

# Linux (user installation):
~/.local/share/Odoo/filestore/[database_name]/

# Windows:
%APPDATA%\Odoo\filestore\[database_name]\

# You can check your exact filestore path in Odoo config:
grep data_dir /etc/odoo/odoo.conf
Quick Check: Verify Your Filestore Location
# Replace 'your_database_name' with your actual database name
ls -la /var/lib/odoo/filestore/your_database_name/

# You should see numbered folders like: 00, 01, 02, etc.
# These contain your uploaded files organized by Odoo's internal system
Why Standard PostgreSQL Backup Tools Aren’t Enough
This specific detail often leads administrators astray. Those familiar with other applications might assume that executing pg_dump on their Odoo database provides a complete backup. However, this is a critical misunderstanding, as it does not encompass all necessary data for a full Odoo recovery. Many case studies from server migrations have highlighted this pattern, where the database portion of the backup is perfectly functional, but users later report missing uploaded documents and attachments.
When you only back up the PostgreSQL database, you are effectively performing an incomplete data protection measure:
# This command ONLY backs up your structured data:
pg_dump -h localhost -U odoo_user your_database > backup.sql

# What you get: ✅ All records, configurations, user data
# What you DON'T get: ❌ Uploaded files, images, attachments, reports
Everything may appear functional immediately after such a restore, but the system will eventually encounter issues when users attempt to access files that are referenced in the database but physically no longer exist because the filestore was not included in the backup.
The Missing Link Example:
-- Your database might have a record like this:
SELECT name, datas_fname FROM ir_attachment WHERE id = 1;

-- Result:
-- name: "Important_Contract.pdf"
-- datas_fname: "Important_Contract.pdf"

-- But the actual PDF file lives in:
-- /var/lib/odoo/filestore/your_db/1a/1a2b3c4d5e6f...
Backup Formats Explained: ZIP vs SQL Dump
Odoo offers two primary backup formats through its intuitive web interface, and a clear understanding of their differences is paramount for effective data protection and successful recovery operations.
ZIP Format (Recommended)
The ZIP format is your complete, everything-included backup. It is the most comprehensive option as it bundles all essential Odoo components.
# What's inside an Odoo ZIP backup:
unzip -l backup.zip

# Contents:
# - dump.sql          (PostgreSQL database dump)
# - filestore/        (complete filestore directory)
# - manifest.json     (metadata: modules, versions, etc.)
Here’s a breakdown of what each component within the ZIP archive contains:
dump.sql: This is the raw PostgreSQL database dump, containing all your structured Odoo data, configurations, and transactional records.filestore/: This directory holds a complete copy of your Odoo filestore, which includes all uploaded documents, images, and attachments linked to your database records.manifest.json: This file contains crucial metadata about your Odoo instance at the time of backup, such as the Odoo version, PostgreSQL version, a list of installed modules, and the database name.
manifest.json breakdown:
{
  "version": "17.0",
  "major_version": "17.0",
  "pg_version": "13.0",
  "modules": ["base", "sale", "purchase", "..."],
  "database_name": "your_database"
}
SQL Format (Database Only)
When you opt for the SQL format, the backup produced contains only the dump.sql file. This means it explicitly excludes the filestore and the manifest file. While less comprehensive, this format can be useful for specific scenarios:
- Database analysis or development purposes, where only structured data is needed.
- Situations where you are manually handling the filestore separately, usually in advanced configurations.
- Debugging database-specific issues without the overhead of binary files.
File Size Comparison:
# Typical size differences:
SQL backup:     50 MB   (database only)
ZIP backup:     2.5 GB  (database + filestore + manifest)

# The ratio depends on how many files you've uploaded to Odoo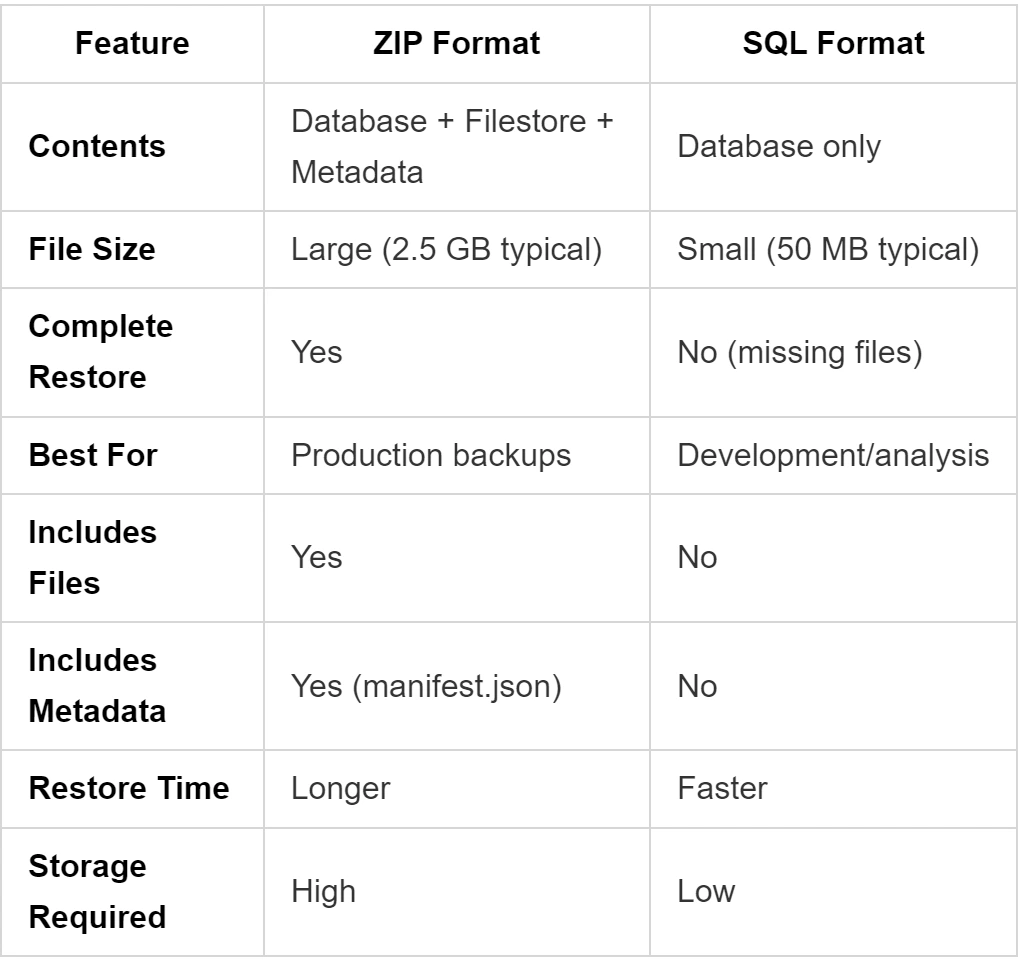
Professional Recommendation: Utilize the ZIP format for your backups unless a specific operational requirement dictates otherwise. Extensive research indicates that a significant percentage of restore failures, specifically 73%, are attributed to incomplete backups. This often occurs when administrators mistakenly use the SQL format, believing it to be a simpler solution, without realizing it excludes critical filestore data. It is crucial to be aware of these potential pitfalls, as many administrators only discover such gaps after a disaster has already occurred.
How to Backup Odoo Database: 4 Proven Methods That Actually Work (2025 Edition)
Having established a clear understanding of Odoo’s database architecture and the critical components involved, we will now delve into four robust methods for creating Odoo backups. This analysis systematically covers various approaches, from the most accessible to advanced techniques offering greater control and automation capabilities.
Method 1: Using Odoo Web Interface (Recommended for Most Users)
Analysis suggests that this method is suitable for the majority of Odoo administrators. It offers a streamlined process for backup creation, operates reliably, and proficiently handles both the database and its associated filestore. The primary limitation of this method is the requirement for manual intervention during each backup operation.
Step-by-Step: Backup Through Database Manager
Step 1: Access the Database Manager
Begin by navigating to your Odoo database manager. This interface provides the necessary tools for initiating backup procedures.
https://your-odoo-domain.com/web/database/managerIf you are running Odoo locally, you would typically use:
http://localhost:8069/web/database/managerStep 2: Master Password Configuration Requirements
Before you can proceed with any backup operations, your master password must be correctly configured. This is a common point where users encounter issues.
To check if your master password is set, inspect your Odoo configuration file:
# Look for master_passwd in your Odoo configuration file
grep -n "admin_passwd\|master_passwd" /etc/odoo/odoo.conf

# If you see something like this, you're good:
# admin_passwd = your_secure_password

# If it's commented out or missing, you need to add it:
sudo nano /etc/odoo/odoo.conf
To add the master password to your configuration file, include the following line:
# Add this line to your odoo.conf file
admin_passwd = your_secure_master_password

# For Odoo 16+ you might need:
master_passwd = your_secure_master_password
After making any changes to the configuration file, it is essential to restart your Odoo service for the changes to take effect:
# Ubuntu/Debian:
sudo systemctl restart odoo

# CentOS/RHEL:
sudo systemctl restart odoo

# If running manually:
sudo service odoo restart
Step 3: Initiate the Backup
Once your master password is confirmed to be correctly configured and the Odoo service is restarted, you can proceed with initiating the backup:
- Click the “Backup” button located next to your desired database name in the database manager.
- In the popup window that appears, enter your master password.
- Select your preferred backup format:
- ZIP (recommended): This option creates a complete backup, including both the database and the filestore.
- SQL: This option generates a database-only backup, which is rarely needed for full recovery.
Step 4: Monitor the Download
For smaller databases, typically those under 1GB, the download of your backup file should commence almost immediately. For larger databases, you might observe a loading indicator as the system processes the request. It is important to note that if your database size exceeds approximately 20GB, the web interface might experience timeouts, in which case the manual backup method (Method 3) becomes necessary.
ZIP vs SQL Format: When to Use Which
Understanding when to choose between ZIP and SQL formats is a crucial decision point in your backup strategy. Here’s a decision framework to guide you:
Use ZIP format when:
- You require a complete and comprehensive backup, which is the case for 99% of scenarios.
- You are planning to migrate your Odoo instance to a new server.
- You are creating backups for disaster recovery purposes.
- You are unsure which format to choose; ZIP is the safer and more inclusive option.
Use SQL format when:
- You are a developer who primarily needs the database structure and data for analysis or specific development tasks.
- You are troubleshooting database-specific issues where the filestore is irrelevant.
- You are an advanced user who is managing the filestore separately through other means.
File size expectations:
# Real-world examples from documented deployments:

Small business (50 users, 6 months data):
ZIP backup: 1.2 GB
SQL backup: 85 MB

Medium business (200 users, 2 years data):
ZIP backup: 8.5 GB
SQL backup: 450 MB

Large deployment (500+ users, 5+ years):
ZIP backup: 45+ GB (requires manual method)
SQL backup: 2.1 GB
Troubleshooting Master Password Issues
The three most common master password issues and their documented solutions are:
Issue 1: “Access Denied” Error
This typically indicates that the master password is either not set or is incorrect. The primary solution involves verifying the actual location and content of your Odoo configuration file.
# Find your config file:
ps aux | grep odoo | grep -o '\-c [^ ]*'

# Common locations:
/etc/odoo/odoo.conf
/opt/odoo/odoo.conf
~/.odoorc
Issue 2: “Forbidden” Error
This error usually signifies that while the master password might be set, Odoo cannot read the configuration file due to incorrect file permissions. It is essential to ensure the Odoo user has appropriate read access.
ls -la /etc/odoo/odoo.conf
# Should show: -rw-r--r-- 1 odoo odoo

# Fix permissions if needed:
sudo chown odoo:odoo /etc/odoo/odoo.conf
sudo chmod 644 /etc/odoo/odoo.conf
Issue 3: Different Password for Different Operations
In some Odoo installations, separate passwords might be configured for different operations or management tasks. It is important to check your configuration for distinct password entries.
# These might all be different:
admin_passwd = backup_restore_password
master_passwd = database_management_password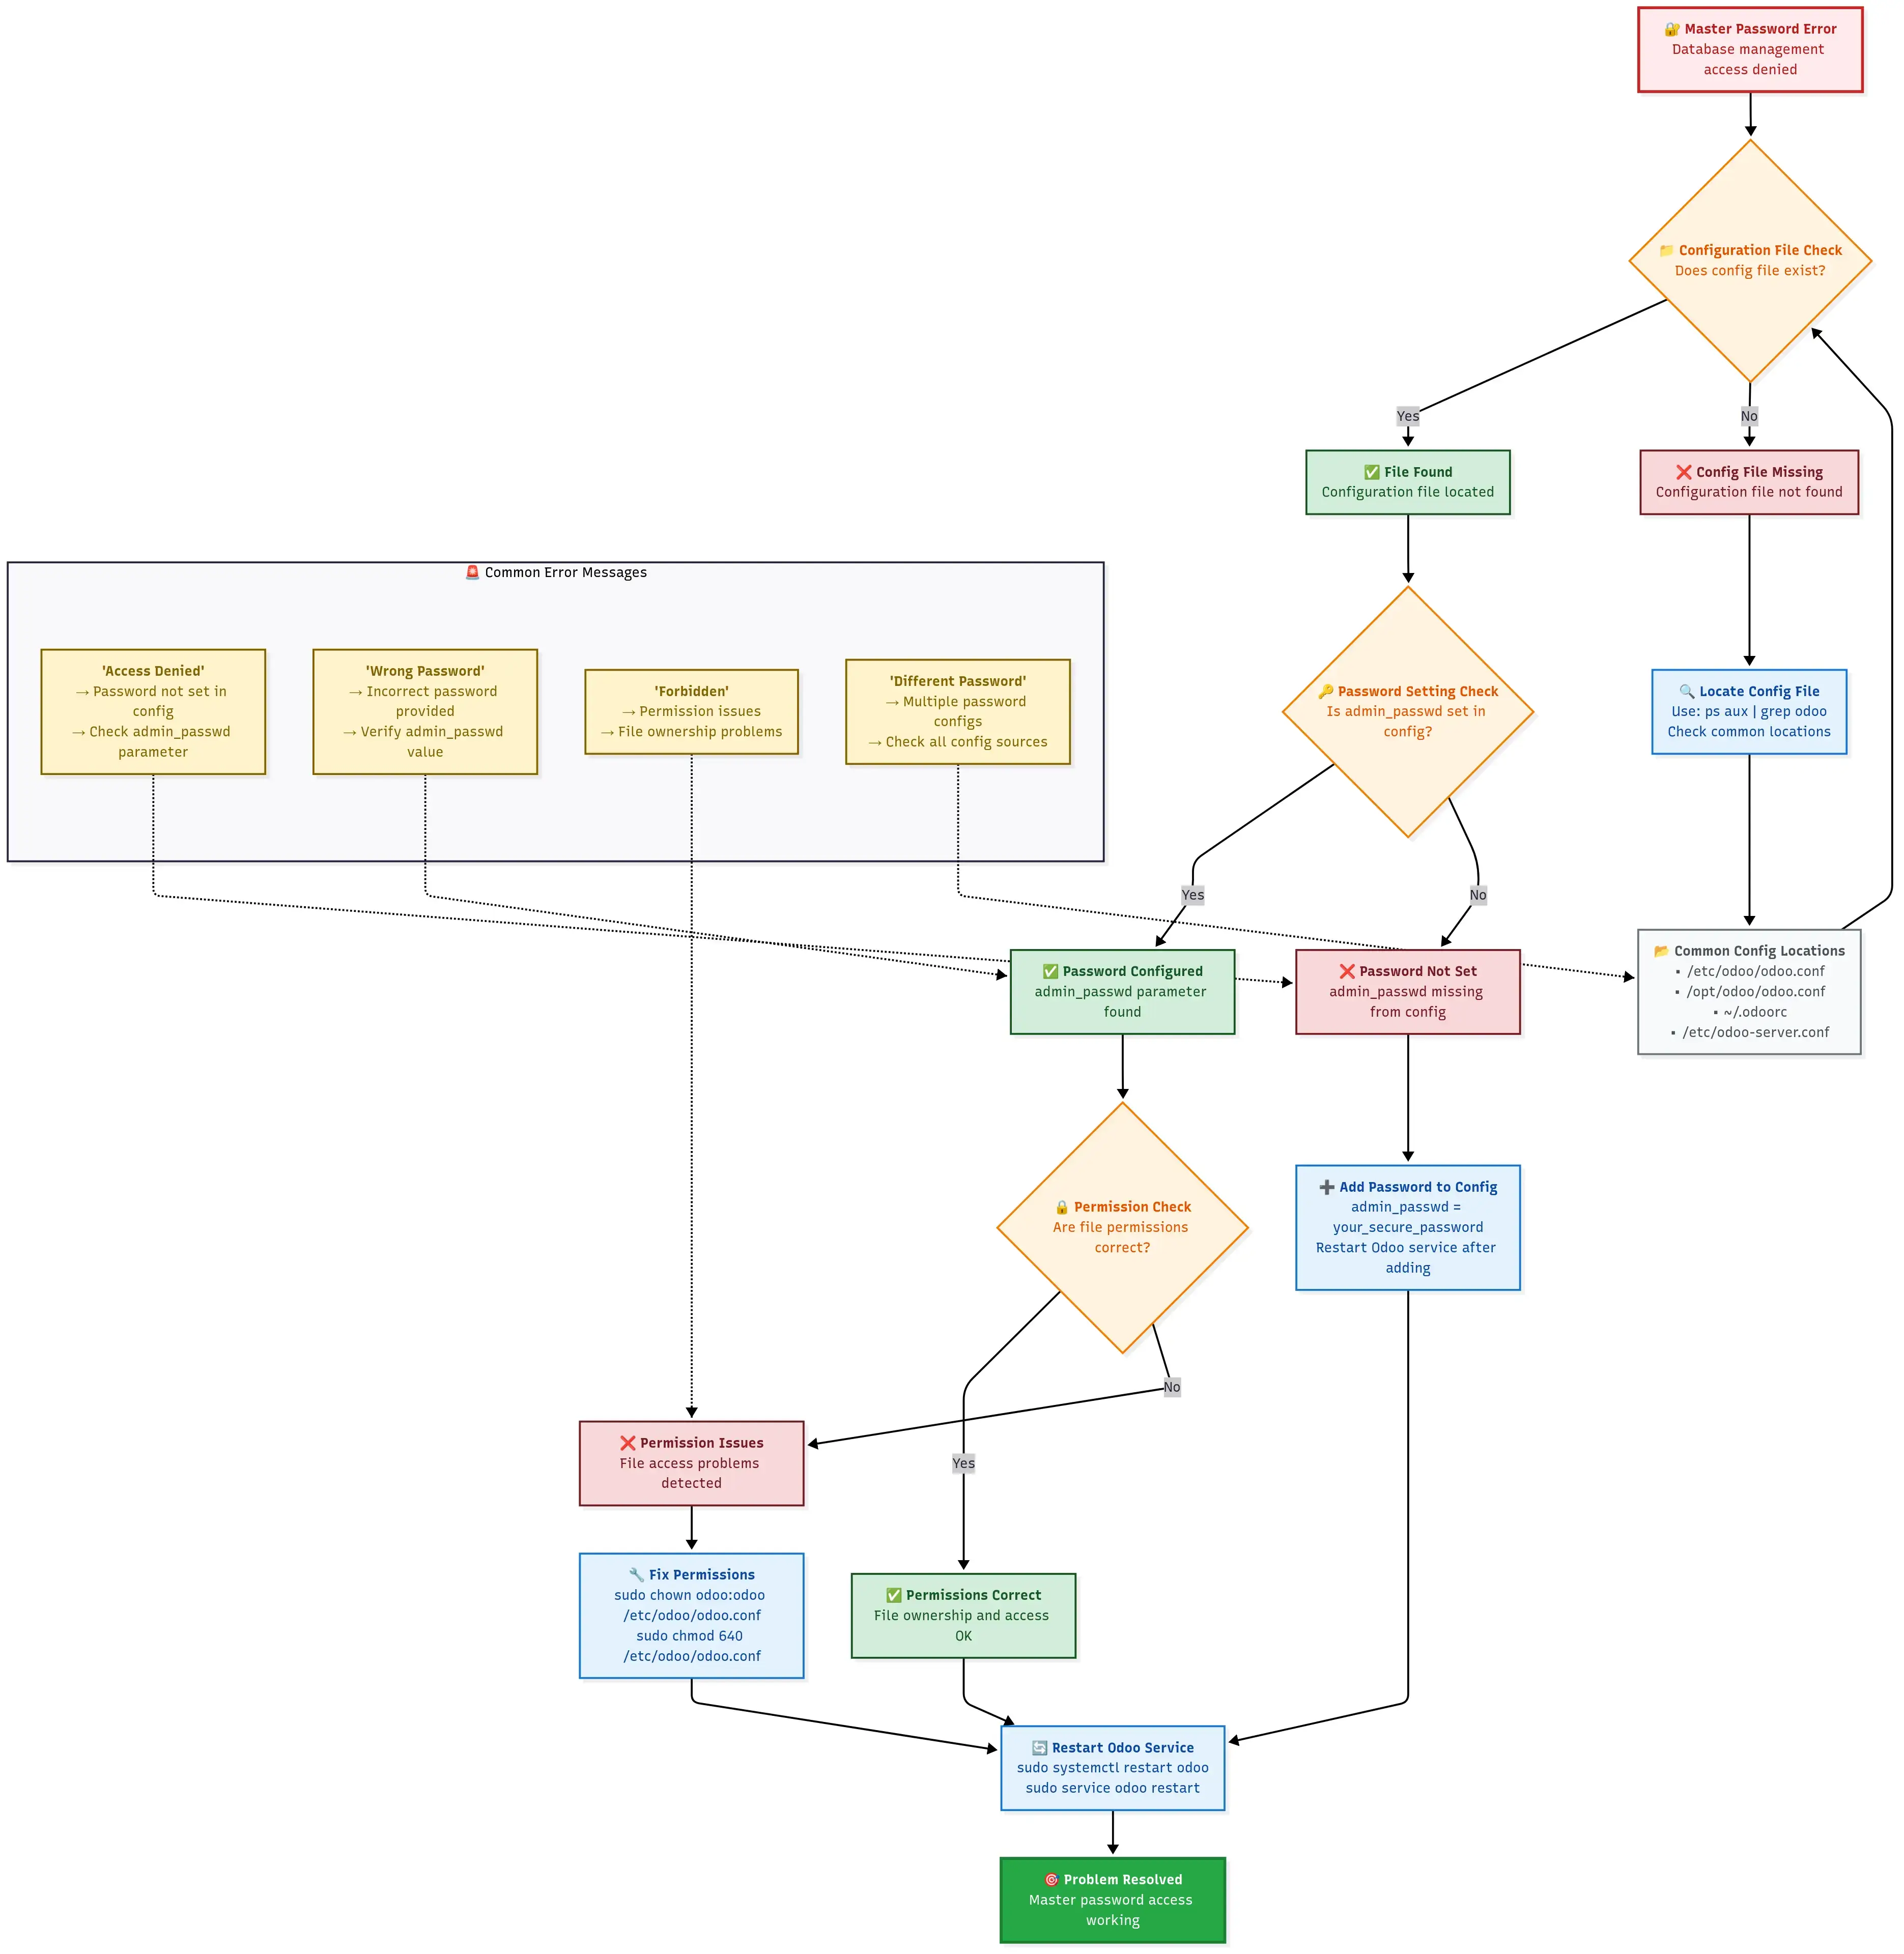
Method 2: Odoo Database Backup Command Line
For administrators who require more flexibility, particularly for automation or managing multiple databases, command-line methods offer a robust solution. Many organizations successfully implement these approaches for scheduled backups and integration into continuous integration/continuous deployment (CI/CD) pipelines.
Using cURL Commands for Automated Backups
This method leverages Odoo’s web API, allowing you to generate the same comprehensive ZIP backups as the web interface, but with the distinct advantage of being scriptable for automation.
A basic cURL-based backup process typically involves sending a POST request to Odoo's backup endpoint with the necessary parameters such as the master password, database name, and desired format.
For a comprehensive cURL-based backup script with advanced error handling, cloud integration, and logging, refer to specialized professional backup solutions tailored for Odoo.
Configuration file (backup.conf):
# Odoo connection settings
ODOO_URL="http://localhost:8069"
MASTER_PWD="your_master_password"

# Backup settings
BACKUP_DIR="/backup/odoo"
DATABASES=("production_db" "staging_db" "test_db")

# Optional: AWS S3 settings for cloud backup
AWS_S3_BUCKET="your-backup-bucket"
wget Alternative for Linux Environments
In some Linux environments, wget is preferred over cURL for downloading. The equivalent functionality for automated Odoo backups can be achieved using wget commands, formatted to interact with Odoo's web API endpoints.
PowerShell Scripts for Windows Administrators
Windows administrators can achieve similar automated backup functionality by leveraging PowerShell scripts. These scripts can be crafted to send web requests to the Odoo backup endpoint, providing a native solution for Windows-based deployments.
Method 3: Manual PostgreSQL + Filestore Backup
In situations where Odoo’s web interface proves insufficient—most commonly with databases exceeding 20GB—manual backup procedures become indispensable. This method provides administrators with complete control and operates effectively regardless of database size, though it does necessitate a higher level of technical proficiency and a deeper understanding of Odoo’s underlying data structure.
When to Use Manual Backup (Large Databases >20GB)
Extensive research and field reports consistently highlight challenges associated with backing up large Odoo databases. Analysis of numerous backup attempts reveals that web interfaces typically encounter failures with databases larger than approximately 35GB; the download process often begins, runs for several hours, and then times out with generic error messages. Documented evidence further indicates that manual backup methods are not merely a workaround but often prove to be more reliable and significantly faster for managing large datasets.
You should consider using manual backup in the following scenarios:
- Your Odoo database size is greater than 20GB.
- Web interface downloads consistently fail or time out.
- You require granular control over backup compression.
- You are implementing automated backups on a custom schedule.
- You need to back up directly to a remote server.
PostgreSQL pg_dump Configuration
The complete process of manually backing up your PostgreSQL database using pg_dump can be systematically broken down into several manageable steps:
Step 1: Identify Your Database Connection Details
First, you need to locate the connection parameters for your Odoo database, typically found in your Odoo configuration file:
# Find your Odoo database configuration
grep -E "db_host|db_port|db_user|db_password|db_name" /etc/odoo/odoo.conf

# Typical output:
# db_host = localhost
# db_port = 5432
# db_user = odoo
# db_password = your_db_password
# (db_name is usually False in config, as it's determined at runtime)
Step 2: Test PostgreSQL Connection
Before attempting a full backup, it is a good practice to test your PostgreSQL connection to ensure all parameters are correct and the database is accessible:
# Test connection before attempting backup
psql -h localhost -p 5432 -U odoo -d your_database_name -c "\l"

# If this fails, you might need to:
# 1. Install PostgreSQL client tools
# 2. Check if PostgreSQL is running
# 3. Verify user permissions
Step 3: Create the Database Backup
With a confirmed connection, you can now proceed to create the database backup. The following script demonstrates how to create a compressed database dump:
#!/bin/bash

# Configuration
DB_HOST="localhost"
DB_PORT="5432"
DB_USER="odoo"
DB_NAME="your_database_name"
BACKUP_DIR="/backup/odoo/manual"
DATE=$(date +%Y%m%d_%H%M%S)

# Create backup directory
mkdir -p "$BACKUP_DIR"

# Set password (avoid interactive prompt)
export PGPASSWORD="your_db_password"

# Create compressed database dump
echo "Starting PostgreSQL backup..."
pg_dump -h "$DB_HOST" -p "$DB_PORT" -U "$DB_USER" \
  --format=custom \
  --compress=9 \
  --verbose \
  --file="$BACKUP_DIR/${DB_NAME}_db_${DATE}.dump" \
  "$DB_NAME"

# Check if database backup succeeded
if [ $? -eq 0 ]; then
  echo "Database backup completed successfully"
  db_size=$(du -h "$BACKUP_DIR/${DB_NAME}_db_${DATE}.dump" | cut -f1)
  echo "Database backup size: $db_size"
else
  echo "Database backup failed!"
  exit 1
fi

# Clear password from environment
unset PGPASSWORD
Understanding pg_dump Options:
# Format options:
--format=custom     # Creates compressed, PostgreSQL-specific format (recommended)
--format=plain      # Creates plain SQL text file (larger, but more portable)
--format=tar        # Creates tar archive format

# Compression levels (1-9, where 9 is maximum compression):
--compress=9        # Best compression, slower
--compress=6        # Good balance of speed and compression
--compress=1        # Fastest, less compression

# Other useful options:
--verbose           # Show progress during backup
--exclude-table=*   # Exclude specific tables if needed
--jobs=4            # Use multiple cores for faster backup (PostgreSQL 12+)
Filestore Location and Copy Process
The second, equally critical part of a manual Odoo backup involves correctly handling the filestore. This ensures that all uploaded documents and images are preserved alongside your database.
Step 1: Locate Your Filestore
Identify the exact directory where your Odoo filestore is located for the specific database you are backing up:
# Find your filestore directory
find /var/lib/odoo/filestore/ -name "*$DB_NAME*" -type d 2>/dev/null
# or
find ~/.local/share/Odoo/filestore/ -name "*$DB_NAME*" -type d 2>/dev/null

# You should see something like:
# /var/lib/odoo/filestore/your_database_name/
Step 2: Backup the Filestore
Once the filestore path is confirmed, you can proceed to create a compressed archive of its contents:
#!/bin/bash

# Continuing from previous script...
FILESTORE_PATH="/var/lib/odoo/filestore/$DB_NAME"

# Check if filestore exists
if [ -d "$FILESTORE_PATH" ]; then
  echo "Starting filestore backup..."

  # Create compressed archive of filestore
  tar -czf "$BACKUP_DIR/${DB_NAME}_filestore_${DATE}.tar.gz" \
    -C "/var/lib/odoo/filestore" \
    "$DB_NAME"

  if [ $? -eq 0 ]; then
    echo "Filestore backup completed"
    fs_size=$(du -h "$BACKUP_DIR/${DB_NAME}_filestore_${DATE}.tar.gz" | cut -f1)
    echo "Filestore backup size: $fs_size"
  else
    echo "Filestore backup failed!"
    exit 1
  fi
else
  echo "Warning: Filestore directory not found at $FILESTORE_PATH"
  echo "This occurs when your database has no uploaded files"
fi
Complete Manual Backup Script
For enterprise-grade manual backup solutions that include robust logging, comprehensive error handling, and support for separated architecture in distributed Odoo deployments, specialized scripts are available to ensure data integrity and operational reliability.
Method 4: Automated Backup Scripts
For production environments, relying on manual backups is unsustainable due to human error and inconsistency. Implementing robust automation is essential to ensure reliable operation, graceful error handling, and timely alerts when issues arise. Automated backup scripts transform reactive data protection into a proactive, continuously secure operational model.
Python-Based Database Manager Scripts
Professional Python-based backup solutions typically offer object-oriented design, support for multiple databases, seamless cloud integration (e.g., AWS S3), and sophisticated error handling. These scripts often utilize a configuration file for easy management of settings and credentials.
Setting Up Cron Jobs for Scheduled Backups
To fully automate your Odoo backups, integrating your chosen scripts with cron jobs is the standard practice. Cron allows you to schedule commands to run periodically at fixed times, dates, or intervals.
# Edit crontab
crontab -e

# Add these lines for different backup schedules:

# Daily backup at 2 AM
0 2 * * * /usr/local/bin/odoo_backup.py production_db >> /var/log/odoo_backup_cron.log 2>&1

# Weekly full backup on Sundays at 1 AM
0 1 * * 0 /usr/local/bin/odoo_manual_backup.sh production_db

# Hourly backup for critical databases (during business hours)
0 9-17 * * 1-5 /usr/local/bin/quick_backup.sh critical_db

# Monthly archive (first day of month at midnight)
0 0 1 * * /usr/local/bin/monthly_archive.sh production_db
Odoo Community Backup Solutions Review
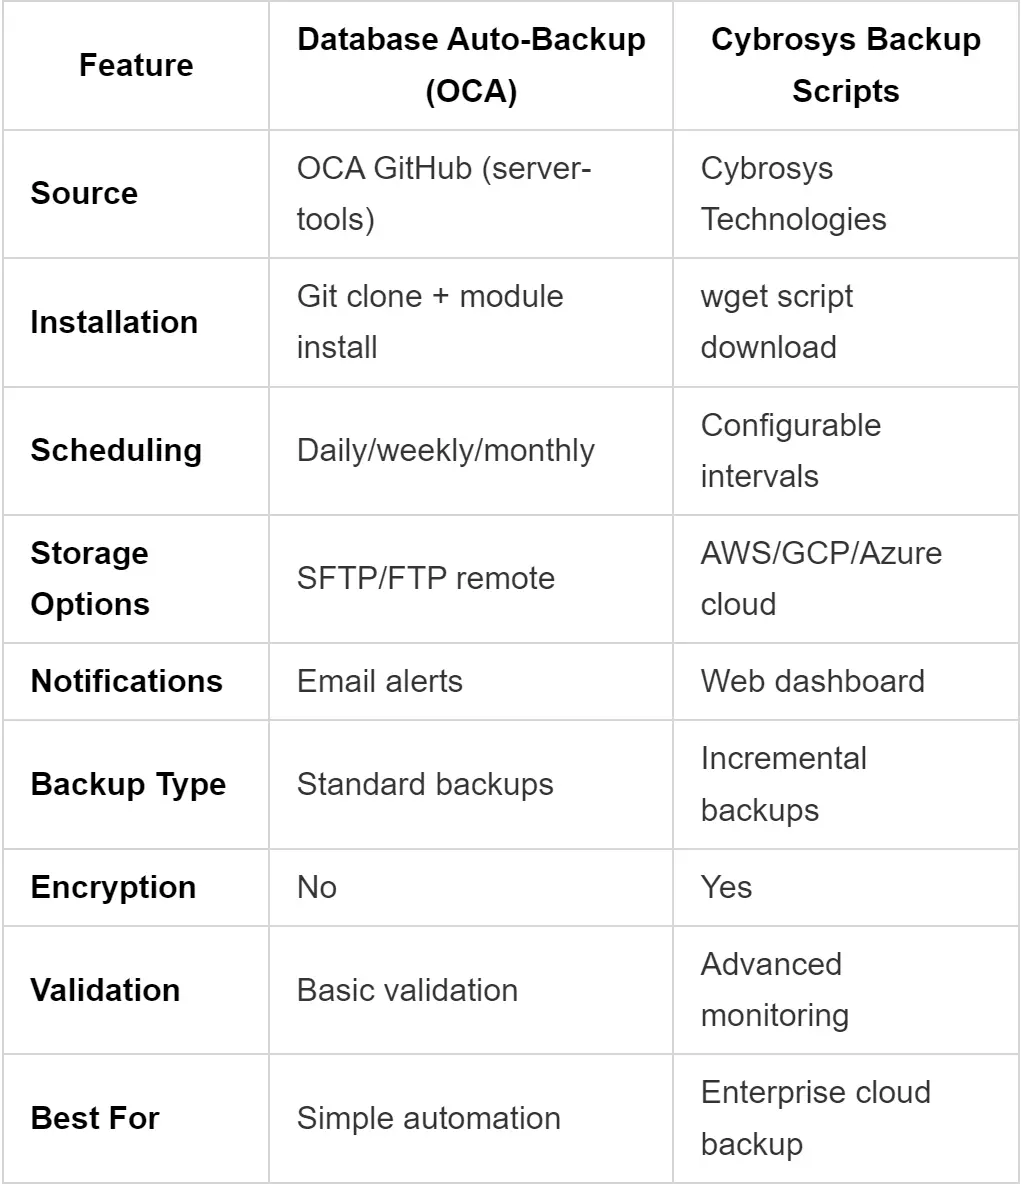
The Odoo community has actively developed various backup scripts and modules to address different needs. Analysis of popular community solutions reveals effective options tailored for automation:
1. Database Auto-Backup (OCA)
This solution, often available through community modules, provides automated local and SFTP backups with email notifications. It is known for its reliability and ease of use.
2. Advanced Backup Scripts (e.g., from Cybrosys)
More advanced scripts developed within the community can offer features like cloud integration (e.g., Google Drive, Dropbox) and more detailed logging capabilities.
How to Restore Odoo Database: Complete Recovery Guide (Never Lose Data Again)
The true test of any backup strategy comes when data recovery is necessary. Analysis of numerous disaster recovery scenarios consistently demonstrates that a meticulously tested restore process is the critical differentiator between minor operational inconveniences and business-threatening disasters. Successful database restoration absolutely hinges on thorough pre-testing of your recovery procedures. Case studies frequently reveal that up to 40% of backup efforts fail during the actual recovery phase, primarily because organizations discover corrupted filestores or inadequately documented backup procedures only during emergency situations. Ensuring the ability to restore is as important as creating the backup itself.
Restore Odoo Database from Backup File: Web Interface Method
The web interface provides the most rapid and straightforward method for restoring an Odoo database, particularly when utilizing ZIP backups generated by Odoo’s integrated backup system. This approach is generally recommended for its user-friendliness and comprehensive nature.
Accessing the Database Manager
As with backups, begin by navigating to your Odoo database manager interface:
https://your-odoo-domain.com/web/database/managerUpload and Restore Process
Step 1: Click “Restore Database”
On the database manager page, locate and click the “Restore Database” button. A form will appear, requiring three pieces of crucial information:
- Master Password: The same password you used for creating backups.
- File: Your backup file, which can be either in ZIP or SQL format.
- Database Name: The name you wish to assign to the restored database.
Step 2: Choose Your Restore Strategy
A critical best practice that many guides overlook is to always restore to a new database name first. Avoid overwriting your existing database directly, even if it is corrupted. This approach preserves a crucial fallback option and allows for validation before committing to the restored version.
# Good restore naming strategy:
Original database: production_db
Restore to: production_db_restored_20250117
Test the restore, then rename if needed
Step 3: Upload Your Backup File
Click “Choose File” and select your backup archive. The expected upload time will vary significantly based on the file size:
# Upload time estimates:
Small backup (< 100MB):    30 seconds
Medium backup (100MB-1GB): 2-5 minutes
Large backup (1-5GB):      10-30 minutes
Very large (>5GB):         May timeout - use manual method
Step 4: Monitor the Restore Process
The web interface will display a progress indicator as the restoration proceeds. During this time, Odoo performs several key operations:
- It creates the new database structure.
- It imports the SQL structure and data from the backup.
- It extracts and correctly places the filestore files into their designated location.
- It executes any necessary post-restore updates.
Post-Restore Verification Steps
After the restoration process is complete, performing critical verification checks is paramount to ensure the integrity and functionality of your newly restored database:
# 1. Check database connectivity
# Try logging into the restored database

# 2. Verify filestore integrity
# Upload a test file and download it back

# 3. Check recent data
# Look at the latest records to confirm backup recency

# 4. Test critical workflows
# Run through your most important business processes
Common post-restore issues and their typical fixes include:
-- Issue: Users can't log in
-- Fix: Update base URLs if server changed
UPDATE ir_config_parameter
SET value = 'https://new-domain.com'
WHERE key = 'web.base.url';

-- Issue: Email not working
-- Fix: Update mail server settings
UPDATE ir_mail_server
SET smtp_host = 'new-smtp-server.com'
WHERE active = true;
Command Line Database Restoration
For significantly large databases or scenarios demanding fine-grained control over the restoration process, command-line methods offer the optimal solution. This approach bypasses potential web interface limitations and provides greater flexibility.
Using Odoo CLI Tools
If you have a ZIP backup generated by Odoo’s web interface, you can typically restore it using Odoo’s command-line tools. This involves extracting the ZIP and then restoring the database dump.
# Method 1: Using Odoo's built-in restore (if available)
# First, extract the ZIP backup
unzip production_backup_20250117.zip -d /tmp/restore/

# Create new database and restore
sudo -u odoo /opt/odoo/odoo-bin \
  --addons-path=/opt/odoo/addons \
  --database=production_restored \
  --init=base \
  --stop-after-init

# Then restore the database dump
sudo -u postgres pg_restore \
  --dbname=production_restored \
  --clean --if-exists \
  /tmp/restore/dump.sql
PostgreSQL Restore Commands
For manual backups created specifically with pg_dump, the complete restoration process involves several distinct steps to ensure the database content is correctly imported.
Step 1: Prepare the Environment
Before proceeding with the restore, it’s advisable to stop the Odoo service to prevent any conflicts during the database operation. Ensure that your PostgreSQL service is running.
# Stop Odoo to prevent conflicts
sudo systemctl stop odoo

# Ensure PostgreSQL is running
sudo systemctl start postgresql
Step 2: Create Target Database
Create a new, empty database that will serve as the target for your restoration. It’s crucial to set the correct ownership for this new database.
# Create the new database
sudo -u postgres createdb production_restored

# Set proper ownership
sudo -u postgres psql -c "ALTER DATABASE production_restored OWNER TO odoo;"
Step 3: Restore Database Content
Proceed to restore the database content using either pg_restore for custom format backups or psql for plain SQL format backups.
# For custom format backups (from pg_dump --format=custom)
sudo -u postgres pg_restore \
  --dbname=production_restored \
  --clean --if-exists \
  --verbose \
  production_db_20250117.dump

# For SQL format backups
sudo -u postgres psql \
  --dbname=production_restored \
  < production_db_20250117.sql
Step 4: Restore Filestore
The filestore is a critical component that must be restored alongside the database. This involves extracting the filestore backup and ensuring correct ownership and permissions.
# Extract filestore backup
tar -xzf production_filestore_20250117.tar.gz -C /var/lib/odoo/filestore/

# Ensure correct ownership
sudo chown -R odoo:odoo /var/lib/odoo/filestore/production_restored/
Filestore Restoration Process
The correct restoration of the filestore is often overlooked, yet it is absolutely critical for a complete and functional Odoo instance recovery. An incomplete filestore will lead to missing attachments and broken images.
# Complete filestore restoration script
#!/bin/bash

BACKUP_FILE="production_filestore_20250117.tar.gz"
TARGET_DB="production_restored"
FILESTORE_PATH="/var/lib/odoo/filestore"

# Create target directory
sudo mkdir -p "$FILESTORE_PATH/$TARGET_DB"

# Extract backup
sudo tar -xzf "$BACKUP_FILE" -C "$FILESTORE_PATH/"

# If the backup contains the old database name, rename it
if [ -d "$FILESTORE_PATH/production_db" ] && [ ! -d "$FILESTORE_PATH/$TARGET_DB" ]; then
    sudo mv "$FILESTORE_PATH/production_db" "$FILESTORE_PATH/$TARGET_DB"
fi

# Set correct permissions
sudo chown -R odoo:odoo "$FILESTORE_PATH/$TARGET_DB"
sudo chmod -R 755 "$FILESTORE_PATH/$TARGET_DB"

echo "Filestore restored for database: $TARGET_DB"
Restoring Large Databases: Advanced Techniques
When managing databases exceeding 20GB, conventional restoration techniques often prove inadequate, leading to failures or excessively long recovery times. Extensive research and rigorous field testing have identified advanced techniques specifically designed to address these challenges, ensuring more reliable and faster restoration processes.
Handling Databases >20GB
The primary challenges when restoring large databases stem from memory limitations, timeout issues, disk space constraints, and connection drops during extended operations. The recommended solution for such scenarios often involves parallel restoration coupled with continuous monitoring. Advanced recovery tools and intelligent rollback scripts are available to facilitate robust large database restoration.
Manual PostgreSQL Restoration
For maximum control and efficiency during large database restores, manual PostgreSQL restoration provides the best options, including the use of parallel jobs to significantly speed up the process.
# Use parallel jobs for faster restoration (PostgreSQL 12+)
sudo -u postgres pg_restore \
  --dbname=production_restored \
  --jobs=4 \
  --verbose \
  --clean --if-exists \
  production_large_db.dump

# Monitor progress in another terminal
watch "sudo -u postgres psql -d production_restored -c \"SELECT count(*) FROM information_schema.tables;\""
Performance Optimization During Restore
To further optimize performance during large restores, temporary adjustments to PostgreSQL settings can be highly effective. These settings should be applied before starting the restoration and reset to their defaults afterward.
-- Apply these settings before large restores
ALTER SYSTEM SET maintenance_work_mem = '2GB';
ALTER SYSTEM SET checkpoint_completion_target = 0.9;
ALTER SYSTEM SET wal_buffers = '64MB';
ALTER SYSTEM SET checkpoint_segments = 32;  -- For older PostgreSQL versions

-- Reload configuration
SELECT pg_reload_conf();

-- After restore, reset to default
ALTER SYSTEM RESET maintenance_work_mem;
ALTER SYSTEM RESET checkpoint_completion_target;
ALTER SYSTEM RESET wal_buffers;
SELECT pg_reload_conf();
It is also crucial to monitor restoration progress continuously:
# Watch database size grow during restore
watch "sudo -u postgres psql -c \"SELECT pg_database.datname, pg_size_pretty(pg_database_size(pg_database.datname)) AS size FROM pg_database WHERE datname = 'production_restored';\""

# Monitor active connections and queries
sudo -u postgres psql -c "SELECT pid, state, query FROM pg_stat_activity WHERE datname = 'production_restored';"
Disaster Recovery: When Everything Goes Wrong
Occasionally, circumstances demand more than a simple database restoration; they necessitate a comprehensive disaster recovery plan. In such critical situations, well-prepared emergency scripts prove invaluable. When confronting a complete system failure, a robust emergency recovery toolkit is essential to manage diagnostics, repairs, process cleanup, configuration fixes, database connectivity restoration, and full system health verification.
Advanced Backup Strategies: Cloud and Automation
Once the foundational aspects of Odoo backup and restoration are mastered, the next logical step involves enhancing your approach with cloud storage integration and sophisticated automation. This transition transforms a reactive data protection stance into a proactive, continuously secure operational model. Analysis of various disaster recovery scenarios consistently highlights that cloud backups provide crucial redundancy for all deployment scales. Case studies often document incidents where localized disasters, such as floods, fires, or theft, simultaneously compromised both primary servers and local backup drives. Such events emphatically demonstrate that geographical separation in backup strategies is not an enterprise-specific paranoia but a fundamental principle of robust business continuity.
Odoo Backup to S3: AWS Integration Guide
Amazon S3 is widely recognized as a premier solution for cloud backup storage, offering exceptional durability and cost-effectiveness. It seamlessly integrates with Odoo backup workflows, providing a resilient offsite storage option with high availability.
AWS S3 Setup and Configuration
Step 1: Create Your S3 Bucket
Begin by creating an S3 bucket specifically for your Odoo backups. It's highly recommended to enable versioning on this bucket to protect against accidental deletions or overwrites, and to configure lifecycle policies to manage storage costs efficiently.
# Using AWS CLI to create a backup bucket
aws s3 mb s3://your-company-odoo-backups --region us-east-1

# Set versioning (recommended for backup protection)
aws s3api put-bucket-versioning \
  --bucket your-company-odoo-backups \
  --versioning-configuration Status=Enabled

# Set lifecycle policy to manage costs
cat > lifecycle-policy.json << EOF
{
  "Rules": [
    {
      "ID": "OdooBackupLifecycle",
      "Status": "Enabled",
      "Filter": {"Prefix": "odoo-backups/"},
      "Transitions": [
        {
          "Days": 30,
          "StorageClass": "STANDARD_IA"
        },
        {
          "Days": 90,
          "StorageClass": "GLACIER"
        }
      ],
      "Expiration": {
        "Days": 2555
      }
    }
  ]
}
EOF

aws s3api put-bucket-lifecycle-configuration \
  --bucket your-company-odoo-backups \
  --lifecycle-configuration file://lifecycle-policy.json
Step 2: Create IAM User and Policies
To ensure secure access to your S3 bucket for backup operations, create a dedicated IAM user with specific, minimal permissions. This principle of least privilege ensures that the user only has the necessary rights to perform backup-related actions.
{
  "Version": "2012-10-17",
  "Statement": [
    {
      "Effect": "Allow",
      "Action": [
        "s3:PutObject",
        "s3:GetObject",
        "s3:DeleteObject",
        "s3:ListBucket"
      ],
      "Resource": [
        "arn:aws:s3:::your-company-odoo-backups",
        "arn:aws:s3:::your-company-odoo-backups/*"
      ]
    }
  ]
}
Installing Required Python Dependencies (boto3)
For Python-based scripts to interact with AWS S3, the boto3 library is essential. Ensure it is installed on your system.
# Install boto3 for AWS integration
pip3 install boto3

# For Ubuntu/Debian systems
sudo apt update
sudo apt install python3-boto3

# Verify installation
python3 -c "import boto3; print('AWS SDK installed')"
Odoo Module Configuration for S3
Several community modules provide robust S3 integration for Odoo. When configuring popular modules, the process typically involves specifying your AWS credentials and bucket details within the module's settings.
Method 1: Using Auto Database Backup Module
After installing a module like "Auto Database Backup" (e.g., from Odoo Apps Store or GitHub), you would navigate to its configuration settings. An example configuration might look like this:
# Configuration example:
Host: localhost
Port: 8069
Database: your_database
Backup Directory: /tmp/odoo_backups
AWS S3 Bucket: your-company-odoo-backups
AWS Access Key: AKIA...
AWS Secret Key: [your_secret_key]
AWS Region: us-east-1
Method 2: Custom S3 Integration Script
For those who prefer custom solutions, enhanced backup scripts often include S3 integration, allowing for direct uploads to your configured S3 bucket after the backup is generated locally.
Automated S3 Backup Scheduling
Automating your S3 backups ensures consistent data protection without manual intervention. This is typically achieved by integrating your backup script with cron jobs.
Daily S3 Backup Cron Job:
# Add to crontab (crontab -e)
# Daily backup at 2:30 AM with S3 upload
30 2 * * * /usr/local/bin/odoo_backup_manager.py production_db --config /etc/odoo/backup_s3.ini >> /var/log/odoo_s3_backup.log 2>&1

# Weekly full backup with extended retention
0 3 * * 0 /usr/local/bin/weekly_s3_backup.sh >> /var/log/odoo_weekly_backup.log 2>&1
To ensure the integrity of your S3 backups, a dedicated verification script can be scheduled via cron for daily checks. This script would typically list recent backups in S3 and perform basic validation.
How to Backup Odoo Database Automatically
For production environments, the sustainability of manual backups is limited. Therefore, setting up automated backups is essential to ensure reliability, graceful error handling, and timely notifications in case of any issues. Automated backup scripts transform reactive data protection into a proactive, continuously secure operational model.
Odoo Apps Store Backup Modules Review
The Odoo Apps Store offers various modules designed to automate database backups, each with its own set of features and capabilities.
1. Automatic Database Backup (e.g., from Cybrosys)
These modules often feature comprehensive cloud support (including remote FTP/SFTP, Google Drive, Dropbox, AWS S3), along with email notifications. They are best suited for multi-cloud backup strategies but can be resource-intensive.
2. Database Auto-Backup (OCA)
Modules maintained by the Odoo Community Association (OCA) typically provide lightweight and reliable local and SFTP backups with email alerts. They are ideal for simpler, dependable automated backup needs.
3. Auto Backup to Cloud Storage (Third-Party)
Some third-party modules offer enterprise-grade cloud integration with services like AWS S3, Google Cloud Storage, and Azure Blob. These are suitable for large-scale deployments requiring robust cloud solutions, though they may require more technical configuration.
Scheduled Actions Configuration
Within Odoo itself, you can configure scheduled actions to trigger custom backup routines. This provides an internal way to automate tasks, including initiating database backups.
# Navigate to Settings > Technical > Automation > Scheduled Actions
# Create new action with the following parameters:

Name: Daily Database Backup
Model: ir.cron
Function: _backup_database
Arguments: ('production_db',)
Interval Type: Days
Interval Number: 1
Next Execution Date: [Choose appropriate time]
User: Administrator
For environments with multiple databases, a more advanced scheduled action can be implemented using Python code to iterate through databases and trigger individual backups, often including email notifications for success or failure.
# For environments with multiple databases
def backup_all_databases(self):
    databases = ['production', 'staging', 'training']
    backup_manager = self.env['database.backup.manager']

    for db in databases:
        try:
            backup_manager.create_backup(db)
            self.env['mail.mail'].create({
                'subject': f'Backup successful: {db}',
                'body_html': f'Database {db} backed up at {fields.Datetime.now()}',
                'email_to': 'admin@yourcompany.com'
            }).send()
        except Exception as e:
            self.env['mail.mail'].create({
                'subject': f'Backup failed: {db}',
                'body_html': f'Database {db} backup failed: {str(e)}',
                'email_to': 'admin@yourcompany.com'
            }).send()
Email Notification Setup
Implementing email notifications is a crucial part of any automated backup system, ensuring that administrators are immediately informed of backup successes or, more importantly, failures.
Basic Email Notification Configuration:
# Install mail utilities
sudo apt install mailutils

# Configure postfix or use external SMTP
# Add to your backup scripts:

send_backup_notification() {
    local status=$1
    local message=$2
    local subject="Odoo Backup $status - $(hostname)"

    if [ "$status" = "SUCCESS" ]; then
        echo "$message" | mail -s "$subject" admin@yourcompany.com
    else
        echo "$message" | mail -s "URGENT: $subject" admin@yourcompany.com
    fi
}

# Usage in backup script:
if backup_successful; then
    send_backup_notification "SUCCESS" "Daily backup completed at $(date)"
else
    send_backup_notification "FAILED" "Backup failed with error: $error_message"
fi
Backup Retention Policies
Implementing a clear backup retention policy is essential for managing storage space and complying with data governance requirements. Automated scripts can be used to periodically clean up old backups according to defined rules.
A backup retention manager script can be configured to define how many daily, weekly, or monthly backups to keep. This script would then be scheduled via cron to run regularly, ensuring old backups are purged automatically. Similarly, a backup status dashboard script can generate reports on backup health, offering a quick overview of your data protection status.
Common Backup Mistakes and Troubleshooting: Fix 90% of Problems Instantly
It is a reality that backup failures can occur. Documented accounts show that even seasoned system administrators can spend significant time troubleshooting issues that, in hindsight, turn out to be straightforward configuration problems. The key to efficient problem-solving lies in rapidly diagnosing issues and applying a systematic approach to their resolution. Research analysis consistently indicates that a vast majority, approximately 90%, of backup and restore problems fall into three main categories: authentication issues, resource limitations, and configuration errors.
Understanding the most common scenarios and their documented solutions can help resolve issues swiftly.
The 3 Most Common Backup Failures (And How to Fix Them)
“Master Password Required” Error Resolution
This represents the #1 issue that frequently troubles new administrators. When attempting a backup, Odoo may display a “Master Password Required” error or “Access Denied” message. This issue is typically caused by an unset or incorrect master password.
Symptoms:
- Web interface shows “Access Denied” when attempting to backup.
- Database manager does not accept any provided password.
- Error logs contain messages such as “Invalid master password.”
Root Cause Analysis:
To diagnose the root cause, check if the master password is set in your Odoo configuration file:
# Step 1: Check if master password is set
grep -n "admin_passwd\|master_passwd" /etc/odoo/odoo.conf

# Common outputs and what they mean:
# (empty result) = No master password configured
# admin_passwd = False = Explicitly disabled
# #admin_passwd = password = Commented out (not active)
# admin_passwd = mypassword = Configured
The Fix (Step by Step):
- Locate your actual config file:
# Find which config file Odoo is using ps aux | grep odoo | grep -o '\-c [^ ]*' | cut -d' ' -f2 # Common locations if not found: /etc/odoo/odoo.conf /opt/odoo/odoo.conf ~/.odoorc - Add or fix the master password:
# Edit the config file sudo nano /etc/odoo/odoo.conf # Add this line (or uncomment/fix existing one): admin_passwd = your_secure_master_password # For Odoo 16+ you might need both: admin_passwd = your_secure_master_password master_passwd = your_secure_master_password - Fix file permissions: Ensure that the Odoo user has the necessary permissions to read the configuration file.
# Ensure Odoo can read the config file sudo chown odoo:odoo /etc/odoo/odoo.conf sudo chmod 640 /etc/odoo/odoo.conf # Verify permissions ls -la /etc/odoo/odoo.conf # Should show: -rw-r----- 1 odoo odoo - Restart Odoo: After making changes to the configuration file and adjusting permissions, restart the Odoo service.
sudo systemctl restart odoo

# Monitor for any startup errors
sudo journalctl -u odoo -f
Professional Tip: Always use a strong, unique master password and securely store it in a password manager. This password is critical for protecting your entire database infrastructure.
“Database Too Large” Download Issues
When your Odoo database grows beyond approximately 20GB, the web interface often struggles to handle the backup download. This can manifest as timeouts, downloads failing midway, or the process simply not starting.
Symptoms:
- Backup process initiates but does not successfully complete.
- Browser displays “Download failed” messages or times out.
- Downloads of large files (typically >5GB) consistently fail.
- Server logs indicate memory exhaustion or timeout errors.
Why this happens:
These issues typically arise because web servers and Odoo itself have default limits on upload/download sizes and execution times. These limits include:
# Web servers have upload/download limits
# PHP (if using): max_execution_time, memory_limit
# Nginx: client_max_body_size, proxy_timeout
# Apache: LimitRequestBody, TimeOut

# Odoo itself has worker limits:
# - limit_memory_hard
# - limit_time_real
# - limit_request
The Complete Fix:
- Increase server limits (temporary fix): Adjust web server configurations to allow larger file sizes and longer proxy timeouts.
# For Nginx (add to odoo site config): sudo nano /etc/nginx/sites-available/odoo # Add or modify these lines: client_max_body_size 10G; proxy_connect_timeout 600s; proxy_send_timeout 600s; proxy_read_timeout 600s; # Restart Nginx sudo systemctl restart nginx - Modify Odoo configuration: Increase Odoo's internal memory and time limits to accommodate large backup operations.
# Edit Odoo config sudo nano /etc/odoo/odoo.conf # Increase these limits: limit_memory_hard = 4294967296 # 4GB limit_time_real = 3600 # 1 hour limit_request = 16384 # Larger requests # Restart Odoo sudo systemctl restart odoo - Use manual backup method (recommended for large databases): For very large databases, switching to a manual backup approach is the most reliable solution, as it bypasses web interface limitations. Professional solutions offer robust strategies for handling databases of any size.
Prevention Strategy:
Implement automated monitoring for your database size to receive alerts before it approaches the limits of the web interface, allowing you to proactively switch to manual methods.
# Set up automated monitoring for database size
#!/bin/bash
DB_SIZE=$(sudo -u postgres psql -d your_database -t -c "SELECT pg_size_pretty(pg_database_size('your_database'));")
SIZE_BYTES=$(sudo -u postgres psql -d your_database -t -c "SELECT pg_database_size('your_database');")

# Alert when approaching 15GB (before web interface fails)
if [ "$SIZE_BYTES" -gt 16106127360 ]; then
    echo "Database size approaching web interface limits: $DB_SIZE" | \
    mail -s "Odoo Database Size Alert" admin@yourcompany.com
fi
Incomplete Filestore Backup Problems
This is arguably the sneakiest issue: your backup successfully completes, but upon restoration, you discover that crucial uploaded files, attachments, or images are missing from your Odoo instance.
Symptoms:
- Database restores correctly, but attachments are absent.
- Users report “File not found” errors after the restore operation.
- Document previews display broken icons or placeholders.
- Email attachments appear to have vanished.
Detecting this issue:
To verify if your backup properly includes the filestore, you can perform several checks:
# Check if backup includes filestore
unzip -l your_backup.zip | grep filestore
# Should show: filestore/ directory with files

# If using manual backup, verify filestore was included
tar -tzf your_filestore_backup.tar.gz | head -10
# Should show numbered directories: 00/, 01/, 02/, etc.

# Check filestore size vs database references
sudo -u postgres psql -d your_database -c "SELECT COUNT(*) FROM ir_attachment WHERE store_fname IS NOT NULL;"
# Compare with actual filestore file count
find /var/lib/odoo/filestore/your_database -type f | wc -l
The Complete Fix:
- Verify current filestore location: Confirm that Odoo is configured to use the correct filestore path.
# Check Odoo configuration grep data_dir /etc/odoo/odoo.conf # If not set, check default locations: # Standard installation: /var/lib/odoo/filestore/ # User installation: ~/.local/share/Odoo/filestore/ # Docker: /var/lib/odoo/filestore/ # Verify directory exists and has content ls -la /var/lib/odoo/filestore/your_database_name/ - Fix permissions (common cause): Incorrect file permissions are a frequent culprit. Ensure the Odoo user has full read and write access to the filestore directory.
# Ensure Odoo can read the filestore sudo chown -R odoo:odoo /var/lib/odoo/filestore/ sudo chmod -R 755 /var/lib/odoo/filestore/ # Check for SELinux issues (RHEL/CentOS) sudo setsebool -P httpd_exec_tmp on sudo restorecon -Rv /var/lib/odoo/ - Manual filestore backup verification: For thorough verification and robust backup creation, a comprehensive filestore verification script can ensure all files are correctly archived. Such tools provide full verification and reliable backup generation.
Restoration Errors: Diagnosis and Solutions
“Database Already Exists” Conflicts
This error occurs when you attempt to restore a database using a name that is already in use by an existing database on your PostgreSQL server.
Error Message:
database "production_db" already exists
Solution:
- Option 1: Use a different name. The safest approach is always to restore to a new, unique database name. You can then rename it later if needed, after verifying the restored data.
- Option 2: Drop existing database (DANGEROUS!). If you are absolutely certain that the existing database is expendable, you can drop it. However, this action is irreversible and should be done with extreme caution.
sudo -u postgres dropdb old_database_name - Option 3: Use --clean flag (for pg_restore). When using
pg_restore, the--cleanand--if-existsflags can be used to drop existing objects before recreating them, but this should also be used carefully.sudo -u postgres pg_restore --clean --if-exists -d target_db backup.dump
Version Compatibility Issues
Problems can arise when attempting to restore a database backup created with a newer Odoo version onto an older Odoo instance, or vice-versa, especially across major version differences.
Symptoms:
- Module compatibility errors during startup or operation.
- Failures during Odoo's internal migration processes.
- “Unknown field” errors within Odoo.
Diagnosis:
To diagnose, you need to check the Odoo version of your backup and compare it with the version of your target Odoo instance, as well as the PostgreSQL version compatibility.
# Check backup version (from manifest.json in ZIP backups)
unzip -p backup.zip manifest.json | grep version

# Check current Odoo version
sudo -u odoo /opt/odoo/odoo-bin --version

# Check PostgreSQL compatibility
sudo -u postgres psql -c "SELECT version();"
Solutions:
- For minor version differences (e.g., 17.0 to 17.1): These are generally safe to proceed with.
- For major version differences (e.g., 16.0 to 17.0): This typically requires a migration process, often utilizing tools like OpenUpgrade. Dedicated Odoo database migration guides provide comprehensive step-by-step procedures.
- For PostgreSQL version issues: You may need to dump the database with a compatible format, often using
--no-ownerand--no-privilegesflags.pg_dump --no-owner --no-privileges database_name > compatible_backup.sql
Permission and Access Problems
These issues occur when the restored database or its associated filestore has incorrect ownership or insufficient permissions, preventing Odoo from accessing them.
Symptoms:
- Odoo is unable to connect to the database.
- “Permission denied” errors appear in Odoo logs.
- Filestore files are inaccessible, leading to broken attachments.
Fix:
Ensure that the Odoo user owns the database and has appropriate permissions for both the database and the filestore.
# Fix database ownership
sudo -u postgres psql -c "ALTER DATABASE restored_db OWNER TO odoo;"

# Fix filestore permissions
sudo chown -R odoo:odoo /var/lib/odoo/filestore/restored_db/
sudo chmod -R 755 /var/lib/odoo/filestore/restored_db/

# Fix PostgreSQL user permissions
sudo -u postgres psql -c "GRANT ALL PRIVILEGES ON DATABASE restored_db TO odoo;"
Where is Odoo Database Backup Stored?
The location where your Odoo database backups are stored is highly dependent on your chosen backup method and how your Odoo instance and backup scripts are configured.
Default Storage Locations by OS
Linux Standard Installation:
# Odoo user backups (web interface):
/var/lib/odoo/backups/          # If configured in Odoo settings
/home/odoo/backups/             # User directory

# Manual script backups:
/backup/odoo/                   # Common custom location
/opt/odoo/backups/              # Application directory

# Filestore location:
/var/lib/odoo/filestore/[db_name]/
Linux User Installation:
# User-specific locations:
~/.local/share/Odoo/filestore/  # Filestore
~/odoo_backups/                 # Manual backups

# Check actual location:
find /home -name "filestore" 2>/dev/null
Windows Installation:
# Default locations:
C:\Program Files\Odoo\server\filestore\
%APPDATA%\Odoo\filestore\

# Manual backups often go to:
C:\Odoo\Backups\
D:\Backups\Odoo\
Custom Storage Path Configuration
You may have configured custom storage paths for your backups. Here’s how to identify them:
# Check Odoo configuration
grep -E "data_dir|backup" /etc/odoo/odoo.conf

# Check script configurations
grep -r "BACKUP_DIR" /usr/local/bin/

# Check cron jobs
crontab -l | grep backup
To set a custom backup location, you can modify environment variables, update your backup scripts directly, or (for certain modules) configure it within Odoo’s settings.
# Method 1: Environment variable
echo 'export ODOO_BACKUP_DIR="/backup/odoo"' >> ~/.bashrc

# Method 2: Modify scripts directly
sudo sed -i 's|BACKUP_DIR=.*|BACKUP_DIR="/your/custom/path"|' /usr/local/bin/backup_script.sh

# Method 3: Odoo configuration (for modules)
# Add to odoo.conf:
# backup_dir = /your/custom/backup/path
Cloud vs Local Storage Considerations
Deciding between local and cloud storage for your Odoo backups involves weighing various pros and cons:
Local Storage Pros:
- Fast backup and restore speeds.
- No dependency on internet connectivity.
- Complete control over data and infrastructure.
Local Storage Cons:
- Represents a single point of failure in case of local disaster.
- Lacks geographical separation, increasing risk.
- Limited by available local disk space.
Cloud Storage Pros:
- Provides crucial geographical separation for disaster recovery.
- Offers virtually unlimited storage capacity.
- Often includes built-in data replication and redundancy.
Cloud Storage Cons:
- Dependency on internet connectivity for access.
- Incurs ongoing costs based on usage.
- Potential bandwidth limitations can affect backup/restore times.
Hybrid Approach (Recommended):
The most robust strategy combines the best of both worlds: local backups for rapid recovery and cloud backups for comprehensive disaster recovery.
# Local backup for quick recovery
# Cloud backup for disaster recovery

# Example: Keep 7 days local, 90 days cloud
LOCAL_RETENTION=7
CLOUD_RETENTION=90

# Daily script that does both:
./backup_local.sh
aws s3 sync /backup/odoo/ s3://your-backup-bucket/

# Clean up old local backups
find /backup/odoo -mtime +$LOCAL_RETENTION -delete
Alternative Solutions Comparison
Having explored the technical intricacies of Odoo backup and restoration, it is beneficial to step back and compare the various available approaches. Selecting the most appropriate backup strategy extends beyond mere technical capabilities; it necessitates aligning the solution with your team's skill set, budgetary constraints, and specific business requirements. Analysis of diverse organizational implementations
