
 (1).svg)
 (1).png)


 (1).svg)
.svg)
Understanding the Automatic Database Backup Module for Odoo 18
The Automatic Database Backup module for Odoo 18 is an essential tool designed to streamline and automate the critical process of backing up your Odoo databases. This robust module significantly enhances data protection by offering unparalleled flexibility, allowing users to securely store their backups in a multitude of locations. These options include local servers for immediate access, remote servers for geographical redundancy, and a wide array of popular cloud storage services such as Google Drive, Dropbox, OneDrive, Nextcloud, and Amazon S3. By automating this vital function, the module ensures business continuity and minimizes the risk of data loss, providing a reliable safety net for your valuable Odoo data.
Key Features for Enhanced Data Protection
This powerful module comes equipped with a suite of features engineered to provide comprehensive and hassle-free database backup management:
- Automated Backups: Configure regular, scheduled backups of your Odoo databases to ensure continuous data safety without requiring any manual intervention. This proactive approach guarantees that your data is consistently protected against unforeseen events.
- Redundancy Management: Efficiently manage your storage space by automatically removing older backup files. This intelligent feature prevents unnecessary accumulation of data, optimizing storage utilization while maintaining a robust history of backups.
- Comprehensive Notifications: Stay informed with real-time alerts. Receive instant notifications regarding the success or failure of backup operations, providing crucial insights into the status of your data protection measures and allowing for prompt action if issues arise.
- Flexible Storage Options: Benefit from the freedom to choose your preferred backup destination from a wide range of options. This includes both local and remote servers for traditional storage, alongside integration with popular cloud platforms for enhanced accessibility and off-site redundancy.
- Configurable Backup Frequency: Define precisely how often your backups should occur. Whether you require daily, weekly, or monthly backups, the module provides the flexibility to align the backup schedule with your specific operational needs and data retention policies.
- Multiple Backup Formats: The module supports various backup formats, including ZIP and Dump, allowing you to choose the most suitable option for your data recovery strategy and storage considerations.
Setting Up the Automatic Database Backup Module
To begin leveraging the benefits of automated database backups, follow these straightforward setup steps:
1. Installation of External Dependencies
Before proceeding with the module installation, ensure that all necessary Python packages are installed on your system. This step is crucial for the module to function correctly, especially when integrating with various cloud storage providers:
pip install dropbox
pip install pyncclient
pip install nextcloud-api-wrapper
pip install boto3
pip install paramiko
2. Module Installation in Odoo
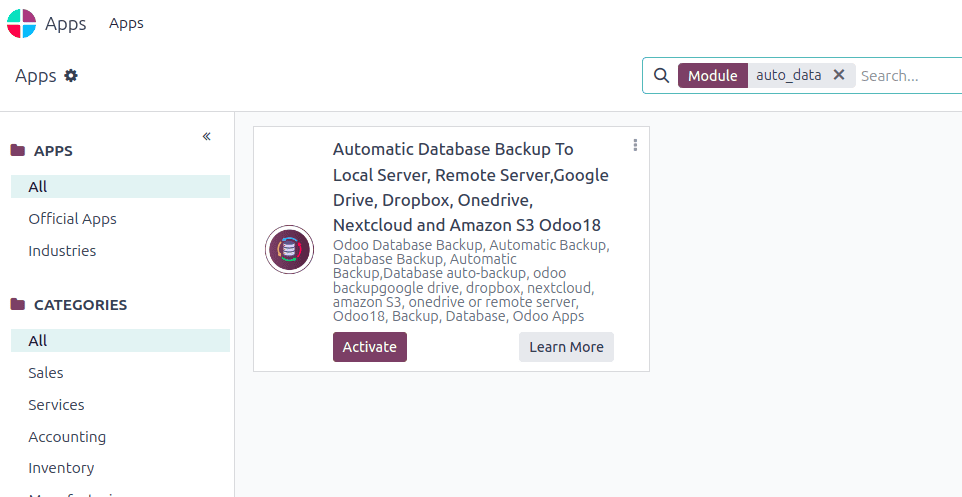
Once the external dependencies are successfully installed, proceed to install the Automatic Database Backup module within your Odoo environment. This can typically be done via the Odoo Apps interface.
3. Initial Configuration Steps
After installation, the module requires some initial configuration to define your backup preferences:
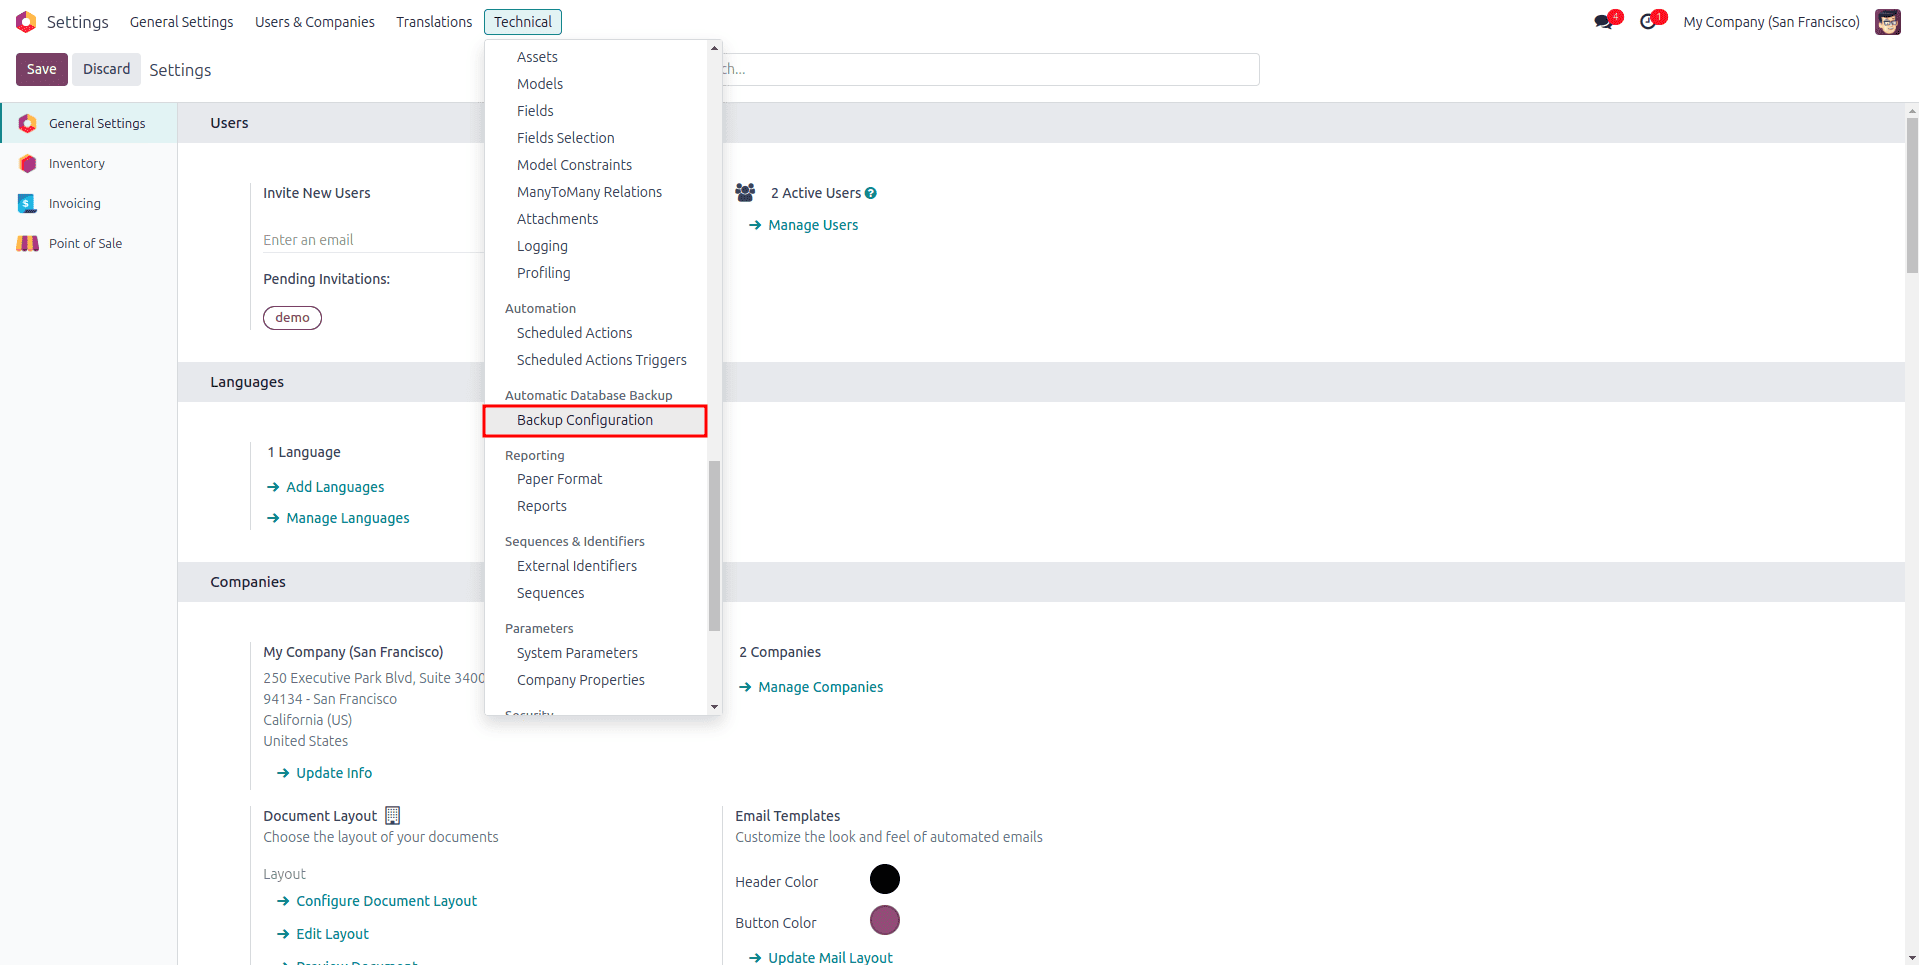
- Access Backup Configuration: Navigate to the Odoo backend and go to Settings > Technical > Backup Configuration. This section is where you will manage all aspects of your automated backups.
- Create a New Backup Configuration: Click on the "Create" button to set up a new backup profile. You will then need to fill in the following critical details:
- Database Name: Clearly specify the exact name of the Odoo database you intend to back up.
- Master Password: Provide the master password associated with your Odoo instance. This is required for secure database operations.
- Backup Destination: Select your preferred storage location from the available options (e.g., Local Storage, FTP, Google Drive, etc.).
- Backup Directory Path: For local or network-based storage, specify the full path to the directory where backup files will be stored. The system is designed to automatically create this directory if it does not already exist.
- Backup Frequency: Determine the regularity of your backups. Choose between daily, weekly, or monthly schedules to best suit your data protection requirements.
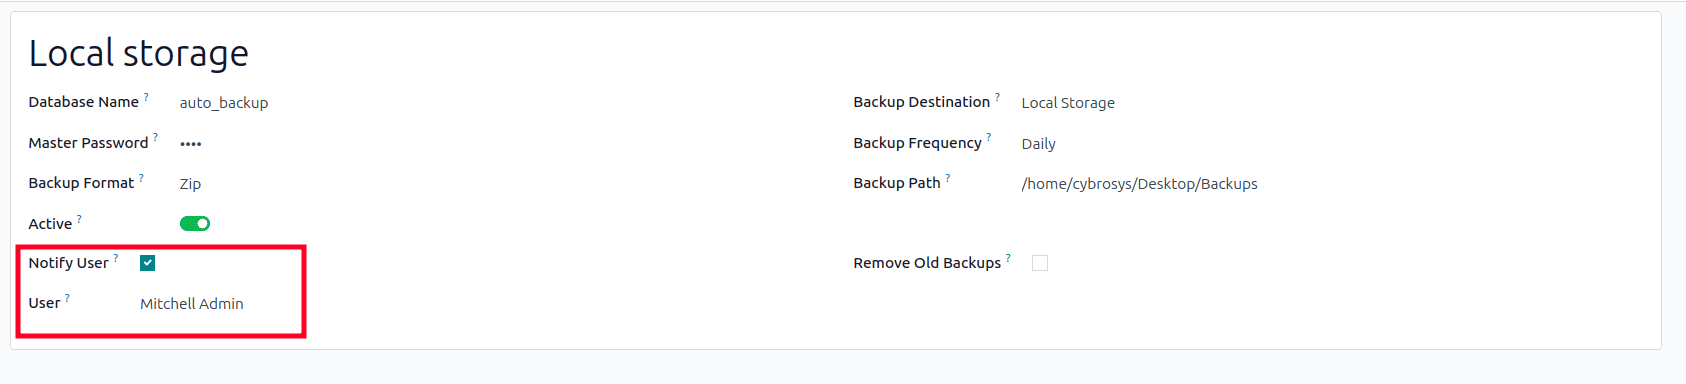
- Notify User: Enable the notification feature and select a specific Odoo user to receive email alerts. This user will be informed about the success or failure of each backup operation.
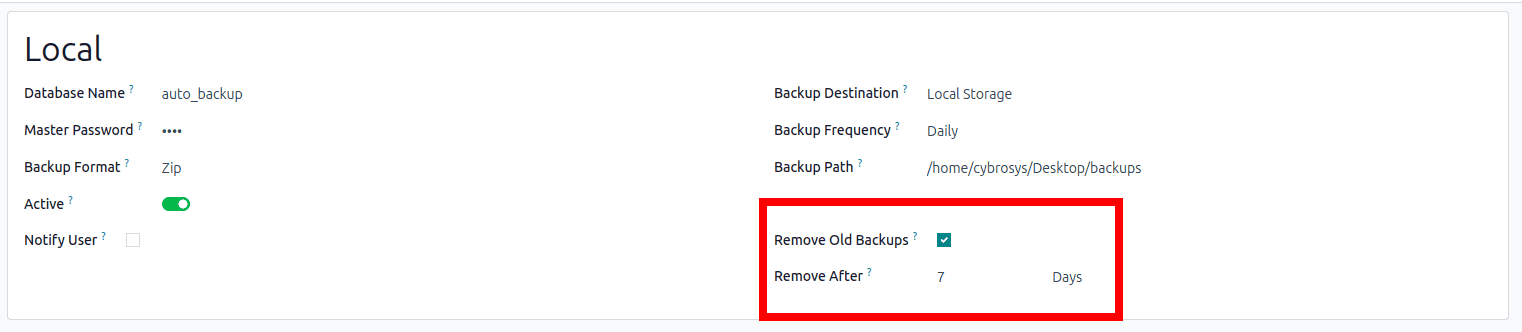
- Remove Old Backups: Activate the auto-removal option and specify the number of days after which old backup files should be automatically deleted. This helps maintain optimal storage usage.
- Backup Format: Select the desired format for your backup files, either ZIP or Dump, based on your restoration strategy and compatibility needs.
Configuring Backup to Different Destinations
The Automatic Database Backup module offers robust integration capabilities with various storage services, providing flexibility and redundancy for your Odoo database backups. Below are detailed steps for configuring backups to each supported platform:
Local Server Backup
For immediate access and straightforward management, you can configure backups to be stored directly on your local server or a mounted network drive.
- Select "Local Storage" as your backup destination.
- Provide the complete path to the desired directory where your backup files will be securely saved. This path should be accessible by your Odoo instance.

FTP Server Backup
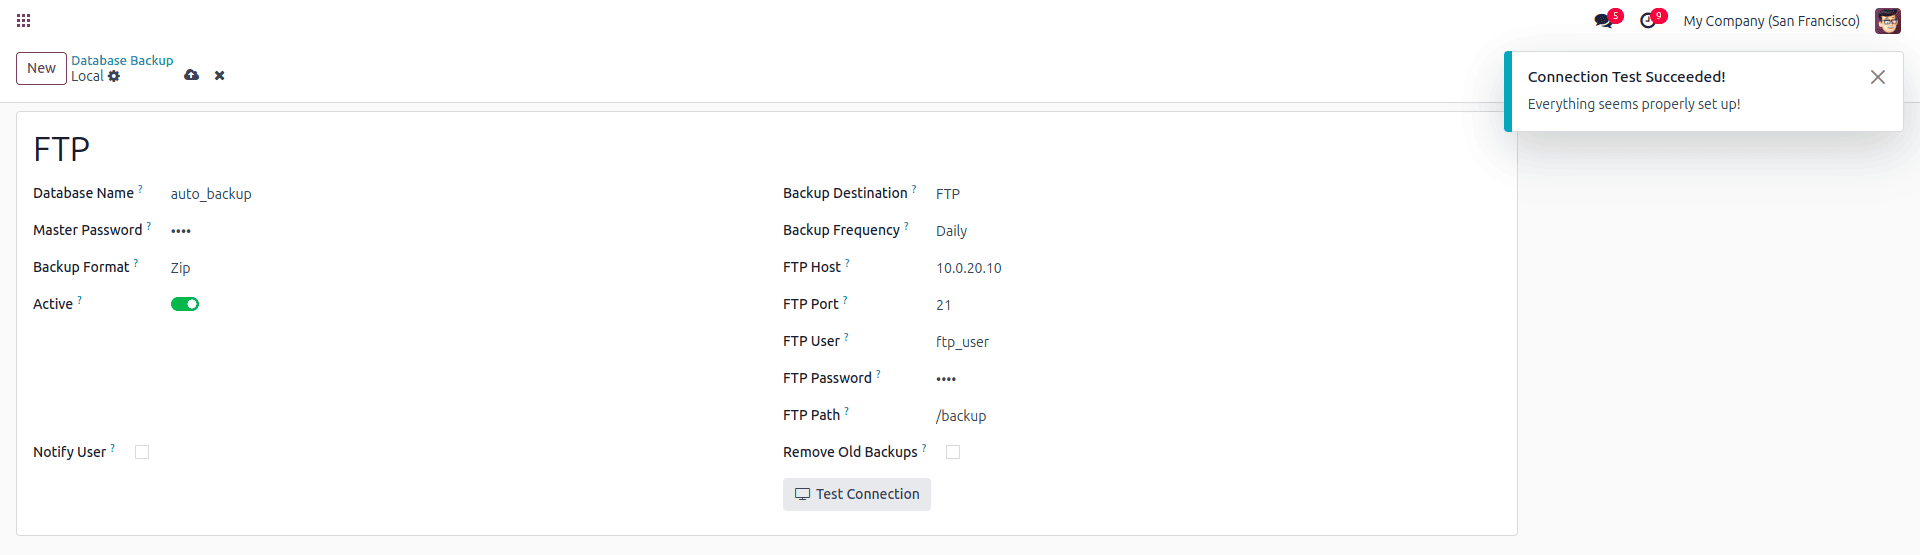
To leverage an FTP server for your backups, ensuring off-site storage and easy access:
- Choose "FTP" as the backup destination.
- Enter the FTP Host address, Port number, Username, and Password for authentication.
- Specify the FTP Path within the server where backup files should be stored.
- It is highly recommended to use the "Test Connection" feature to verify that all settings are correct and the connection can be established successfully.
SFTP Server Backup
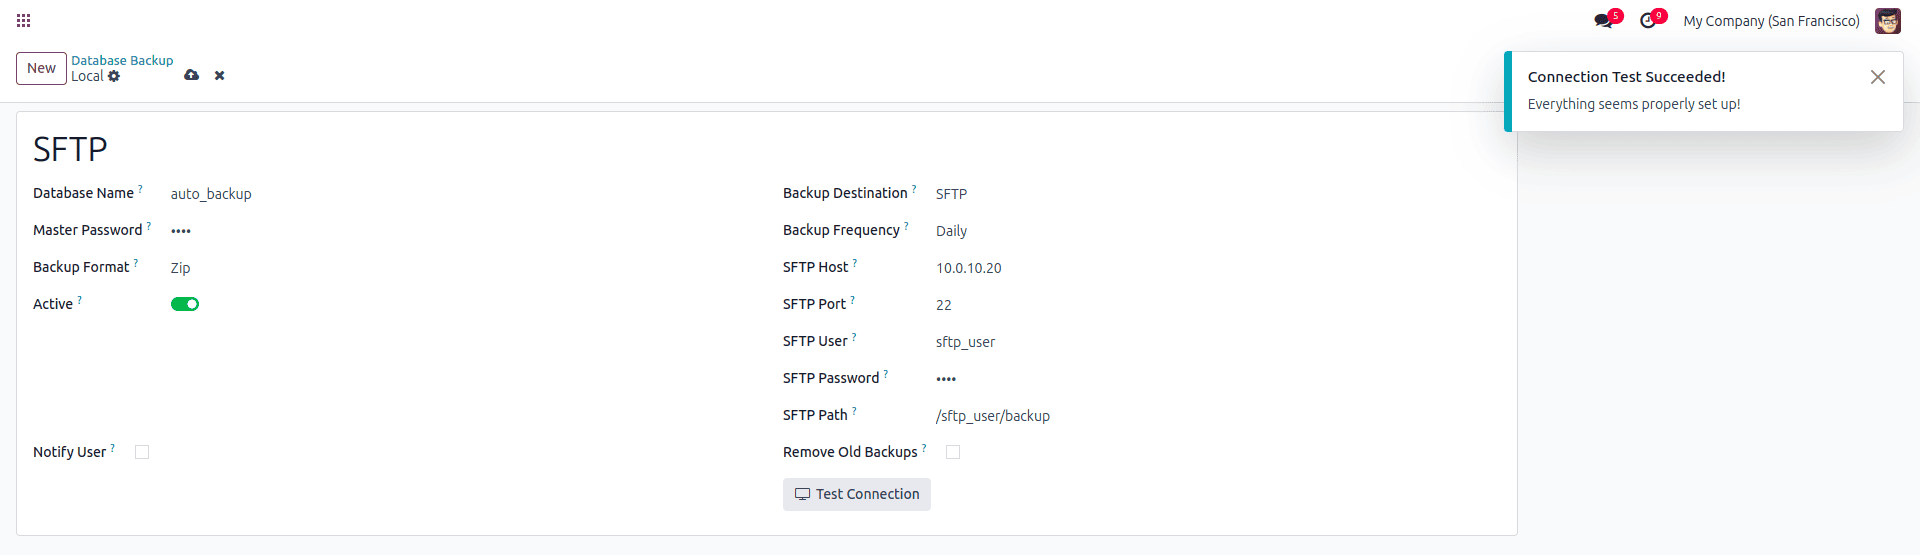
For secure file transfer protocol (SFTP) backups, offering an encrypted connection:
- Select "SFTP" as your backup destination.
- Input the SFTP Host address, Port number, Username, and Password.
- Define the SFTP Path where your backup files will be securely stored on the remote server.
- Always perform a "Test Connection" to confirm the setup is accurate and the secure connection is viable.
Google Drive Backup
Integrate with Google Drive for a convenient cloud-based backup solution:
- Create a Google API Project:
- Log in to the Google Cloud Console and initiate a new project.
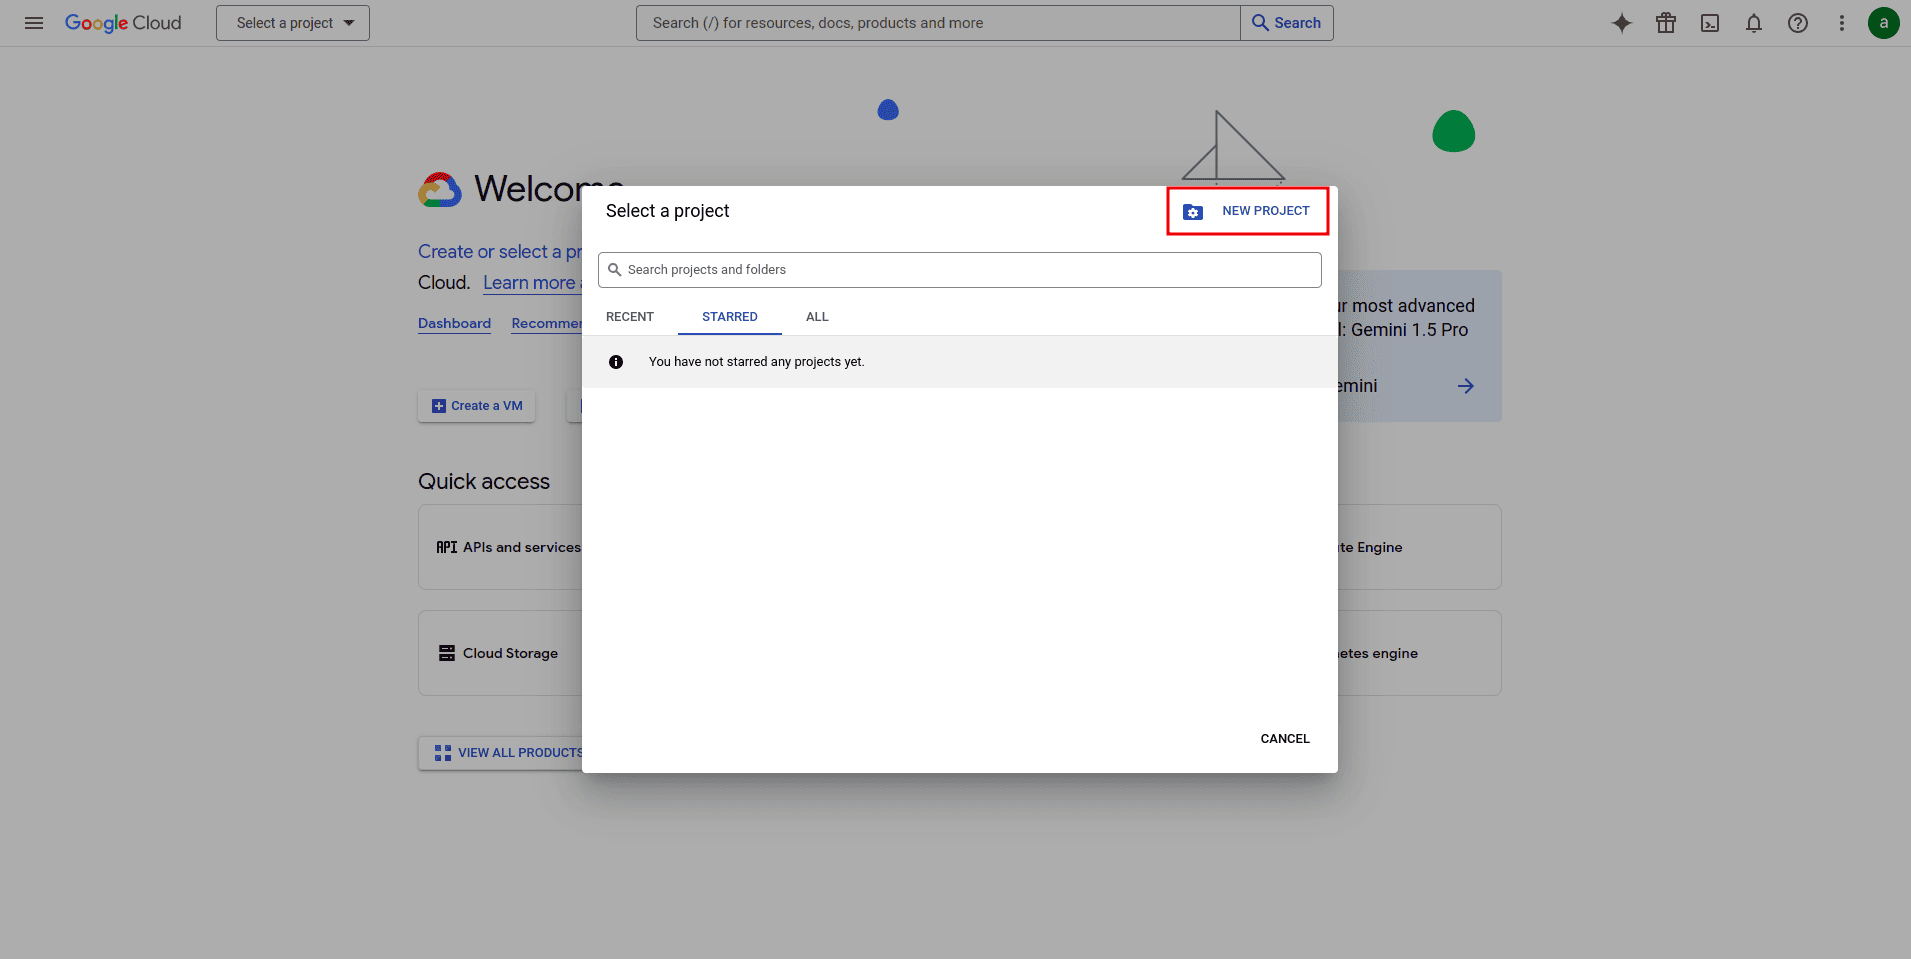
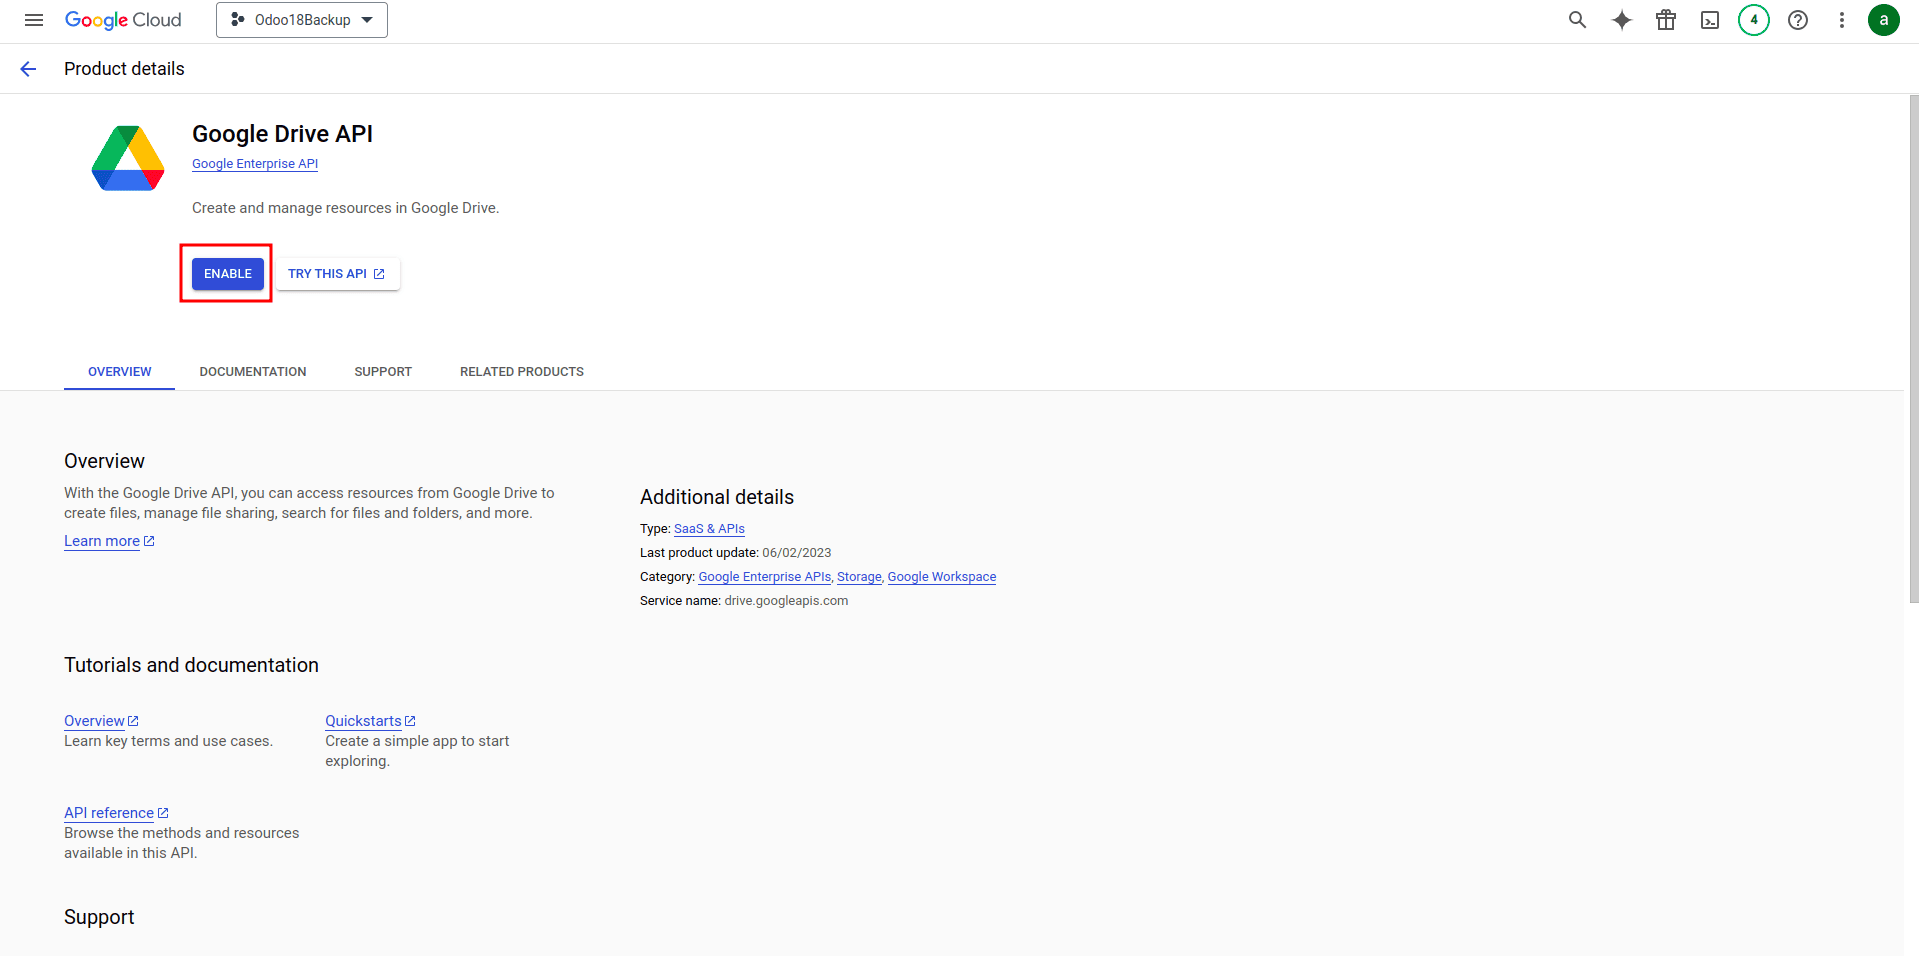
- Once the project is created, enable the Google Drive API for this project.
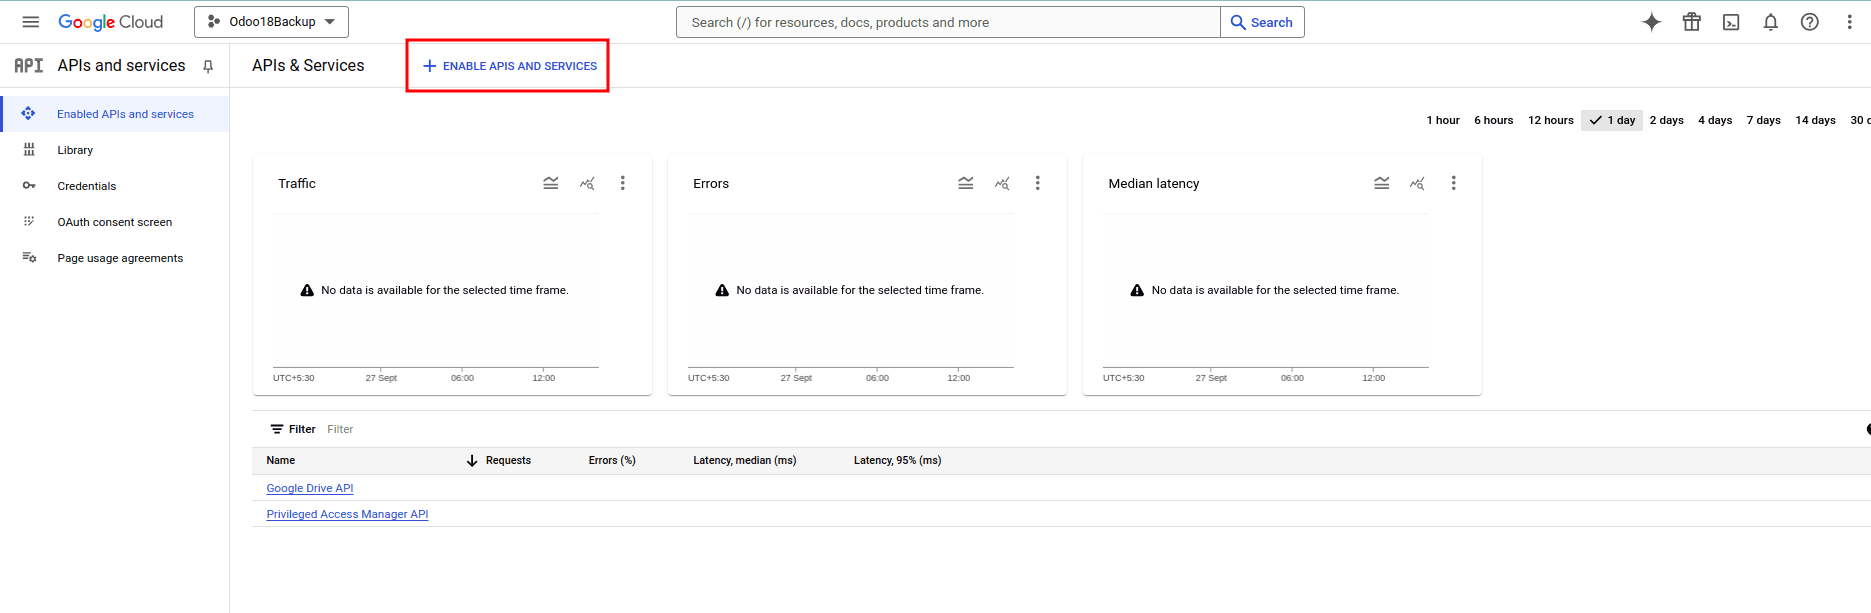
- Generate Credentials:
- From the project dashboard, navigate to "Enable API and Services".
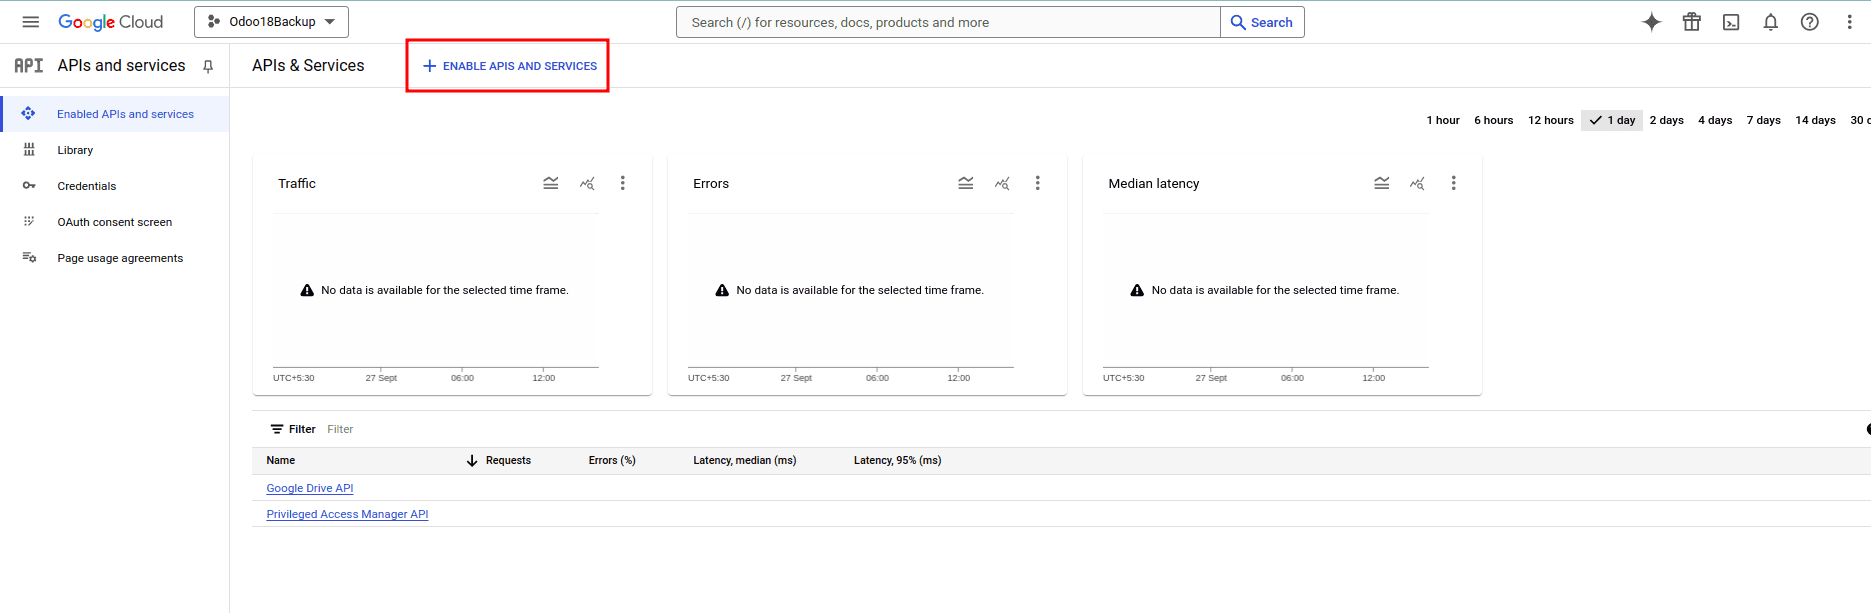
- Ensure the Google Drive API is enabled.
- Go to "Credentials" and create new credentials, specifically selecting "OAuth Client ID".
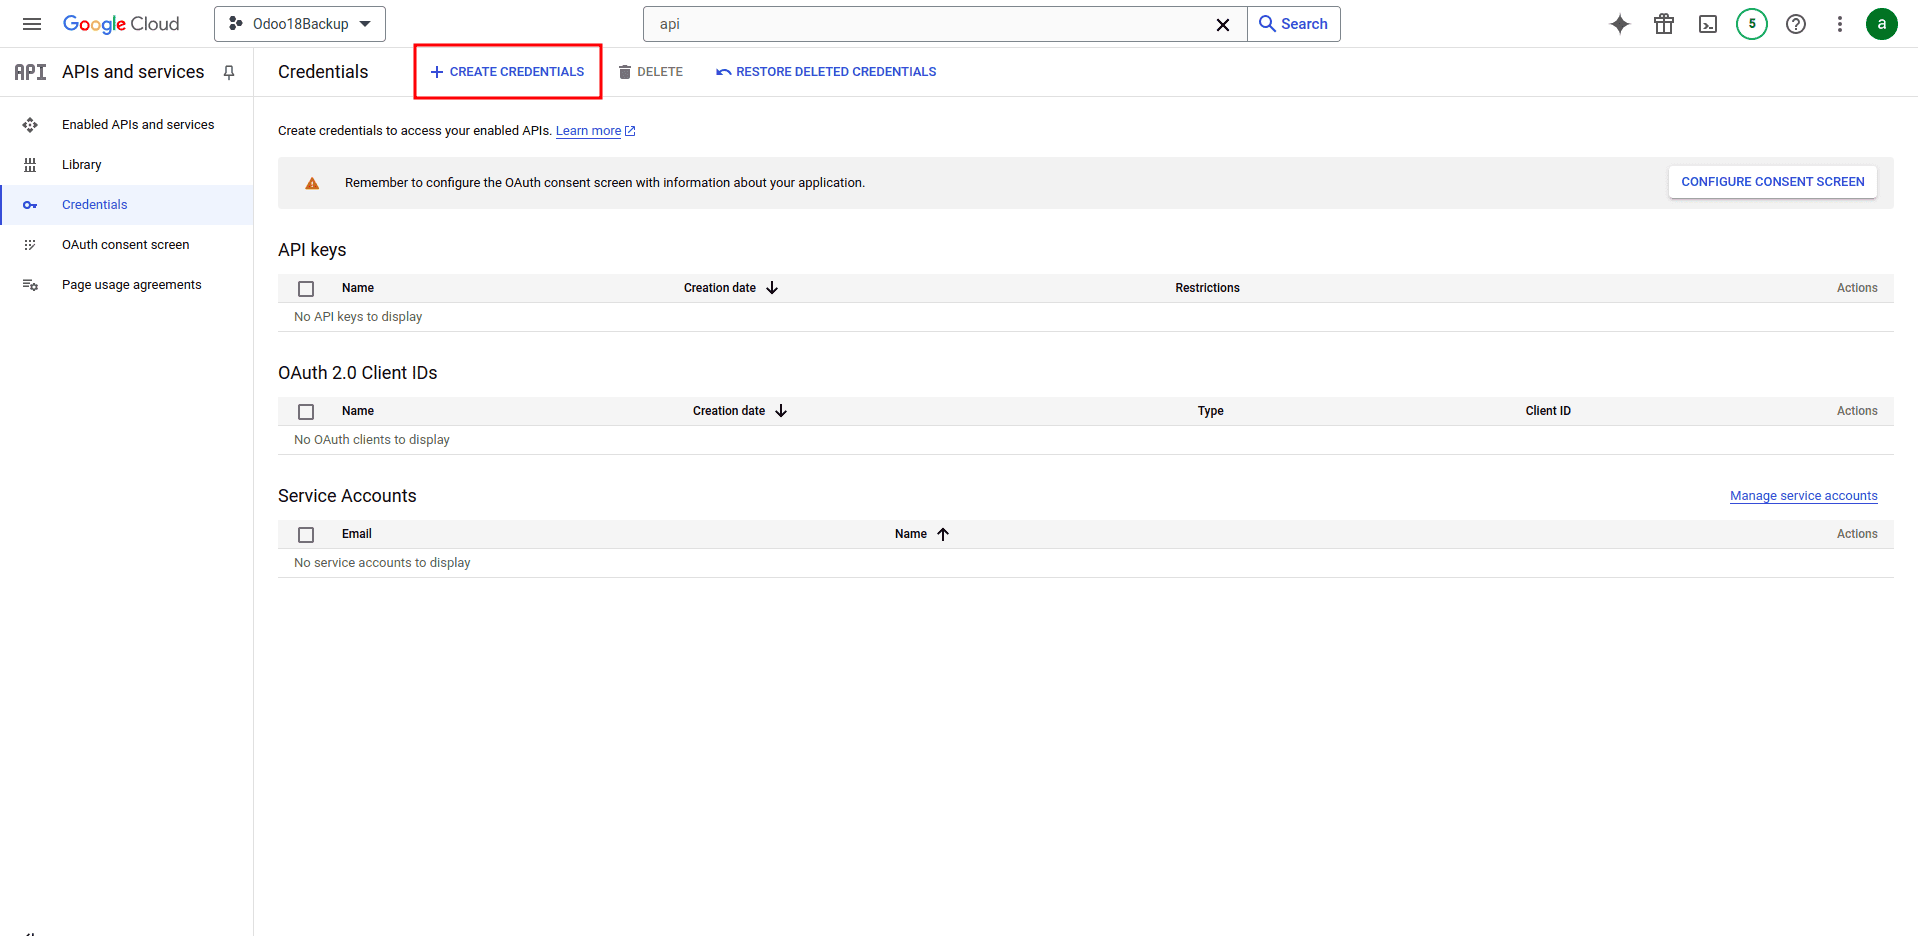
- Configure Authorized Redirect URI:
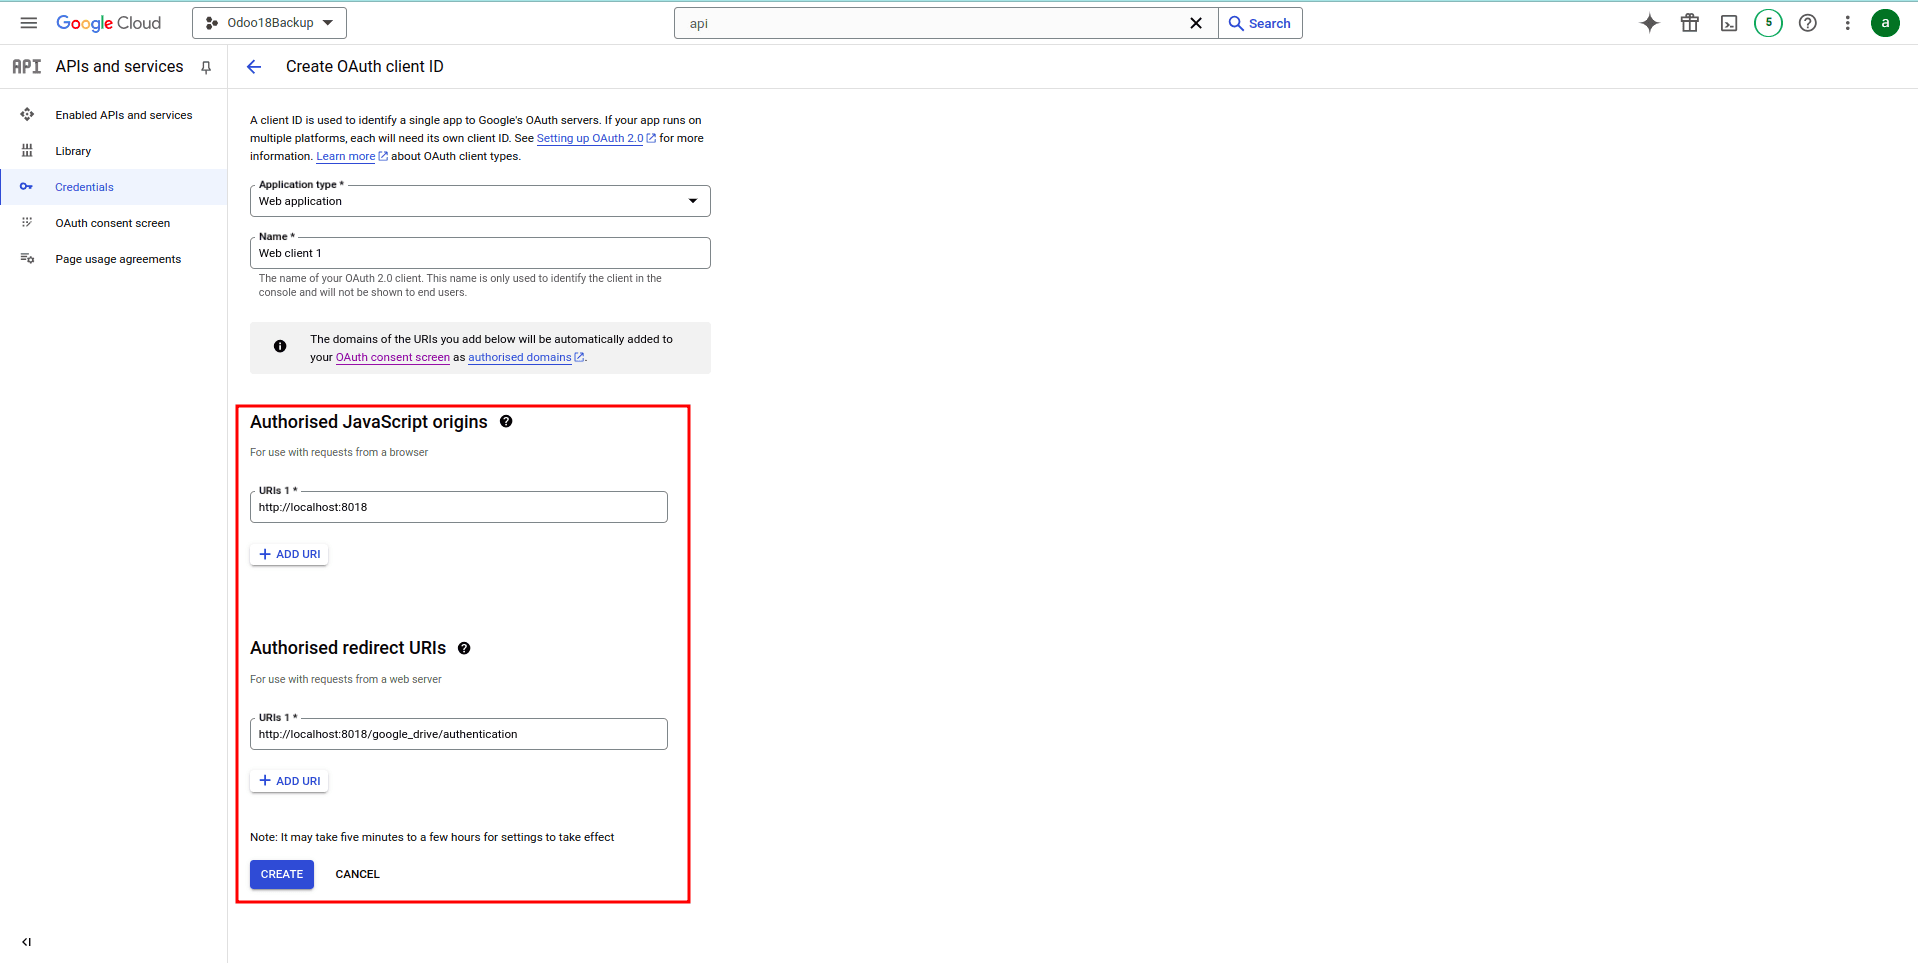
- Set the "Application Type" to "Web Application".
- In the "Authorized JavaScript Origins" field, add your Odoo instance's URL.
- For "Authorized Redirect URIs", input your Odoo URL followed by `/google_drive/authentication`. For example: `https://your-odoo-instance.com/google_drive/authentication`.
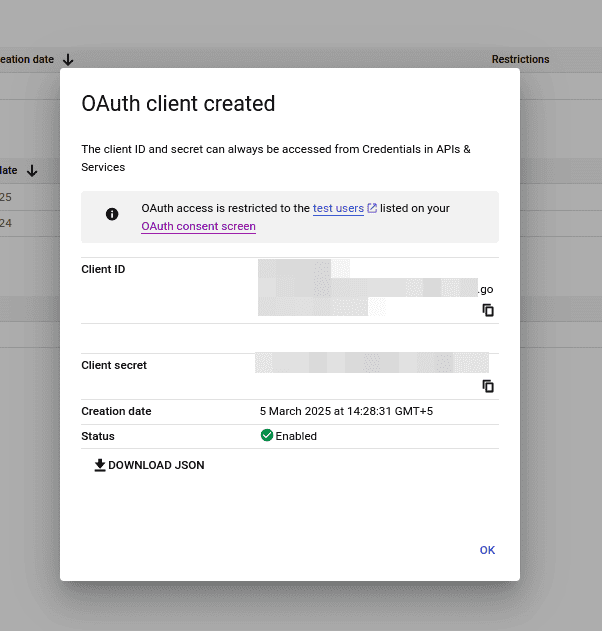
- Upon completion, a Client ID and Client Secret will be generated. Make sure to copy these credentials securely.
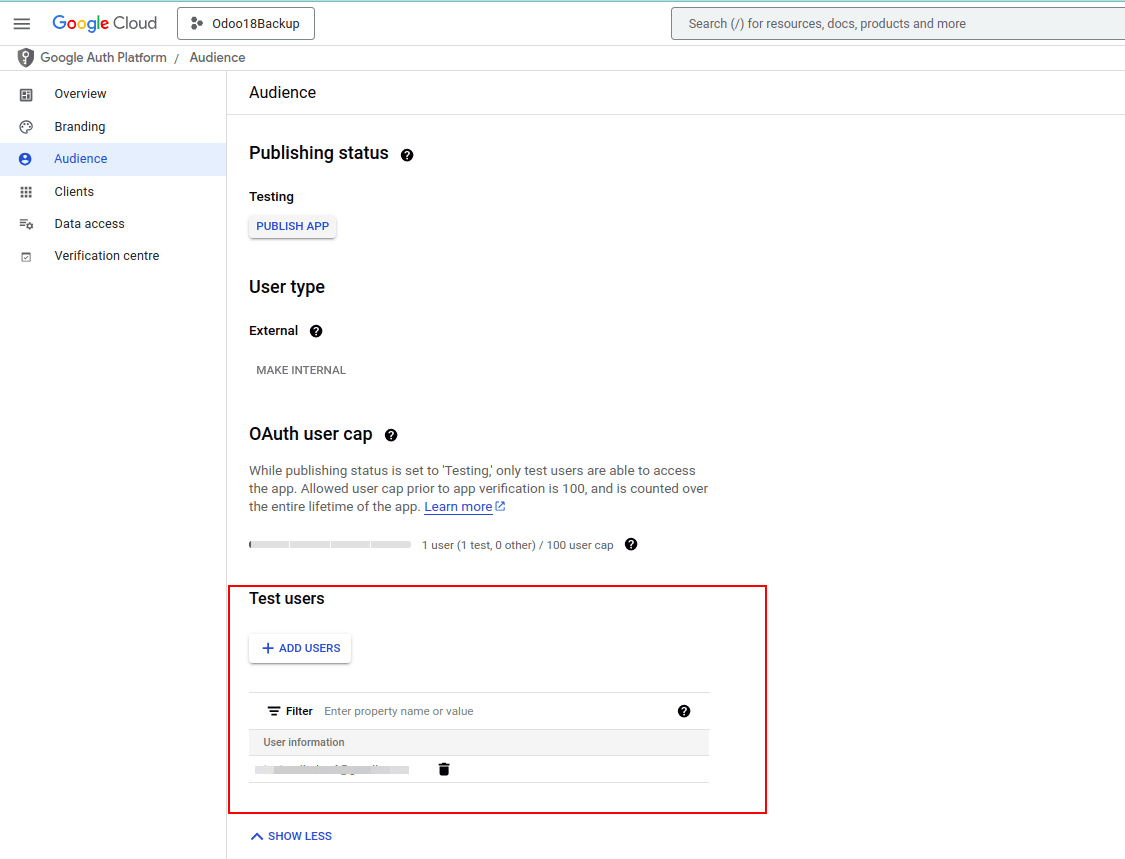
- Additionally, access the OAuth consent screen and, under "Audience," add the currently logged-in email as a "Test User" to grant access to your application, or complete the full app publishing process if applicable.
- Configure Odoo Backup Settings:
- In Odoo's Backup Configuration, enter the generated Client ID and Client Secret into their respective fields.
- Also, input the specific Google Drive folder ID, which can be extracted from the folder's URL in Google Drive.
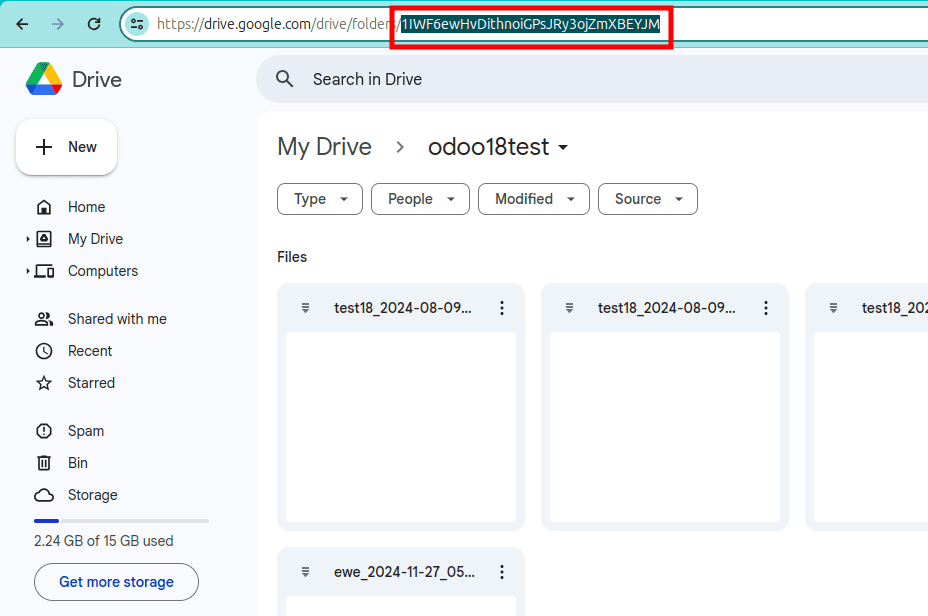
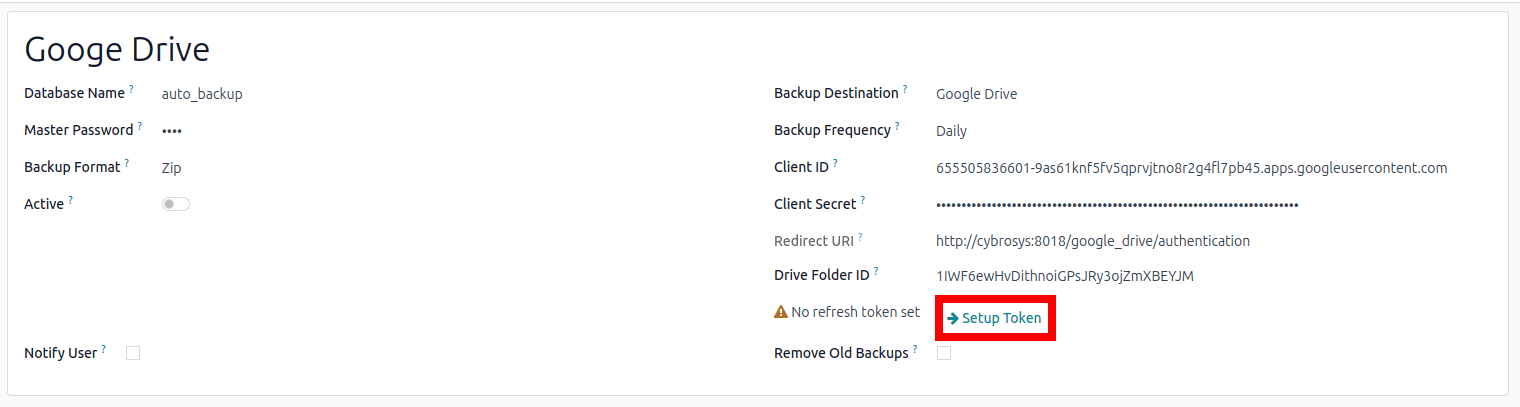
- After inputting the credentials, click on "Setup Token". This action will redirect you to a Google authorization page.
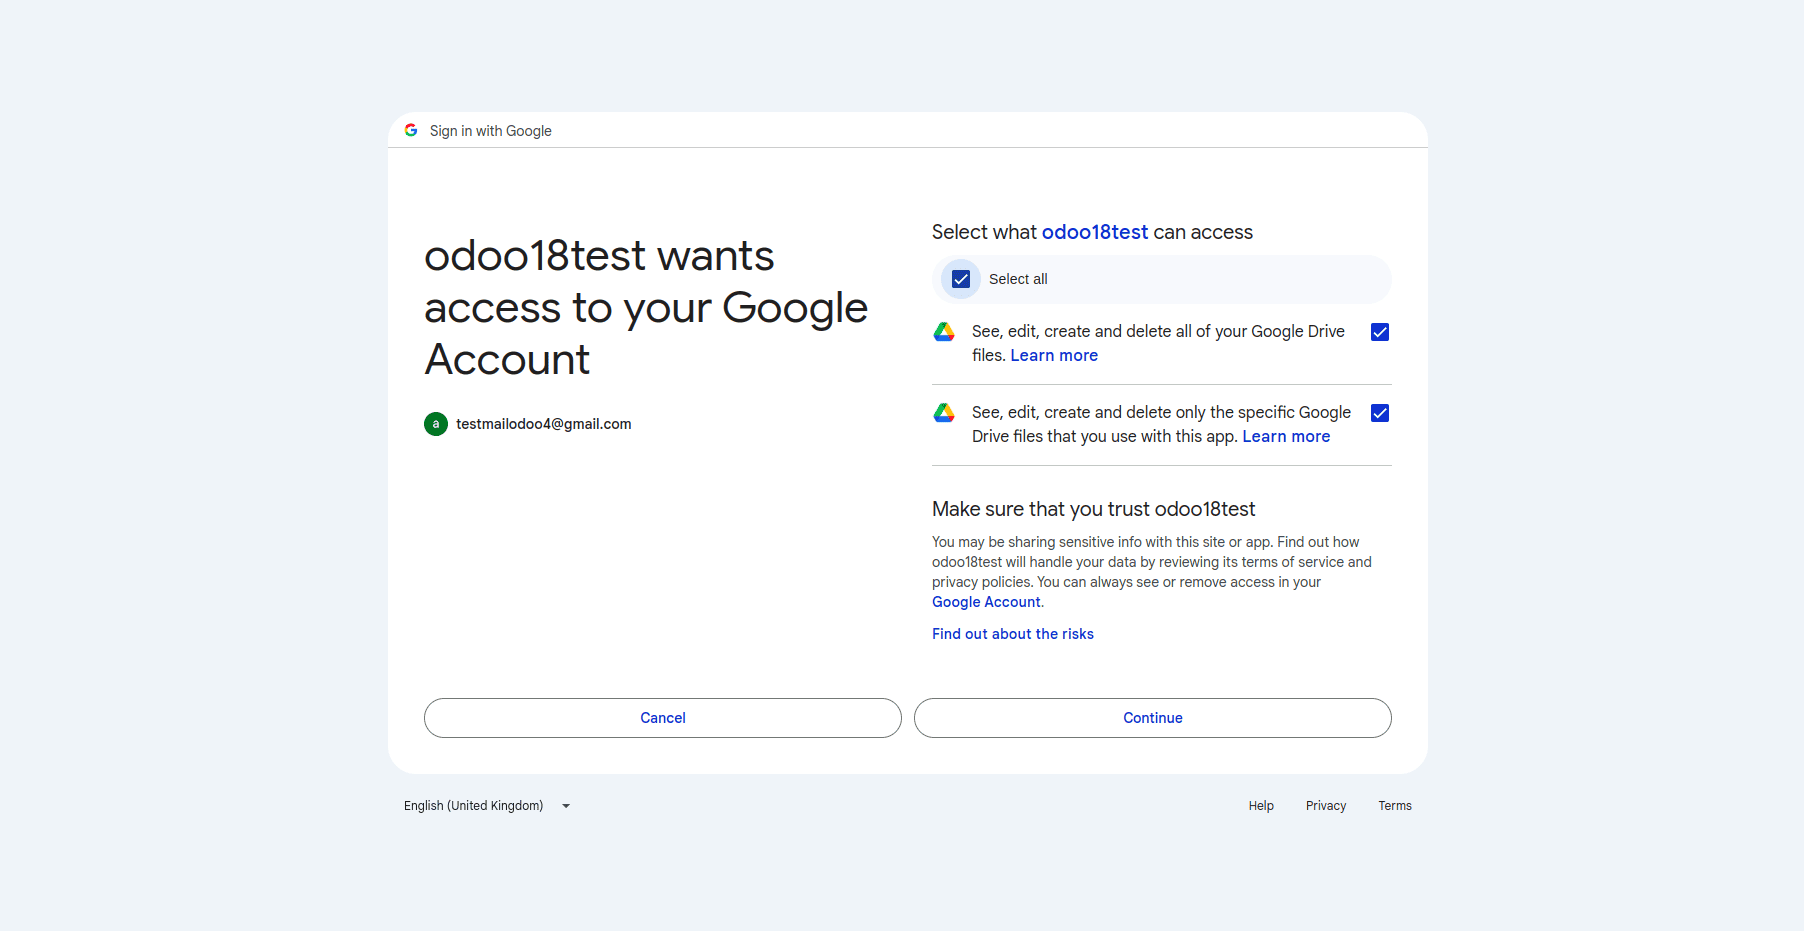
- Grant the necessary access permissions and continue.
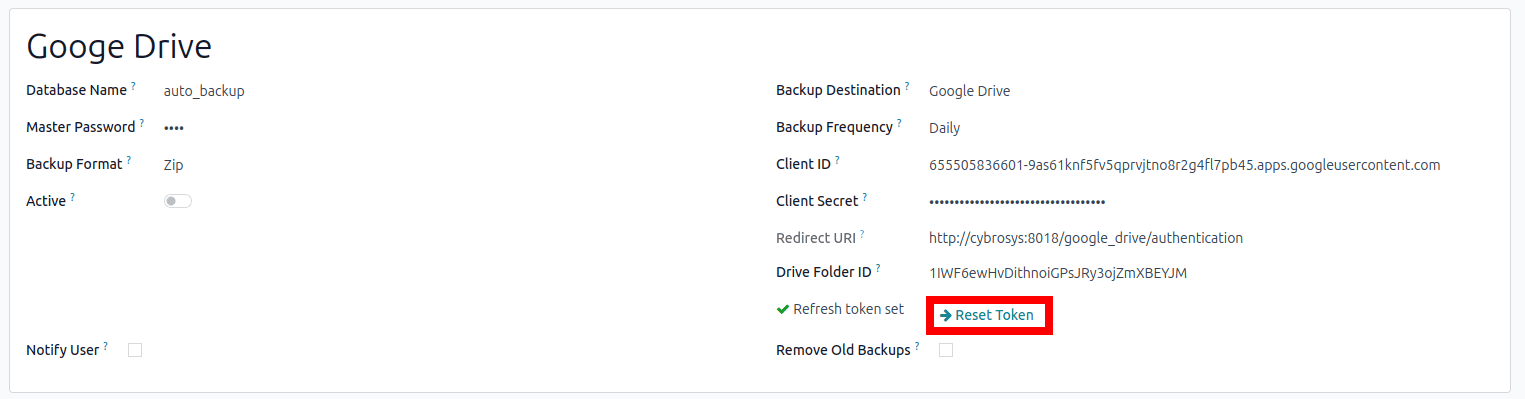
- Once the token is successfully generated, your Odoo backups will automatically be uploaded to your designated Google Drive folder according to your defined schedule.
- A "Reset Token" button will be available, allowing you to refresh the authentication token if required in the future.
Dropbox Integration
To configure your Odoo backups to store files on Dropbox, follow these steps to obtain the necessary App Key and Secret Key from the Dropbox Developers App Console:
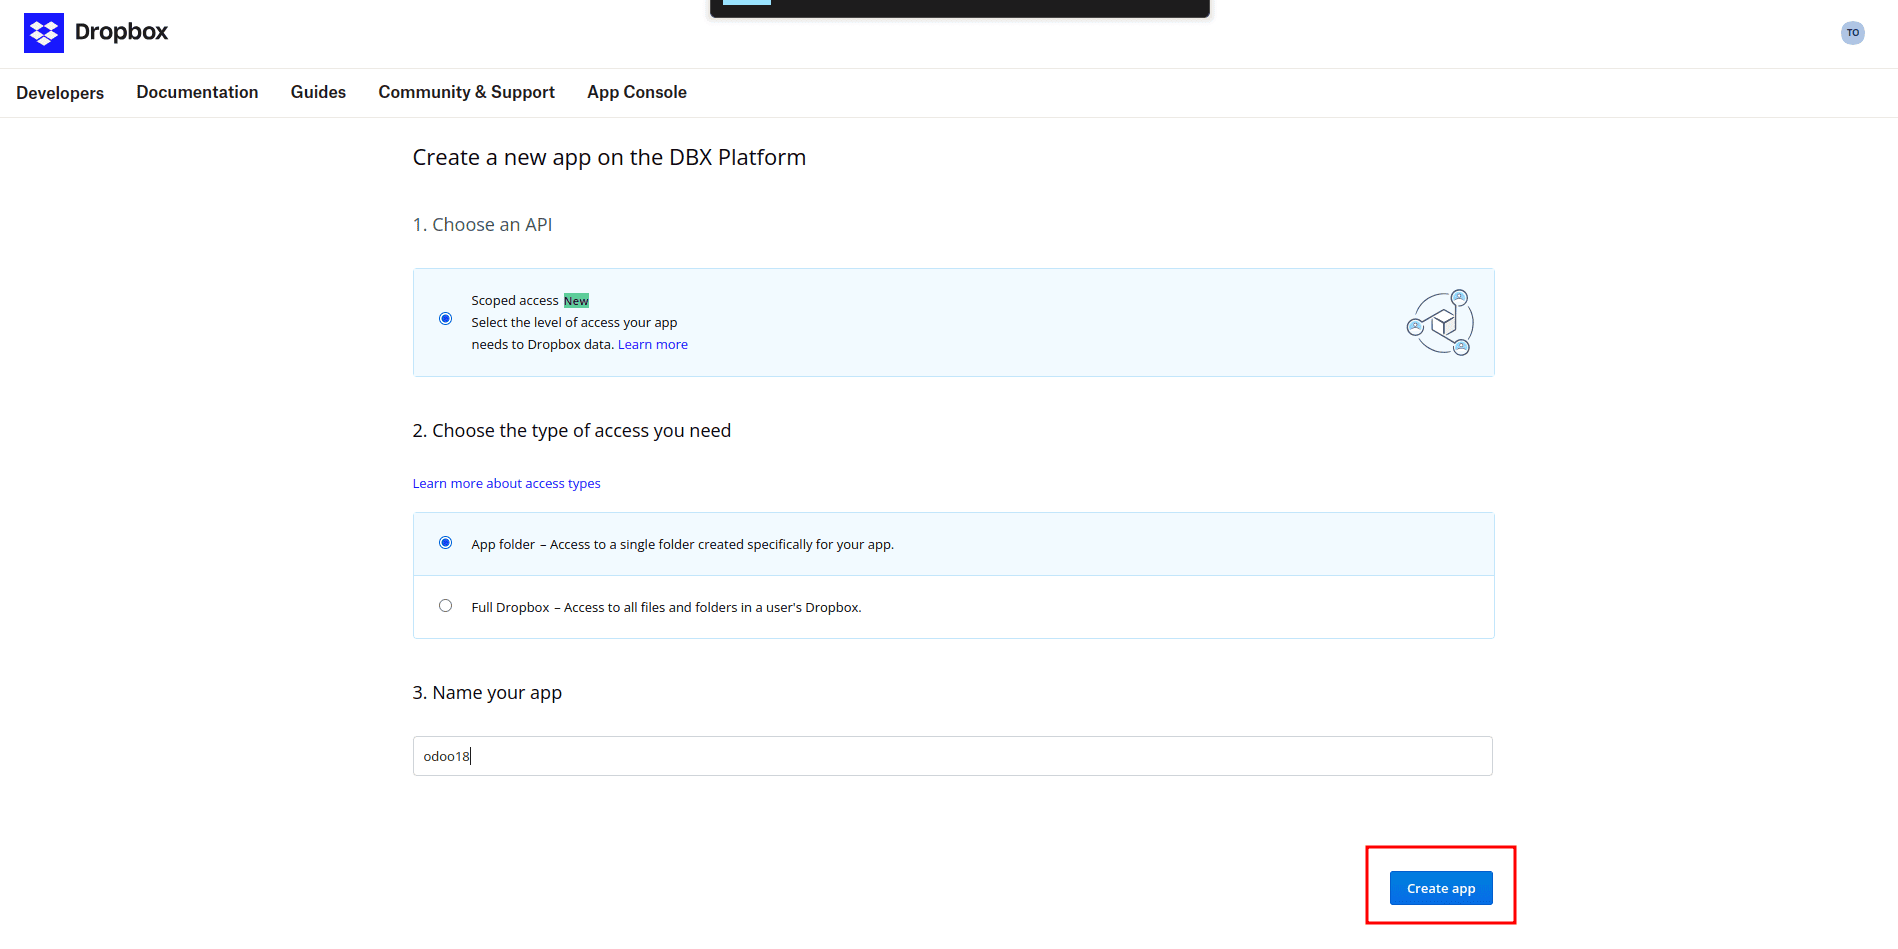
- Create a New App:
- Navigate to the Dropbox Developers App Console and proceed to create a new application.
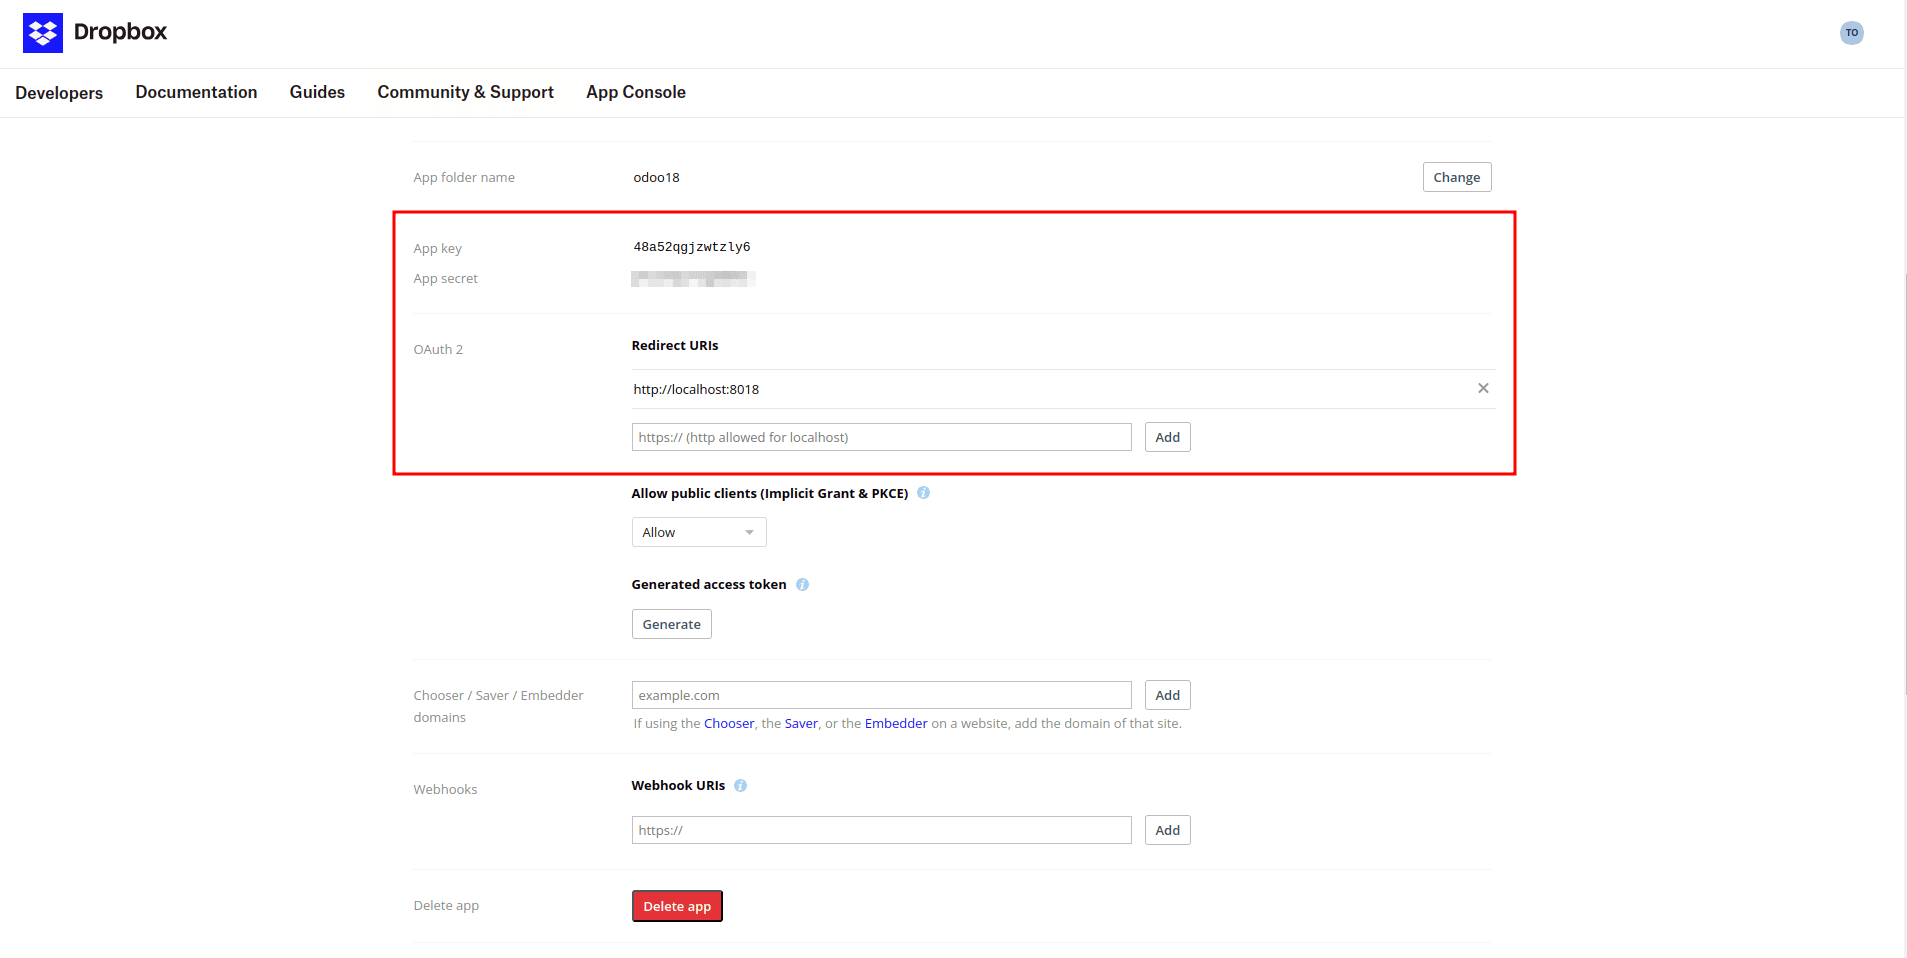
- Retrieve App Key and Secret:
- Once your application is successfully created, the system will provide you with an App Key and an App Secret. These are crucial credentials for integration.
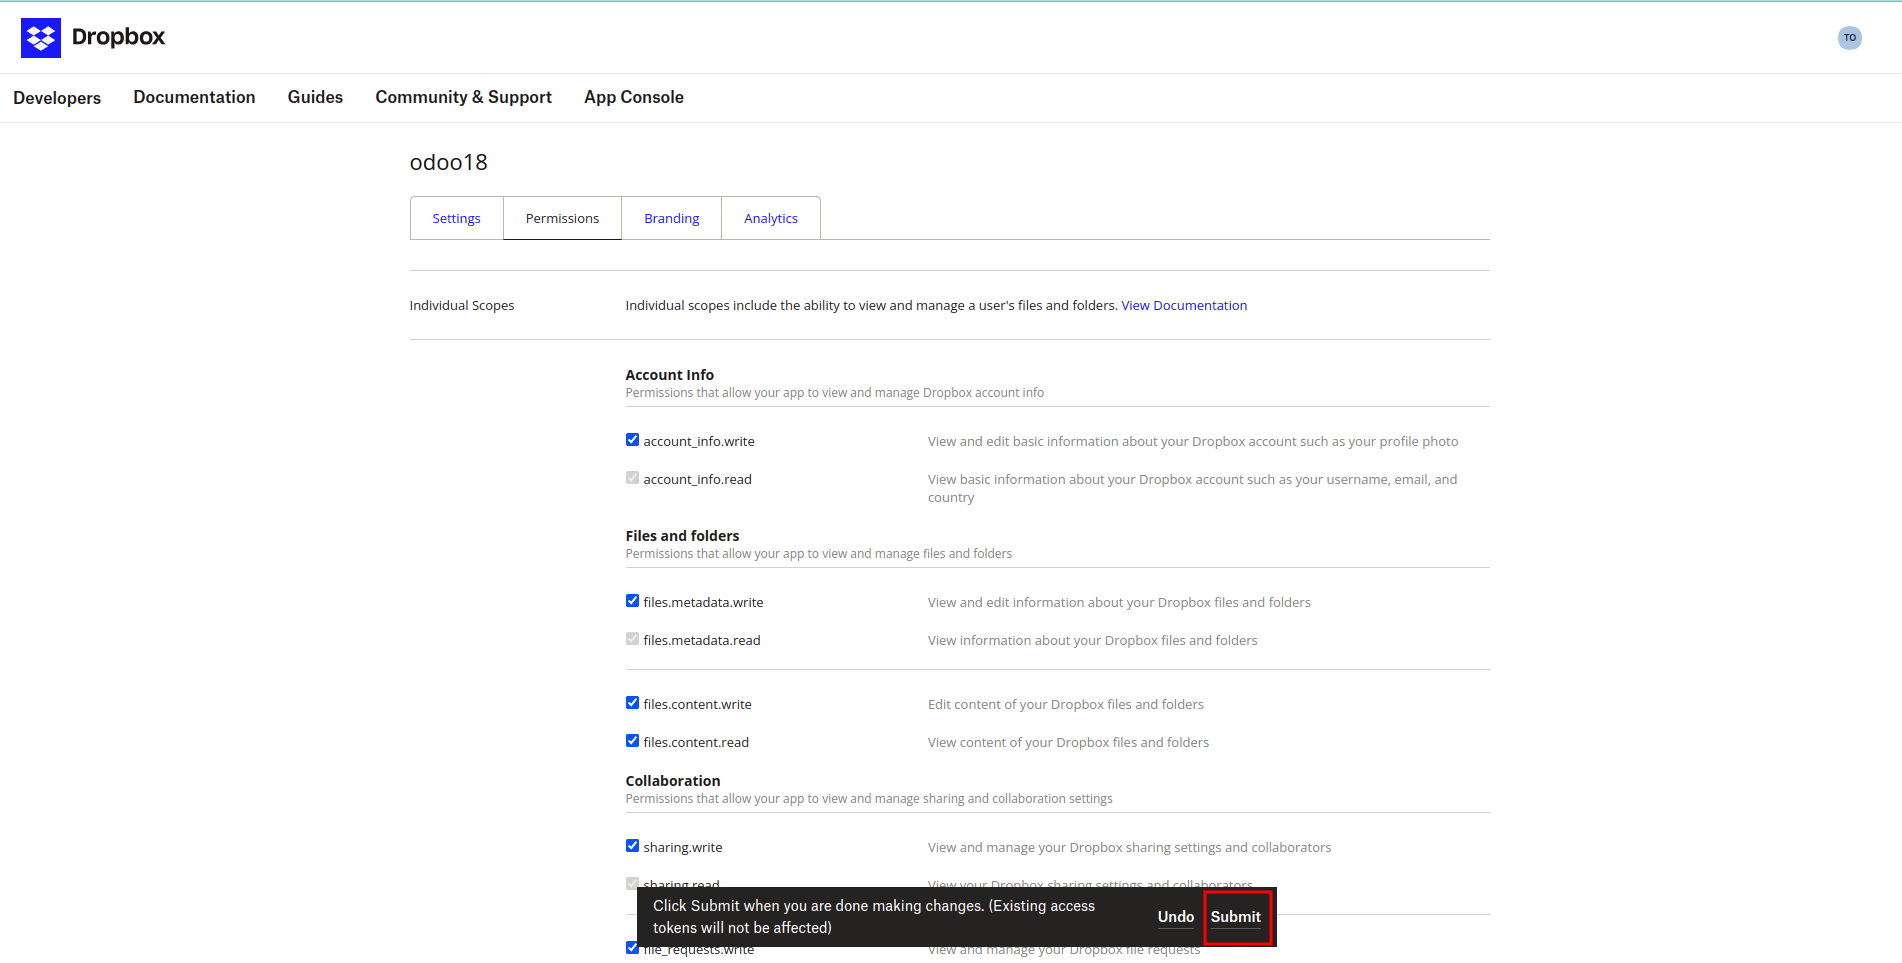
- Set Permissions:
- Carefully select the appropriate permissions for your application to ensure it has the necessary access rights for backup operations, then click "Submit" to save your changes.
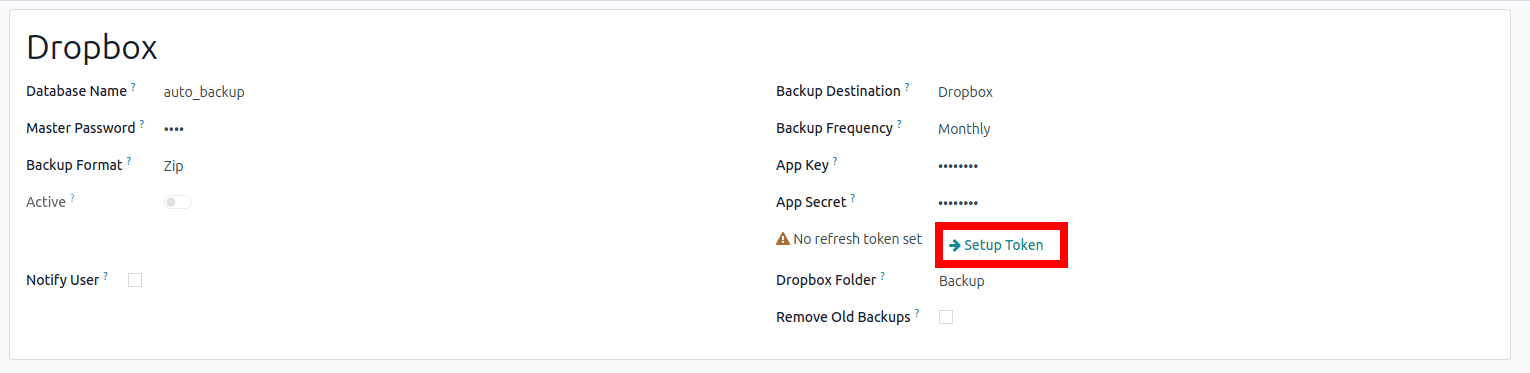
- Configure Backup in Odoo:
- In your Odoo instance, access the Backup Configuration settings and select "Dropbox" as your preferred backup destination.
- Enter the App Key, App Secret, and the exact Dropbox Folder Name (this should match the folder where you want backups stored in your Dropbox account).
- Click on "Setup Token" to initiate the token generation process.
- Obtain the Authorization Code:
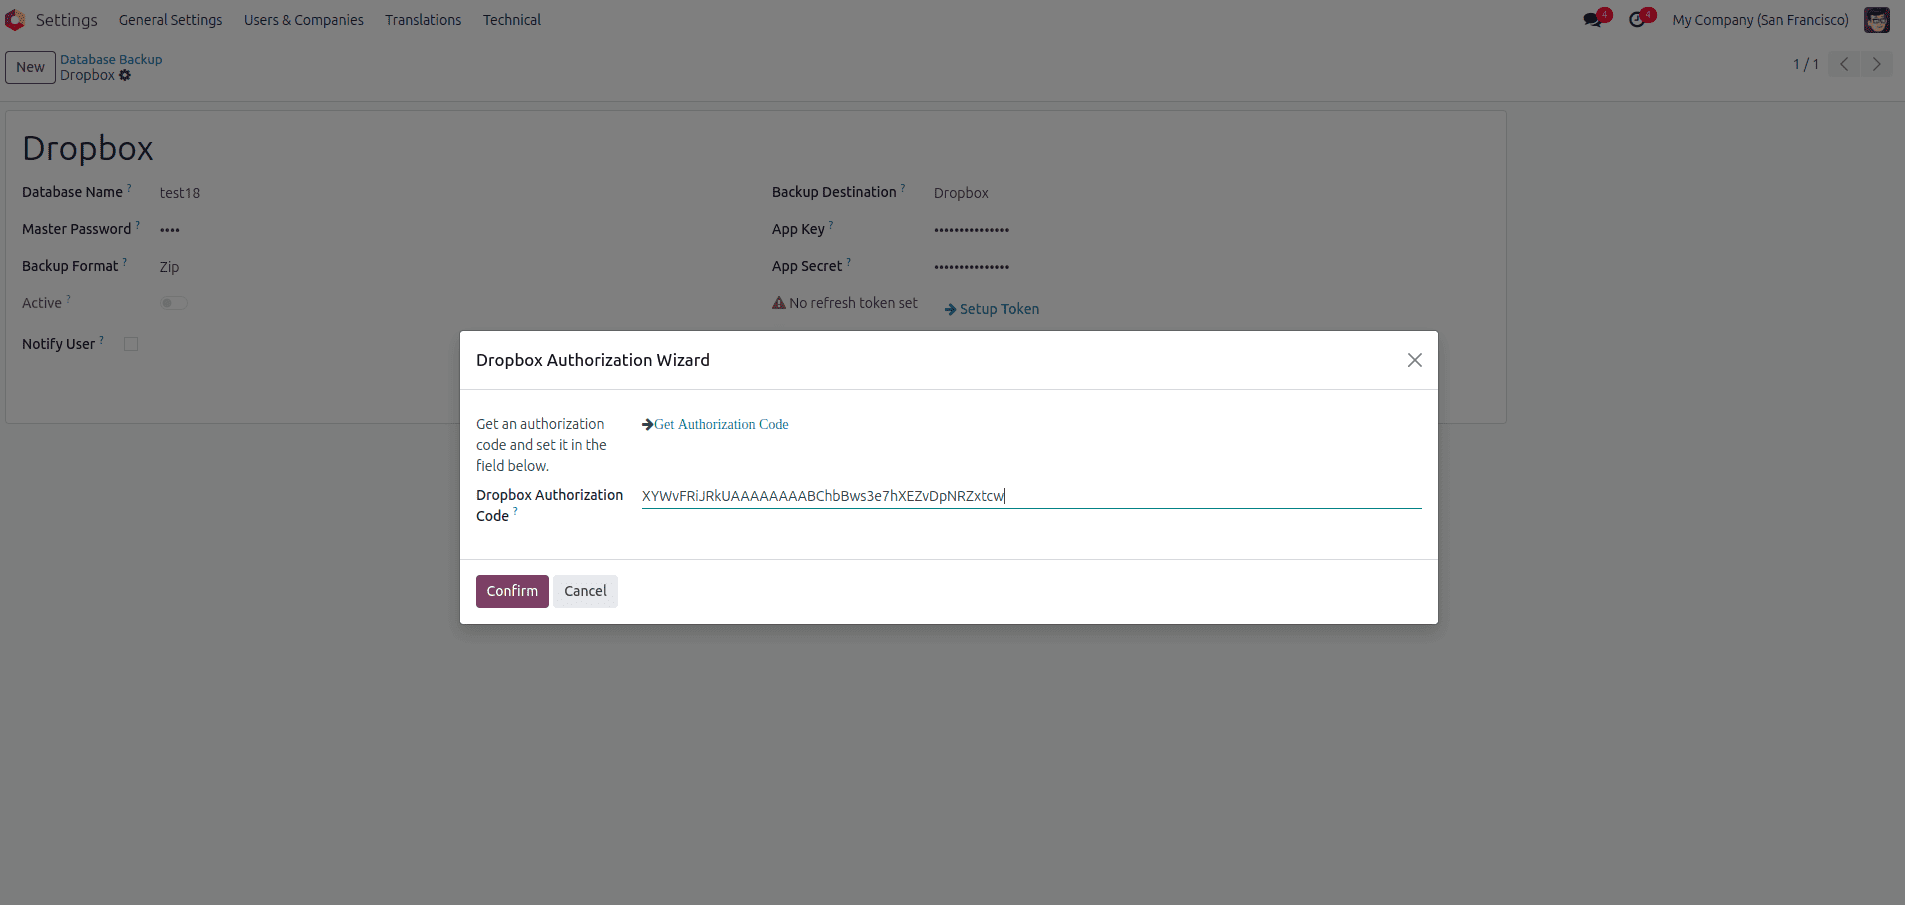
- Click on "Get Authorization Code". This will typically open a new window or tab prompting you to authorize the application.
- Once authorized, copy the generated code and paste it into the "Dropbox Authorization Code" field within the Odoo wizard.
- Reset Refresh Token (If Required):
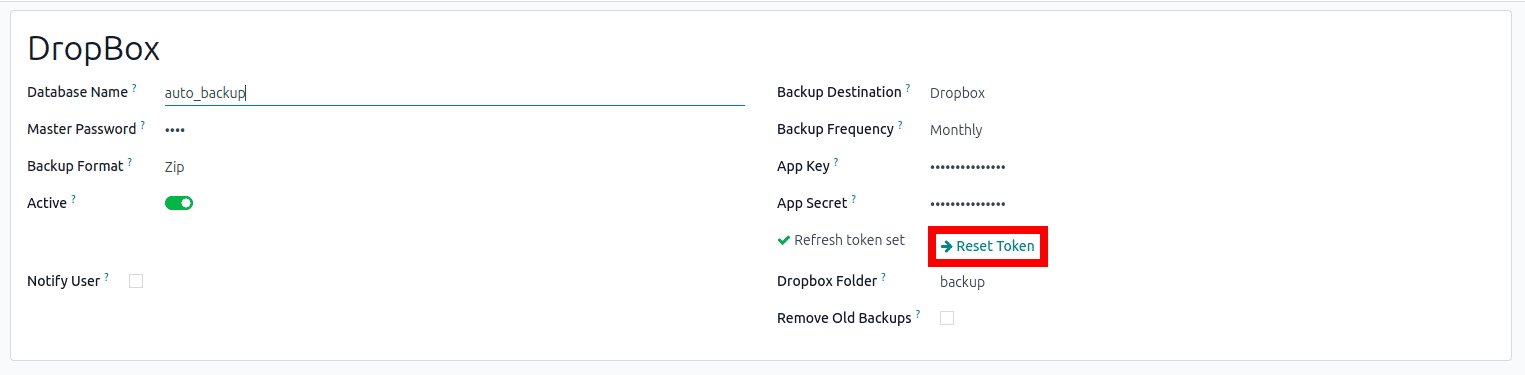
- Should the authentication token ever need to be refreshed, simply click the "Reset Token" button.
OneDrive Backup
To integrate your Odoo backup system with Microsoft OneDrive, ensuring secure cloud storage for your files, follow these detailed steps:
- Register a New App in Microsoft Azure:
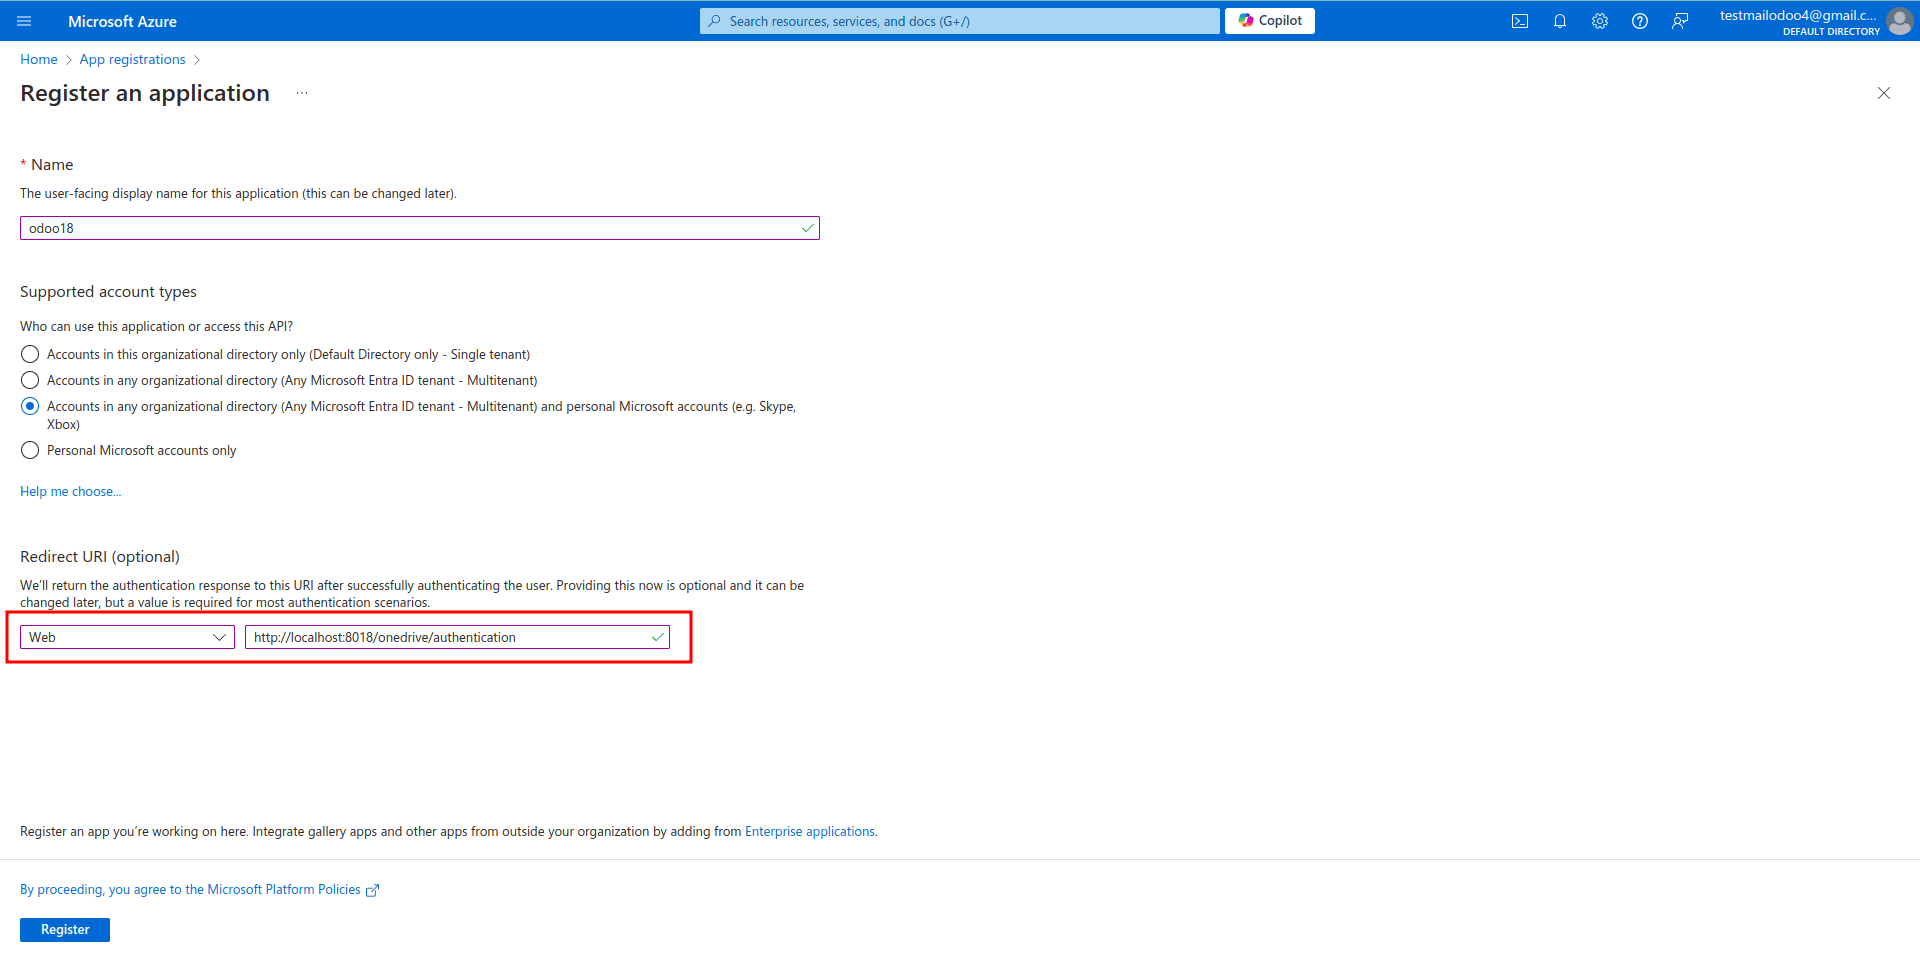
- Access the Microsoft Azure Portal and proceed to register a new application.
- When configuring the Redirect URI, ensure you enter your Odoo database URI followed by `/onedrive/authentication`. For instance: `https://your-odoo-instance.com/onedrive/authentication`.
- Obtain Credentials:
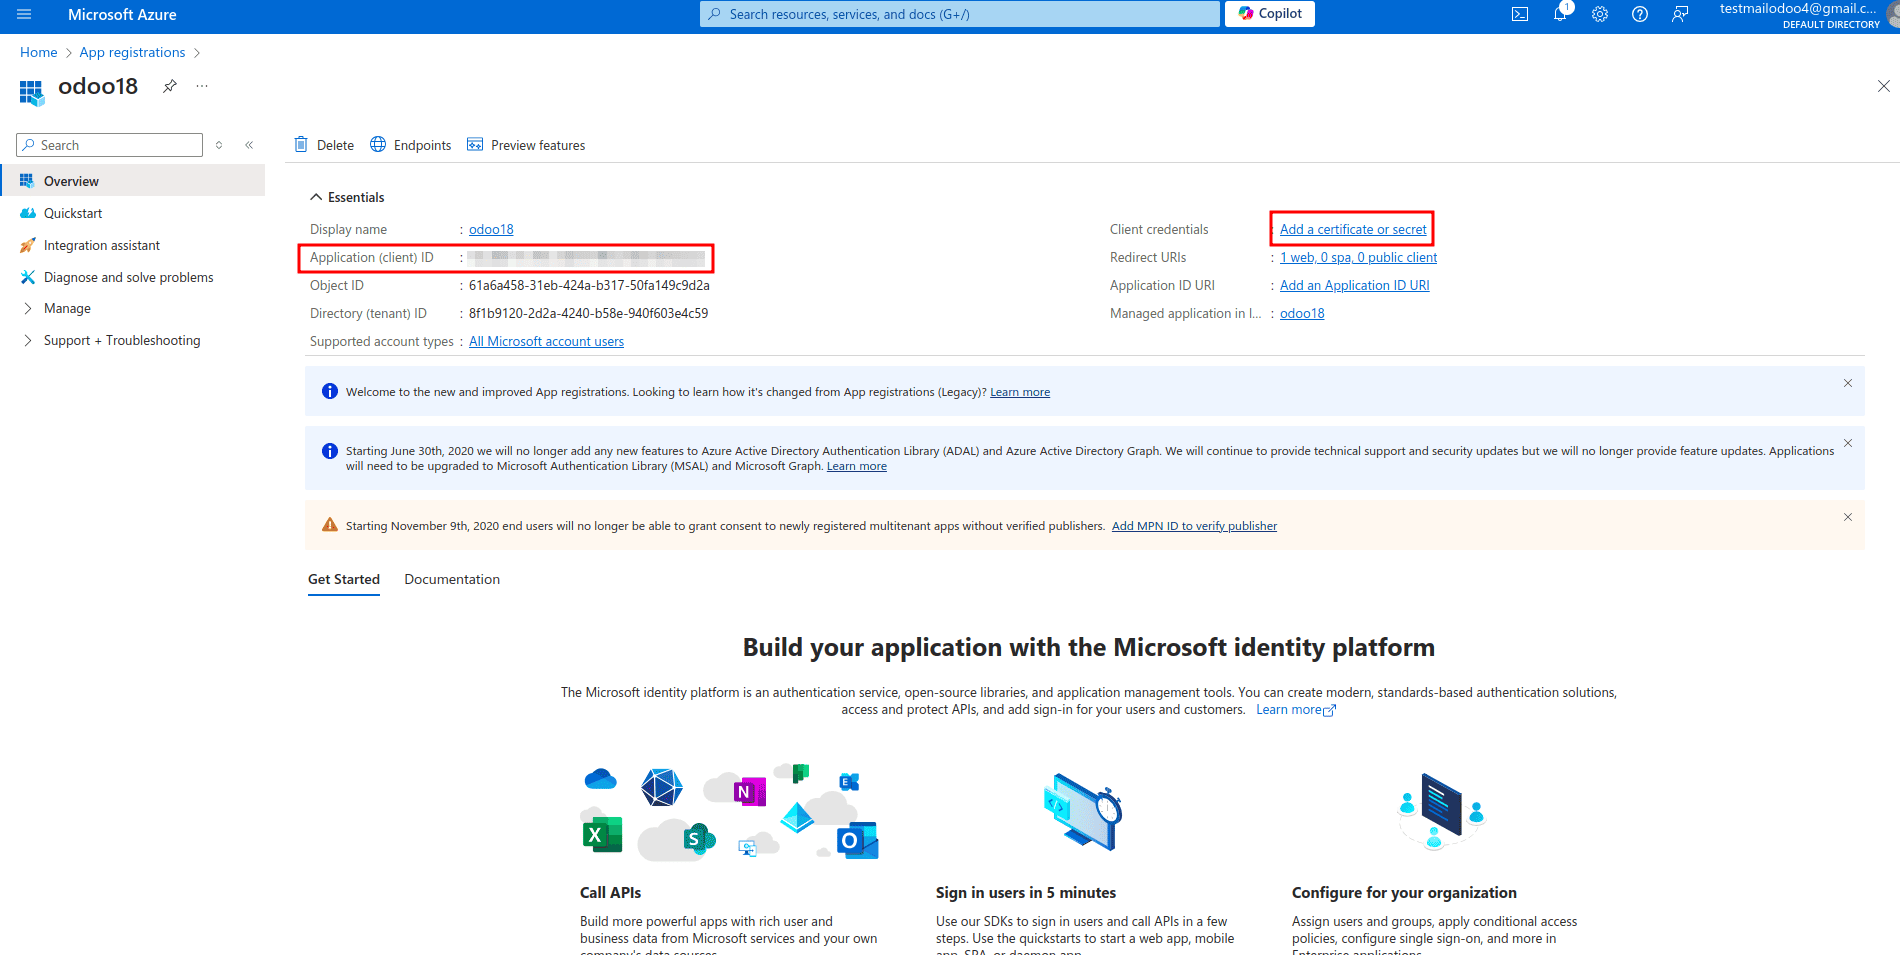
- After registration, copy the Client ID that is generated.
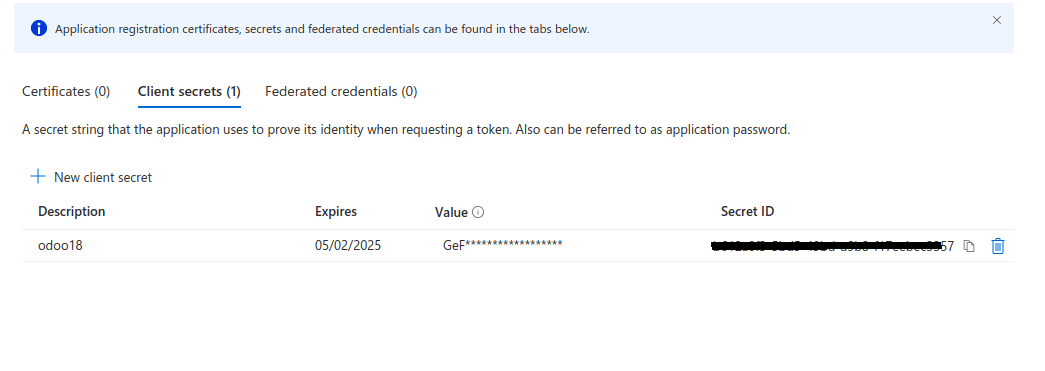
- Proceed to generate a Client Secret from your registered application. This acts as a password for your application.
- Retrieve the newly generated client secret.
- Set Permissions (Scopes):
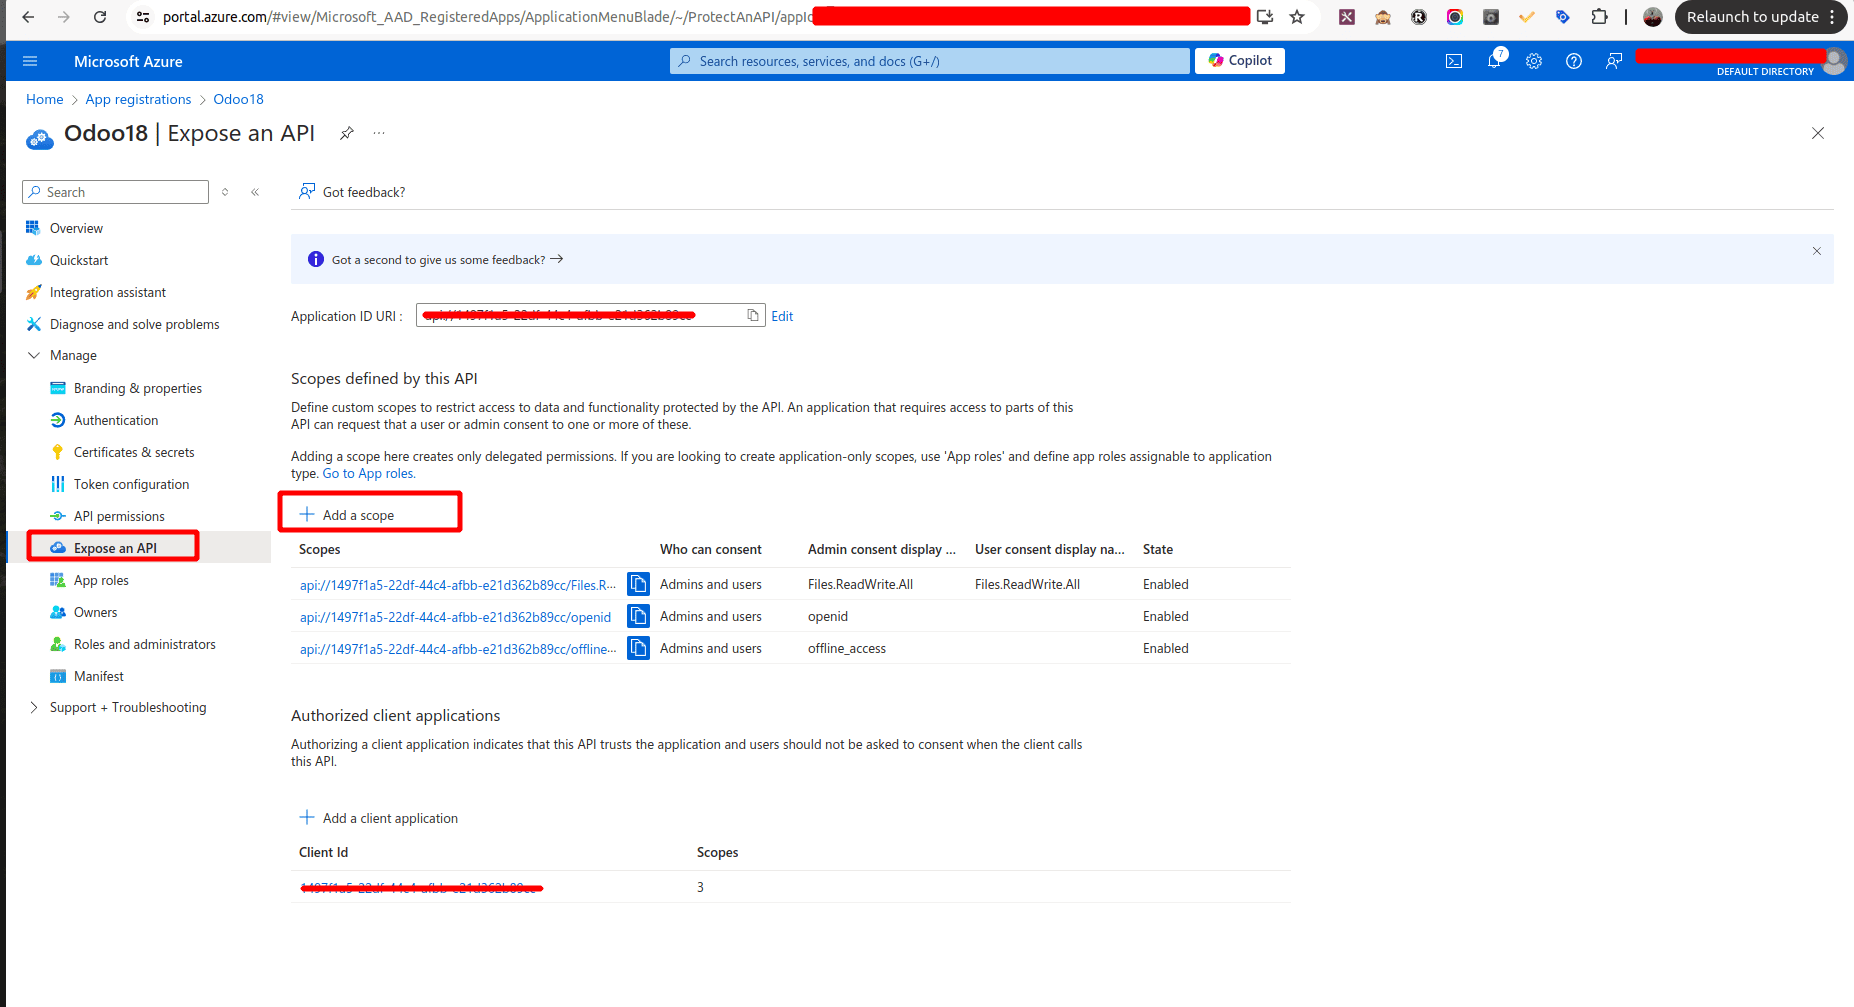
- In the "Expose an API" section, add the necessary Scopes for your application to securely access OneDrive. Key scopes typically include:
Offline_access: Allows the application to maintain access to resources even when the user is not present.openid: Enables the application to verify the user's identity.Files.ReadWrite.All: Grants full read and write access to all files the user can access.
- In the "Expose an API" section, add the necessary Scopes for your application to securely access OneDrive. Key scopes typically include:
- Retrieve OneDrive Folder ID:
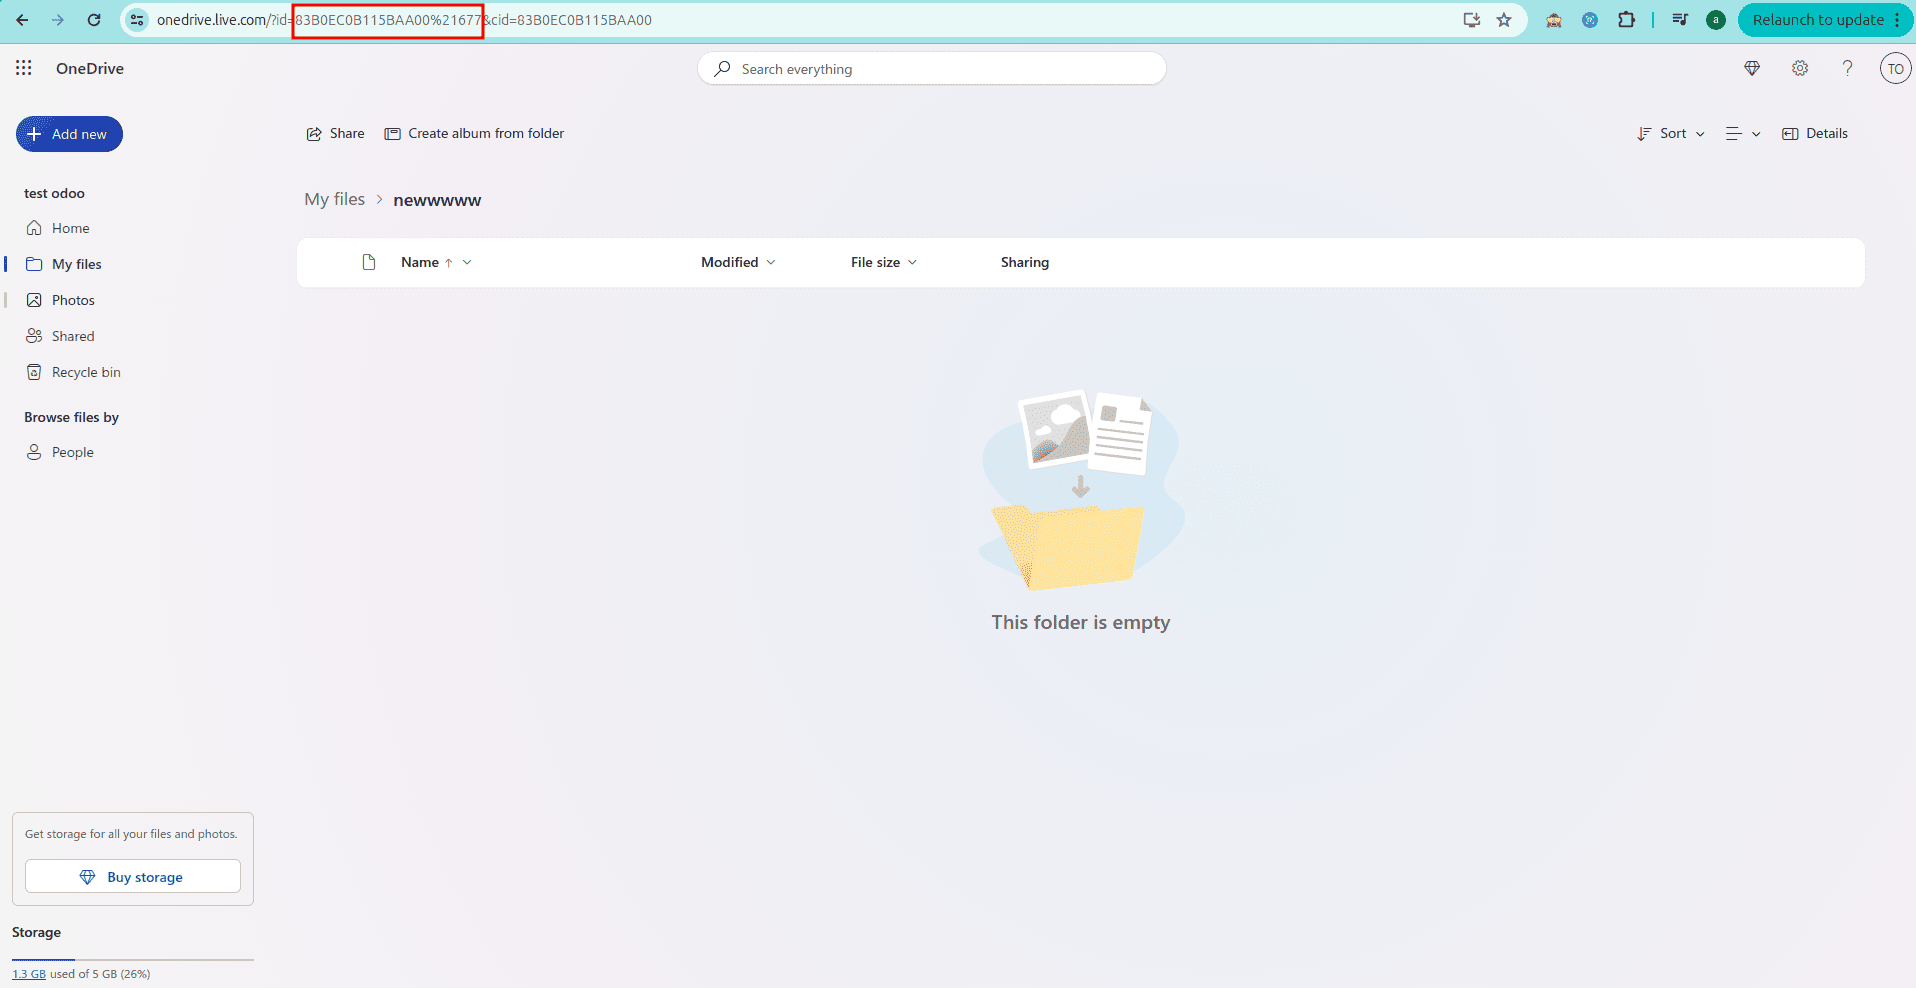
- Obtain the specific Folder ID from the URL of the OneDrive folder where you intend to store your backup files.
- Configure Backup in Odoo:
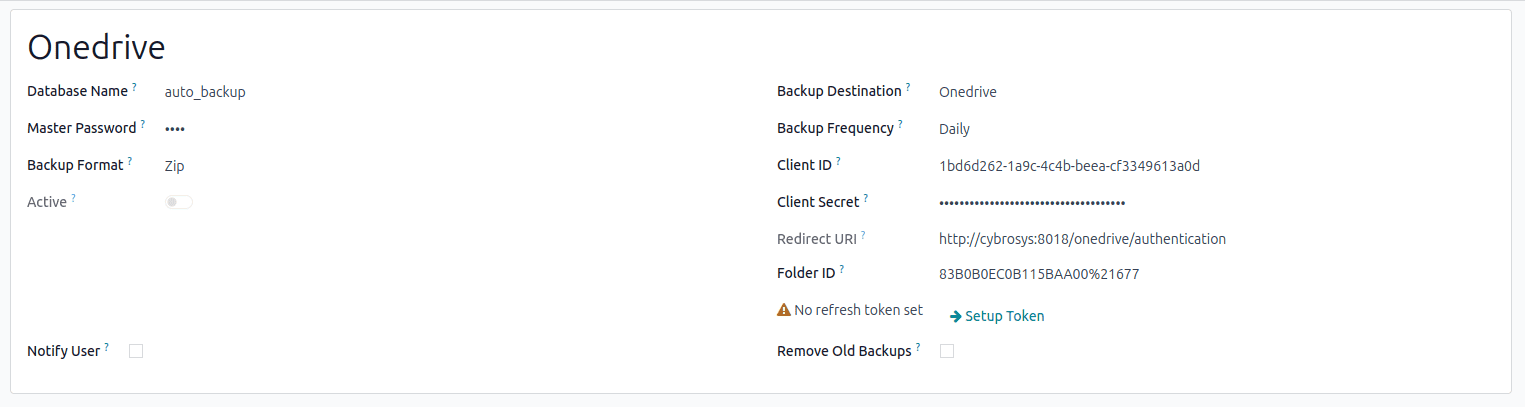
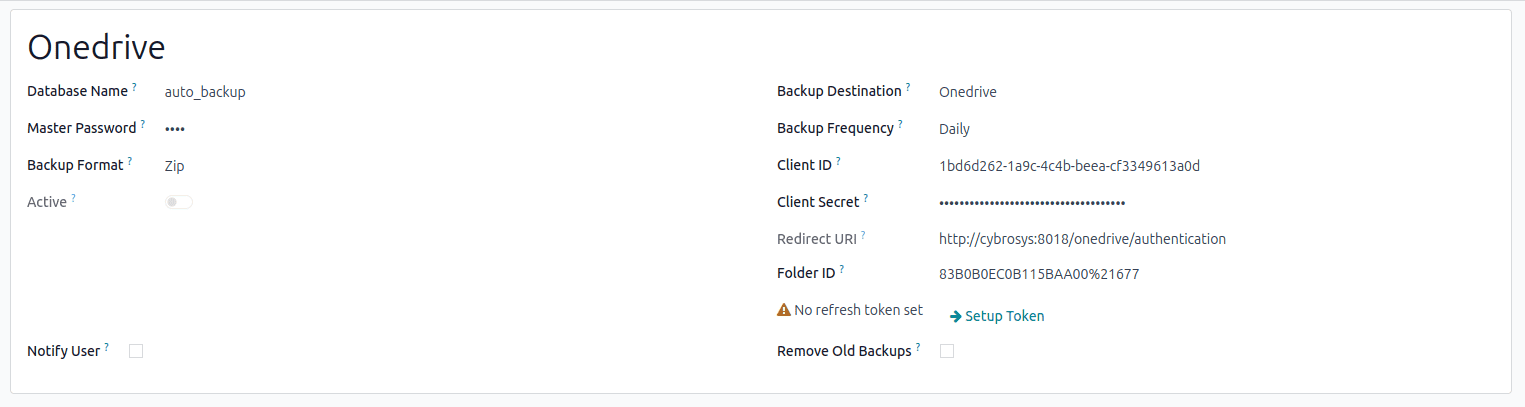
- Within Odoo's Backup Configuration, select "OneDrive" as the desired backup destination.
- Enter the previously obtained App Key (Client ID), App Secret (Client Credentials), and the OneDrive Folder ID into the respective fields.
- Authenticate & Generate Token:
- Click on "Setup Token" to begin the authentication process.
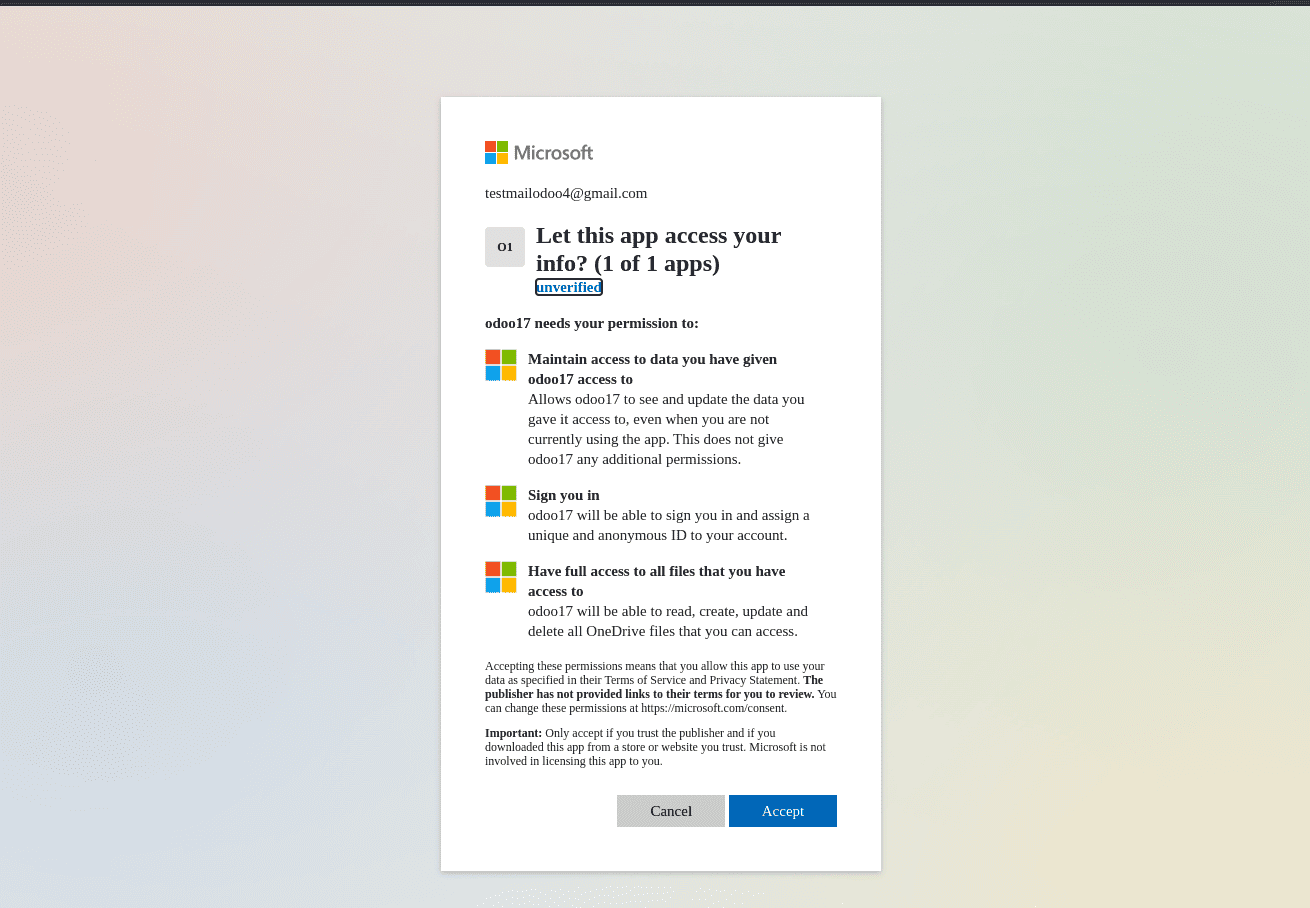
- You will be redirected to an authorization page for Microsoft. Grant the necessary permissions for the connection to be established.
Nextcloud Configuration
To configure your Odoo backup system to store files on a Nextcloud instance, offering a private and secure cloud storage solution, follow these steps:
- Create a Nextcloud Account:
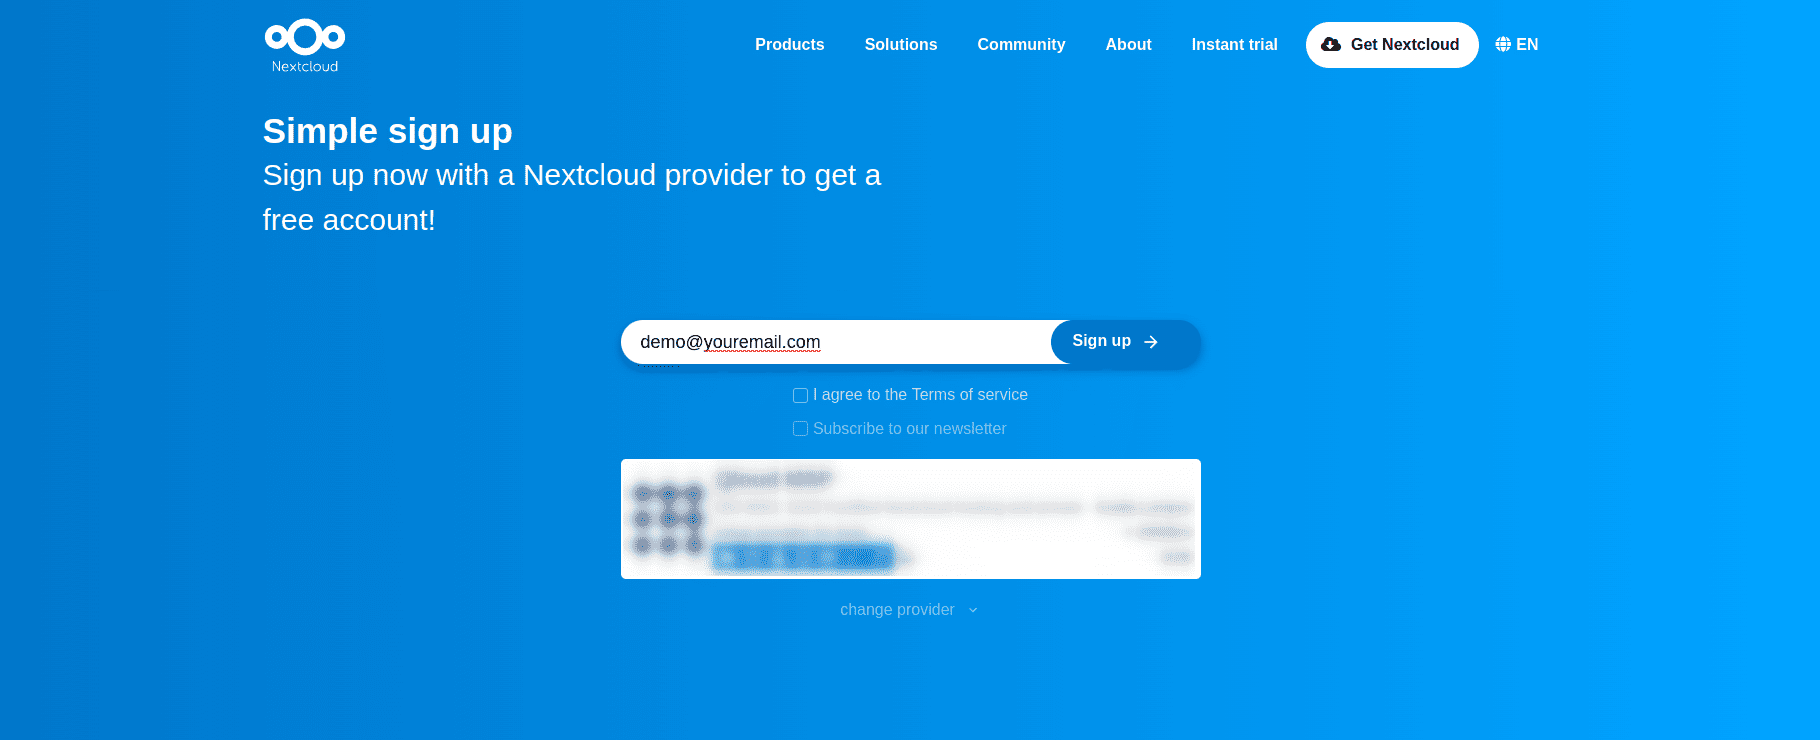
- Visit the Nextcloud sign-up page (or use your existing instance).
- Enter your email address and complete the sign-up process.
- Log in to Nextcloud:
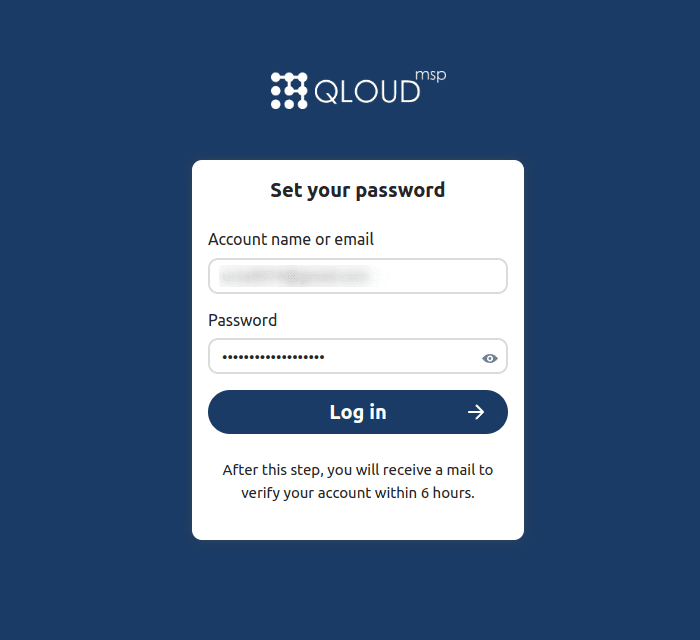
- After successfully signing up or if you have an existing account, you will be directed to the login page.
- Enter your registered email and password to access your Nextcloud account.
- Retrieve Your Nextcloud Domain:
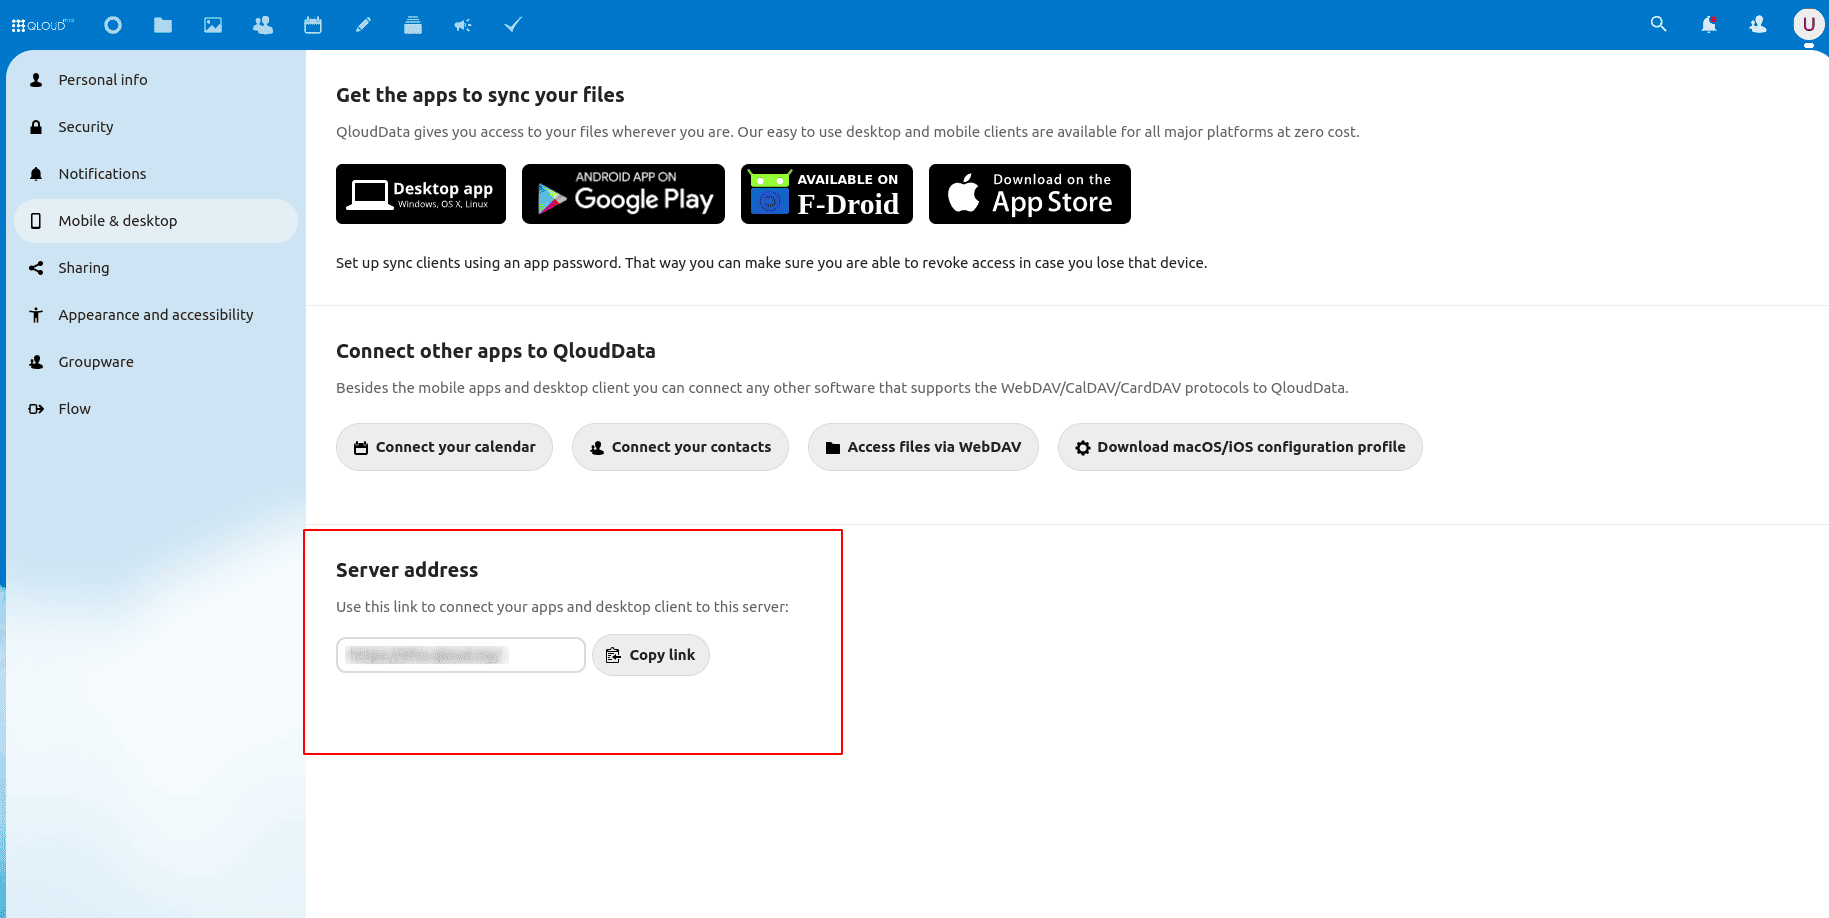
- Within your Nextcloud account, navigate to "Settings".
- Locate the "Mobile & Desktop" section.
- Find the "Server Address," copy this link, and then paste it as your "Domain Name" in the Odoo Backup Configuration.
- Configure Backup in Odoo:
- In Odoo's Backup Configuration, select "Nextcloud" as your backup destination.
- Carefully enter the following details:
- Domain Name: The server address you retrieved in Step 3.
- Username: Your Nextcloud account username.
- Password: Your Nextcloud account password.
- Folder Name: The specific folder within Nextcloud where your Odoo backups will be stored.
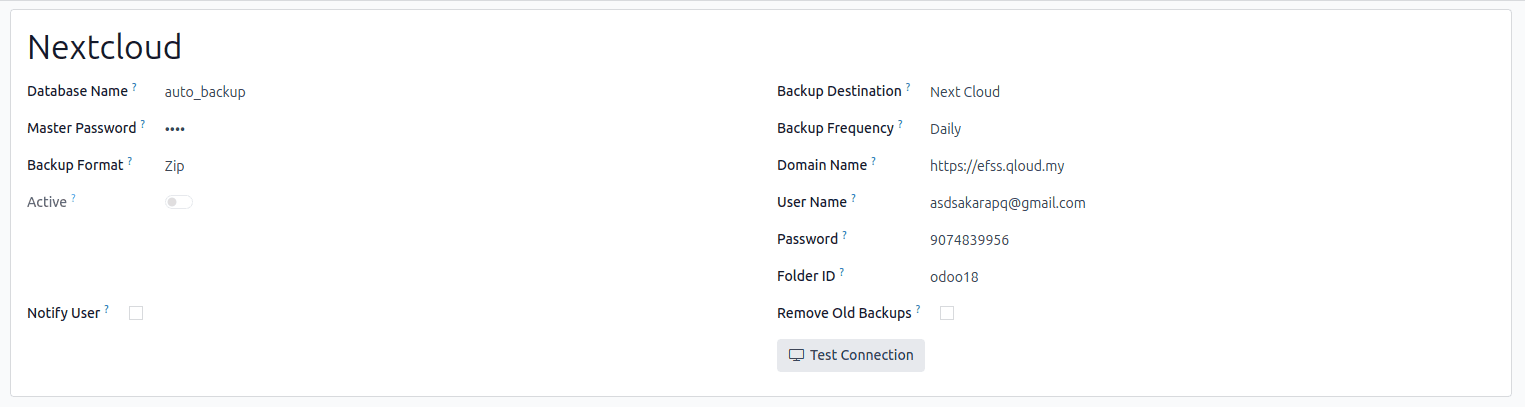
- Click the "Test Connection" button to verify that the Odoo instance can successfully communicate with your Nextcloud server.
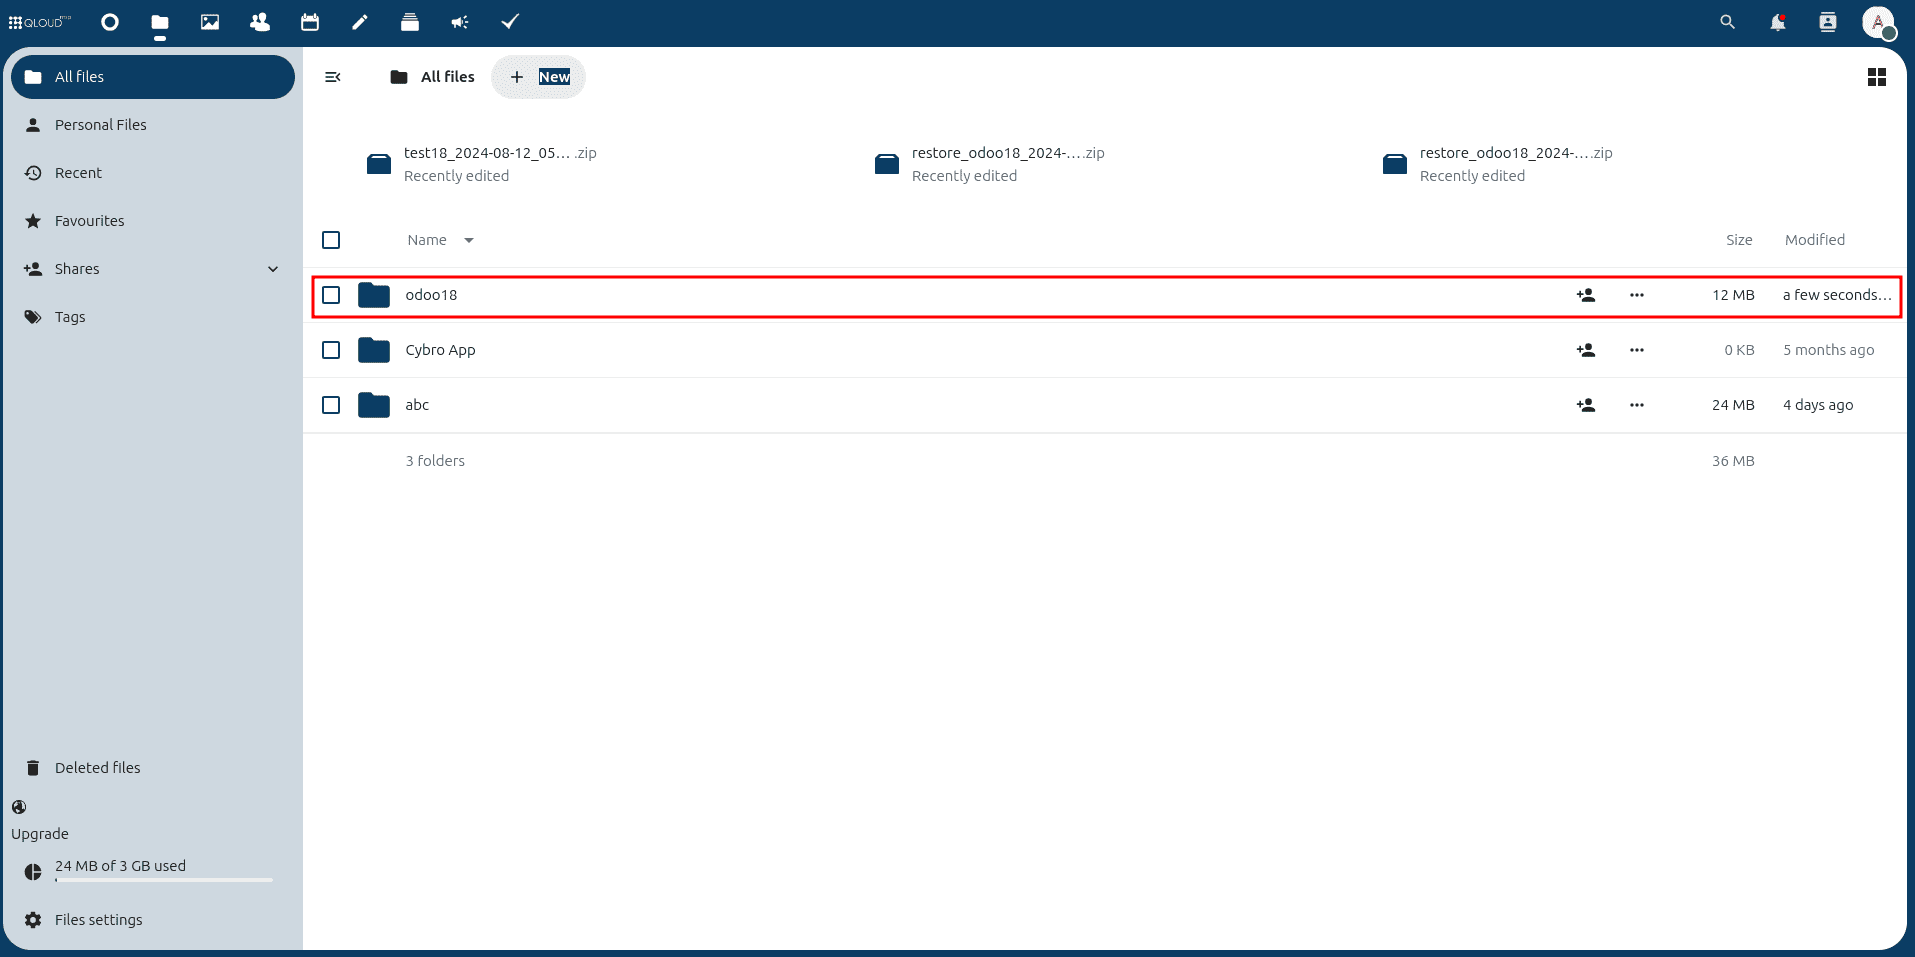
Once configured, backups will be automatically created in the specified Nextcloud folder according to your defined backup frequency.
Amazon S3 Integration
To configure Amazon S3 as your backup destination, leveraging its scalable and secure cloud storage capabilities, follow these comprehensive steps:
- Create an Amazon S3 Account:
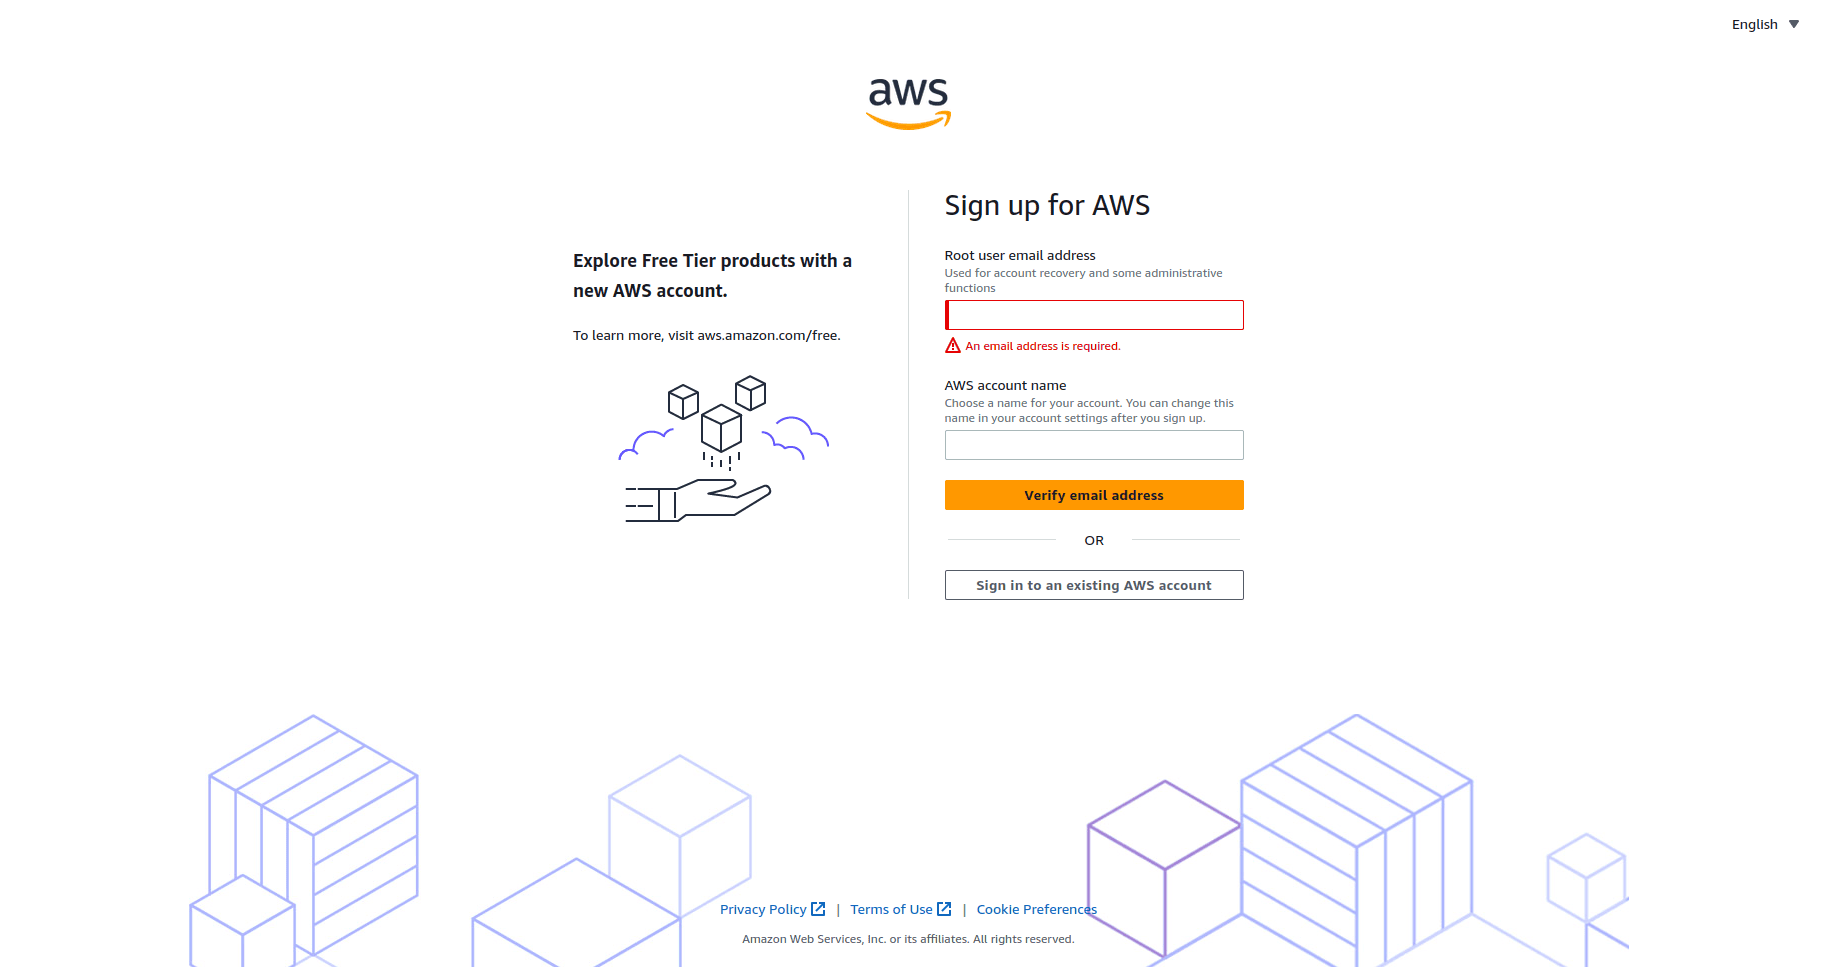
- Navigate to the Amazon S3 sign-up page.
- Provide your email address and complete the guided sign-up process to establish your AWS account.
- Generate Access Keys:
- After successfully creating your AWS account, proceed to "Account Security Credentials".
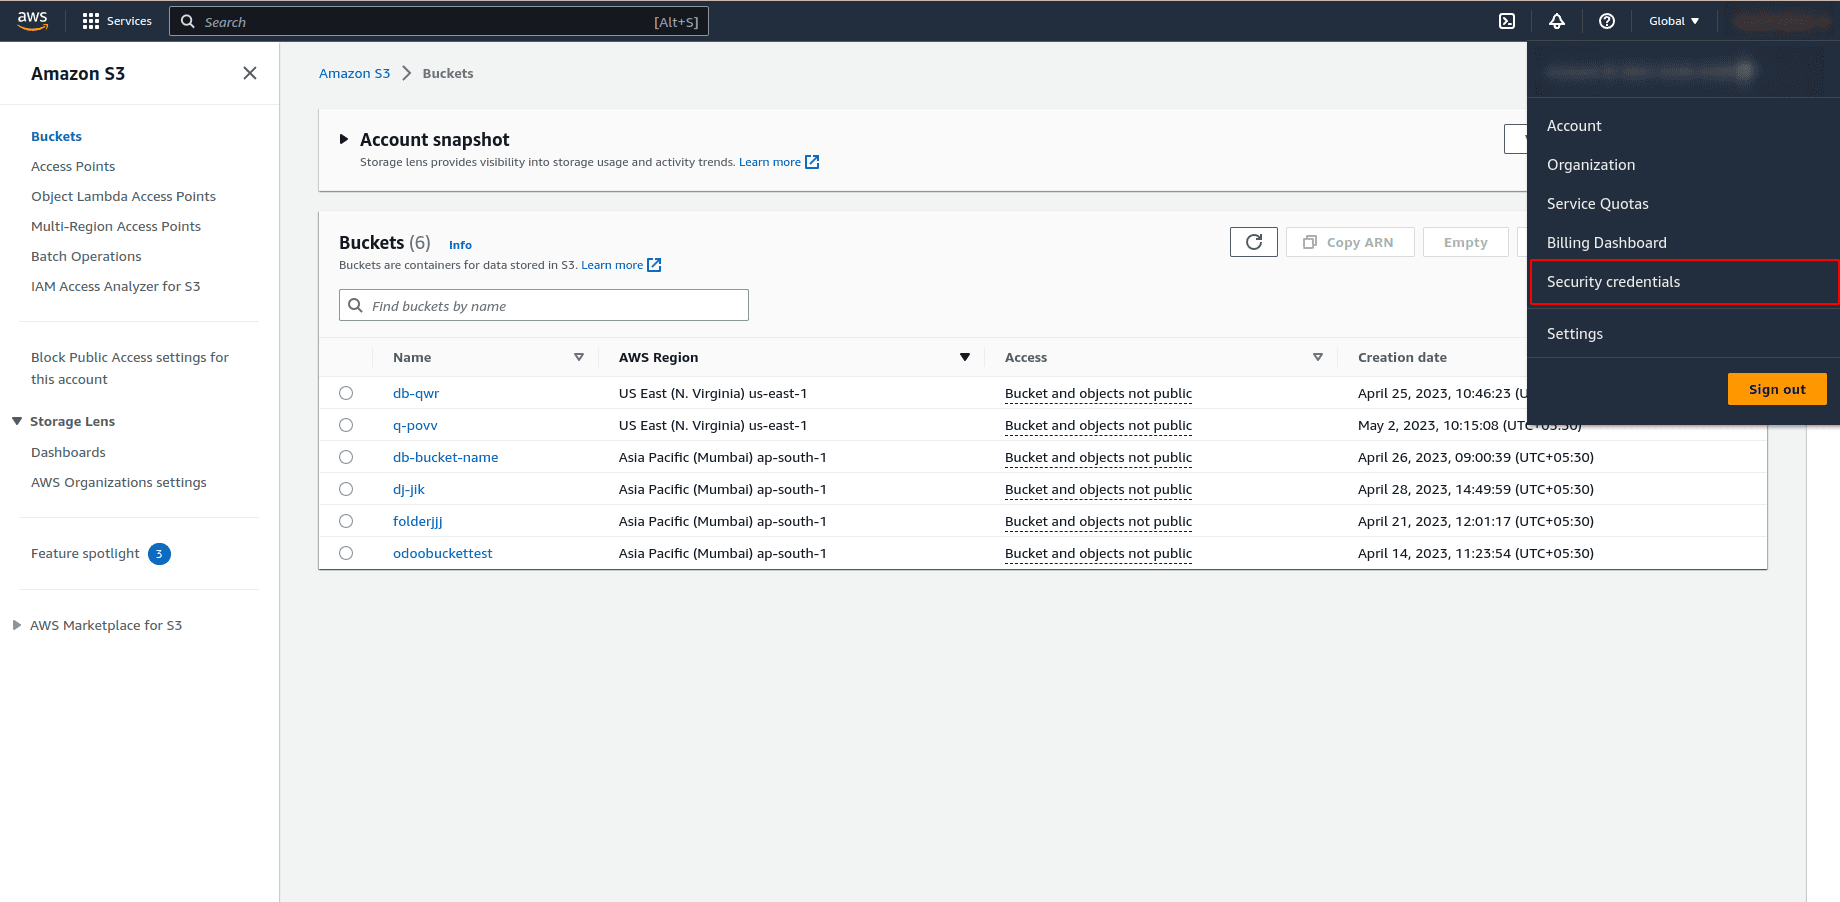
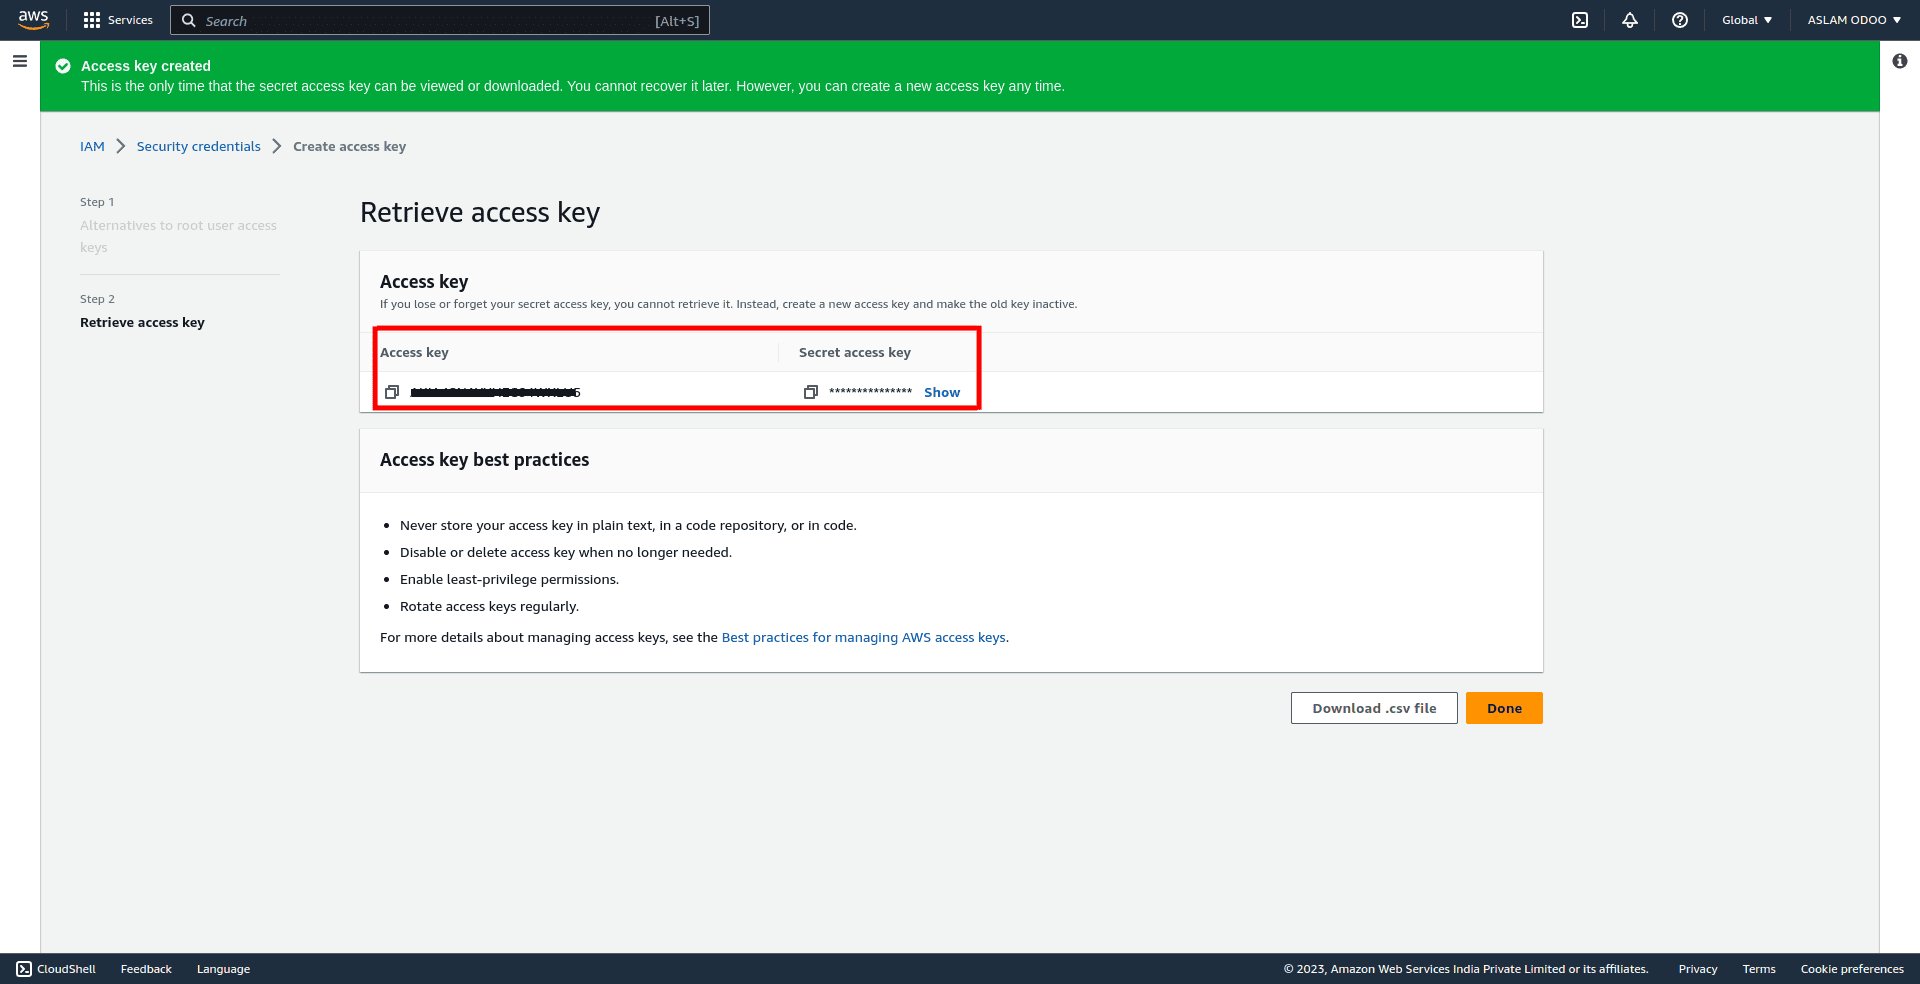
- Within this section, go to "Access Keys" and create a new access key.

- Crucially, copy both the Access Key ID and the Secret Access Key. Store these securely as they will be required for Odoo integration.
- Create an S3 Bucket:
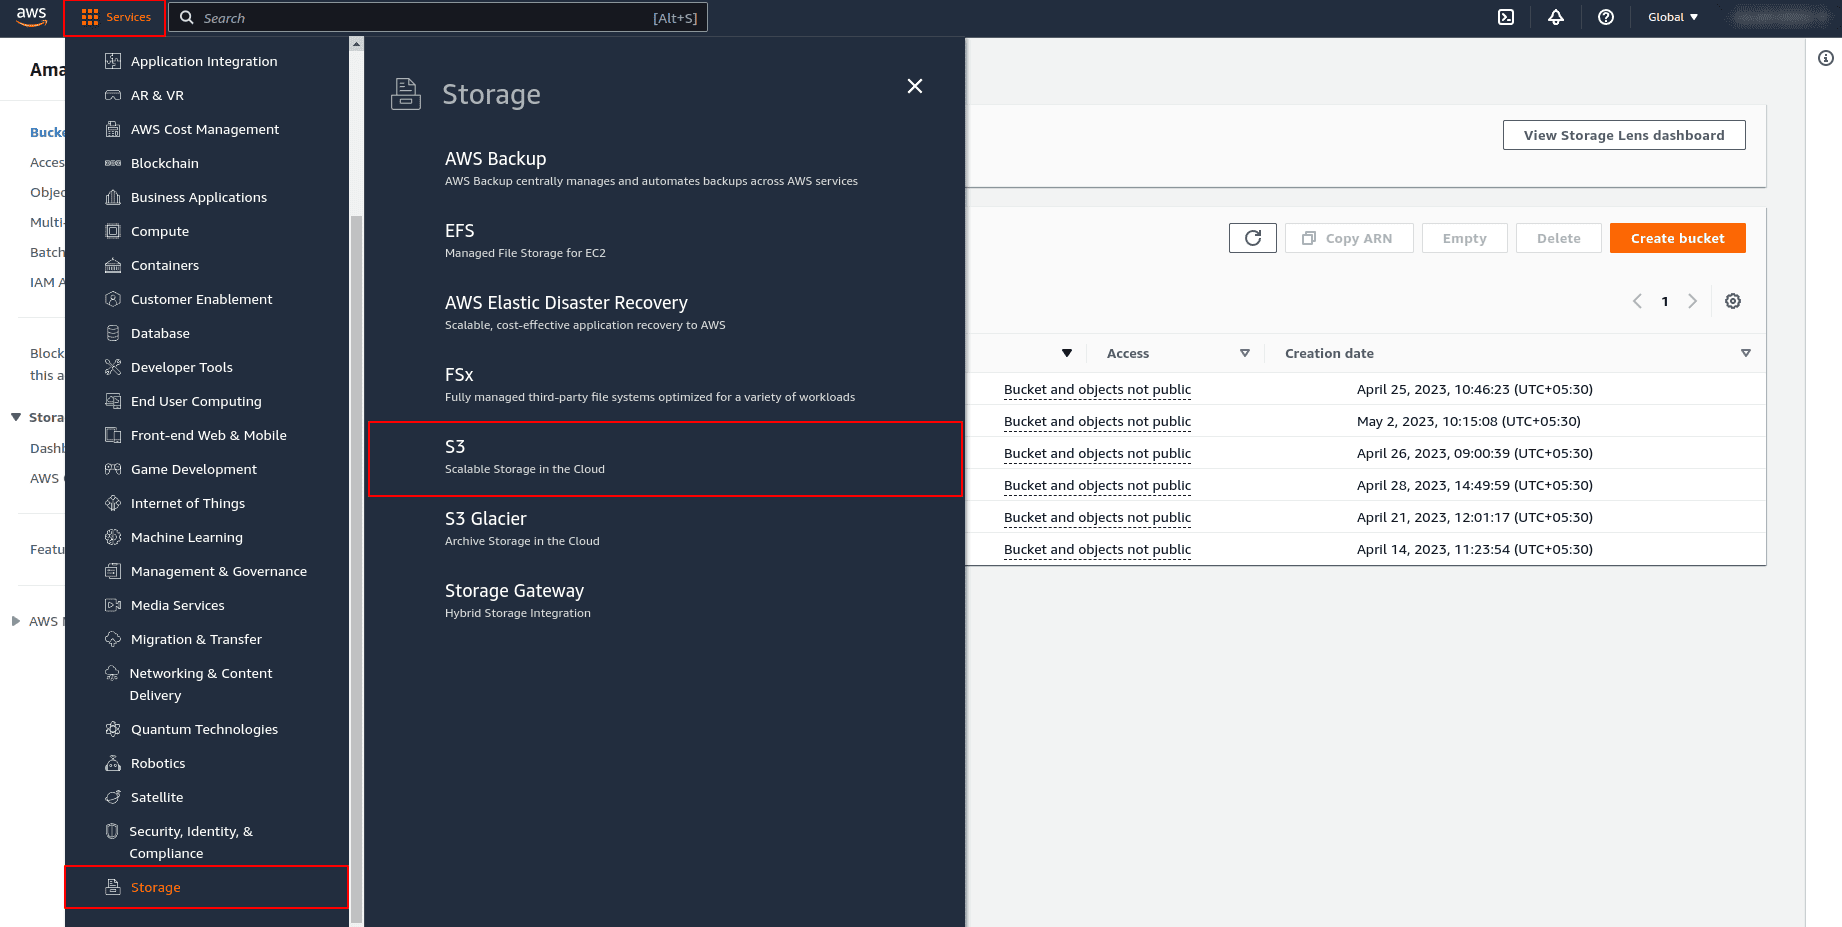
- In the AWS Management Console, click on "Services" (located in the top-right corner).
- Navigate to "Storage" > "S3".
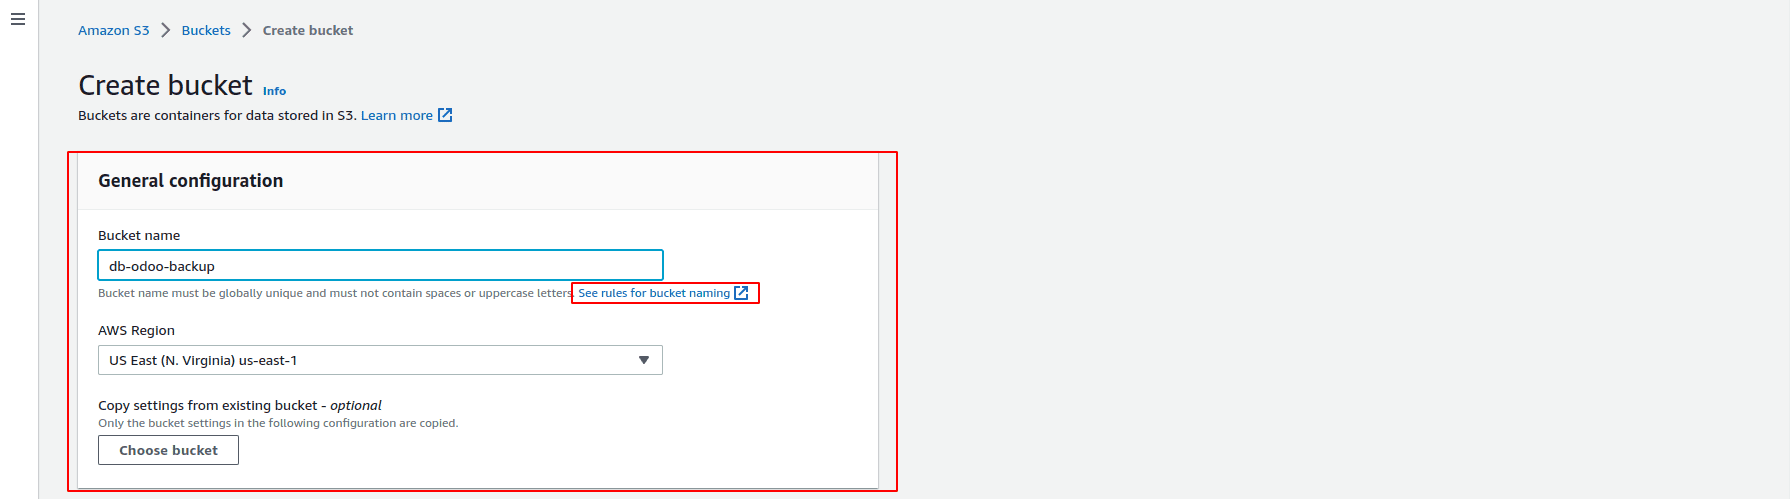
- Click on "Create Bucket".
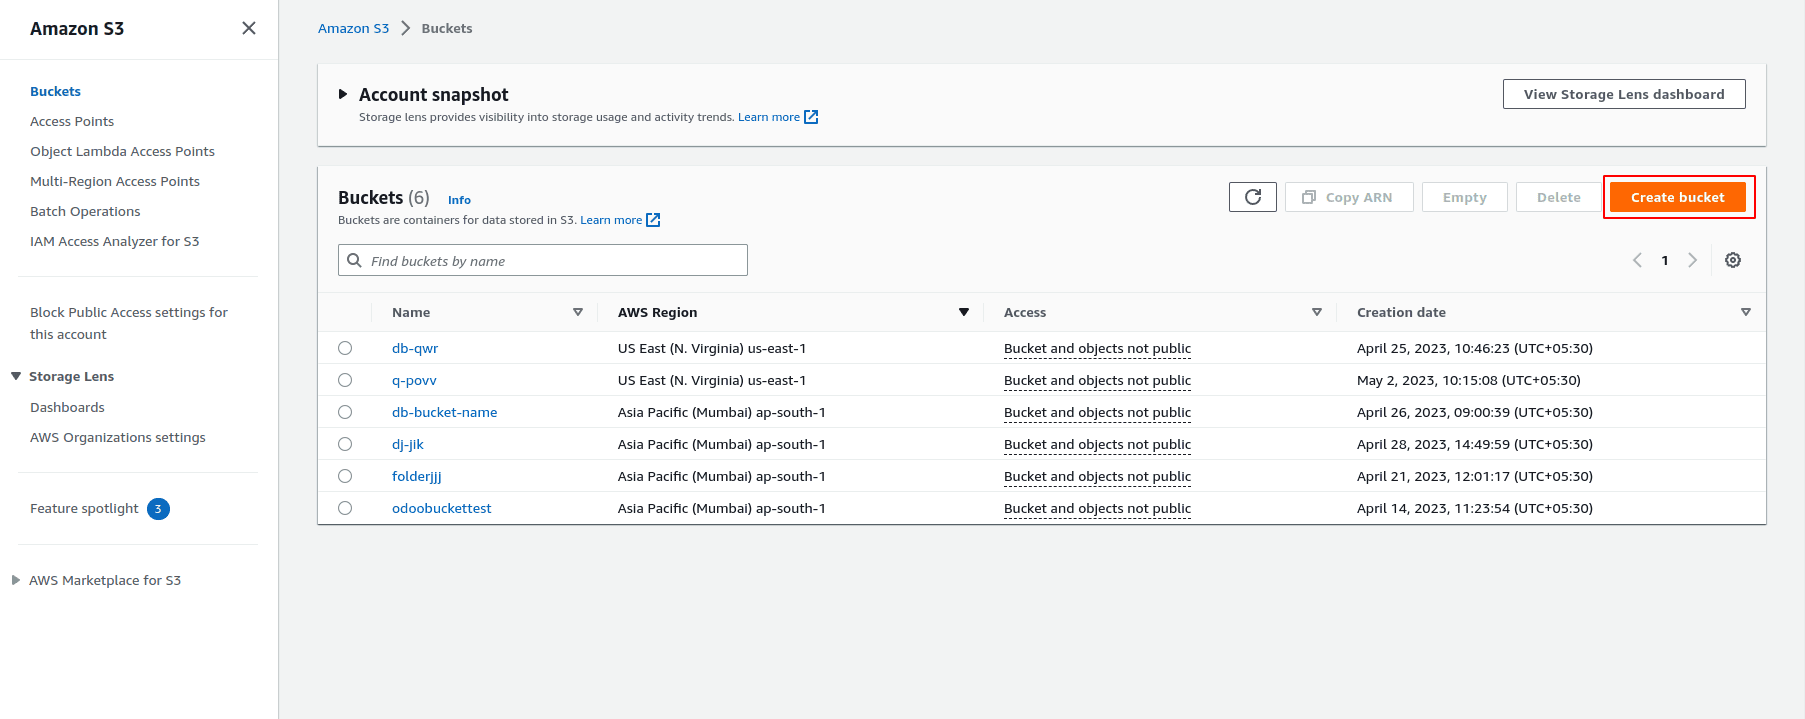
- Follow the S3 bucket naming rules and select the AWS Region where you wish to store your backups for optimal performance and compliance.
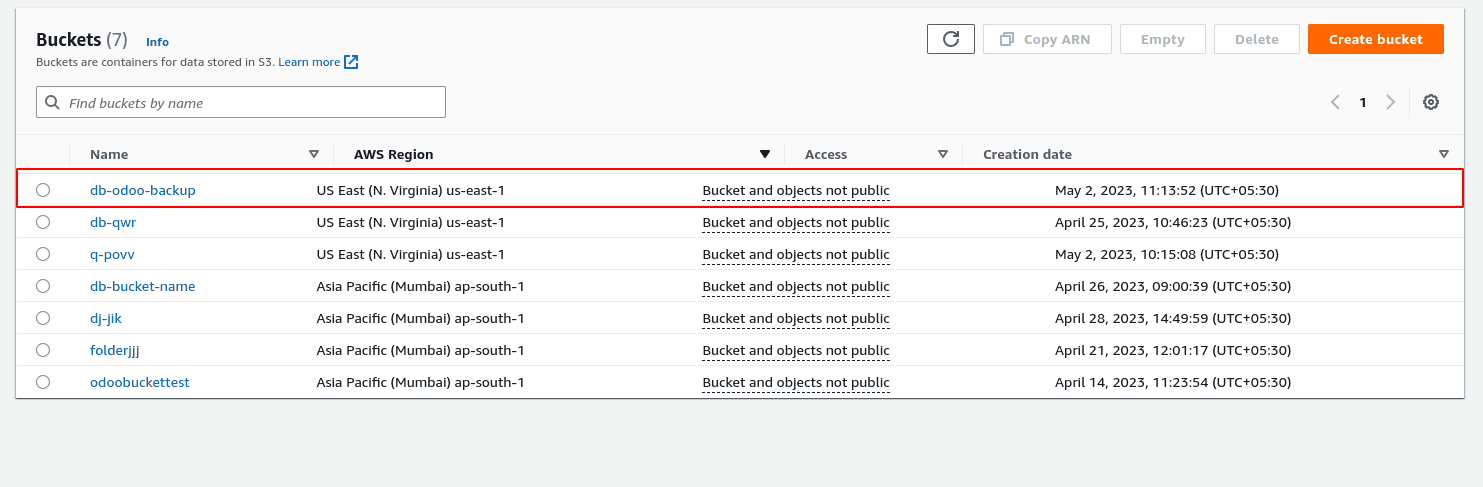
- Click "Create Bucket" to finalize the setup. You will then see your newly created bucket listed.
- Configure Backup in Odoo:
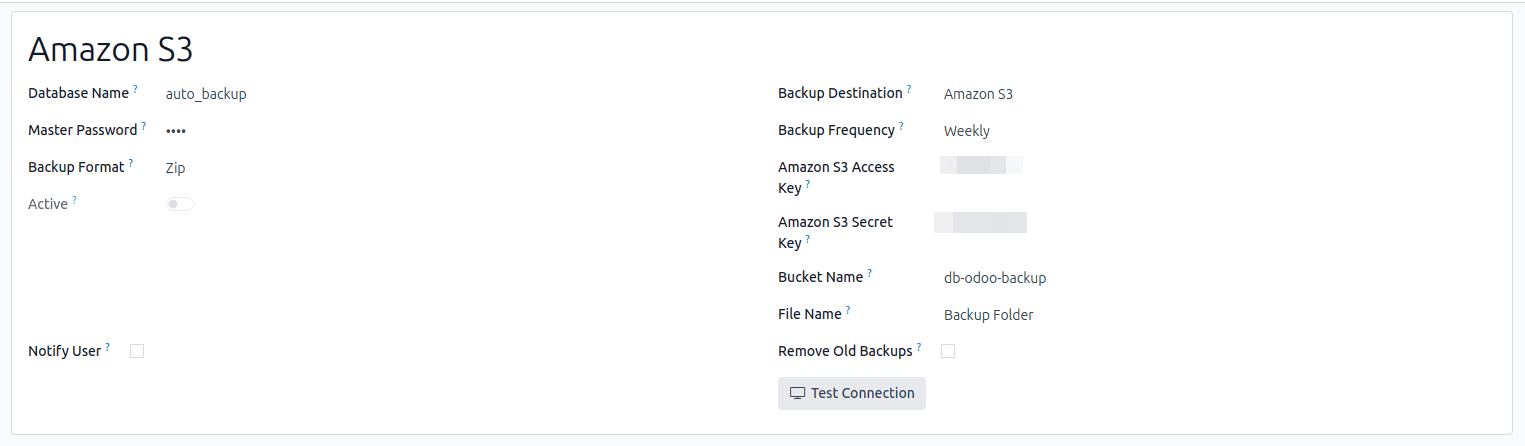
- In Odoo's Backup Configuration, select "Amazon S3" as your chosen backup destination.
- Input the following essential details:
- Amazon S3 Access Key: The Access Key ID obtained in Step 2.
- Amazon S3 Secret Key: The Secret Access Key obtained in Step 2.
- Bucket Name: The exact name of the S3 bucket you created in Step 3.
- File Name: Specify the desired folder name (or prefix) where backup files will be stored within your S3 bucket.
- Test Connection:
- Click on the "Test Connection" button to verify that the Odoo instance can successfully establish a connection with your Amazon S3 bucket using the provided credentials. This ensures a smooth backup process.
Automating Backup Management: Advanced Options
Beyond initial setup, the module offers advanced automation features to ensure efficient backup lifecycle management and timely communication.
Automatic Backup Retention Policies
To prevent excessive storage consumption and maintain an organized backup archive, the module provides an option for automatic removal of old backup files. Enabling this feature allows you to specify a retention period (number of days) after which backup files will be automatically deleted. This ensures that you retain only relevant and recent backups, optimizing your storage resources while adhering to data retention policies.
Backup Notification System
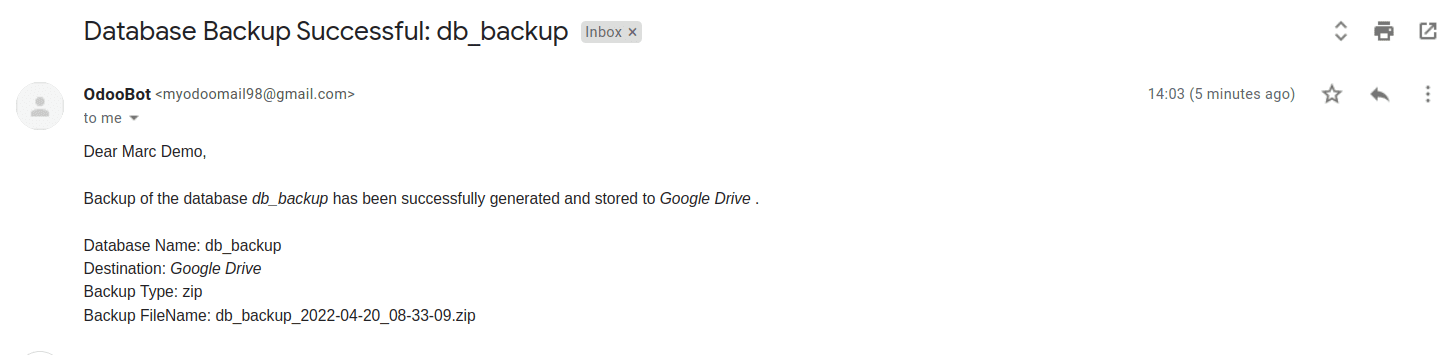
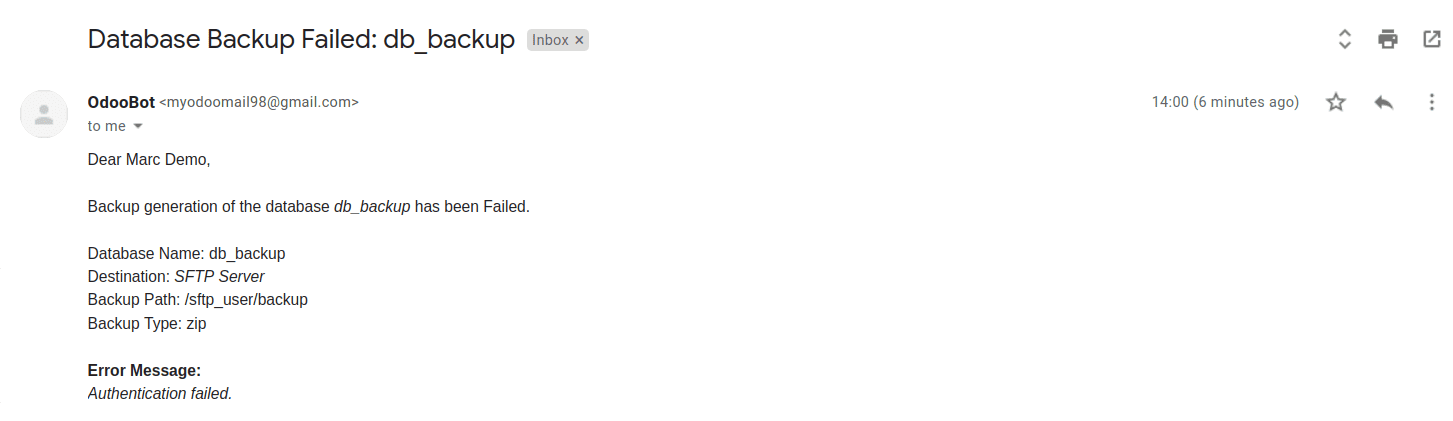
Staying informed about the status of your backup operations is crucial for data integrity. By enabling the "Notify User" option, you can designate a specific Odoo user who will receive email alerts for every backup operation, whether successful or failed. This real-time monitoring capability allows administrators to promptly address any backup failures, ensuring minimal downtime and robust data protection.
An example of a successful backup notification email:
An example of a failed backup notification email, highlighting issues that require attention:
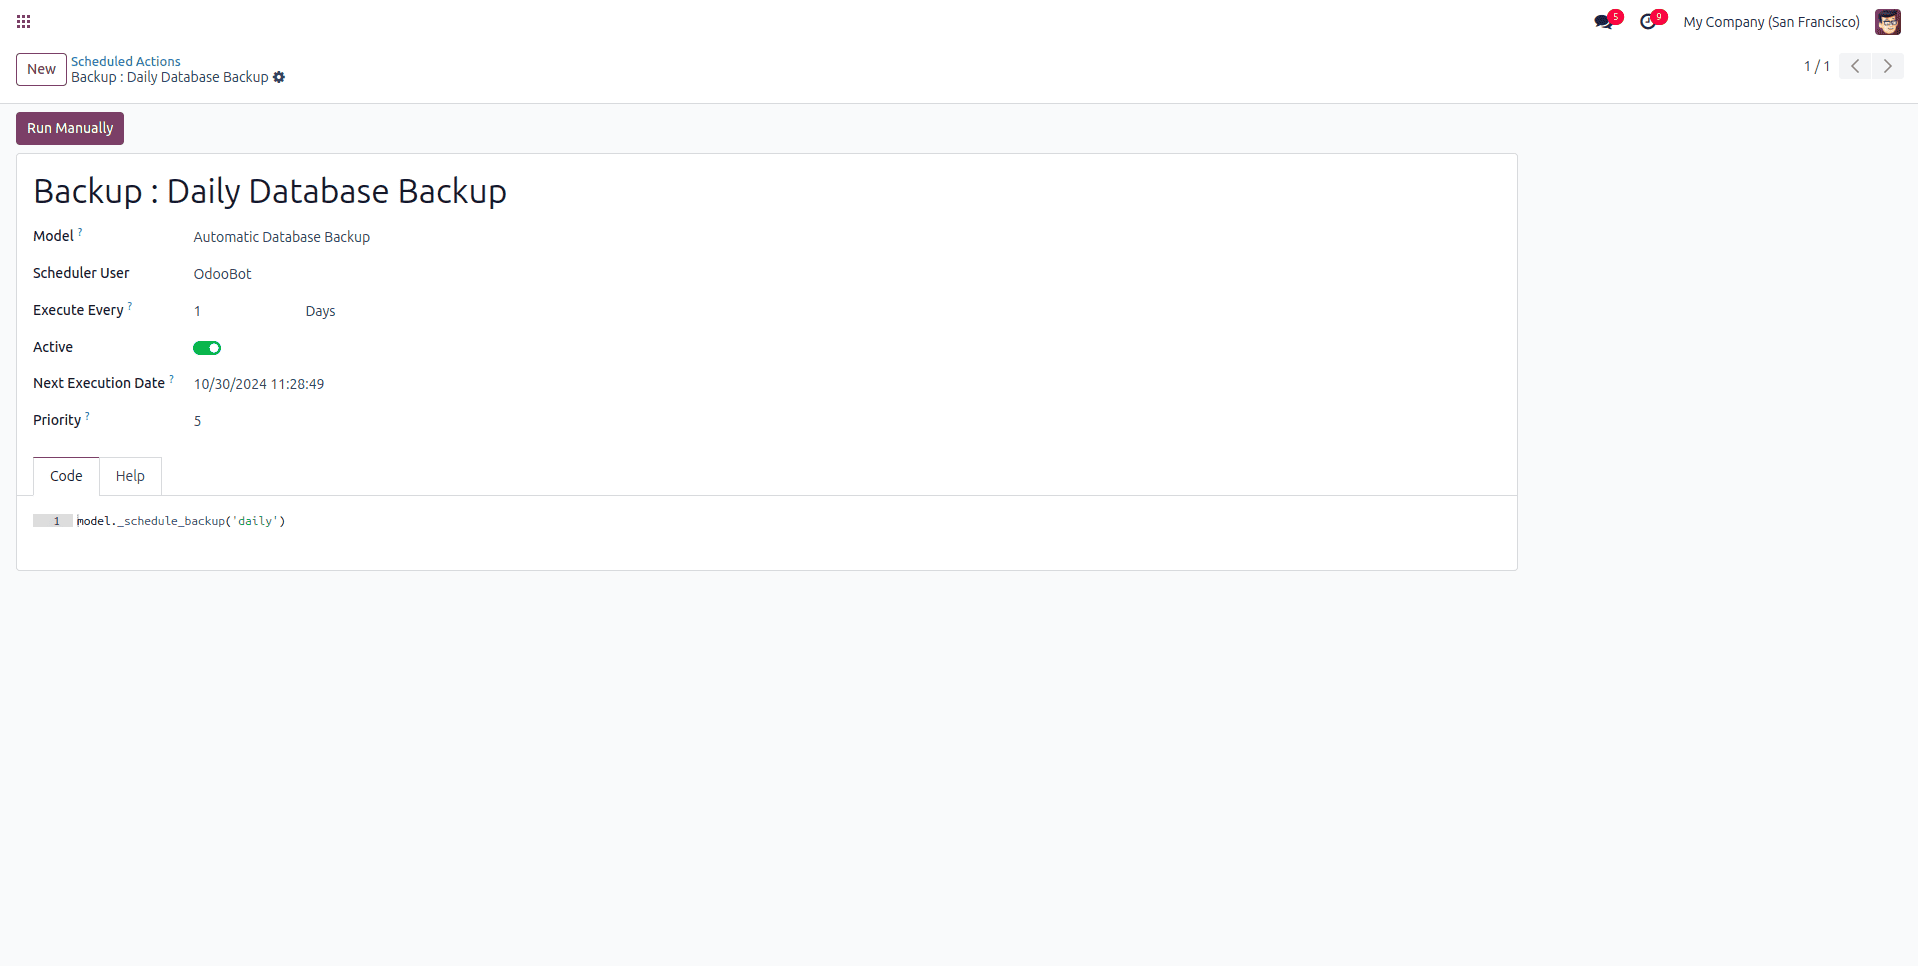
Scheduled Backup Actions
The module automates the backup process through three distinct scheduled actions, ensuring that your data recovery strategy is consistently maintained at your specified location and frequency:
- Daily Backup: This action runs every day, providing the most up-to-date data recovery points and minimizing potential data loss.
- Weekly Backup: Executed once a week, this ensures a periodic layer of data protection, suitable for maintaining a consistent history of your database state.
- Monthly Backup: Running once a month, this action is ideal for long-term backup retention and archival purposes.
To activate these automated backups, you must enable the relevant scheduled action that corresponds to your desired backup frequency within your configuration. This ensures reliable and hands-free data protection.
Select the scheduled action that aligns with your chosen backup frequency (e.g., Daily, Weekly, or Monthly).
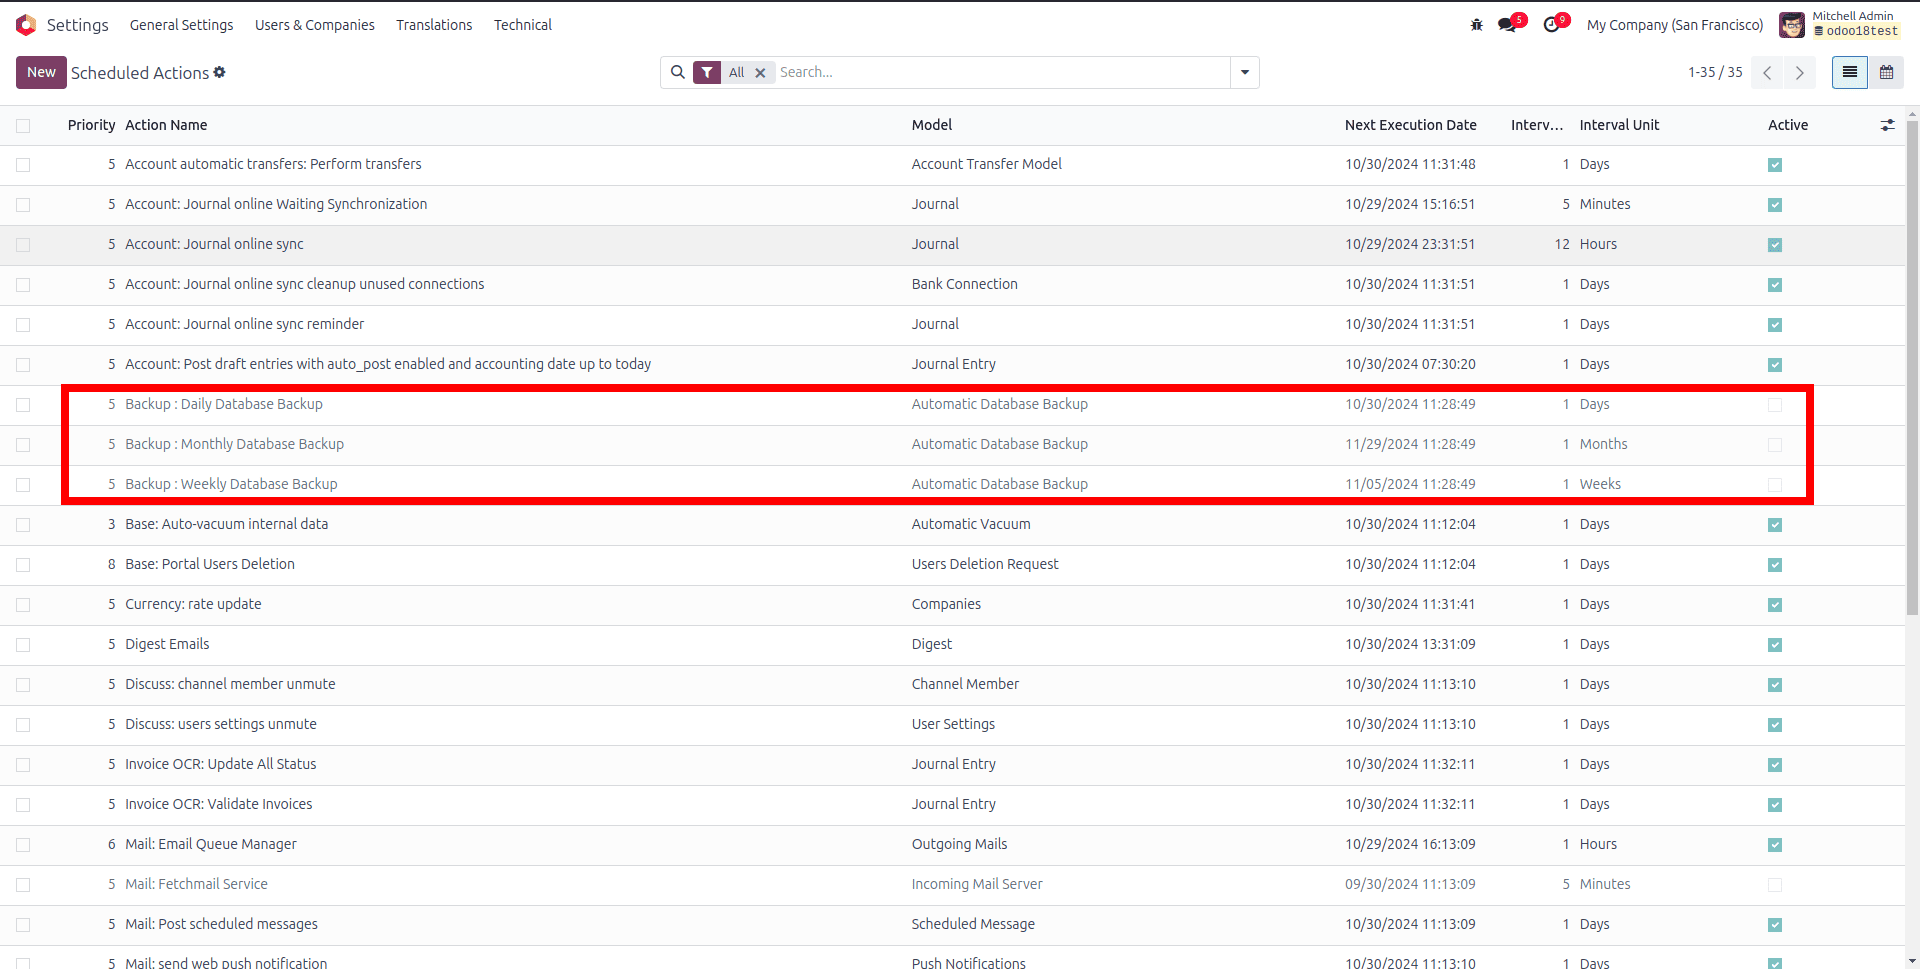
Once selected, activate the scheduled action to allow it to run automatically. You also have the option to click 'Run Manually' to execute a backup immediately, which is useful for testing or urgent backup needs.
Conclusion
The Automatic Database Backup module for Odoo 18 stands as a comprehensive solution designed to provide seamless and reliable backup management. By fully automating the backup process across a multitude of storage destinations, it ensures the integrity and availability of your critical Odoo data.
With robust support for various storage options—including local and remote servers, alongside leading cloud services like Google Drive, Dropbox, OneDrive, Nextcloud, and Amazon S3—organizations can implement a resilient data protection strategy. This feature-rich module significantly enhances data security, optimizes storage utilization, and strengthens disaster recovery readiness.
Key functionalities such as configurable scheduled backups (daily, weekly, and monthly), intelligent automatic removal of outdated backups, and real-time notifications for backup success or failure collectively contribute to a robust and proactive data management system. Whether for large enterprises or growing small businesses, this solution ensures that your Odoo database remains thoroughly protected, thereby substantially minimizing the risk of data loss and potential operational downtime. Implementing this sophisticated module offers invaluable peace of mind, knowing that your essential Odoo backups are consistently automated, securely stored, and readily accessible whenever needed.
