 (1).svg)
 (1).png)


 (1).svg)
.svg)
The Secure Sockets Layer (SSL) is a fundamental cryptographic protocol designed to provide secure communication between web clients and web servers over potentially insecure networks. It ensures the confidentiality and integrity of data exchanged. Self-signed certificates are a type of security certificate that are not issued or signed by a recognized Certificate Authority (CA). While they encrypt the communication between the server and clients, they do not offer the same level of trust or identity validation as certificates issued by a trusted CA. This guide details the process of configuring self-signed SSL certificates specifically for an Odoo instance utilizing Nginx as a reverse proxy. It's important to understand that because self-signed certificates are not backed by a trusted authority, web browsers will typically display a warning message, as they cannot automatically verify the server's identity. However, they still effectively encrypt the data in transit.
Prerequisites for Configuration
Before proceeding with the configuration of self-signed SSL certificates, ensure that the following prerequisites are met:
- Access to a non-root user with
sudoprivileges on your server. - An Nginx web server must be installed and configured. If Nginx is not yet set up, you will need to install it and configure it as a reverse proxy for your Odoo instance.
1. Creating the Self-Signed Certificate Using OpenSSL
The initial step in securing your Nginx server with SSL involves generating an SSL certificate and its corresponding private key. OpenSSL is a powerful, open-source command-line tool widely used for generating private keys, Certificate Signing Requests (CSRs), and self-signed certificates.
Execute the following command to create a new self-signed certificate and key pair. This command will generate a 2048-bit RSA private key and an X.509 certificate valid for 365 days.
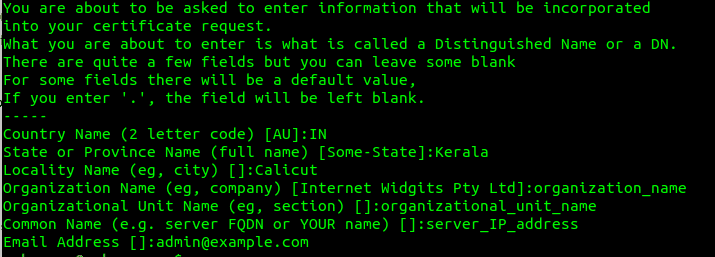
sudo openssl req -x509 -nodes -days 365 -newkey rsa:2048 -keyout /etc/ssl/private/nginx-selfsigned.key -out /etc/ssl/certs/nginx-selfsigned.crtUpon execution, you will be prompted to answer several questions related to your server and organization. It is crucial to provide accurate information as these details will be embedded within your certificate. You will be asked for your country name, state or province, locality, organization name, organizational unit, a common name, and an email address.
Of these, the Common Name (e.g., your server's Fully Qualified Domain Name or public IP address) is the most critical field. It is imperative to specify the domain name or the public IP address that clients will use to access your server, as this name will be validated during the SSL handshake.
Furthermore, it is recommended to create a robust Diffie-Hellman group. This group is essential for improving the security of key exchange during the SSL/TLS handshake. Use the following command to generate a 4096-bit Diffie-Hellman parameter file:
sudo openssl dhparam -out /etc/nginx/dhparam.pem 40962. Configuring Nginx to Utilize SSL
With the SSL certificate and Diffie-Hellman parameters generated, the next step is to configure Nginx to use these security elements. This involves creating dedicated configuration snippets that Nginx will reference.
Configuration Snippet for SSL Key and Certificate
Begin by creating a new Nginx configuration snippet file. This file will explicitly define the paths to your newly created SSL certificate and private key.
sudo nano /etc/nginx/snippets/self-signed.confAdd the following lines to the self-signed.conf file, ensuring the paths accurately point to your certificate and key:

Creating a Configuration Snippet with Strong Encryption Settings
To enhance the security of your Nginx server, it is advisable to define additional SSL settings. Create another snippet file to specify strong encryption protocols, ciphers, and other SSL parameters.
sudo nano /etc/nginx/snippets/ssl-params.confInsert the following configuration into the ssl-params.conf file. These settings prioritize modern, secure TLS protocols and ciphers, contributing to a more robust SSL implementation:
ssl_protocols TLSv1.2;
ssl_prefer_server_ciphers on;
ssl_dhparam /etc/nginx/dhparam.pem;
ssl_ciphers ECDHE-RSA-AES256-GCM-SHA512:DHE-RSA-AES256-GCM-SHA512:ECDHE-RSA-AES256-GCM-SHA384:DHE-RSA-AES256-GCM-SHA384:ECDHE-RSA-A38256;
ssl_ecdh_curve secp384r1; # Requires nginx >= 1.1.0
ssl_session_timeout 10m;
ssl_session_cache shared:SSL:10m;
ssl_session_tickets off; # Requires nginx >= 1.5.9
ssl_stapling on; # Requires nginx >= 1.3.7
ssl_stapling_verify on; # Requires nginx => 1.3.7
resolver 8.8.8.8 8.8.4.4 valid=300s;
resolver_timeout 5s;
# Disable strict transport security for now. You can uncomment the following
# line if you understand the implications.
# add_header Strict-Transport-Security "max-age=63072000; includeSubDomains; preload";
add_header X-Frame-Options DENY;
add_header X-Content-Type-Options nosniff;
add_header X-XSS-Protection "1; mode=block";
3. Adjusting the Nginx Server Block Configuration for SSL
Now, integrate the previously created SSL snippets into your main Nginx server block configuration. For this guide, we'll assume your server block configuration file is located at /etc/nginx/sites-available/example.com. Always replace example.com with your actual domain or server name.
Before making any changes, it is a crucial best practice to create a backup of your current Nginx configuration file. This allows for easy restoration in case of any issues.
sudo cp /etc/nginx/sites-available/example.com /etc/nginx/sites-available/example.com.bakNext, open your Nginx configuration file for editing:
sudo nano /etc/nginx/sites-available/example.comThe goal is to modify the existing server block to listen on port 443 for SSL traffic and create a new server block that redirects all HTTP traffic from port 80 to HTTPS on port 443. This ensures that all connections are encrypted.
Locate your existing server block, which might look similar to this:
server {
    listen 80;
    listen [::]:80;
    server_name example.com www.example.com;
    root /var/www/example.com/html;
    index index.html index.htm index.nginx-debian.html;
    . . .
}
Update this server block to listen on port 443 for SSL, and include the two SSL snippet files you created earlier:
server {
    listen 443 ssl;
    listen [::]:443 ssl;
    include snippets/self-signed.conf;
    include snippets/ssl-params.conf;
    server_name example.com www.example.com;
    root /var/www/example.com/html;
    index index.html index.htm index.nginx-debian.html;
    . . .
}
Additionally, add a new server block—typically placed before the HTTPS block—to handle HTTP traffic and redirect it permanently to HTTPS:
server {
    listen 80;
    listen [::]:80;
    server_name example.com www.example.com;
    return 301 https://$server_name$request_uri;
}
This redirection ensures that users accessing your site via HTTP are automatically and securely redirected to the HTTPS version.
4. Enabling and Testing Nginx Changes
After making modifications to the Nginx configuration, it's essential to verify the syntax for any errors before applying the changes. This helps prevent service disruptions.
Run the following command to test your Nginx configuration files for syntax errors:
sudo nginx -tIf the configuration is valid and error-free, you should see output similar to this:
nginx: [warn] "ssl_stapling" ignored, issuer certificate not found
nginx: the configuration file /etc/nginx/nginx.conf syntax is ok
nginx: configuration file /etc/nginx/nginx.conf test is successful
Once the syntax check is successful, restart the Nginx service to apply all the new configurations:
sudo systemctl restart nginx5. Testing Your SSL Server Configuration
With Nginx restarted, it's time to verify that your self-signed SSL certificate is functioning correctly. Open your web browser and navigate to your server using HTTPS:
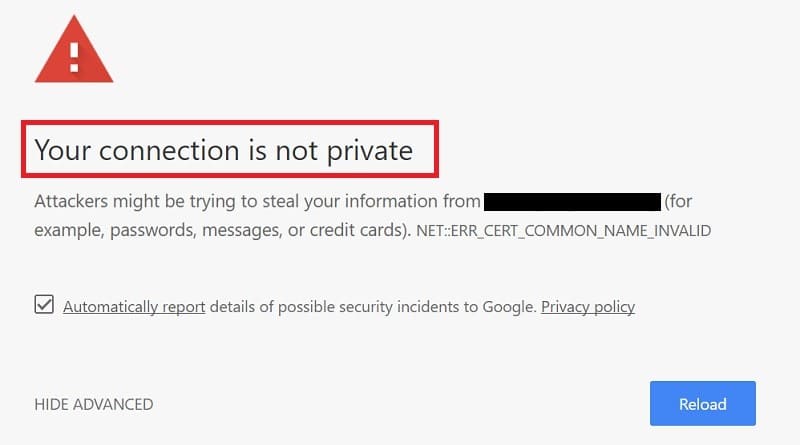
https://server_domain_or_IPSince you are using a self-signed certificate—one not issued by a globally trusted Certificate Authority—your browser will display a security warning. This is an expected behavior, as the browser cannot automatically validate the identity of your server through a recognized CA.
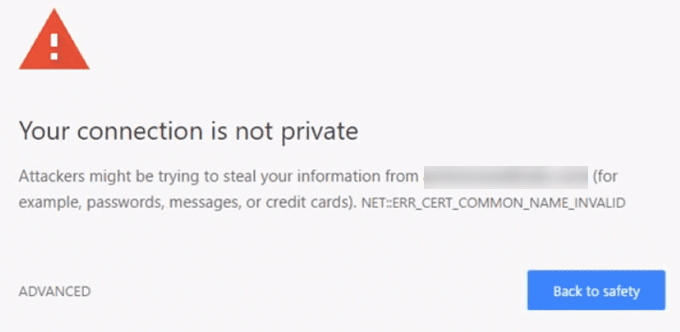
To proceed, you will typically need to click on an "ADVANCED" or similar option and then choose to "Proceed" or "Accept the Risk." This action tells your browser to trust the certificate for this session, allowing you to access your site.
After proceeding, you should be directed to your website. In the address bar of your browser, you might observe a lock symbol, possibly with an "x" or a warning triangle over it. Despite the visual warning about trust, this symbol indicates that your connection is indeed encrypted, fulfilling the primary purpose of the self-signed certificate.
6. Changing to a Permanent Redirect
For optimal user experience and SEO, it's best to enforce HTTPS permanently. In the previous steps, we added a redirect from HTTP to HTTPS. To ensure this redirect is recognized as permanent by browsers and search engines, you should use a 301 Moved Permanently status code instead of a temporary 302 Found.
Re-open your Nginx configuration file where you defined the HTTP to HTTPS redirection:
sudo nano /etc/nginx/sites-available/example.comLocate the redirect line in your HTTP server block and change return 302 to return 301:
server {
    listen 80;
    listen [::]:80;
    server_name example.com www.example.com;
    return 301 https://$server_name$request_uri;
}
Save the changes, then once again test your Nginx configuration for syntax errors:
sudo nginx -tIf the test is successful, restart Nginx to apply the permanent redirect:
sudo systemctl restart nginxBy following these comprehensive steps, you have successfully configured your Nginx server to use a self-signed SSL certificate, ensuring encrypted communication for your Odoo instance. While self-signed certificates are ideal for development, testing environments, or internal applications where trusted validation is not strictly required, they provide a robust layer of encryption, protecting data in transit from eavesdropping and tampering. This setup secures the client connection and provides a foundation for further security enhancements.
