
 (1).svg)
 (1).png)


 (1).svg)
.svg)
Website staging is an indispensable practice for developers and website administrators who need to test updates and modifications before they go live. This comprehensive guide offers a detailed, step-by-step walkthrough of how to leverage Plesk to establish an effective staging environment. We will meticulously cover the entire process of duplicating your existing website, which includes mirroring all files, databases, and critical configurations. This approach ensures that you can thoroughly test new features, design alterations, or software updates in a secure, isolated, and controlled environment, significantly reducing the risk of issues impacting your production site.
Understanding Website Staging in Plesk
Website staging within the Plesk environment involves the creation of an exact duplicate of your active website. This duplicate serves as a dedicated testing ground for any modifications, updates, or new functionalities before they are deployed to your public-facing site. This isolated environment empowers you to freely experiment with new features, implement design revisions, or integrate fresh code without any risk of disrupting the stability or user experience of your live operational website.
Plesk is equipped with integrated tools specifically designed to streamline this crucial process. These tools facilitate the effortless copying of your website's files, databases, and all associated settings into a designated staging area. The benefit of this approach is a fully controlled testing environment where you can meticulously identify, debug, and resolve any potential issues. By proactively addressing problems in staging, you prevent them from ever reaching your live website and negatively impacting your visitors. Essentially, a staging environment acts as a vital rehearsal space, ensuring everything is perfect before the main performance.
Setting Up the Website Staging Environment
Establishing your staging environment is a fundamental step and can be conveniently done within your existing Plesk webspace. The most common methods involve creating either a new domain or a subdomain specifically for this purpose. For example, if your primary website operates on 'example.com', you might choose to create a subdomain such as 'staging.example.com' or 'dev.example.com' to host your testing site. This clear separation helps prevent any accidental interference between your development work and your live content. Ensure that the chosen domain or subdomain is correctly configured to serve web content, just as your main domain is.
Copying Your Website
With your dedicated staging environment now prepared, the next critical step involves accurately copying your entire production website into this new space. This process ensures that all website files, associated databases, and essential configuration settings are replicated precisely, providing an authentic testing ground. Follow these detailed steps to perform a successful website copy:
- Log in to your Plesk panel using the administrative credentials supplied by your web hosting provider.
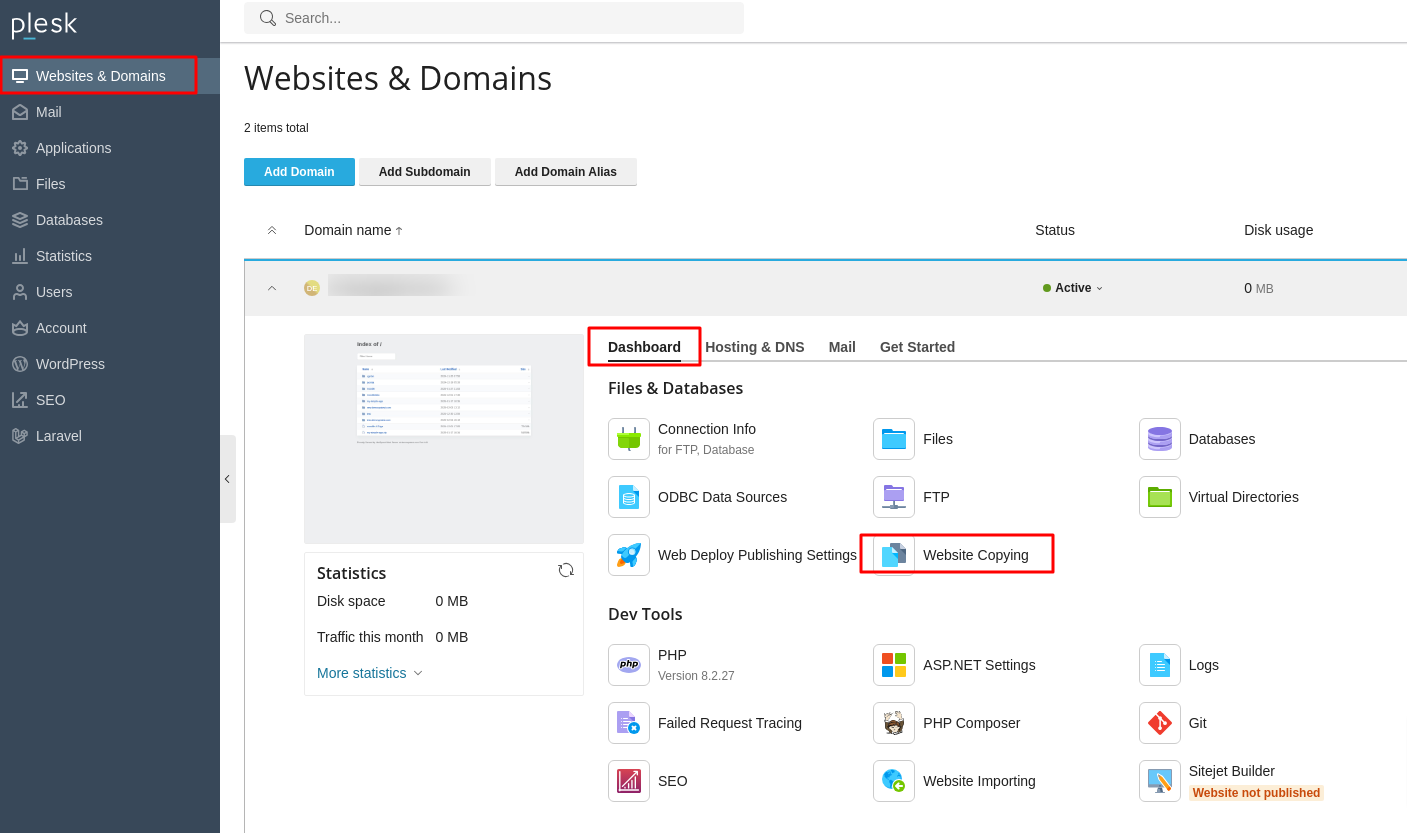
- From the left-hand navigation sidebar, click on Websites & Domains to access your domain management interface.
- On the subsequent interface, which lists all your hosted websites, locate the specific website you intend to copy. Click on the Website Copying option associated with that domain.
- The "Copy Files" page will now open, presenting you with options for the copying process.
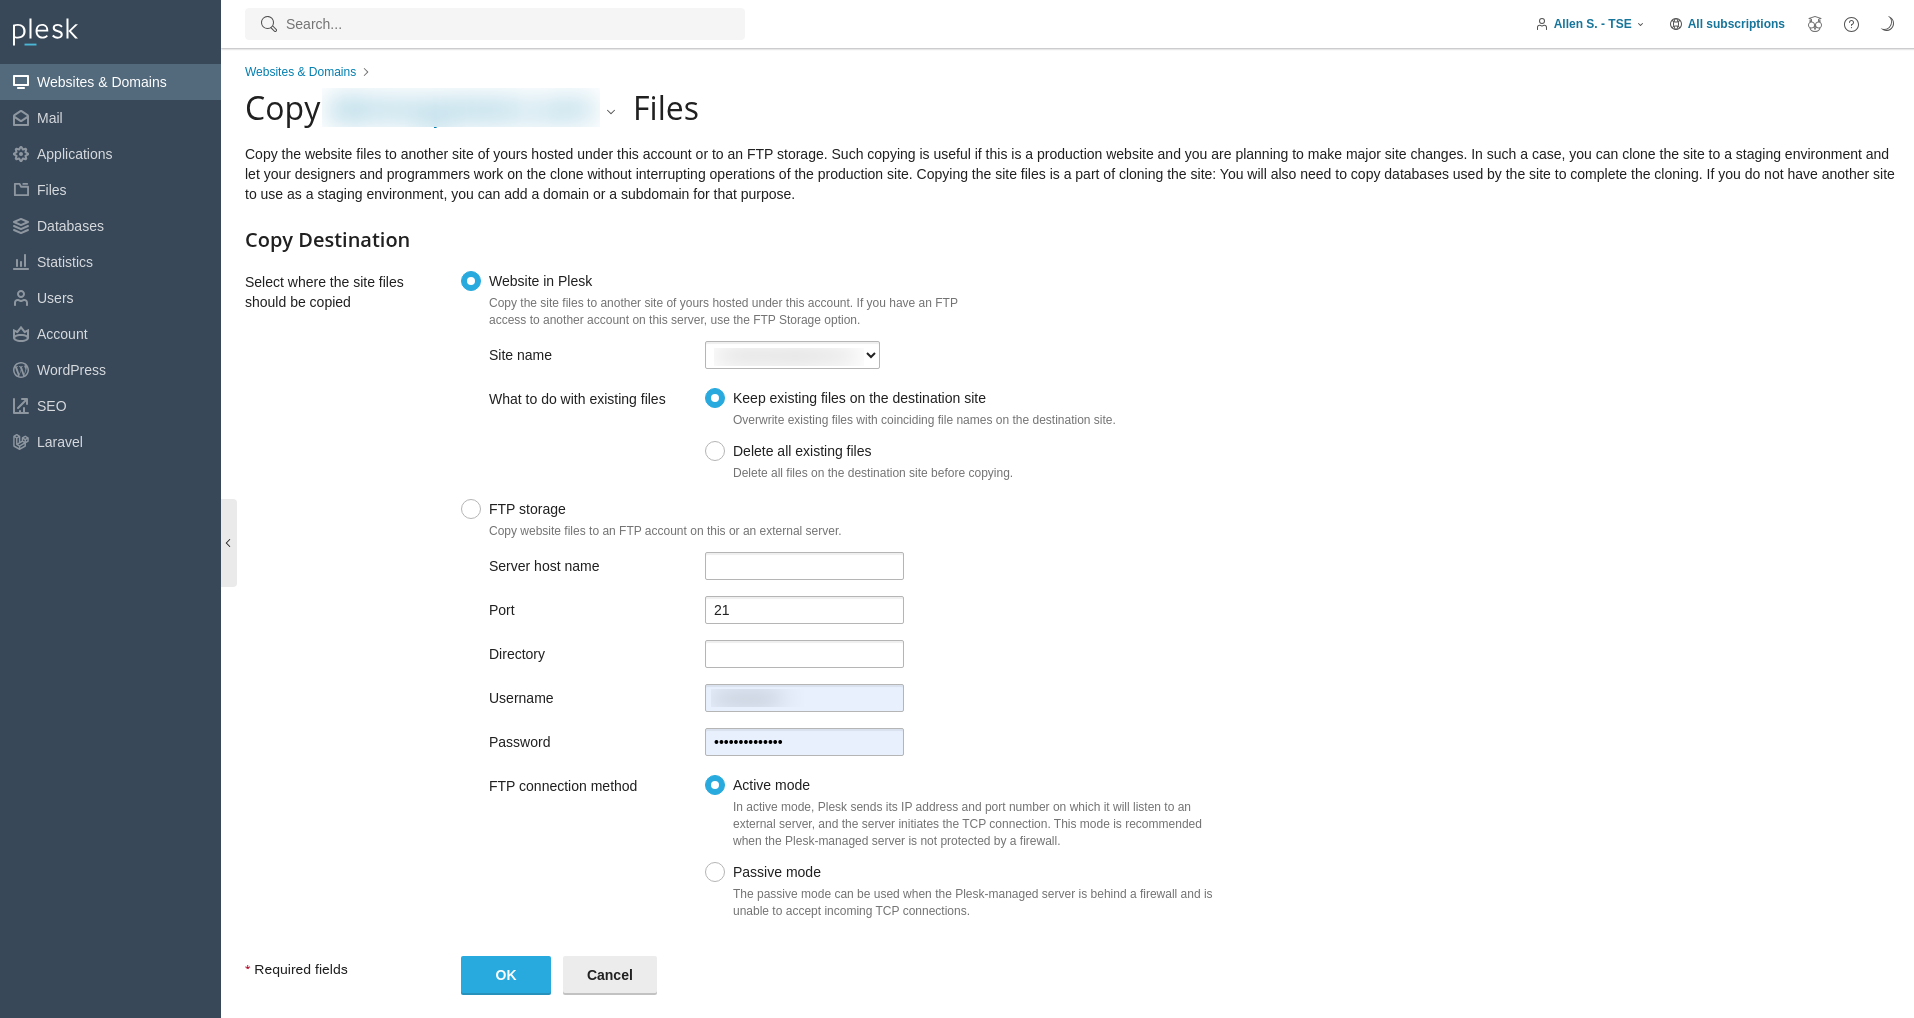
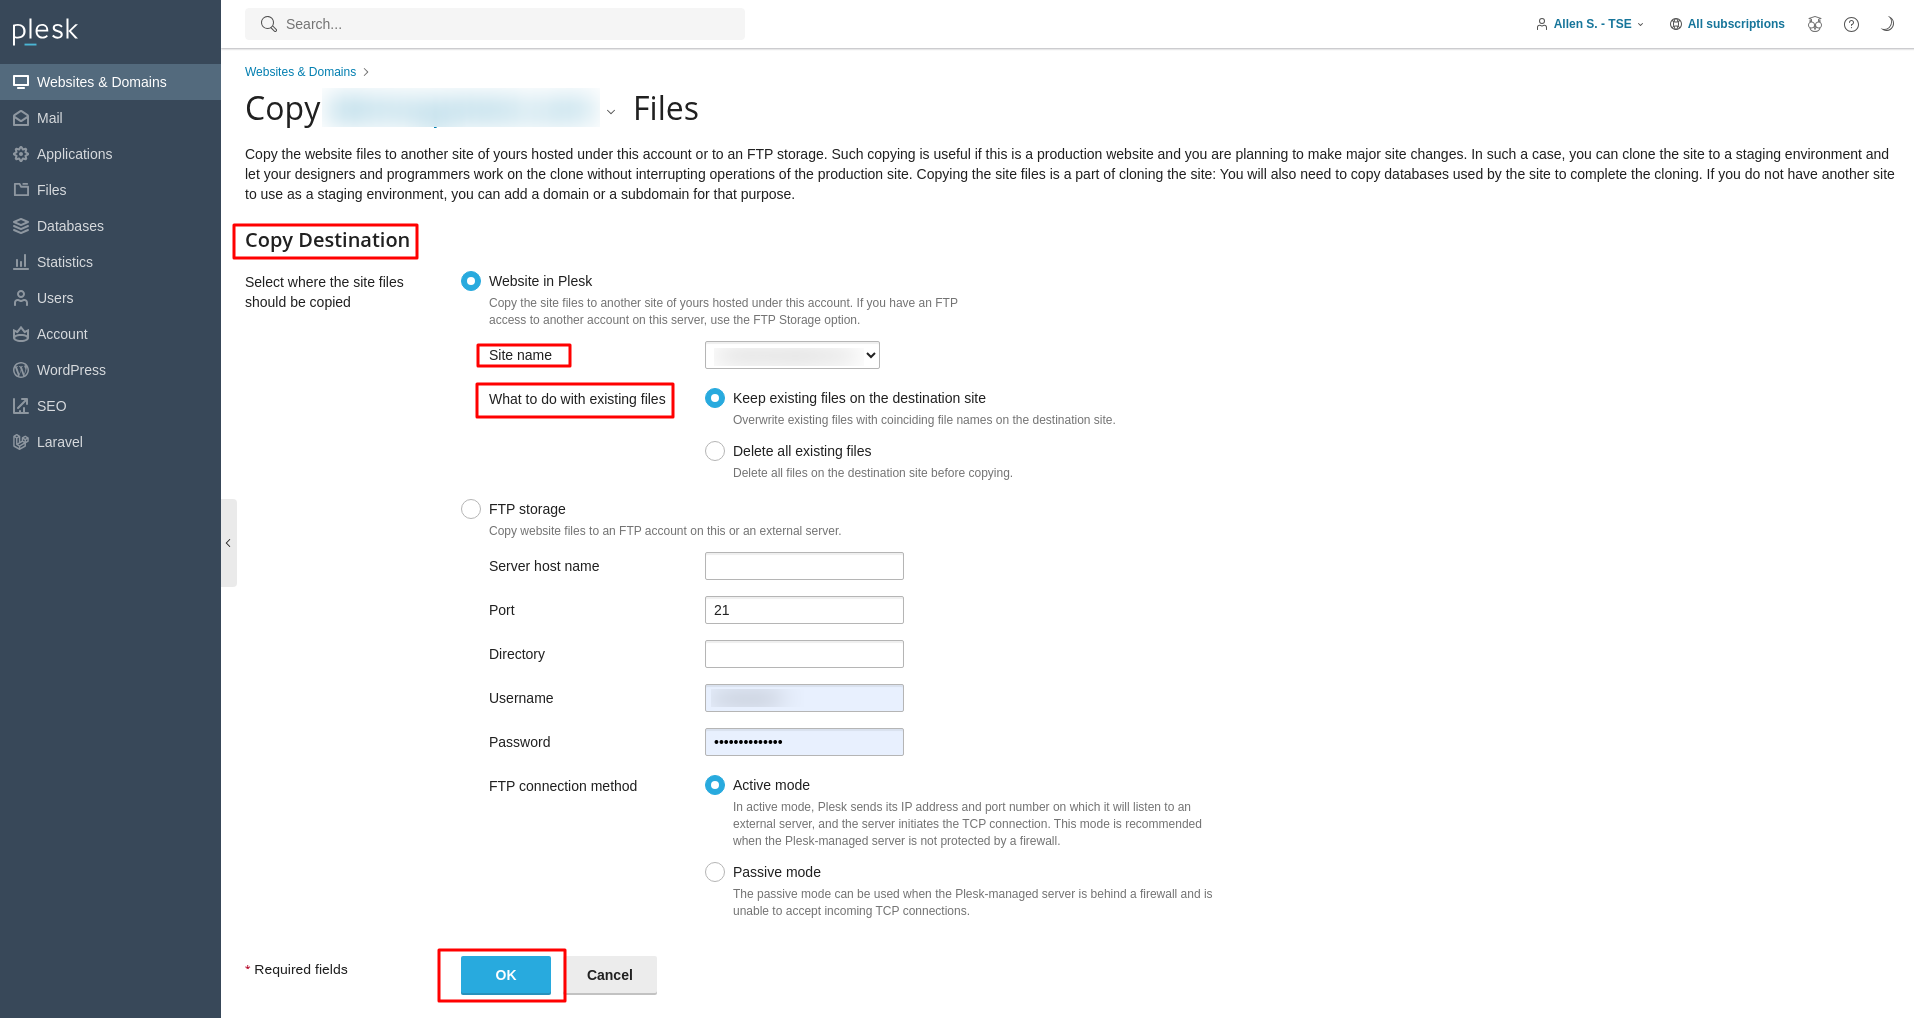
- Under the Copy Destination section, select the option Website in Plesk. This indicates that you are copying to another site within your Plesk installation.
- From the Site Name dropdown menu, carefully select the previously configured destination domain or subdomain (e.g., staging.example.com) that will host your copied site.
- In the What to do with existing files section, choose the appropriate action for handling any files that might already exist on the destination domain. Options typically include overwriting existing files or leaving them untouched.
- To initiate the copying process, click OK. Plesk will then proceed to duplicate your live website's files to the specified destination domain.
Copying Databases
For websites that rely on one or more databases to store content, user data, or other critical information, it is imperative to also copy these databases to your staging environment. This ensures that your staging site operates with the same data set as your live site, allowing for accurate testing. Follow these steps to duplicate your databases:
- Log in to your Plesk panel using the administrative credentials provided by your hosting provider.
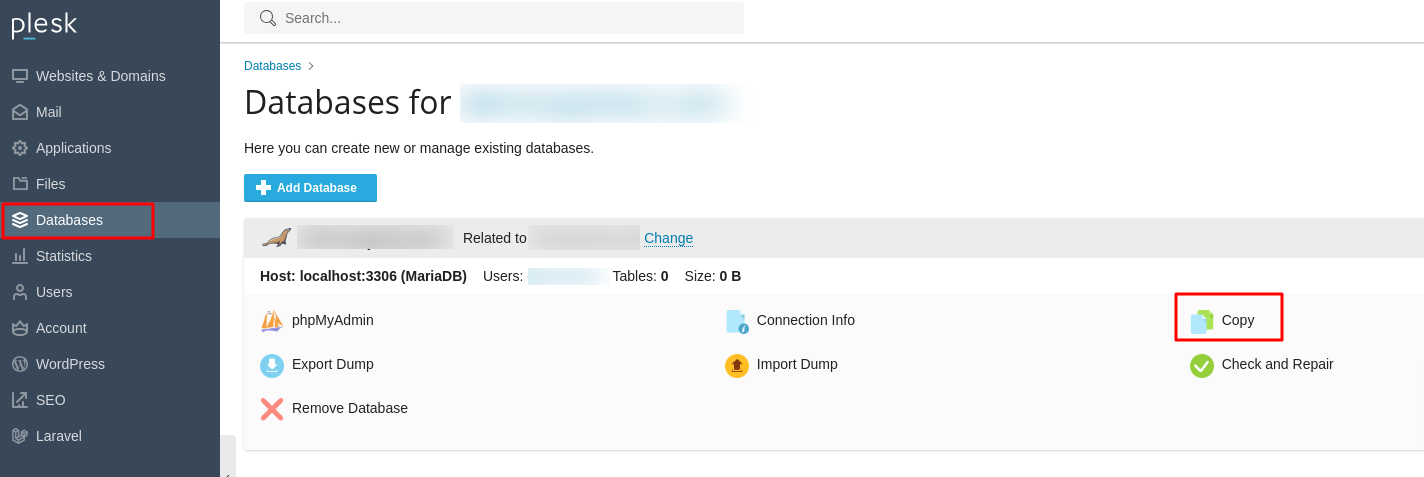
- From the left-hand navigation sidebar, click on Databases to manage your site's databases.
- Locate the specific database you wish to copy from your production environment and click on the Copy option associated with it.
- The "Copy Database" page will appear, prompting you for destination details.
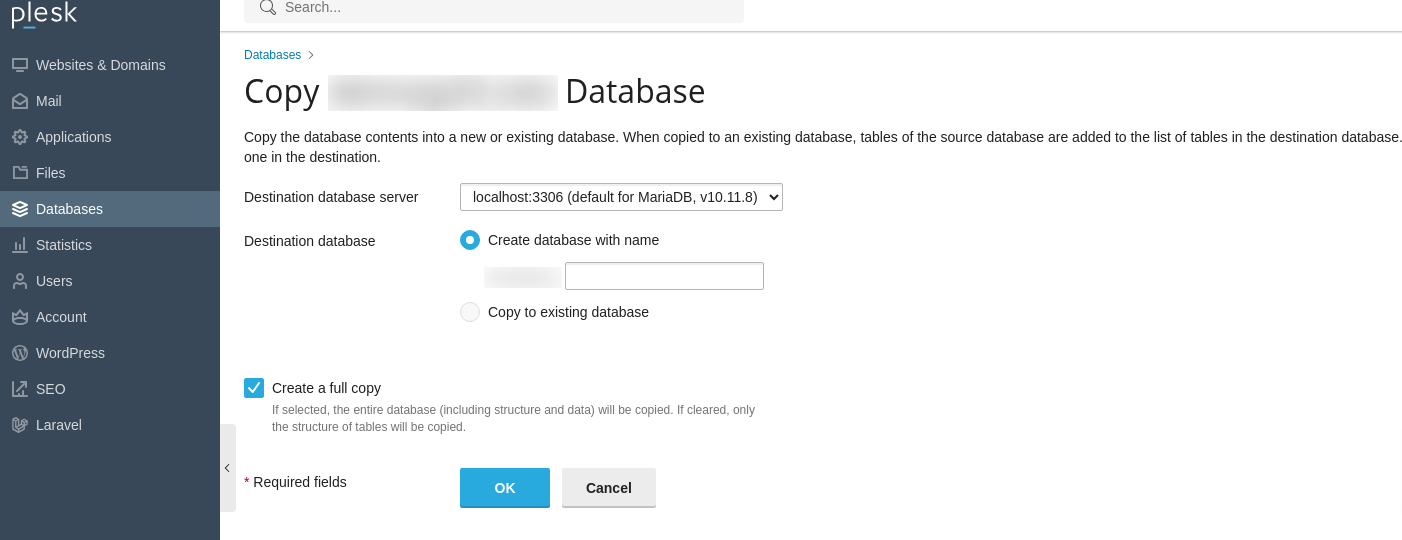
- In the Destination database server dropdown menu, select localhost:3306. This typically refers to the local database server within your Plesk environment.
- Within the Destination database section, choose the option Create database with name and then enter a unique and descriptive name for your new staging database.
- Ensure that the Create a full copy checkbox is selected. This guarantees that all data and structure from the source database are replicated.
- Click OK to initiate the database copying process through Plesk.
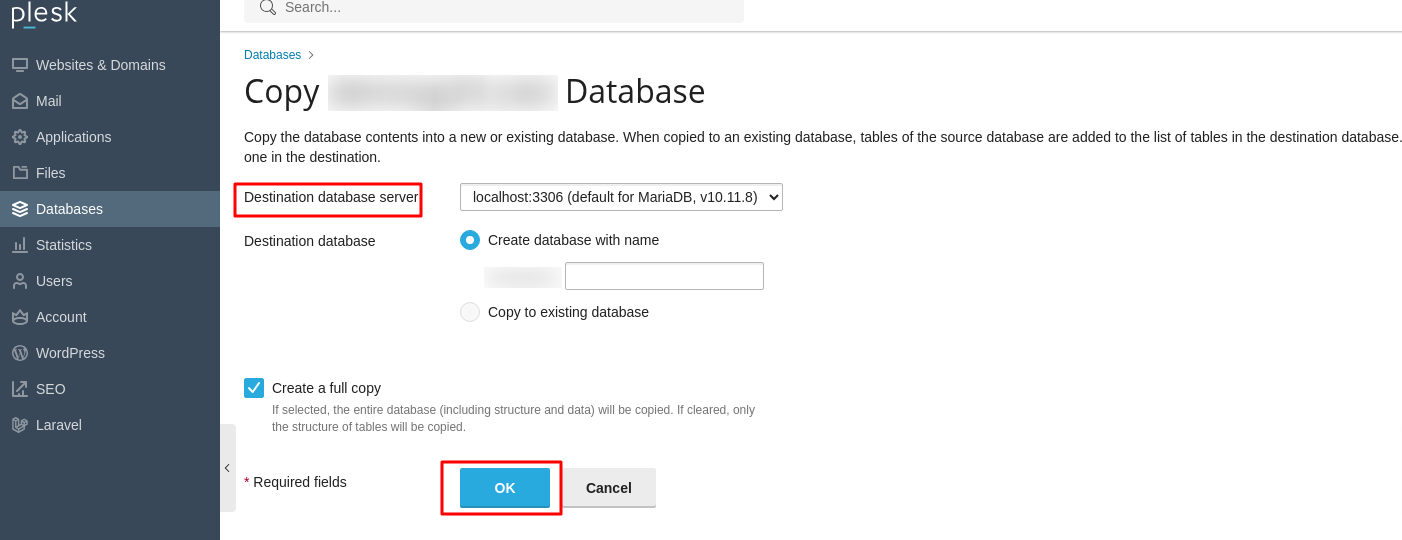
Important Note: After the database copy is successfully completed, a crucial follow-up step is required. You must update your website's configuration files or scripts within the staging environment to ensure they correctly connect to this newly copied staging database. This typically involves modifying parameters such as the database name, username, and password in your site's connection string to reflect the details of the staging database, rather than continuing to point to your live production database. Failing to do this will result in your staging site still interacting with your live data.
Testing Changes in Staging
Once your website files and databases have been successfully copied to the staging environment, you are now free to begin making and testing changes without any risk to your live production site. This is the core purpose of a staging setup, providing a safe sandbox for development. During this phase, you should:
- Proceed to update your website's code, rigorously test any new features, implement design alterations, or modify existing content as necessary. Explore new plugins, themes, or custom scripts.
- Critically, double-check and confirm that all database connection settings within your staging site's configuration files (e.g., wp-config.php for WordPress, local.xml for Magento) are correctly pointed to the newly copied staging database, and not inadvertently to your live production database. This isolation is paramount to prevent data corruption or unintended modifications on your active site.
- Perform thorough quality assurance (QA) checks, including functional testing, compatibility testing across different browsers and devices, and performance analysis.
Publishing the Site to Live
Once you have thoroughly completed all testing in your staging environment and are fully satisfied with the updates, functionality, and overall performance, you can proceed to publish these changes to your live website. This process effectively swaps your staging site with your production site. Follow these steps carefully:
- Log back into your Plesk panel using your administrative credentials.
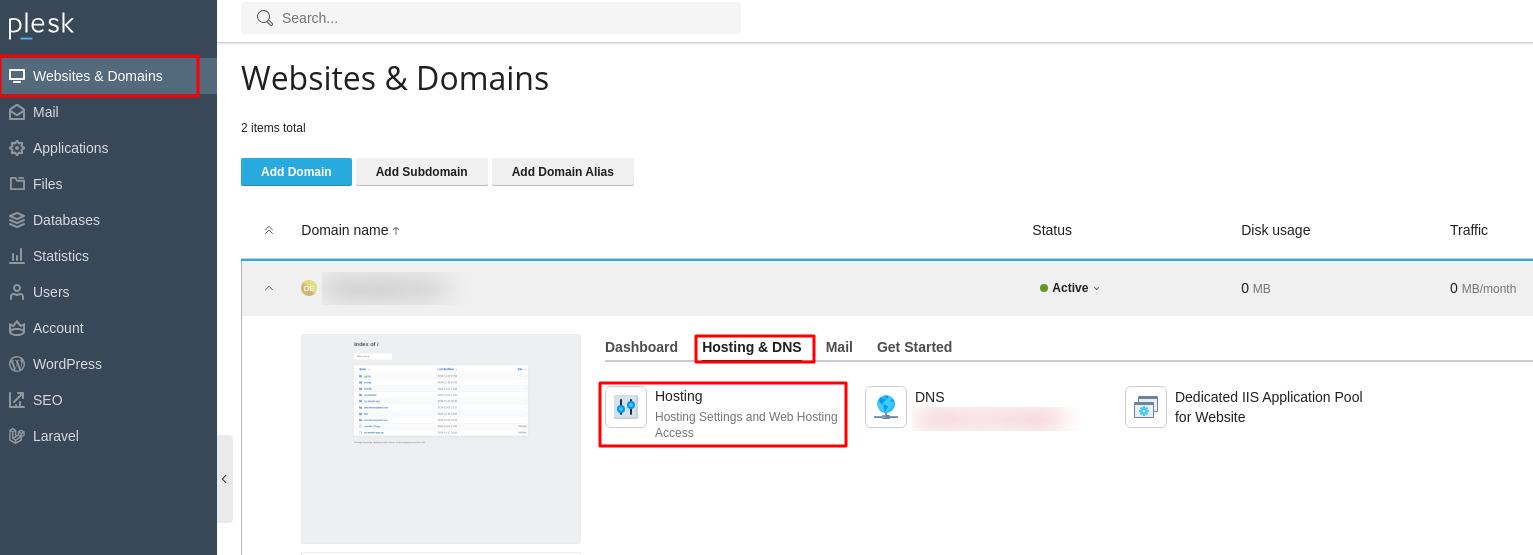
- From the left-hand navigation sidebar, click on Websites & Domains.
- Locate your primary live domain and click on Hosting & DNS Settings, then specifically click on the Hosting tab or section.
- In the Document Root field, which specifies the directory where your website files are served from, enter the path to the directory that contains your now-approved staging site environment files. This effectively tells Plesk to serve the content from your staging folder as the live site.
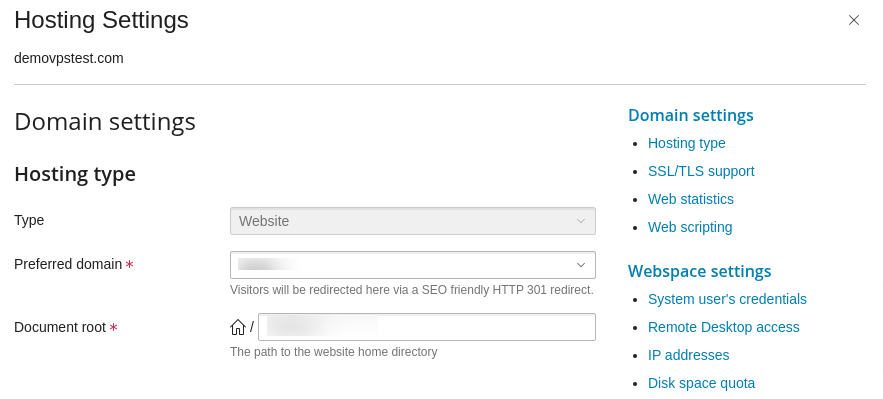
- Click OK to save these changes. Your previously staged website will now be serving as your live production site, making all your tested updates publicly accessible.
In conclusion, establishing a staging environment within Plesk is an exceptionally straightforward process, yet its value to any website owner or administrator is immense. By meticulously following the step-by-step instructions detailed in this comprehensive guide, you gain the power to create a secure, isolated sandbox. This dedicated space allows you to freely experiment with critical updates, integrate exciting new features, and implement significant design alterations without ever jeopardizing the stability, performance, or overall user experience of your live production website.
The strategic implementation of a staging environment in Plesk fundamentally minimizes the inherent risks associated with making changes to a live website. It empowers you to proactively identify and rectify potential issues before they can impact your audience. This best practice not only ensures a smoother deployment process but also plays a pivotal role in helping you maintain a consistently well-functioning, secure, and reliable online presence for your users. Embracing staging is a hallmark of professional web management, safeguarding your digital assets and reputation.
