 (1).svg)
 (1).png)


 (1).svg)
.svg)
As one of the most widely used content management systems (CMS), WordPress provides exceptional flexibility and extensive customization capabilities. A key element of its versatility lies in the vast array of WordPress plugins available, which empower users to significantly enhance and tailor their website's functionality.
The WordPress ecosystem includes its own official plugin directory, offering both free and premium options. These powerful extensions enable you to integrate a diverse range of features, from essential contact forms and personalized newsletters to advanced website caching mechanisms and robust security enhancements. Furthermore, specific plugins can transform your WordPress site into a fully functional online store using solutions like WooCommerce, or an engaging e-learning platform with specialized LMS plugins. For advanced users, there's even the possibility to develop custom WordPress plugins to meet unique requirements.
This comprehensive guide will walk you through the step-by-step process of installing WordPress plugins using three distinct methods. Additionally, we'll provide valuable tips and considerations to help you select the most suitable plugins to optimize your site's performance and user experience.
Installing WordPress Plugins from the Official Directory
The most straightforward method for installing WordPress plugins involves accessing the official plugin directory directly through your WordPress administration area. It's important to note that this method primarily provides access to free plugin options.
Follow these steps to install a plugin using the WordPress dashboard:
- Log in to your WordPress dashboard.
- Navigate to Plugins -> Add New in the sidebar menu.
- Use the search bar to find the specific plugin by name. Alternatively, you can explore the featured, popular, or recommended plugins by clicking on the respective tabs provided on the page.
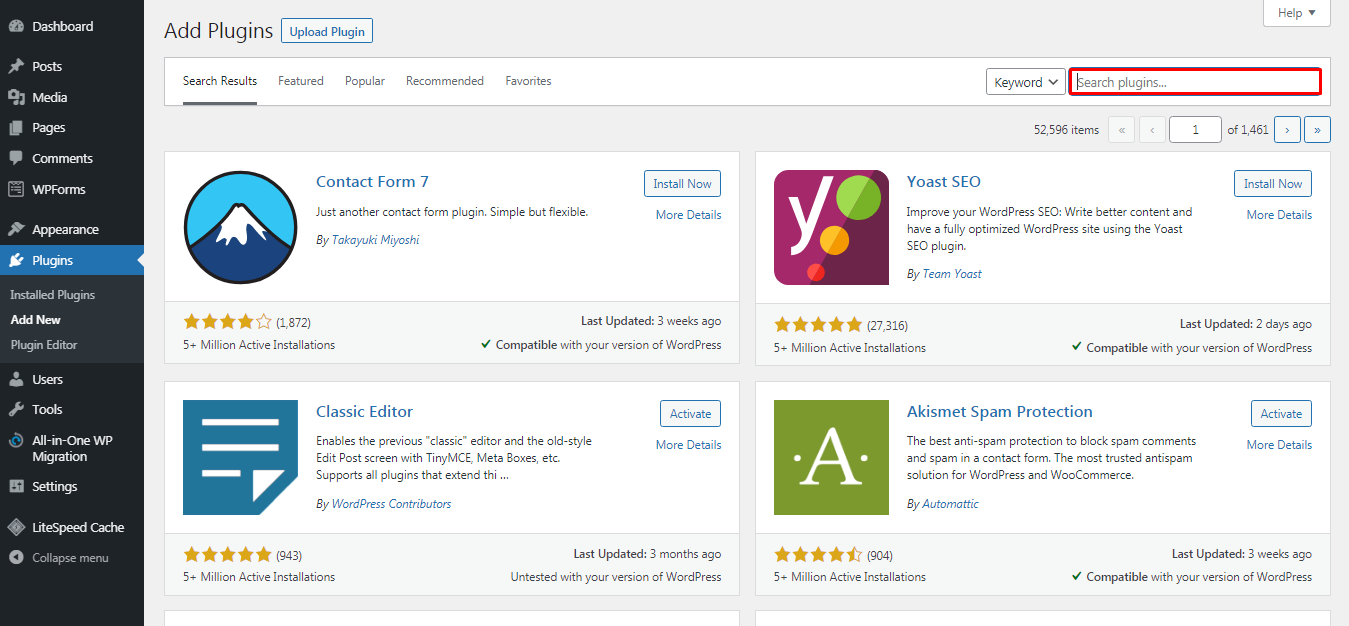
For instance, if you search for a popular plugin like MonsterInsights, it will typically appear as one of the top results. To initiate the installation, click on the Install Now button associated with your chosen plugin.
Allow the installation process to complete. Once finished, click the Activate button to enable the plugin and begin utilizing its features on your WordPress site.
After successful activation, it is advisable to review and configure the plugin settings. You can usually access these by navigating to Plugins -> Installed Plugins and finding the newly activated plugin.
Manually Uploading and Installing WordPress Plugins
Beyond the official directory, you can also install WordPress plugins by manually uploading their files directly through your WordPress dashboard. This method is particularly useful for plugins obtained from third-party marketplaces or those not listed in the official repository, such as those found on CodeCanyon and Codester.
Before proceeding with the installation, ensure you have downloaded the plugin as a **ZIP** file from your chosen, reputable source.
Expert Tip: When sourcing plugins from external websites, always verify the trustworthiness of the source. Plugins from untrustworthy sites may pose security risks by containing hidden malware or viruses that could compromise your website.

Here’s how to install a plugin manually:
- Access your WordPress administration area.
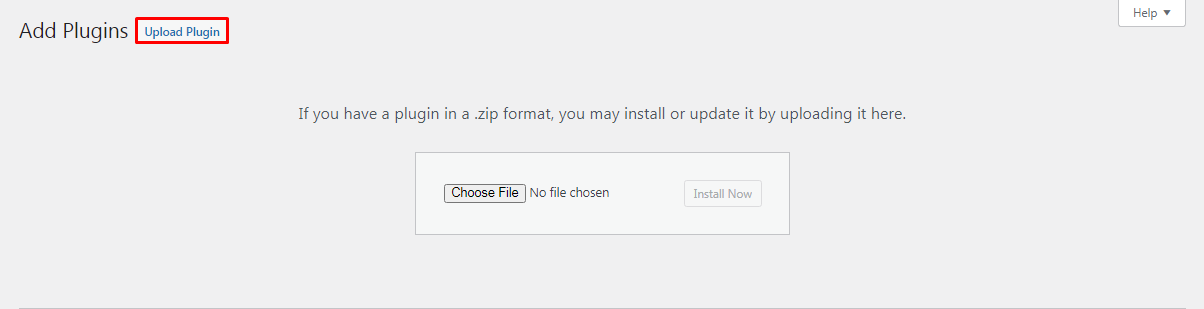
- Navigate to Plugins -> Add New.
- Locate and click the Upload Plugin button, typically found at the top of the page.
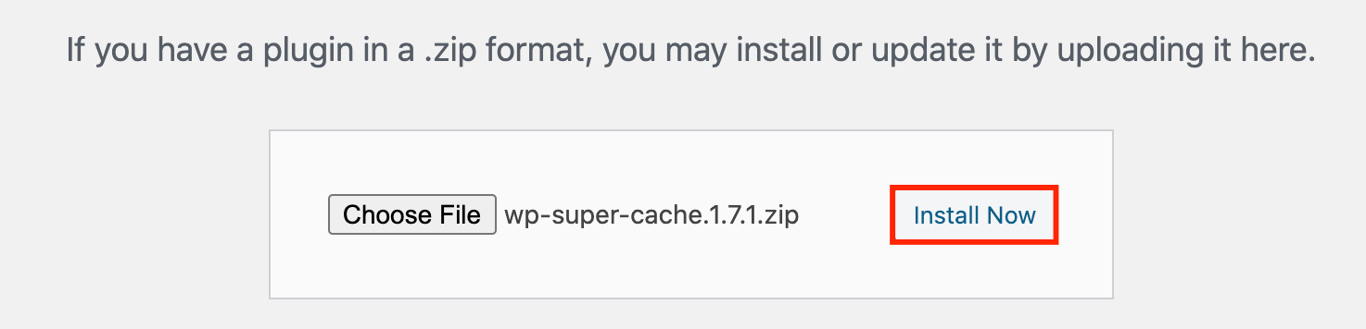
- Click Choose File (or similar button) to select the plugin's **ZIP** file from your local computer.
- After selecting the file, click Install Now to begin the upload and installation.
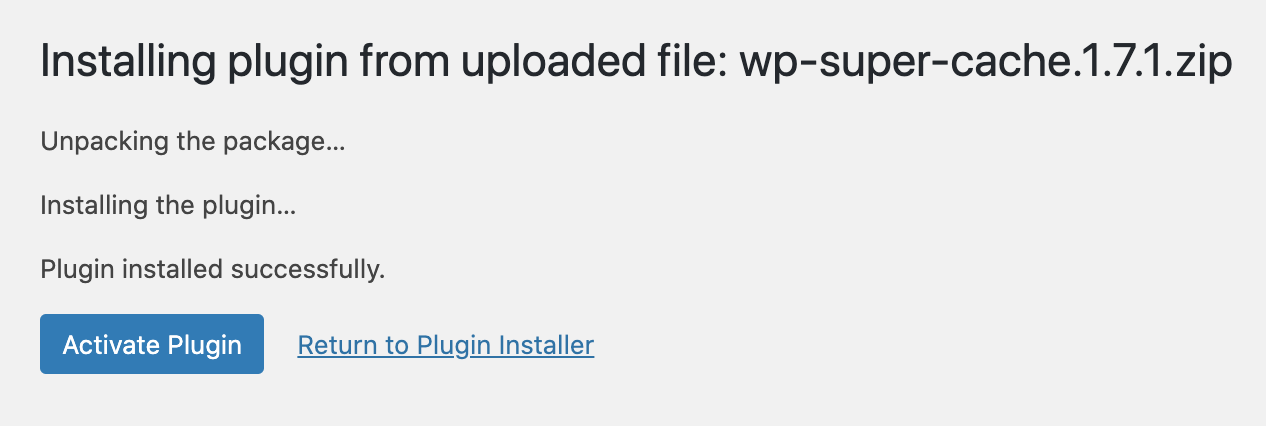
Once the installation is complete, you will see a success message. Click Activate Plugin to enable it on your website.
Installing WordPress Plugins via FTP Client
Some premium or custom WordPress plugins might require manual installation using an FTP (File Transfer Protocol) client. While this method might seem slightly more complex for beginners, as it involves configuring an FTP client, this step-by-step guide will simplify the process.
Follow these instructions to install a plugin using FTP:
- First, extract the contents of the plugin's **ZIP** file to a designated folder on your computer. It's crucial to remember that this extracted folder, containing all the plugin's files, is what you will upload via the FTP client.
- Next, establish a connection between your website and the FTP server. You'll need to obtain your FTP login details (hostname, username, password, port) from your web hosting provider. These details are typically found within your hosting account's control panel.
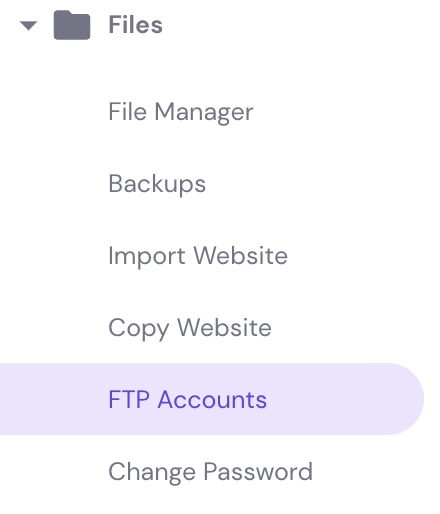
- If your hosting provider offers a custom control panel, you can usually find these FTP details by logging in and navigating to sections like "Files" or "FTP Accounts."
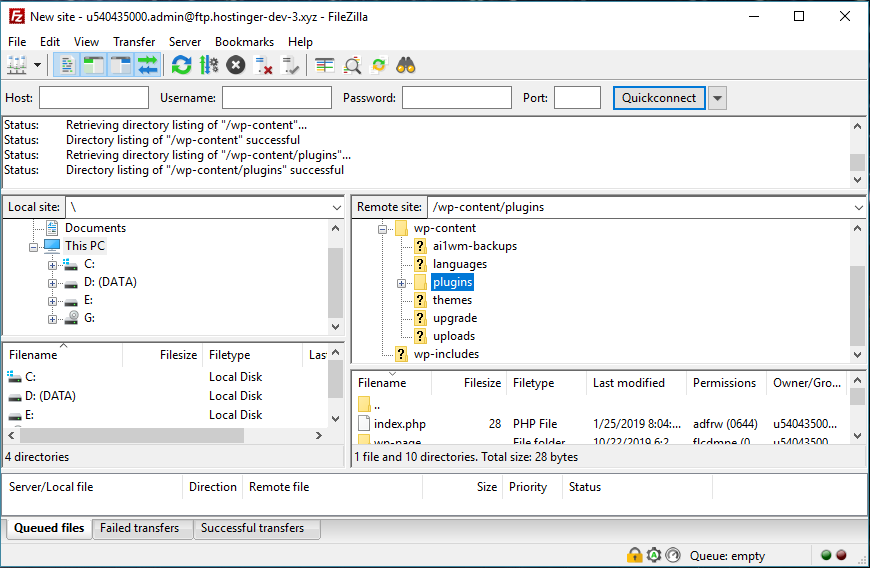
- Once you have your credentials, open your preferred FTP client (for example, FileZilla). Enter your login credentials and click the "Quickconnect" or equivalent button to connect to your server.
- In the FTP client's **Remote Site** panel, navigate to the
/wp-content/plugins/directory of your WordPress installation. - In the **Local Site** panel, locate the extracted plugin folder on your computer.
- Drag and drop or upload this extracted plugin folder from your computer into the
/wp-content/plugins/directory on your server.
After the file transfer is complete, the WordPress plugin will be installed on your site, though it will not yet be active.
To activate the plugin, access your WordPress dashboard. Navigate to the **Plugins -> Installed Plugins** section, find the newly uploaded plugin in the list, and click **Activate**.
Installing Suggested WordPress Plugins Through Your Hosting Control Panel
Many hosting providers offer convenient features to simplify WordPress management, including suggestions for essential plugins during the initial setup of a new WordPress website. This can streamline the process for new users.
During your hosting provider's onboarding or setup process, you might encounter a screen presenting a selection of plugins for installation. To proceed, simply select the plugins you wish to install and click the "Continue" or "Install" button.

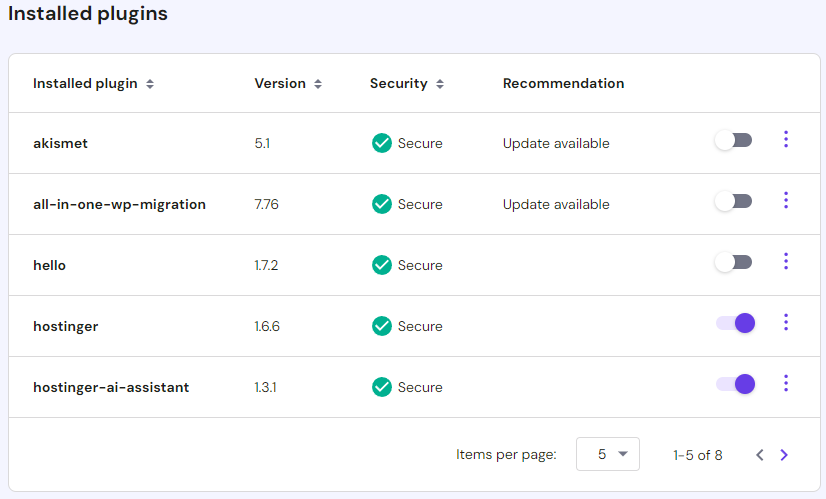
Furthermore, some hosting services may pre-install a set of beneficial plugins with every new WordPress installation. Common examples of such pre-installed plugins often include:
- Akismet Anti-Spam (for comment spam protection)
- All-in-One WP Migration (for easy site migration and backups)
- AI Assistant (a feature that may be available with certain hosting plans)
- LiteSpeed Cache (for performance optimization)
Your hosting provider's control panel typically provides a dedicated interface for managing all your plugins. You can often navigate to a "WordPress" or "Security" section within your control panel to find a comprehensive list of your installed themes and plugins. From there, you can use toggle switches to easily deactivate or activate any plugin, as well as perform actions like deletion or updating.
Key Considerations When Selecting a WordPress Plugin
With an extensive collection of plugins available in the official WordPress directory and numerous options from third-party developers, choosing the right plugins can be daunting, especially for new website owners. Understanding essential criteria will help you make informed decisions.
The following sections outline crucial factors to evaluate when selecting a plugin for your WordPress website:
Prioritizing Regular Updates and Support
WordPress itself receives frequent updates to enhance performance, bolster security, resolve bugs, and introduce new features. Therefore, the plugins you choose should ideally follow a similar update schedule to ensure compatibility and stability.
Before installing any plugin, consider these vital points:
- Last Updated: Opt for plugins that are frequently updated. This indicates active development and management, which is crucial for preventing security vulnerabilities and ensuring ongoing compatibility with the latest WordPress versions.
- Active Installations: A high number of active installations generally signifies a popular and well-regarded plugin. This often correlates with better quality, more robust support, and a larger community for troubleshooting.
- Ratings and Reviews: User reviews and ratings offer invaluable insights into a plugin's real-world performance, usability, and potential drawbacks. Always consult these to gauge user satisfaction and identify any common issues.
- Compatibility: Always verify the plugin's compatibility with your current WordPress version. Developers usually specify the required WordPress version in the plugin's description or documentation.
Ensuring the Plugin Meets Your Needs
Before committing to a plugin, thoroughly research its capabilities and verify the claims made by its developers. Take the time to:
- Read through the official plugin documentation.
- Explore its support forums to see how developers interact with users and resolve issues.
- Scrutinize user reviews for honest feedback.
Consulting independent blog posts and reviews is also an excellent practice, as many websites provide detailed analyses and tests of various plugins across different functionalities. This external validation can offer a balanced perspective.
Best Practices for Plugin Installation and Management
To maintain a healthy and efficient WordPress site, adhere to these best practices when installing and managing plugins:
Install One Plugin at a Time
When evaluating new plugins, install and test each one individually. This approach allows you to quickly identify if a particular plugin introduces any conflicts or performance issues, making troubleshooting significantly easier. If you are testing multiple plugins, deactivate the previous one before activating the next.
Furthermore, it’s beneficial to regularly review your installed plugins. If you have several inactive plugins that you no longer use, it's best to delete them. An excessive number of installed (even inactive) plugins can unnecessarily consume server resources and potentially impact your website's overall performance and loading speed.
Use a Single Plugin for Each Specific Function
While WordPress plugins are designed to enhance your website's functionality, installing too many, or multiple plugins that perform similar tasks, can adversely affect your site's speed and stability. Each plugin adds new code and often necessitates additional HTTP requests to load assets like CSS stylesheets, JavaScript files, and images, which can cumulatively slow down your website's loading speed.
Moreover, employing multiple plugins with overlapping functionalities significantly increases the risk of conflicts, which can cause one or both plugins to malfunction or even break core aspects of your site. Therefore, the optimal practice is to install only one WordPress plugin for each specific function you require. For example, if you need SEO optimization, choose either a comprehensive solution like Yoast SEO or AIOSEO, but not both, to prevent potential conflicts and maintain peak performance.
Conclusion
We trust that this tutorial has provided you with a clear understanding of how to add plugins to your WordPress website. With these methods, you can confidently enhance your site's functionality and features, regardless of your prior technical expertise.
When deciding which plugin to install, begin by identifying specific needs or areas where your website could improve. Then, carefully review available plugins, paying close attention to critical factors such as compatibility with your WordPress version, user reviews, and the recency of their last update. This diligent approach will help you select robust and reliable extensions.
To help you get started, here are some recommended essential WordPress plugins that can significantly benefit most websites:
- Yoast SEO: This widely used plugin is instrumental in optimizing your WordPress blog posts and pages for search engines, helping with keyword optimization, meta descriptions, and overall SEO strategy.
- Elementor or Beaver Builder: These popular page builders offer an intuitive drag-and-drop interface, making it significantly easier to design and customize your website's layout and appearance without needing coding knowledge.
- Ultimate Blocks: Designed to extend the capabilities of the WordPress block editor (Gutenberg), this plugin adds various content blocks to enhance your content creation and design flexibility.
- W3 Total Cache or WP Super Cache: Implementing a caching plugin is crucial for boosting website performance and significantly reducing loading times. These plugins achieve this by caching content and often integrating with Content Delivery Networks (CDNs).
- Google XML Sitemaps: This plugin automatically generates XML sitemaps for your website, which are essential for search engines to efficiently crawl and index your content, thereby improving search engine optimization.
- Akismet Spam Protection: An indispensable tool for any WordPress site, Akismet effectively detects and filters out spam comments and contact form submissions, safeguarding your site from malicious attacks and maintaining a clean user experience.
Frequently Asked Questions About Installing WordPress Plugins
How do I manually install a WordPress plugin?
To manually install a WordPress plugin, first download the plugin's ZIP file. Then, from your WordPress dashboard, navigate to Plugins and click on the Add New button. Select the Upload Plugin button, choose the downloaded ZIP file from your computer, and proceed with the installation. Once installed, remember to activate the plugin.
Can I install plugins on a free WordPress site?
Yes, you can install free WordPress plugins that are available in the official WordPress plugin directory. However, be aware that many plugins offer premium versions or add-ons that unlock additional features and advanced functionality.
What access is required to install a WordPress plugin?
To install a plugin directly from the WordPress dashboard, you must have an administrator user role. Alternatively, for manual installation via FTP, you need direct access to the /wp-content/plugins/ directory of your WordPress installation on the server.
