
 (1).svg)
 (1).png)


 (1).svg)
.svg)
An SSL (Secure Sockets Layer) certificate plays a crucial role in securing your website by encrypting data transmitted between your server and visitors' browsers. While not strictly mandatory for all websites, implementing an SSL certificate is highly recommended, especially if you plan to introduce secure login functionalities, e-commerce transactions, or simply wish to enhance trust and search engine rankings. A secure website is indicated by "https://" in the URL and a padlock icon in the browser, assuring users of a protected browsing experience.
Before proceeding with the installation process, it is essential to ensure that you have completed a few preparatory steps. These include generating a Certificate Signing Request (CSR), successfully ordering your SSL certificate from a trusted provider, and having the certificate thoroughly verified. Once these prerequisites are met, you will be ready to install your SSL certificate on your server, a process that this comprehensive guide will detail for your domain within the Plesk environment.
Installing Your SSL Certificate in Plesk
-
Accessing Your Certificate Details
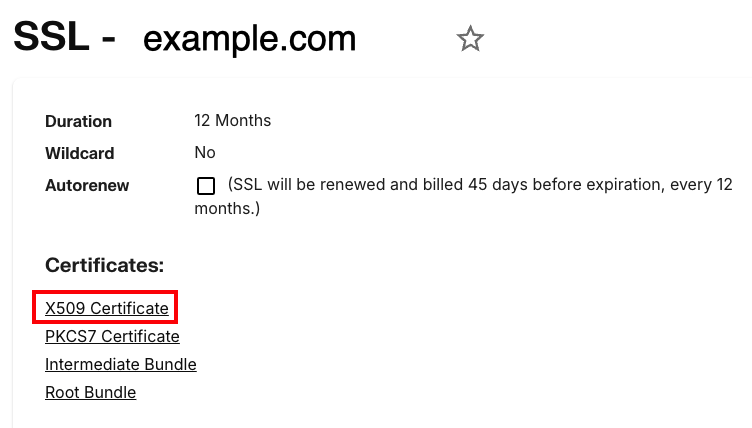
To begin, navigate to your certificate provider's dashboard or portal. Locate the specific domain for which you require the SSL details. Within the certificate management section, you should find an option to view the X509 Certificate. This will display a block of text that closely resembles your initial CSR. Copy this entire text block. For ease of handling, it is often best to paste this into a plain text editor temporarily.
-
Logging into Plesk
Next, log into your Plesk control panel using your administrative credentials.
-
Navigating to Websites & Domains
In the left-hand navigation menu of Plesk, click on Websites & Domains. If you are utilizing the Service Provider view, select Domains and then choose the specific domain where the SSL certificate will be installed.
-
Accessing SSL Certificates Section
For the selected domain, click on the SSL Certificates option.
-
Selecting Your Certificate
You will see a list of certificates. Click on the certificate name that corresponds to the SSL certificate you have recently ordered and prepared for installation.
-
Uploading Certificate Files
Scroll down to find the section titled Upload the certificate as text. Here, you will paste the X509 certificate content that you copied earlier into the Certificate (*.crt) field. Immediately after this, paste the intermediate bundle and the root bundle into the CA certificate (*-ca.crt) field. It is crucial to paste these two certificates consecutively, without any additional line breaks between them, to ensure proper chain validation.
-
Completing the Upload
Finally, click the Upload Certificate button to complete this step.
Enabling and Activating Your SSL Certificate
-
Returning to Websites & Domains
From the left navigation menu in Plesk, click Websites & Domains once more. (Again, if in Service Provider view, navigate to Domains and select your target domain).
-
Accessing Hosting Settings
Click on Hosting Settings for the domain.
-
Enabling SSL Support
Locate the Security section. Check the box labeled SSL support to enable this feature for your domain.
-
Choosing the Installed Certificate
Utilize the Certificate dropdown menu to select the newly installed SSL certificate. A clear naming convention for your certificates, perhaps including the date and domain name, can be highly beneficial here for easy identification.
-
Saving Your Configuration
To apply these changes and activate your SSL certificate, click OK or Apply.
Once these steps are completed, your website should now be accessible via HTTPS, indicating a secure connection. It is always a good practice to test your website thoroughly after installation to ensure the certificate is correctly deployed and functioning as expected across all pages and resources. Verifying the padlock icon in your browser and checking for any mixed content warnings will confirm a successful installation.
