
 (1).svg)
 (1).png)


 (1).svg)
.svg)
In this guide, we will walk you through the process of creating an email auto-responder using your cPanel interface. Auto-responders are an incredibly useful feature for managing incoming emails, especially when you are unavailable to reply immediately.
While many web and email hosting packages include cPanel, its full range of features is often underutilized. The auto-responder function stands out as one of its most practical tools. It allows you to automatically send a predefined message in response to incoming emails, and you can even schedule its activation and deactivation times to align with your specific needs, such as during holidays or out-of-office periods.
Setting Up Your Auto-Responder in cPanel
1. Log In to Your cPanel Account
To begin, access your cPanel dashboard for the specific account where you wish to configure the auto-responder. You will typically find the login details provided by your hosting provider.
2. Navigate to Auto Responders
Once logged in, locate the "Mail" section and click on the "Auto Responders" icon. This will take you to the management page for your automatic email replies.
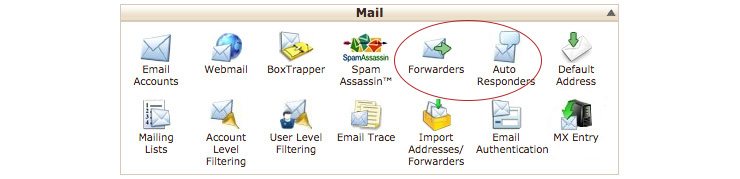
3. Add a New Auto Responder
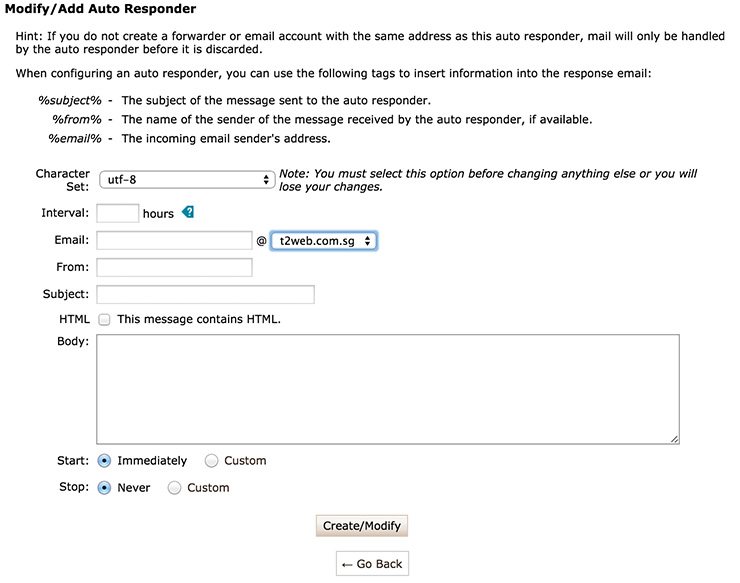
On the Auto Responders page, click the "Add Auto Responder" button. This action will present you with a form where you will define the parameters for your new automatic response.
4. Configure the Interval
The "Interval" setting determines the time (in hours) that must pass before the auto-responder sends another automatic reply to the same email address. For example, if you set the interval to 12 hours and a contact emails you at 9:00 AM, your auto-responder will immediately send a reply. If the same contact sends you another email within the next 12 hours (i.e., before 9:00 PM), no further auto-response will be sent to them. The system will only send another automatic reply to that specific email address once the 12-hour interval has elapsed.
5. Fill In the Essential Details
You must complete the following mandatory fields for your auto-responder:
- Email: The email address for which this auto-responder will be active.
- From: The name that will appear as the sender of the automatic reply.
- Subject: The subject line of your auto-response email.
- Body: The content of your automatic reply message. This is where you compose your out-of-office message, confirmation, or any other relevant information.
6. Select Start and Stop Times (Optional Scheduling)
cPanel offers flexibility in when your auto-responder is active. You can choose to:
- Immediately: The auto-responder will become active as soon as you save it and remain active indefinitely until manually disabled.
- Custom: This option allows you to define precise start and stop dates and times. For instance, if you anticipate being out of the office from Monday, April 27th, 2015, at 9:00 AM until Thursday, April 30th, 2015, at 9:00 AM, you can set these exact parameters. The auto-responder will automatically activate and deactivate according to your schedule, ensuring that incoming emails receive an automatic reply only during your specified absence.
7. Create or Modify Your Auto-Responder
Once all details are entered and reviewed, click the "Create/Modify" button to save your settings. Your auto-responder will now be active according to your specified schedule, helping you manage communications efficiently and ensuring your contacts receive timely acknowledgments. Now you can enjoy your time away with the peace of mind that your emails are being managed effectively!
