 (1).svg)
 (1).png)


 (1).svg)
.svg)
Understanding MySQL Database Creation in cPanel
Creating a MySQL database within cPanel is a fundamental task for web developers and administrators who manage data-driven websites and applications. This straightforward process is crucial for the development and operation of any project requiring a robust database backend.
Prerequisites for Database Setup
- Access to a server running cPanel.
- Valid cPanel login credentials, ensuring appropriate permissions for database management.
Step-by-Step Guide to Creating a MySQL Database in cPanel
-
Access Your cPanel Account
Begin by logging into your cPanel dashboard. This is the central control panel where you manage all aspects of your hosting account, including databases.

-
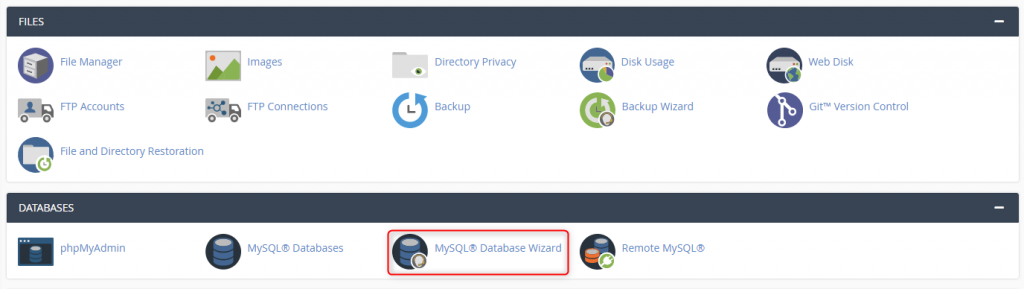
Initiate the MySQL Database Wizard
Once logged in, navigate to the "Databases" section and click on the MySQL Database Wizard icon. This wizard streamlines the database creation process, guiding you through each necessary step.
-
Name Your New Database
In the first step of the wizard, you will be prompted to enter a descriptive name for your new database. Choose a name that clearly identifies its purpose, then click Next Step to proceed.

-
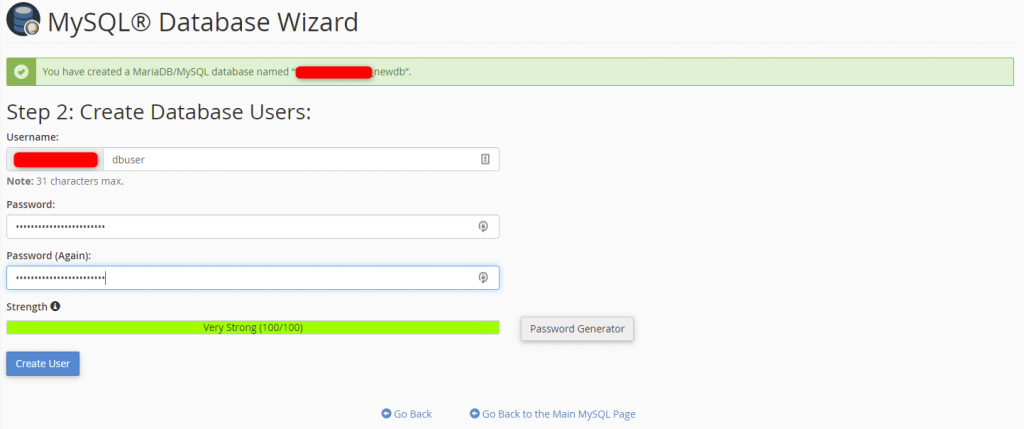
Create a Database User
A dedicated user is required to interact with your database. Enter a unique username and create a strong, secure password for this new user. It is highly recommended to use the password generator for maximum security. After entering the credentials, click Create User.
-
Assign User Privileges
On this step, you will assign privileges to the newly created user for the database. For most web applications, selecting the All Privileges checkbox is appropriate. Alternatively, you can select individual privileges based on the specific security and operational requirements of your application. Once your selections are made, click Next Step.

-
Finalize Database Creation
At this point, your MySQL database has been successfully created, and the new user has been added with the specified privileges. It is crucial to securely record the database name, username, and password, as these credentials are essential for connecting your scripts and applications to the database. Click Return Home to go back to the cPanel main page.

-
Manage Your Databases
Should you need to view or modify your databases and users in the future, return to the cPanel home page and click on the MySQL Databases icon under the "Databases" section. This interface allows for comprehensive management of all your MySQL databases.

Here, you can perform various operations, including checking database usage, repairing databases, changing user passwords, and deleting databases or users.
Conclusion
Creating a MySQL database in cPanel is a straightforward and efficient process, enabling you to quickly set up the necessary backend infrastructure for your web projects. By following these steps, you can effectively manage your databases and ensure the smooth operation of your data-driven applications.
