
 (1).svg)
 (1).png)


 (1).svg)
.svg)
Setting up and managing email aliases and forwarders in cPanel is a straightforward process that can significantly streamline email management, particularly for individuals or organizations handling multiple email addresses or domains. This guide will walk you through the essential steps of configuring and utilizing email forwarders and aliases in cPanel, covering their creation, removal, and useful supplementary functions like autoresponders and domain-wide forwarding.
What are Email Forwarders?
An email forwarder is a fundamental feature in cPanel designed to automatically redirect incoming emails from one specified email address to another. When an email is sent to the original address, it will be instantly and seamlessly delivered to the designated forwarding address, ensuring no messages are missed.
Email forwarders are an invaluable tool for individuals and businesses seeking to consolidate communication across multiple email accounts. For instance, if you manage distinct email addresses for sales inquiries, customer support, and personal correspondence, configuring forwarders ensures that all emails destined for these various accounts converge into a single, unified mailbox. This consolidation simplifies email administration, allowing you to monitor one primary account effectively, rather than juggling several separate inboxes. This enhances efficiency and ensures timely responses to all incoming communications.
Understanding Email Aliases
An email alias serves a similar purpose to a forwarder but with an important distinction: it allows you to both send and receive emails using the alias address. Essentially, an alias acts as an additional email address that shares the same inbox, sent items, drafts, and trash folders as your primary email account. This provides flexibility without creating a completely separate mailbox.
Aliases are perfectly suited for organizations that wish to present multiple professional email addresses for different departmental functions (e.g., info@yourdomain.com, contact@yourdomain.com) without the administrative overhead of maintaining separate email accounts for each. This not only simplifies the overall email management process but also helps in maintaining a consistent and professional communication front for your audience.
Key Benefits of Email Forwarders and Aliases
- Efficiency: Significantly save time and effort by consolidating and managing all your incoming emails from a single, centralized account.
- Organization: Maintain a well-organized email system, minimizing clutter and significantly reducing the risk of overlooking important communications.
- Convenience: Easily redirect emails to relevant colleagues, departments, or personal accounts as needed, fostering better collaboration and responsiveness.
Step-by-Step Guide to Creating Email Forwarders and Aliases
Creating an email forwarder or alias is a powerful capability that automatically redirects emails from one address to another. This functionality proves particularly useful in various scenarios, such as ensuring that multiple team members receive customer inquiries or consolidating several email addresses for streamlined management without the need to constantly check multiple inboxes. This guide will walk you through setting up an email forwarder or alias using cPanel.
It's important to note that an email forwarder or alias does not store emails independently. Instead, it efficiently redirects incoming messages to another designated email address. This makes it a highly effective tool for managing email flow without accumulating unnecessary clutter in additional mailboxes.
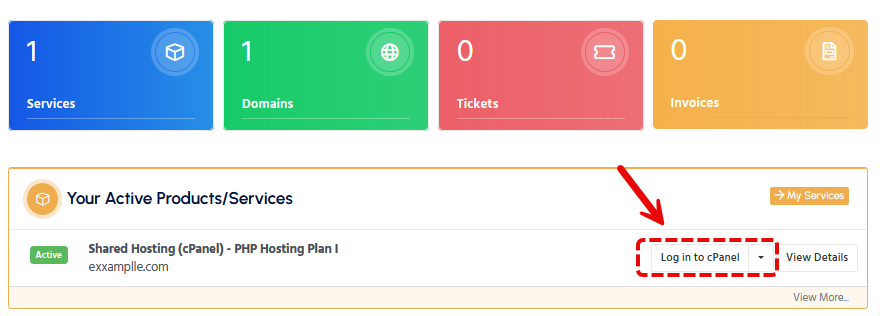
Step 1: Access Your cPanel Account
First, you need to log into your cPanel account. You can typically access cPanel through your hosting provider's client area. Look for a "Services" or "My Account" section and locate the cPanel login link associated with your hosting package.
Step 2: Locate the Email Forwarders Section
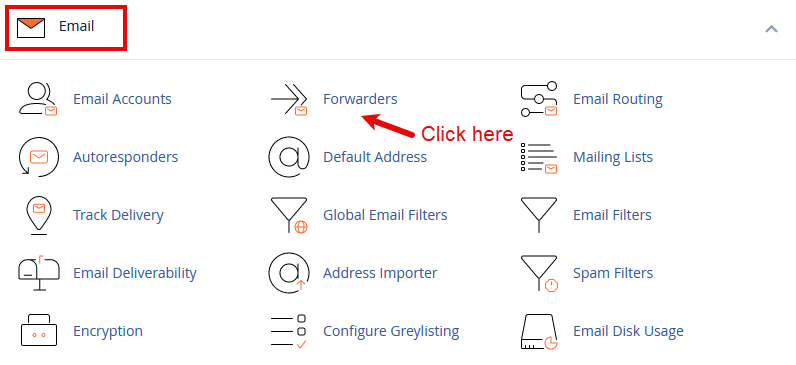
Once successfully logged in to cPanel, scroll down to the "Email" section. Within this section, click on "Forwarders". This action will direct you to the dedicated page where you can effectively manage all your existing and new email forwarders.
Step 3: Initiate the Forwarder Creation
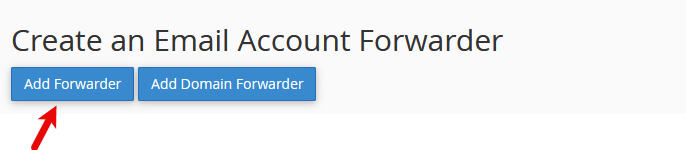
On the Forwarders page, click on the "Add Forwarder" button. This will present you with fields to enter the email address you wish to forward from. For example, if your goal is to forward all emails sent to info@yourdomain.com, you would input "info" into the first text box and then select your domain name from the adjacent dropdown menu.
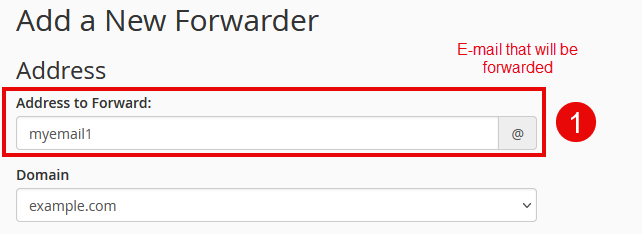
It is crucial to ensure that the email address you are setting up a forwarder for does not already exist as a standalone mailbox, unless your specific intention is for emails to be both received by that mailbox and simultaneously forwarded to another destination.
Step 4: Define the Forwarding Destination
In the "Destination" field, you will clearly specify the email address where you want all incoming emails to be redirected. This can be any valid email address of your choice, including addresses outside your current domain, such as a personal Gmail or Outlook account.
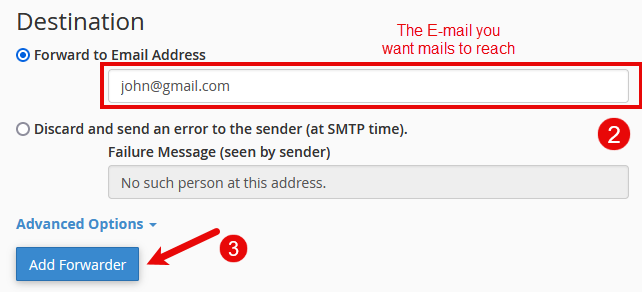
After accurately entering the desired forwarding address, proceed by clicking on "Add Forwarder" to finalize the setup. Upon successful creation, your new forwarder should appear listed on the "Forwarders" page, confirming its active status.
Congratulations! You have successfully created an email forwarder or alias. Emails sent to the original address will now be automatically redirected to the forwarding address you specified, ensuring seamless delivery.
Following its creation, you can conveniently view the forwarder's details, which include the forwarder name, its target email address, and options to trace email delivery or delete the forwarder if it is no longer needed.
Important Considerations and Best Practices
While email forwarders and aliases are incredibly powerful and convenient tools, it's advisable to use them thoughtfully. Excessive or poorly managed use can potentially lead to confusion or the unfortunate omission of important communications. Furthermore, always ensure that forwarded emails comply with relevant privacy policies and do not inadvertently trigger spam regulations, which could lead to delivery issues.
- Privacy Management: Be acutely aware of who will have access to forwarded emails, especially within a business or team environment, to maintain confidentiality.
- Spam Filter Awareness: Configure your forwarding rules carefully to avoid triggering spam filters, which could otherwise result in critical emails being misdirected or undelivered.
- Regular Organization and Review: Make it a practice to regularly review and update your forwarding and alias settings. This ensures they consistently align with your current communication needs and organizational structure.
How to Remove an Email Alias in cPanel
Follow these straightforward steps to remove an existing email alias from your cPanel account:
- Access Your cPanel Account: Begin by logging into your cPanel dashboard. You can usually find the login portal through your hosting provider's main website or client area.
- Navigate to the Email Section: Once logged in, locate the "Email" section on your cPanel dashboard and click on the "Forwarders" option. This is the central hub for managing your email aliases and forwarders.
- Identify the Alias for Deletion: On the Forwarders page, you will see a comprehensive list of all your active email aliases. Carefully locate the specific alias you intend to remove.
- Execute the Deletion: Adjacent to the email alias you wish to remove, you will find a "Delete" option. Click on this, and then confirm your decision when prompted to complete the deletion process.

It is important to remember that once an email alias is deleted, any emails sent to that address will no longer be forwarded. Before proceeding with deletion, ensure that you no longer require the alias and that its removal will not disrupt critical communications.
After successfully deleting the email alias, it is considered good practice to verify that your overall email setup continues to function as intended. If the deleted alias was previously redirecting important emails, make sure to update any relevant records or notify affected parties about the change to prevent any communication gaps.
Success! You have now efficiently removed an unnecessary email alias, contributing to a more streamlined and manageable email system.
Setting Up Domain-Wide Email Forwarding
For users managing multiple domains, cPanel offers a convenient feature that allows you to forward all emails from one entire domain to another. This functionality is particularly useful for consolidating emails originating from various domain names into a single, unified inbox for easier management. To configure domain-wide forwarding, follow these steps:
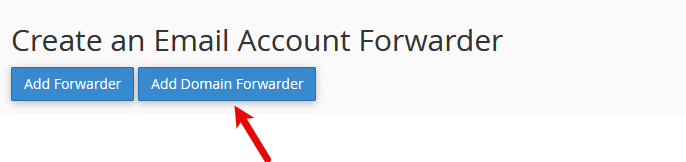
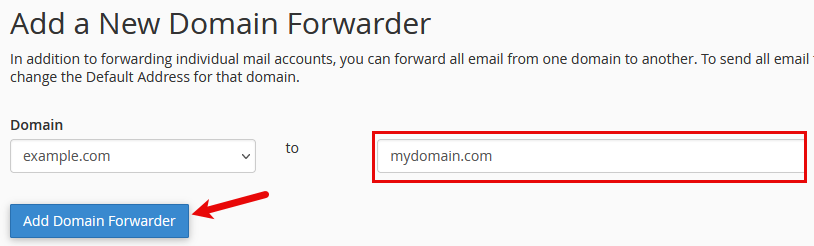
- In the "Forwarders" section of cPanel, look for and select the "Domain Forwarders" option.
- Carefully choose the specific domain name from which you wish to forward all emails.
- Enter the target domain name where all emails will ultimately be redirected.
- Confirm your selection to apply the domain-wide forwarding. This action ensures that emails sent to any address at the original domain will automatically be redirected to the corresponding address at the designated target domain.
What is an Autoresponder?
An autoresponder is an automated email message system designed to send a predefined response in reply to incoming emails. It is exceptionally useful for a variety of scenarios, such as immediately notifying senders when you are out of the office, on vacation, or simply to confirm that their message has been received and will be addressed in due course.
Configuring Autoresponders for Email Aliases
Setting up autoresponders for your email aliases can significantly enhance your communication strategy by providing immediate feedback to senders. Follow these detailed steps to configure autoresponders for your email aliases in cPanel:
Detailed Steps for Autoresponder Setup
- Access Your cPanel Account: First, log into your cPanel dashboard. You can typically find the login portal through your hosting provider's client area, usually under a "My Account" or "Services" section.
- Navigate to Forwarders: Within the cPanel dashboard, locate the "Email" section and click on "Forwarders". This area is crucial for managing both your email aliases and their associated settings.
- Create or Manage Aliases: If you haven't already, ensure your email alias is created. To do this, click "Add Forwarder", input the desired alias you wish to use, and specify the email account(s) to which incoming messages should be redirected.
It is critically important to ensure that the email alias you are configuring does not forward emails back to the very same account from which it is set to autorespond. Such a configuration could inadvertently create an email loop, leading to significant issues with email delivery and potential service interruptions.
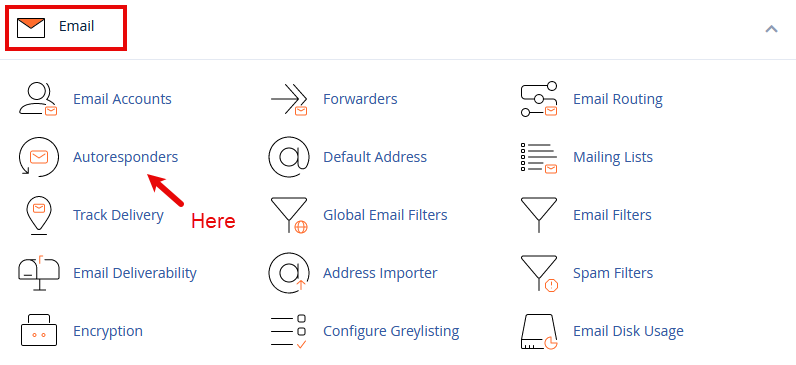
- Configure the Autoresponder: Next, navigate to the "Autoresponders" section, also found within the "Email" area of cPanel. Click on "Add Autoresponder" to initiate the setup of a new automatic response specifically for your email alias.
- Set Autoresponder Details: You can generally leave the default setting in the "Character Set" dropdown menu. Proceed to fill in the required details: define the "Interval" (which dictates how often an autoresponse is sent to a repeated sender address), specify the email address (which will be your alias), craft compelling "From" and "Subject" lines, and compose the main body of your autoresponse message.
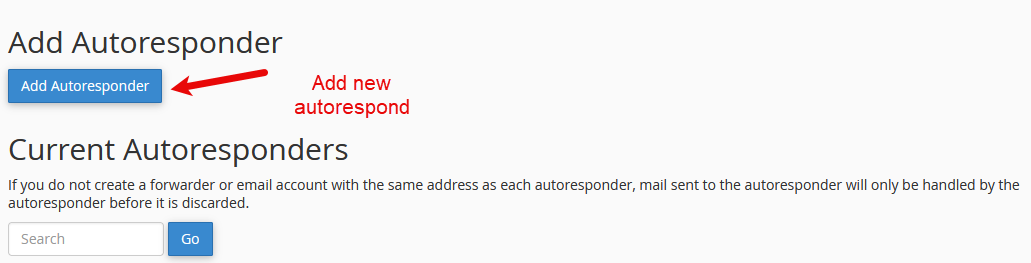
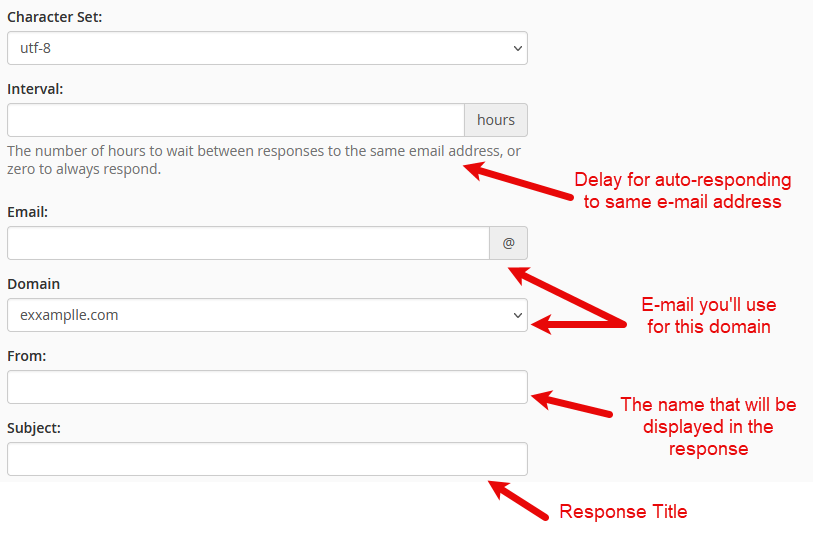
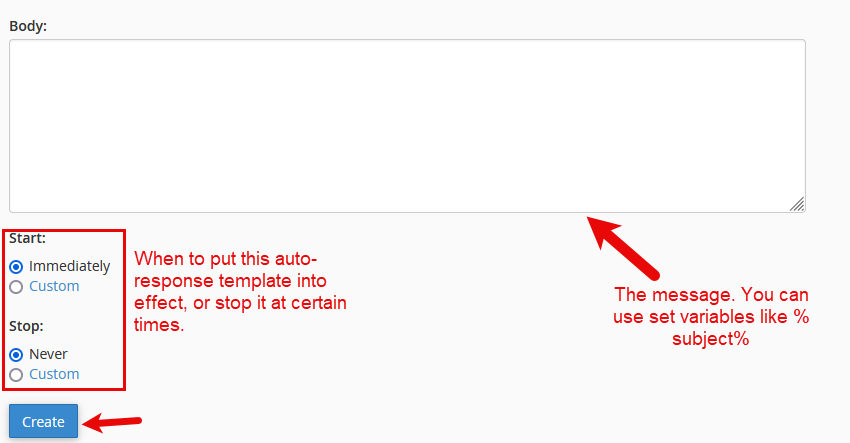
Congratulations! You have successfully configured an autoresponder for your email alias. Now, any emails sent to your designated alias will automatically trigger the customized response you have set up, providing immediate feedback to senders.
cPanel’s Email Trace tool is an indispensable utility that assists you in diagnosing and resolving potential email delivery issues. It provides comprehensive and detailed information regarding an email's journey from the sender's mailbox to the recipient's inbox.
The Email Trace tool is particularly useful for verifying the status of email forwarders and efficiently troubleshooting any delivery issues that might arise.
To effectively utilize the Email Trace tool in cPanel, follow these steps:
- Log in to your cPanel account.
- Navigate to the "Email" section and click on "Track Delivery" or "Email Trace", depending on the specific version of your cPanel interface.
- On this page, you can search for specific email addresses to view the detailed delivery status of emails sent to or from them.
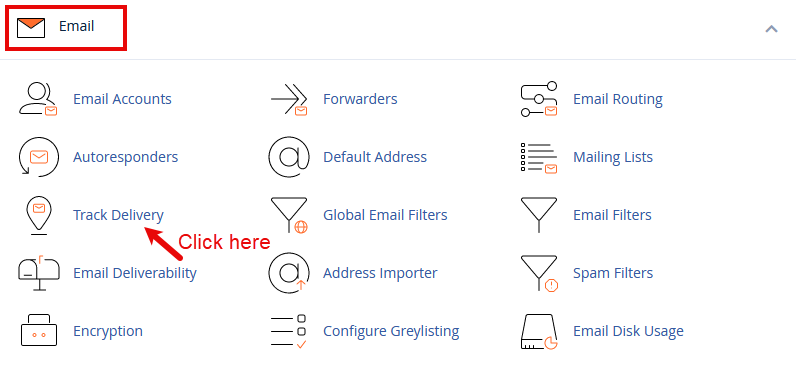
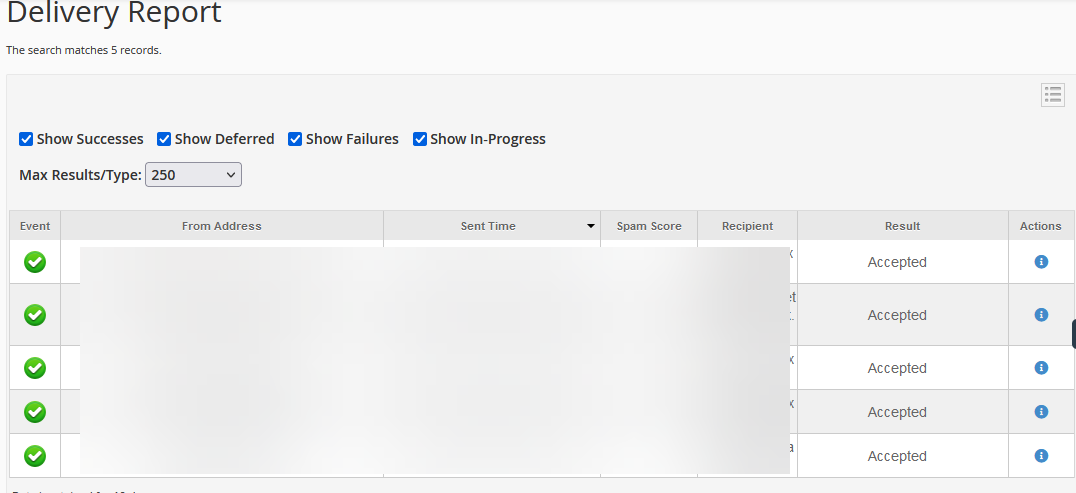
Success! This powerful tool is especially valuable for confirming that your email forwarders are operating as intended. You can easily check if emails are successfully being redirected to their designated destination addresses without hindrance.
Utilizing the Email Trace Tool
When you use the Email Trace tool, you will be presented with comprehensive logs that include vital information such as:
- Date and Time: The precise timestamp when the email was processed by the server.
- Sender/Recipient: Clear identification of who initiated the email and who was the intended recipient.
- Status: An indication of whether the email was successfully delivered, temporarily deferred, or ultimately failed to reach its destination.
This detailed information is invaluable for efficiently troubleshooting any forwarding issues. For example, if an email directed to a forwarded address is explicitly marked as "failed," you can then investigate further to pinpoint and resolve the underlying problem, ensuring future deliveries are successful.
It is important to pay close attention to any messages within the logs that are marked as "deferred" or "failed." These statuses typically indicate underlying issues ranging from temporary server problems to an incorrect or misconfigured forwarder setup, requiring your immediate attention.
Troubleshooting Common Forwarding Issues
If you encounter any issues with your email forwarders, consider these practical troubleshooting tips:
- Verify the forwarder configuration: Always double-check the forwarder settings within cPanel to confirm that the destination email address is absolutely correct and free of typos.
- Review the Email Trace logs: Thoroughly examine the Email Trace logs for any specific error messages or warnings that could help in accurately identifying the root cause of the issue.
- Check destination mailbox capacity: Ensure that the destination mailbox, where emails are being forwarded to, is not full. A full mailbox can prevent additional forwarded emails from being successfully delivered.
Warning! Incorrectly configured email forwarders pose a significant risk of leading to lost or undelivered communications. Always exercise diligence and double-check all your settings whenever you are experiencing issues or making changes to your email forwarding setup.
Conclusion
Email aliases and forwarders in cPanel provide a robust and flexible framework for managing your emails with enhanced efficiency. Whether your objective is to simplify email administration across various departments, implement automated responses, or consolidate communications from multiple domain names, cPanel equips you with all the necessary tools. By diligently following the steps and best practices outlined in this guide, you can effectively create, manage, and leverage email aliases to significantly streamline your communication strategies and ensure smooth email operations.
