
 (1).svg)
 (1).png)


 (1).svg)
.svg)
Understanding Email Autoresponders in cPanel
An email autoresponder is a highly valuable feature designed to send automatic replies to incoming emails for a specific address. This functionality is incredibly useful for a variety of scenarios, such as immediately acknowledging receipt of a customer's inquiry, notifying senders when you are out of the office (for instance, on vacation or during public holidays), or providing instant general information. By configuring an autoresponder, you ensure that anyone who contacts you receives a prompt, professional response, which significantly helps in managing expectations and maintaining effective communication channels, even when you are not personally available to reply.

Step-by-Step Guide to Setting Up an Autoresponder
-
Accessing the Autoresponder Feature
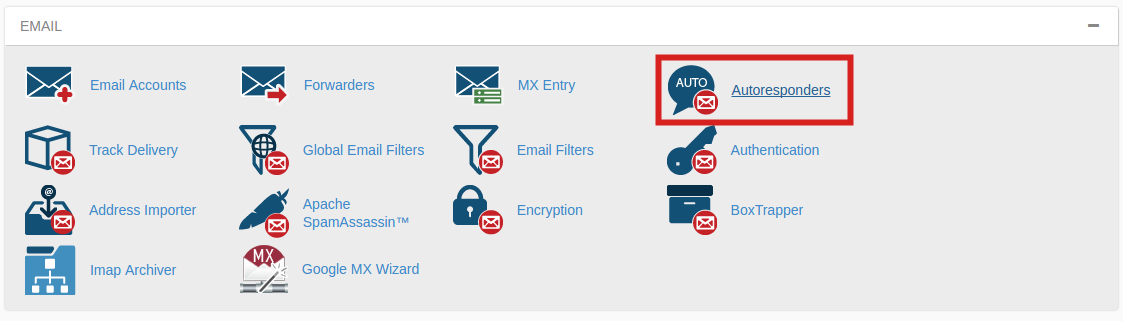
To begin the setup process, you first need to log into your cPanel account using your credentials. Once you have successfully accessed your cPanel dashboard, locate the Mail section. Within this section, you will find and click on the Autoresponders button. This action will direct you to the dedicated interface where you can view, add, or manage all your automatic email reply configurations.
-
Adding a New Autoresponder
The next screen will display any existing autoresponders configured for your email accounts. To create a brand-new autoresponder, locate and click the Add Auto Responder button. This action will present you with a series of configuration options that allow you to customize the behavior and content of your new automatic reply.

-
Configuring Your Autoresponder Settings
On the creation screen, you will be prompted to fill in several fields to define precisely how your autoresponder will function. It is important to carefully review each option to ensure your automated response meets your specific communication requirements. Below is a detailed description of each available setting:
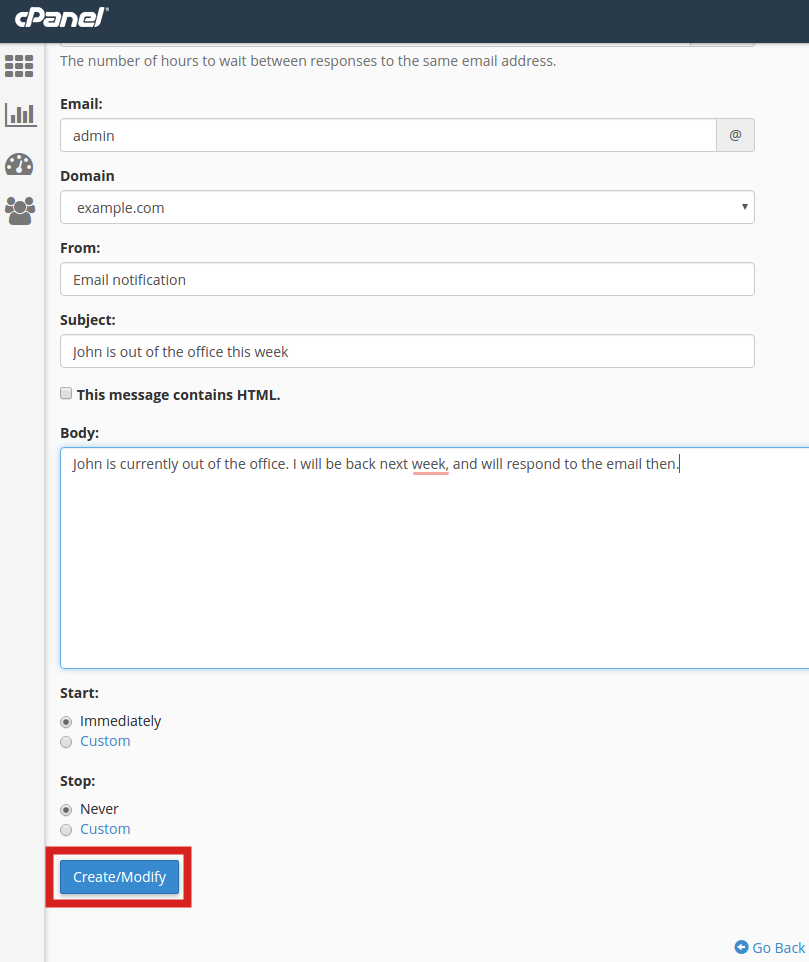
Option Description Character Set The standard character set, "utf-8," is widely recommended as it supports a broad range of characters and languages, making it suitable for most email content. You should only change this if you have a specific requirement for a different encoding to ensure proper display of special characters. Interval This crucial setting prevents a single sender from being inundated with multiple autoresponses. It defines the minimum number of hours that must pass before the system will send another automatic reply to the same email address. Setting an appropriate interval ensures a professional interaction and helps avoid potential classification as spam. Email Specify the exact email address for which this autoresponder will be active. Any emails sent to this designated address will trigger the automatic reply. This ensures the autoresponder only applies to its intended inbox. From Enter the "From" address that will appear on the automatic reply email. It is generally recommended to use the same email address as the one set in the "Email" field for consistency, clarity, and to prevent confusion for the recipient. Subject Compose a clear and concise subject line for your autoresponder email. Examples include: "Out of Office - Will Respond Shortly," "Thank You for Your Inquiry," or "We Have Received Your Message." This immediately informs the recipient of the nature of the email. HTML Check this box if you intend to include HTML formatting within the "Body" of your autoresponder message. Enabling this allows for rich text formatting, the inclusion of links, and embedded images, providing a more visually appealing and informative message. Body This is the main area where you will write the actual message for your autoresponder. Craft a clear, professional, and informative message, such as an acknowledgment of receipt, an out-of-office notice, or details about when the sender can expect a personal reply. Keep it concise but comprehensive. Start Choose when your autoresponder should begin operating. You have the option to start it Immediately upon creation or to define a specific Custom start date and time if you wish to schedule its activation for a future point. Stop Configure when the autoresponder should cease operation. You can set a Custom end date and time, which is useful for fixed periods of absence, or choose Never to keep it active indefinitely until it is manually disabled. -
Saving Your Autoresponder
Once all the settings are configured to your satisfaction, and you have reviewed the details, click the Create/Modify button to save your new autoresponder. You will receive a confirmation message, typically stating, "You have successfully created… auto responder," indicating that your automatic email reply is now active and will begin functioning according to your specified settings.
Conclusion
By carefully following these step-by-step instructions, you can successfully implement an email autoresponder within your cPanel. This feature is an indispensable tool for efficient email management, providing a professional and timely response system for all incoming messages. Whether for acknowledging customer support requests, setting out-of-office notifications, or delivering initial information, autoresponders play a vital role in enhancing communication practices and ensuring consistent sender engagement. They free up your time while keeping your audience informed, contributing significantly to improved operational efficiency and overall satisfaction in managing your email correspondence.
