
 (1).svg)
 (1).png)


 (1).svg)
.svg)
The cPanel Autoresponder feature offers a convenient way to automatically send predefined reply messages in response to emails received on a specific account. This functionality proves invaluable for businesses and individuals alike, ensuring timely communication even when you are away from your inbox. Whether you are on holiday, unavailable, or simply need to send a consistent acknowledgement, an autoresponder ensures your contacts receive an appropriate and prompt response. It streamlines communication by automatically handling initial replies, allowing you to manage your time more effectively.
This detailed guide will walk you through the process of configuring email autoresponders within cPanel, enabling your email accounts to send automatic reply messages efficiently.
What This Guide Covers
- How to Add an Autoresponder in cPanel
- How to Edit an Autoresponder in cPanel
- How to Delete an Autoresponder in cPanel
- Guidance for Crafting Effective Out-of-Office Messages
How to Add an Autoresponder in cPanel
You have the flexibility to set up multiple autoresponders for the same email account. To begin adding an autoresponder in cPanel, follow these straightforward steps:
Note: It is important to remember that a single autoresponder cannot be created to cover all email accounts under a specific domain. Each mailbox requires its own separate autoresponder configuration.
- Log in to your cPanel interface.
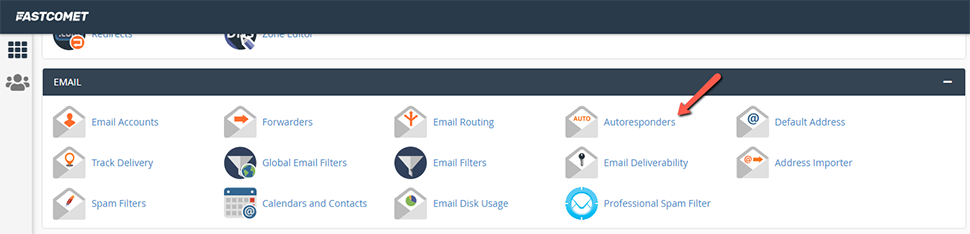
- Navigate to the Email section and click on Autoresponders.
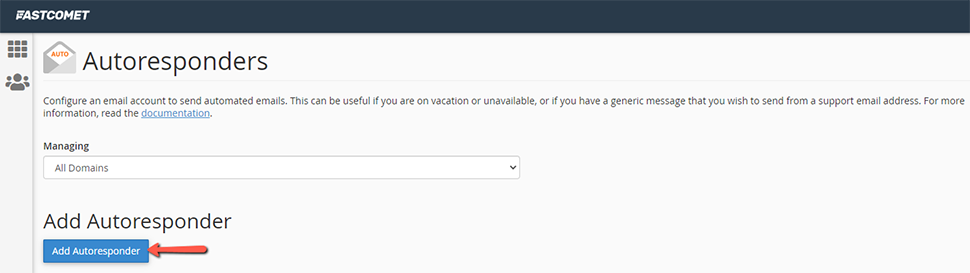
- Proceed by clicking on Add Autoresponder.
- Next, you will configure the specific details for your new autoresponder:
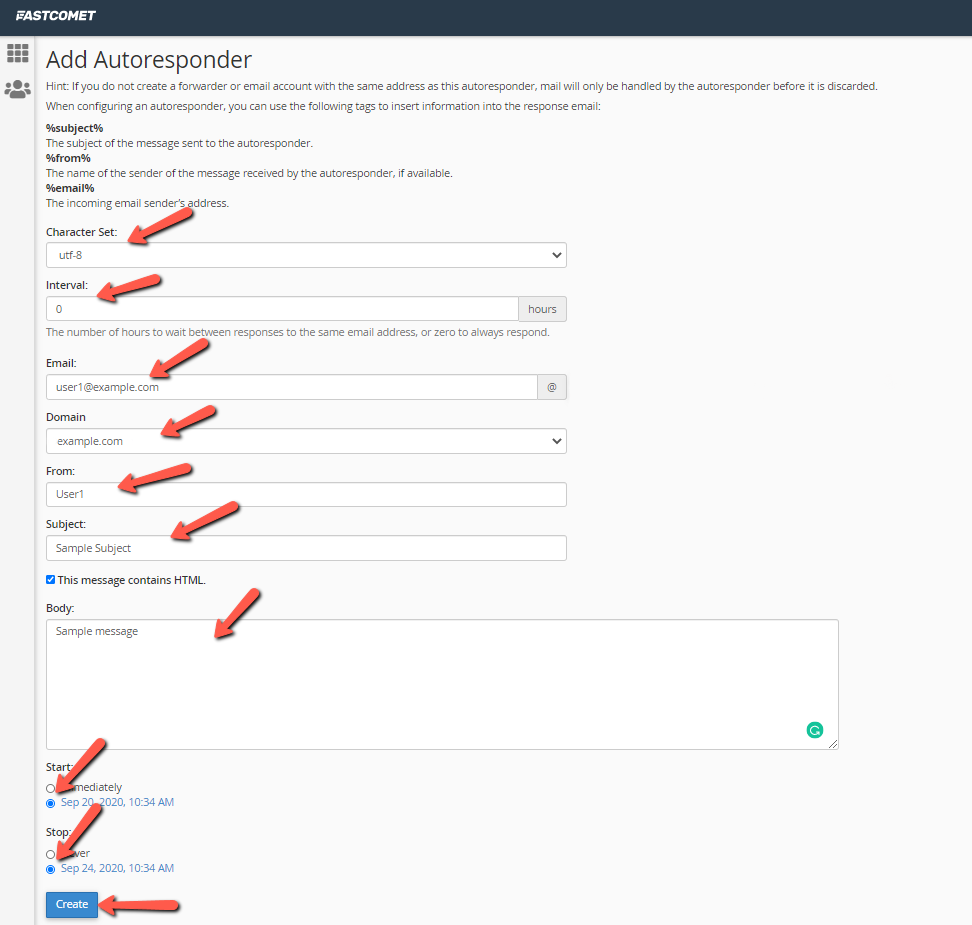
- Under Character Set, it is generally recommended to select UTF-8, which is often the default setting. This ensures proper display of various characters.
- In the Interval text box, specify the number of hours the autoresponder should wait before sending another automated reply to the *same* email address. Setting this to 0 will ensure an auto-reply is sent every time an email is received from that address.
Important: While you cannot exclude specific email addresses from an autoresponder, the Interval setting provides a practical way to control the frequency of responses to individual senders, preventing an overload of automated replies.
- In the Email text box, enter the specific email account for which this autoresponder will operate.
- From the Domain list box, select the appropriate domain associated with the autoresponder.
- The From text box allows you to add your name or the email address that will appear as the sender of the auto-reply. This field can also be left blank.
- In the Subject text box, provide a clear and concise subject line for your autoresponder message.
- If your message body contains HTML formatting, ensure you select the checkbox labeled This message contains HTML.
- In the main Body text box, compose the message you wish to send automatically.
- Beneath the message box, you can choose whether to Start sending autoresponders immediately, or schedule a specific start and end time using the Custom options.
- Similarly, to control when the autoresponder stops, you can choose to never Stop it, or define a scheduled end time.
- Finally, click on Create to activate your new autoresponder.
How to Edit an Autoresponder in cPanel
Should you need to update the content of your response message or modify any account details, you can easily edit an existing autoresponder.
To modify an autoresponder within cPanel, follow these steps:
- Log in to your cPanel account.
- Once again, locate the Email section on the cPanel home screen and click on Autoresponders.
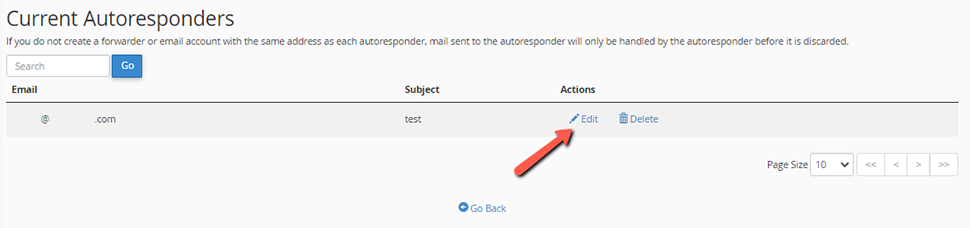
- Under the Current Autoresponders section, identify the autoresponder you wish to modify.
- Click the Edit button associated with that autoresponder.
- Make all necessary changes to the autoresponder's settings or message content.
- Click on Modify to save your updates and apply them to the autoresponder.
How to Delete an Autoresponder in cPanel
When an autoresponder is no longer needed, you can easily remove it from your cPanel. To do so, navigate to the Current Autoresponders section, locate the autoresponder you wish to remove, and then click the Delete button next to it.
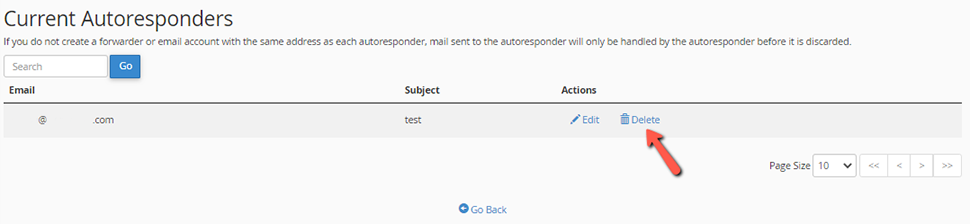
Tip: If you utilize an autoresponder for temporary purposes, such as an out-of-office message, consider modifying it to point to a nonexistent email account to temporarily disable it, rather than deleting it permanently. When you wish to reactivate it, simply restore the correct email account name.
Guidance for Crafting Effective Out-of-Office Messages
Creating a well-crafted out-of-office message is crucial for maintaining professionalism and managing expectations. For comprehensive advice and practical examples, resources are available online that provide everything you need to know about designing effective out-of-office responses. These resources often include templates and tips to assist you in crafting an autoresponder email that perfectly suits your needs.
Conclusion
Autoresponders play a vital role in maintaining professional communication, especially when you are unable to respond to emails instantly. By utilizing the autoresponder function within cPanel, you can ensure that your business associates and contacts receive timely acknowledgments, enhancing your professional image and improving overall communication efficiency. We trust that this guide has provided you with clear instructions and valuable insights for setting up and managing this essential email feature.
