
 (1).svg)
 (1).png)


 (1).svg)
.svg)
Softaculous in cPanel simplifies the process of installing a wide range of web applications. This powerful auto-installer allows users to effortlessly set up web portals, e-commerce solutions, content management systems (CMS), blogs, forums, and many other applications in just a few easy steps. This tutorial will guide you through the installation of WordPress, a process that shares many similarities with other Softaculous installations, though specific requirements may vary for different applications.
Understanding Softaculous
Softaculous is an intuitive auto-installer integrated within cPanel, designed to streamline the deployment of popular web applications. It eliminates the need for manual database creation or file uploads, making it accessible even for users with limited technical expertise. With Softaculous, you can quickly launch various online platforms, from dynamic websites to sophisticated e-commerce stores.
Important Note on Installations
This tutorial specifically details the installation of WordPress. While most installations within Softaculous follow a similar pattern, it's crucial to remember that certain applications may have unique requirements regarding database configurations or other dependencies. Always review the specific details for the application you intend to install.
Step-by-Step Installation Guide
-
Accessing Softaculous in cPanel
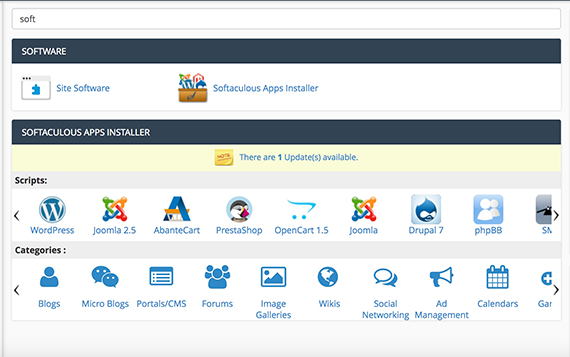
First, log into your cPanel account. Once logged in, use the search bar located at the top of the cPanel home page. As you begin typing "softaculous," the Softaculous Apps Installer link should appear. Click on this icon to proceed.
-
Navigating to the Softaculous Home Page
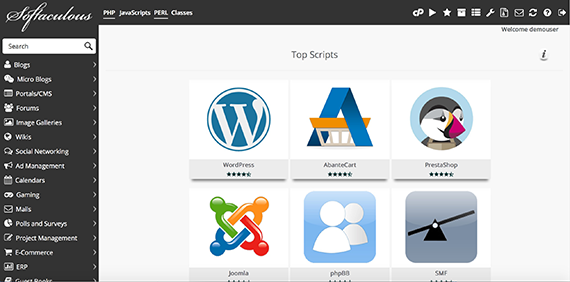
Clicking the Softaculous icon will take you directly to its home page, which serves as your central hub for application management and installation.

-
Selecting Your Application
On the Softaculous home page, you can browse or search for the application you wish to install. If you already know the name, use the search function. Alternatively, you can click on the category of application (e.g., "Blogs," "E-Commerce") to explore available options. For this tutorial, we will proceed with installing WordPress.
-
Initiating the Installation
Once you've selected your desired application (WordPress in this example), click the Install Now button. This action will direct you to the Software Setup page.
-
Configuring Software Setup
The Software Setup page requires you to input various details for your application. While the specifics might vary slightly between applications, the general process involves moving down the page and filling out the requested information until you reach the "Install" button at the bottom.
Choose Protocol
In this section, you can select the protocol for your site. If you have an SSL certificate installed, choose
https://for a secure connection. Otherwise, leave the default setting. A secure connection is highly recommended for all websites.Important Directory Warning
If you opt to install your application into a specific directory (e.g.,
yourdomain.com/blog), users will need to include that directory in the web address to access your site (e.g.,www.example.com/directory). Consider this when planning your site's URL structure.-
Choose Domain: Enter your domain name in this field. It is not necessary to include "www" as it will be handled automatically.
-
Directory: Optionally, you can specify a directory where your web application will be installed. If left blank, the application will be installed directly into your main domain.
Site Settings
Here, you can define your application's site name and a brief description. For WordPress, this section also allows you to enable Multisite functionality. If you decide not to enable it during setup, you can typically configure it later.
Admin Account
This section is for setting up the administrator username, a strong password, and an email address for your application. Softaculous may pre-populate the email field; ensure you update this to a valid and accessible email address.
Password Security Tip
Always select a robust and secure password for your administrator account. Softaculous can assist you by generating a strong password automatically; simply click the key icon to utilize this feature.
Choose Language
Select the preferred language for your application from the provided drop-down menu.
Plugins (Optional)
Some applications offer the option to install certain plugins or add-ons during the initial setup phase. Review these options to see if any are relevant to your site's immediate needs.
Advanced Options
The advanced options allow for more granular control over your installation. This typically includes naming your database, configuring automatic updates, and setting up automated backups with a rotation schedule. Since options can vary by application, it's advisable to carefully read through them and consult with a developer if you have specific questions about these advanced configurations.
-
-
Completing the Installation
Once you have reviewed and completed all the necessary sections on the Software Setup page, click the Install button to begin the installation process. Softaculous will then proceed to set up your application.
Upon successful completion of the installation, you will receive a notification confirming that your application has been installed. An email containing important login links and details will also be sent to the administrator email address you provided during the setup. You are now ready to access and begin customizing your new web application.
