
 (1).svg)
 (1).png)


 (1).svg)
.svg)
Setting up Domain Name System (DNS) records is a fundamental step for any website to be accessible on the internet. Without properly configured DNS, visitors would be unable to locate your site using its domain name. While the process of managing DNS records is generally straightforward, the specific steps can differ based on your server's operating system and the control panel you utilize. This comprehensive guide is specifically designed for Plesk users who need to create, modify, or delete DNS records within their Plesk control panel.
This tutorial will walk you through the essential procedures for creating and editing DNS records in Plesk. Furthermore, we will delve into the methods for adding new domains, subdomains, and domain aliases to enhance your website's presence and functionality. Should you be looking for a particular solution, feel free to navigate directly to the relevant section using the headings provided.
Creating and Modifying DNS Records in Plesk
To effectively manage your DNS records within the Plesk control panel, follow these detailed steps for both creation and modification:
- To begin, you must first log in to your Plesk control panel. You can typically access your Plesk account by navigating to the following URL in your web browser:
https://(your server’s IP address):8443- Alternatively, if the A records for your server are already propagated, you can use:
https://yourdomain.com:8443
- Once successfully logged in, direct your attention to the left-hand navigation pane. Under the Hosting Services section, locate and click on the Domains option. This will display a list of all domains associated with your account.
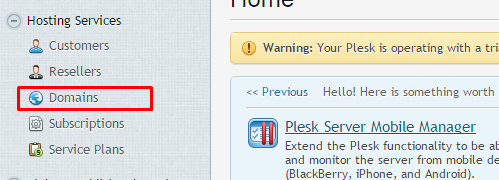
- On the right side of your screen, you will find a comprehensive list of all domains currently hosted on your server. Carefully select and click on the specific domain for which you intend to make DNS record adjustments.
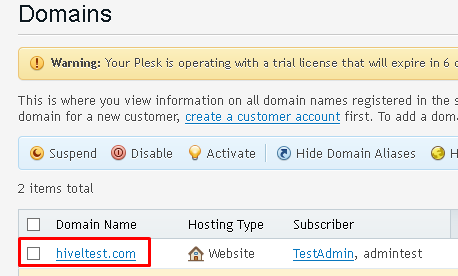
- After selecting your desired domain, a new interface will present various control options. Proceed by clicking on the DNS Settings option, which provides access to all DNS management tools for that domain.
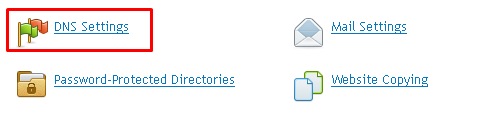
- The subsequent screen will showcase a range of tools and configurations pertinent to your DNS settings. Here, you have several options, including the ability to Switch Off the DNS Service, Add Records, and Restore Defaults. To introduce a new DNS record, click on the Add Record option. You will then need to select the appropriate record type and meticulously fill in all the necessary information required for the specific record you are creating.
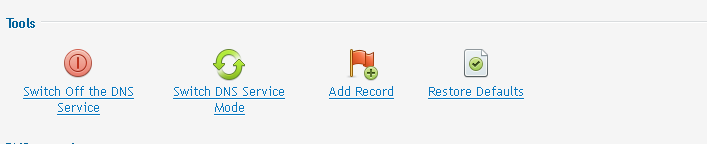
- To modify an existing DNS record, remain on the DNS Settings screen and scroll down to view a complete list of all current DNS records configured for your selected domain. Simply click on any of these records to initiate the editing process.
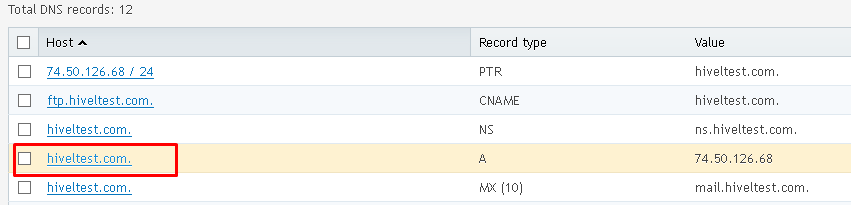
- Upon clicking an existing record, a new window will appear, offering fields to change the Record type, Domain name, and IP address. Ensure all modifications are accurate and reflect your intended configuration.
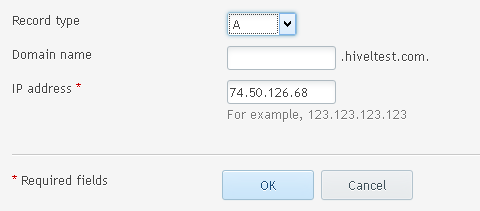
- The specific information required will vary depending on the type of DNS record you are creating or editing:
- For MX Records (Mail Exchange):
- Confirm that MX is selected as the Record Type.
- The Mail Domain field should typically be left blank, but you must set the Mail Exchange Server to match the fully qualified domain name (FQDN) of your mail server.
- If your mail exchange server uses a specific priority number, enter it accordingly. If no specific priority is required, it is common practice to set the priority number to very high (0).
- For A Records (Address Mapping):
- Ensure that A is selected as your Record Type.
- In the Domain Name field, specify the name of the subdomain you wish to host (e.g.,
www,blog). - Set the IP Address to the desired server’s public IP address where your domain or subdomain will resolve.
- For CNAME Records (Canonical Name):
- Verify that CNAME is chosen as your Record Type.
- For the Domain Name, enter the alias or subdomain you want to point (e.g.,
www,ftp). - The Canonical Name should be set to the target domain or server's hostname that this alias will point to.
- For MX Records (Mail Exchange):
- After diligently making all necessary edits and ensuring accuracy, click the OK button to save and finalize your changes. It may take some time for DNS changes to propagate across the internet.
Adding Domains, Subdomains, and Domain Aliases in Plesk
Creating a New Domain or Subdomain
Plesk provides a straightforward interface for establishing new domains and subdomains. Follow these steps to expand your web presence:
- First, securely log in to your Plesk control panel using your designated username and password.
- Once logged in, navigate to the left-hand sidebar and click on the Website & Domains tab. This section is your central hub for managing all domains associated with your account.
- To add a new primary domain, click on the option labeled Add Domain. If your objective is to create a new subdomain under an existing domain, instead, click on the Add Subdomain option, which is typically found near the 'Add Domain' button.
- You will then be presented with on-screen instructions and a form. Carefully fill out the required fields with the details for your new domain or subdomain, such as the domain name, hosting type, and document root.
- Upon completing all necessary information, click OK to finalize the creation of your new domain or subdomain.
Creating a Domain Alias
Domain aliases are useful for directing multiple domain names to the same website content. To set up a domain alias in Plesk, proceed as follows:
- After logging into your Plesk control panel, navigate to the Website & Domains tab on the left-hand menu.
- To reveal more options, click on the link labeled Show Advanced Operations.
- Subsequently, click on the Domain Aliases icon to access the alias management interface.
- Locate the primary domain for which you intend to create an alias. To its right, click on the Manage option.
- Within the domain alias management screen, click the Add Domain Alias icon.
- A form will appear with blank fields. Provide all the necessary information pertinent to the domain alias you are establishing. Fields marked with a red asterisk are mandatory and must be completed.
- Once you have entered all the details, click OK to successfully create and activate your new domain alias.
With these steps, you have successfully learned how to manage DNS records, add new domains, subdomains, and create domain aliases within your Plesk control panel. Proper DNS configuration is vital for the online presence and accessibility of your websites.
