 (1).svg)
 (1).png)


 (1).svg)
.svg)
Managing multiple email accounts within your cPanel environment can become inefficient, especially when you need to monitor communications across several addresses. To streamline this process, cPanel offers the robust functionality of email forwarders. This feature allows you to automatically redirect incoming emails from one account to another, consolidating all your messages into a single inbox. This means you only need to access one email account to view all your correspondence, significantly enhancing your productivity.
Beyond simply redirecting emails, cPanel forwarders provide additional flexibility. You can configure them to discard unwanted emails, send them to a specific program for automated processing, or even forward all emails from an entire domain to another. For instance, if you manage several email IDs like info@tutorialspoint.com, admin@tutorialspoint.com, and support@tutorialspoint.com, instead of logging into three separate mailboxes, you can set up forwarders to redirect emails from admin@tutorialspoint.com and support@tutorialspoint.com to info@tutorialspoint.com. This way, you only need to access the info@tutorialspoint.com mailbox to manage all incoming communications.
Create an Email Forwarder
cPanel offers two primary types of email forwarders: one for redirecting emails from a specific account to another, and another for forwarding all emails addressed to an entire domain.
Creating an Email Account Forwarder
Follow these steps to set up a forwarder for a specific email account:
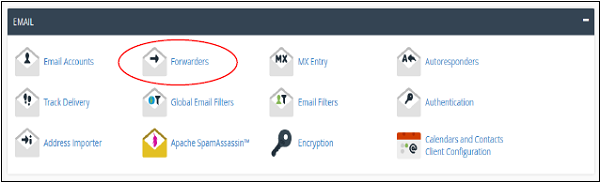
Step 1 − Begin by accessing the Forwarders link, located within the Email section of your cPanel Home interface.
Step 2 − On the Forwarders interface, locate and select the option labeled Create an Email Account Forwarder.

Step 3 − Click the Add Forwarder button. This action will navigate you to a configuration interface similar to the one shown below.
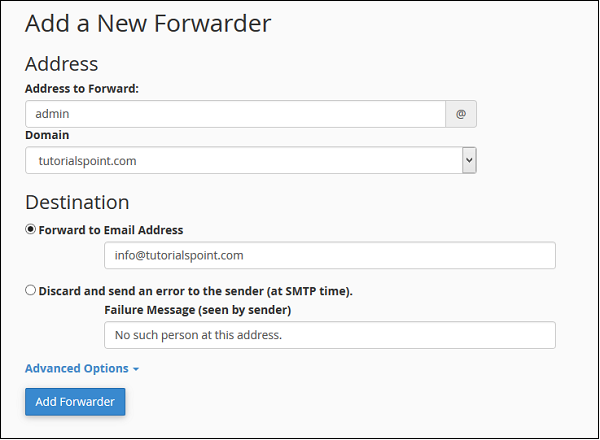
Step 4 − In the designated field, enter the email address from which you wish to forward emails. It is important to note that this email account does not necessarily need to be pre-existing. If the source email account has not been created, any emails sent to it will still be forwarded, but no copies will be stored in a local mailbox for that address since no mailbox exists.
Step 5 − Next, specify the destination where you want these emails to be sent. You have several options:
Forward to Email Address: Choose this option and enter an existing email address in the provided textbox. All incoming emails to the source address will be redirected here.
Discard and send an error to sender: Select this if you wish to reject the incoming email and notify the sender with a failure message. You can customize this failure message by entering your preferred text in the textbox provided.
Under Advanced Options, you will find additional routing choices:
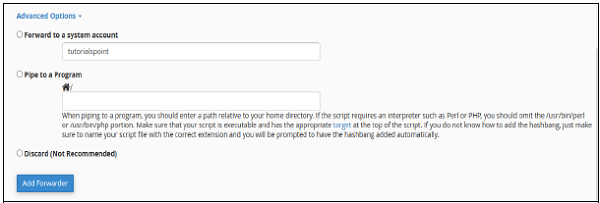
Forward to a System Account: If you prefer to send emails to a system account, select this option and provide the name of the target system account.
Pipe to a program: Use this option to direct incoming emails to a specific program for processing. Enter the full path name of your program, including its file extension (e.g.,
/home/user/myscript.phpor/usr/bin/mailhandler.pl).Discard: This option will simply delete the incoming email without any notification or further action. Select this if the email should be completely ignored.
Step 6 − After configuring your preferred options, click the Add Forwarder button to save your settings and activate the email forwarder.
Adding a Domain Forwarder
A domain forwarder allows you to redirect all emails sent to any address within one domain to a corresponding address on another domain. For example, if you forward olddomain.com to newdomain.com, an email sent to user@olddomain.com would be redirected to user@newdomain.com. This is particularly useful during domain migrations or rebranding efforts.
Step 1 − From the Forwarders interface, locate and click the Add Domain Forwarder button. This button is typically found below the section for creating individual email account forwarders.

Step 2 − On the Add New Domain interface, use the dropdown menu to select the domain whose emails you wish to forward.
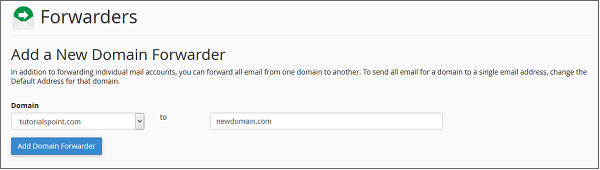
Step 3 − In the text field adjacent to your selected domain, enter the target domain that will receive the forwarded emails.
Step 4 − To finalize the setup, click the Add Domain Forwarder button. All emails directed to the source domain will now be forwarded to the specified destination domain.
Deleting an Email Forwarder
Should you need to remove an existing email forwarder, the process is straightforward:
Navigate back to the main Forwarders interface in cPanel.
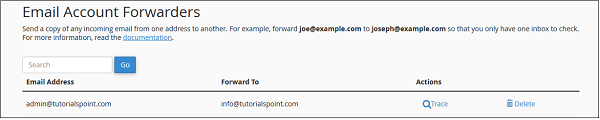
Locate the specific forwarder you wish to delete within the list. For email account forwarders, you will see a 'Delete' link corresponding to each entry:
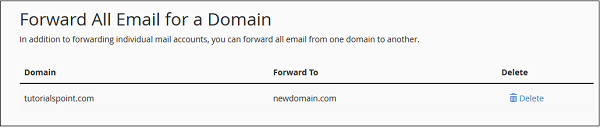
Similarly, for domain forwarders, a 'Delete' link will be available next to each domain forwarder entry:
Click the Delete link corresponding to the desired forwarder. A confirmation prompt will appear, asking you to verify your decision. Click Delete Forwarder again to permanently remove it.
