
 (1).svg)
 (1).png)


 (1).svg)
.svg)
Introduction: Empowering Your Email with cPanel
Hosting your email on your own domain with a dedicated SMTP server provides unparalleled control and flexibility. This approach allows you to establish professional email addresses that perfectly align with your business or personal brand. Furthermore, all your sensitive data remains securely stored on a private server or hosting account, accessible only by you. Should you decide to migrate to a different hosting provider, the freedom to do so is unhindered, as you are not bound by the limitations of a locked-in hosted service.
Despite these significant advantages, many individuals and businesses hesitate to host their own email due to the perceived complexity of setting up and managing an email server independently. This often involves delving into intricate concepts such as SMTP, IMAP, Exim, and mail routing. However, for users leveraging cPanel & WHM, this challenge is significantly simplified. These powerful platforms offer intuitive tools designed to streamline the process of setting up and connecting to email accounts via SMTP. For the vast majority of cPanel users, sending mail through their own server becomes as straightforward as creating an email account and making a few quick configurations in their preferred email application.
This comprehensive guide will walk you through the essential steps to achieve just that. We will cover the entire process, from establishing a new email account within cPanel to configuring your various email applications with the correct SMTP settings. Additionally, we will delve into common SMTP errors you might encounter and provide practical, actionable solutions to resolve them, ensuring a smooth and reliable email experience.
Understanding SMTP: The Backbone of Email Communication
SMTP, or Simple Mail Transfer Protocol, is a fundamental communication protocol employed by email applications to dispatch electronic mail across the internet to designated servers. When you compose an email and click "send" in your chosen email client—be it Apple Mail®, Microsoft Outlook®, Thunderbird®, or any other application—it initiates a connection with an outgoing mail server. This server then authenticates your request and proceeds to deliver the messages from your outbox.
The software component on the server responsible for handling these outgoing messages is known as a Mail Transfer Agent (MTA). The MTA receives messages from your email application, places them into a processing queue, and subsequently transmits them to the recipient's MTA, which then delivers the email to their inbox. cPanel features an integrated MTA called Exim. Like all MTAs, Exim utilizes SMTP to facilitate communication between email clients and other MTAs, which is why MTAs are frequently referred to as SMTP servers.
Typically, cPanel users are spared the complexities of configuring Exim or delving deep into SMTP's intricacies, as cPanel efficiently manages these technical details behind the scenes. However, situations may arise where you or your users encounter email errors. In such cases, a basic understanding of SMTP and potentially minor adjustments to configuration settings might be necessary to restore full functionality.
Before we delve into troubleshooting specific issues, let's establish the foundational steps for setting up an email account on your server and configuring your email client to reliably send messages via the MTA over SMTP.
Step-by-Step: Setting Up SMTP in cPanel
The process of setting up SMTP within cPanel is streamlined into two primary steps, ensuring you can quickly get your email services operational:
- First, you will create a new email account directly on your server via the cPanel interface.
- Second, you will input the necessary server and authentication details into your preferred email client to establish a connection.
1. Creating an Email Account
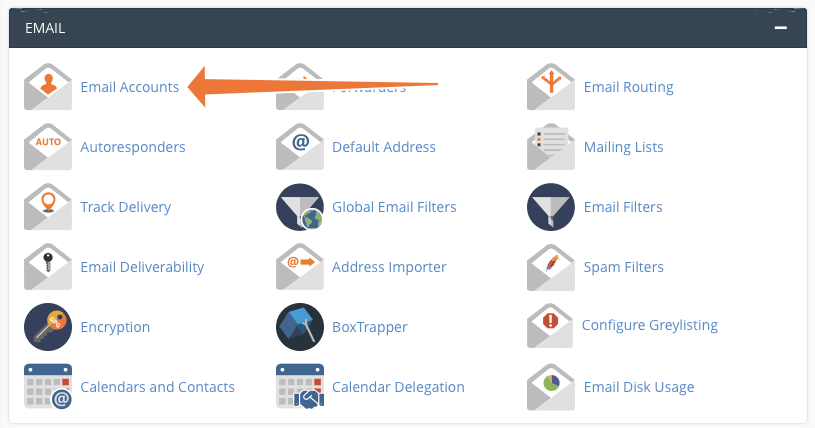
To begin, let's create your new email account. Navigate to the Email Accounts interface within cPanel. You can typically locate this option under the Email section in the main cPanel menu.
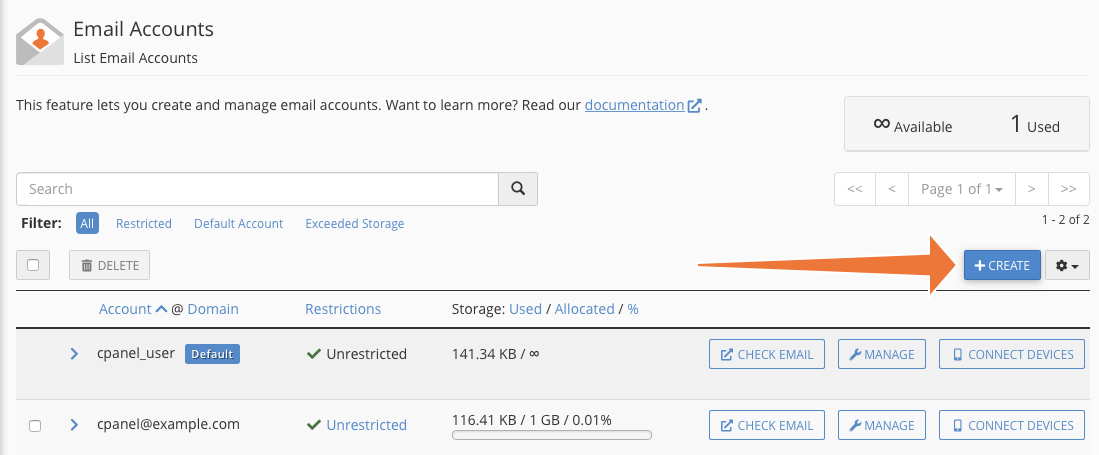
Once on the Email Accounts page, locate and click the "Create" button to initiate the account creation process.
On the subsequent page, you will be prompted to select a domain for the email account, define a unique username (which will form the first part of your email address), and set a strong, secure password. After entering these details, click the "Create" button at the bottom of the page. cPanel will then automatically generate and activate your new email account.
2. Configuring Your Email Client
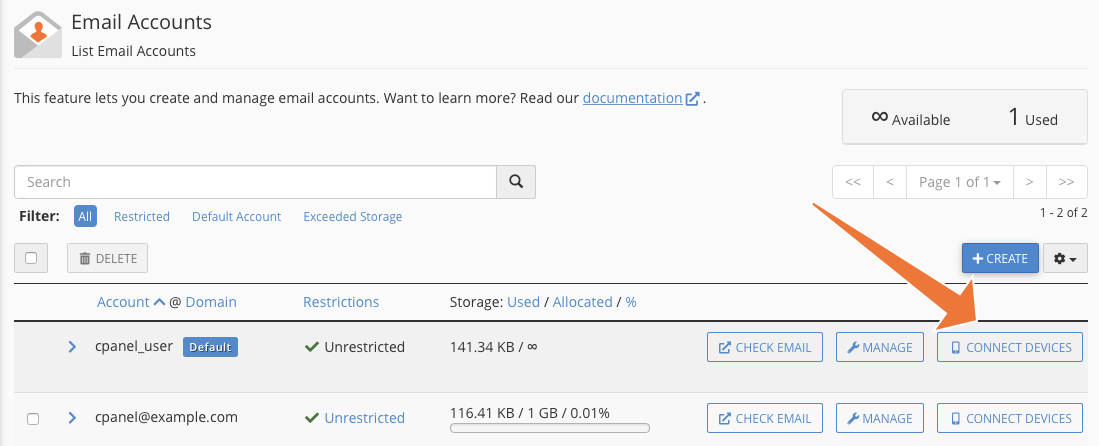
With your email account successfully created, the next crucial step is to configure your email client. This involves providing your client with the information it needs to connect to your server and authenticate securely. All the necessary cPanel SMTP settings are conveniently located in the Connect Devices interface for your new email account.
Within this interface, you will find critical details such as your username (which is your full email address), the URL of the outgoing server, and the corresponding SMTP port number. These are the precise credentials and connection parameters you will need to input into your email application.
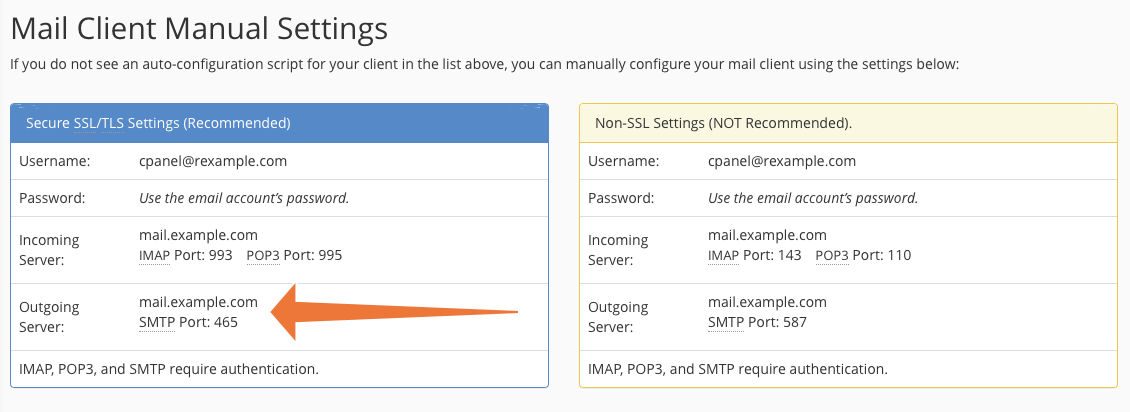
It is paramount to utilize the more secure SSL/TLS settings rather than the less secure Non-SSL options. SSL/TLS encryption ensures that your email communications are protected during transmission, safeguarding your data from potential eavesdropping.
While there is a wide array of email clients available, the general procedure for configuring them to send mail through your server remains largely consistent and user-friendly. For detailed, client-specific setup documentation, you can refer to resources such as the setup guide for Apple Mail on macOS or the comprehensive instructions for Mozilla Thunderbird.
Troubleshooting Common SMTP Errors in cPanel
Ideally, with the steps above completed, you should now be able to send messages seamlessly from your personalized email address via your cPanel-managed server. However, the nature of email communication can sometimes be intricate, and it's not uncommon for misconfigurations to lead to authentication failures or mail delivery problems.
SMTP errors typically manifest as messages that fail to be delivered. When you attempt to send an email, you might receive an immediate bounce-back notification containing a cryptic error message accompanied by a numerical code. In the following sections, we will explore some of the most prevalent SMTP errors encountered by cPanel users and provide clear, step-by-step guidance on how you, or your hosting provider, can effectively diagnose and resolve them.
Error 421: Too Many Concurrent SMTP Connections
The "421 Too Many Concurrent SMTP Connections" error indicates that your mail server, specifically Exim (cPanel's integrated Mail Transfer Agent), has reached its predefined limit for simultaneous SMTP connections. This protective measure is in place to prevent the server from becoming overloaded and ensure stable operation. While the default cPanel setting typically allows for 100 concurrent connections, this threshold might be insufficient for a particularly busy server or during peak email activity.
This connection limit is managed by the smtp_accept_max directive within Exim's configuration file. To adjust this value, you will need to access WHM (WebHost Manager). Navigate to the Exim Configuration Manager, which is located under the Service Configuration section in the WHM sidebar menu.
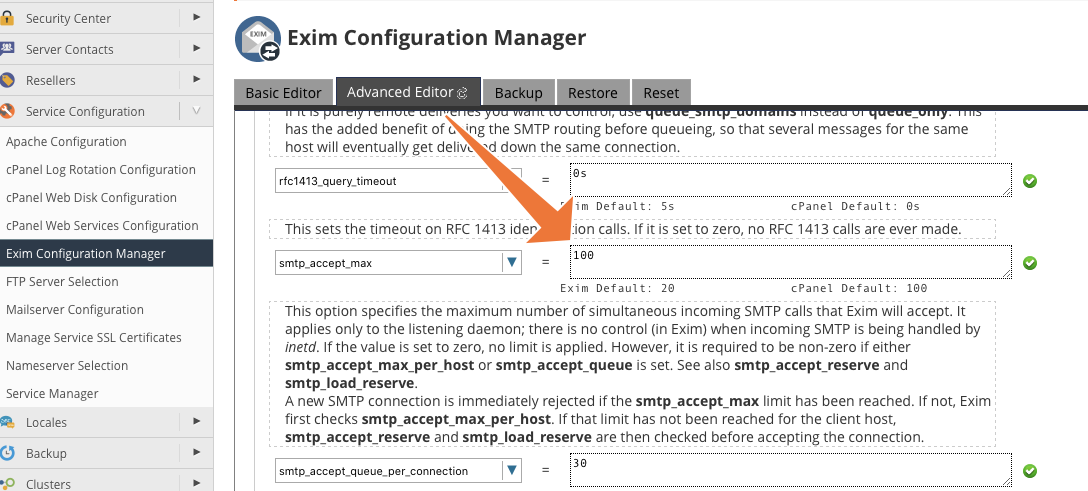
Within the Exim Configuration Manager, select the Advanced Editor tab. Use the search function to locate the smtp_accept_max directive. You can then increase its value upwards to accommodate more concurrent connections. However, it is crucial to exercise caution: setting this value excessively high can lead to the mail server exhausting its available memory resources, potentially causing it to crash or experience severe performance degradation. It's recommended to make incremental adjustments and monitor server performance closely after each change.
Error 550: Please Turn on SMTP Authentication in Your Mail Client
An Error 550 message typically indicates an issue with the SMTP authentication process. For your mail client to successfully send messages, it must provide valid authentication credentials over a secure connection to the mail server. This security measure is crucial; without proper authentication, your server could easily be exploited by spammers. Therefore, the client must unequivocally prove its legitimacy as a sender for the associated account.
Several factors can lead to this authentication failure. Let's explore the most common causes and their respective solutions.
Potential Cause 1: Misconfigured SMTP Client Authentication
One of the most frequent culprits behind an Error 550 is either an incorrect configuration within the email client itself or the use of an outdated client that lacks the necessary capabilities to establish a secure SMTP connection. This scenario is particularly likely if only a select few users are encountering the error.
The most straightforward resolution is to ensure you are using a modern email client and that all SMTP authentication details (username, password, server address, and port) are entered correctly, ideally utilizing SSL/TLS encryption. If upgrading the client or configuring it for standard authentication isn't feasible, WHM provides a useful workaround: the "Pop-before-SMTP" tweak. This setting allows SMTP connections from users who have recently authenticated using either POP or IMAP protocols, which are typically used for retrieving messages from the server.
To enable this tweak, navigate to the Tweak Settings interface, found under Server Configuration in the WHM sidebar menu. Search for "Pop-before-SMTP" and activate the setting.
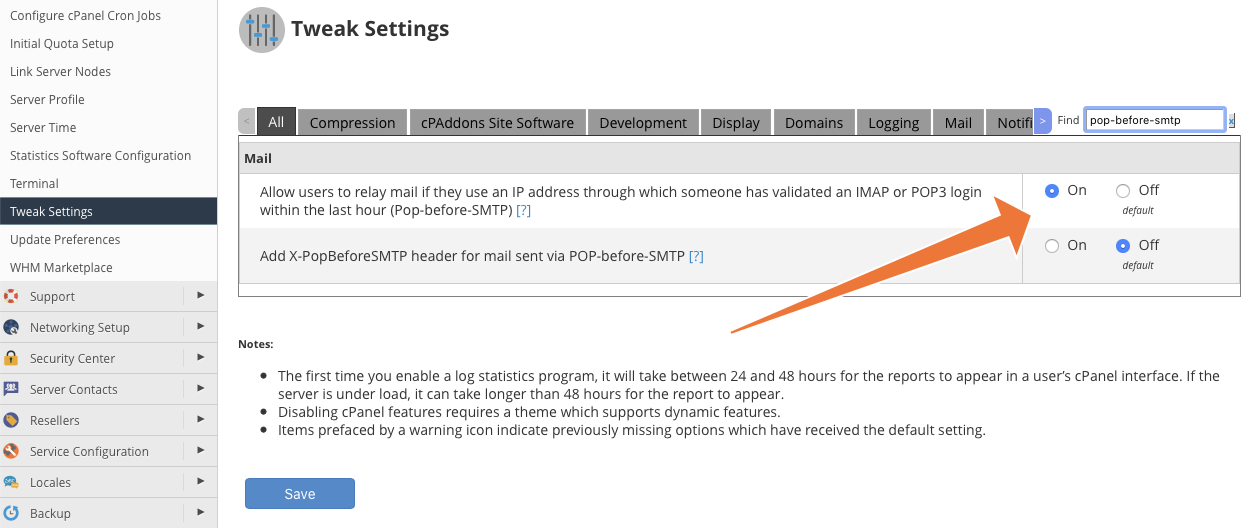
Potential Cause 2: Incorrect Email Routing for the Domain
If users encounter a 550 error when attempting to send an email to an account hosted on your server, the problem often lies with the domain's mail routing configuration. A common reason for this is when the domain is inadvertently configured to use a remote mail exchanger instead of the local one on your server.
To verify and correct this, ensure that emails for the domain are directed to the local mail exchanger. In WHM, go to DNS Functions and select Edit MX Entry. Choose the domain in question and click Edit. On the next screen, confirm that Local Mail Exchanger is selected as the primary mail exchanger.
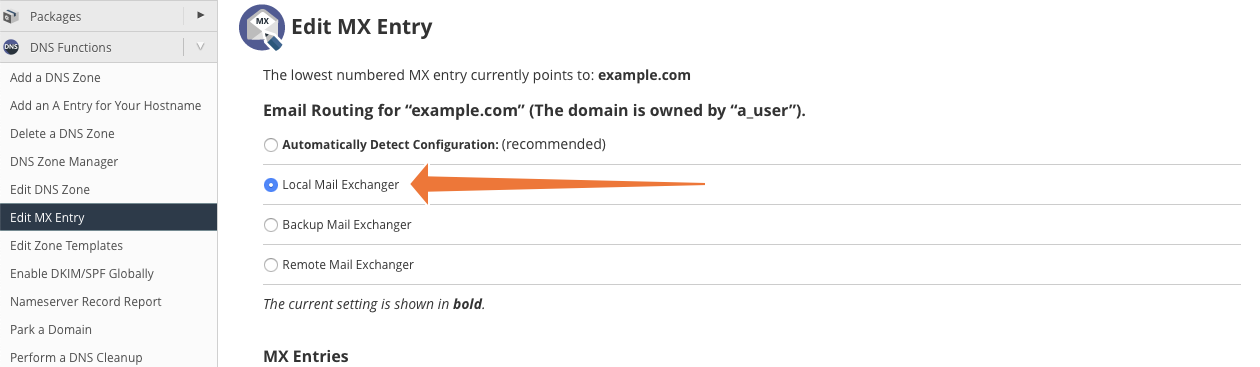
Another related cause can be misconfigured MX (Mail Exchanger) records for the domain. These are specific DNS records that inform other mail servers where to deliver email for your domain. You can utilize command-line tools like "dig" to inspect your domain's MX records and verify that they correctly point to your server's IP address.

In the example above, the 'dig' command is used first to query the MX records associated with a domain, revealing the designated mail servers. Following this, 'dig' is employed again to confirm that the resolved domain names for these MX records correspond to the expected IP address of your mail server. This two-step verification helps confirm proper DNS resolution for email delivery.
While we have covered the most prevalent causes of 550 errors, there are a few less common scenarios. For further in-depth troubleshooting and additional insights, you can consult our dedicated SMTP authentication error troubleshooting tutorial.
Conclusion: Take Full Control of Your Email with cPanel
Email stands as a cornerstone of your brand identity and serves as a critical communication channel with your customers, partners, and colleagues. By opting to host your own email, you gain complete autonomy over your brand's digital presence and the privacy of your valuable data. Thanks to the intuitive and powerful capabilities of cPanel & WHM, the process of setting up, configuring, and effectively managing your private email accounts is simplified, making it more accessible than ever before.
We hope this guide has provided you with the confidence and knowledge to successfully manage your SMTP settings and troubleshoot any potential issues. Should you have any further feedback, questions, or comments, please do not hesitate to reach out. Our community and support channels are readily available to assist you. You can connect with us on Discord, participate in discussions on the official cPanel forums, or engage with our community on Reddit.
