 (1).svg)
 (1).png)


 (1).svg)
.svg)
Cron, a powerful UNIX utility, enables users to execute scheduled tasks on a web server automatically. WordPress incorporates its own simulated cron system, known as WP-Cron, which mirrors the functionality of a traditional UNIX cron. This system is crucial for automating various time-based operations within WordPress, such as checking for core updates, publishing scheduled posts, managing cache, and performing routine maintenance tasks. For any WordPress user, understanding how to effectively schedule and manage WP-Cron events is fundamental to streamlining administrative workflows and maintaining optimal site performance.
This comprehensive article delves into the intricacies of setting up and managing the WordPress cron system. We will explore practical methods using a dedicated plugin and the WP-CLI command-line interface. Furthermore, we will discuss the key advantages and potential drawbacks of utilizing WordPress cron, clarifying how it differs from a conventional server-level UNIX cron job.
Understanding WordPress Cron Jobs
A WordPress cron job refers to the built-in system designed to simulate the functionality of a UNIX cron system. Its primary purpose is to automate the scheduling and execution of various tasks at predefined intervals. Unlike a true server-level cron, WP-Cron operates by triggering these time-based tasks whenever a user visits your WordPress website, initiating a page load. This mechanism is essential for a multitude of automated processes, including the timely publication of scheduled content, routine checks for WordPress core, theme, and plugin updates, clearing cached data, and sending notification emails, thereby ensuring the dynamic and up-to-date operation of your site.
Benefits and Limitations of Using WordPress Cron
The WP-Cron system offers several distinct advantages, particularly for users new to server management. One of its primary benefits is its ease of setup. Unlike traditional UNIX cron jobs, WP-Cron does not necessitate any prior knowledge of complex UNIX commands or direct server access. This accessibility is further enhanced by numerous WordPress cron job management plugins, which provide intuitive interfaces and robust features that simplify the entire setup and monitoring process, making it approachable even for novice users.
By enabling the scheduling of repetitive tasks at customized intervals, WP-Cron significantly reduces manual administrative effort, allowing site owners to allocate more time to content creation and strategic development. Furthermore, a notable advantage of this system is its inherent resilience; it helps prevent data loss or missed tasks even if a scheduled event fails to execute precisely on time, a safeguard that is not inherently present in standard UNIX cron jobs.
However, the WP-Cron system also comes with certain limitations. A significant drawback is that WP-Cron events are executed *only* when a user visits your website, triggering a page load. For WordPress sites with low traffic volumes, this means that scheduled jobs might be skipped or delayed if no user activity occurs within a given timeframe. This can lead to issues such as pending cache buildup, delayed content publication, and ultimately, a negative impact on the site’s load time and overall performance.
Paradoxically, even high-traffic websites that rely heavily on WP-Cron can encounter performance challenges. Such sites are particularly susceptible to race conditions and the accumulation of long-running processes. Race conditions happen when multiple simultaneous visits trigger WP-Cron to execute the same task concurrently. This can lead to an inefficient queue of jobs, causing server strain, increased resource consumption, and a noticeable degradation in site responsiveness.
Managing WordPress Cron Jobs with a Plugin
For many WordPress users, the most straightforward approach to setting up and managing cron jobs is by utilizing a dedicated plugin. These plugins offer a user-friendly interface that abstracts away the complexities of direct code manipulation. For demonstration purposes in this guide, we will refer to a popular and feature-rich free plugin, WP Crontrol. However, you are encouraged to explore other available plugins that best align with your specific requirements and preferences.
Installing a Cron Job Management Plugin
To begin, you’ll need to install and activate your chosen WordPress cron job management plugin. The general steps are as follows:
- From your WordPress admin dashboard, navigate to Plugins → Add New.
- In the search bar, type "WP Crontrol" (or the name of your chosen plugin) and press Enter. Locate the plugin in the search results and click Install Now.
- Once the installation process is complete, click Activate to enable the plugin on your site.
After activation, you can typically view a comprehensive list of all cron jobs currently running on your WordPress site by going to Tools → Cron Events within your dashboard.
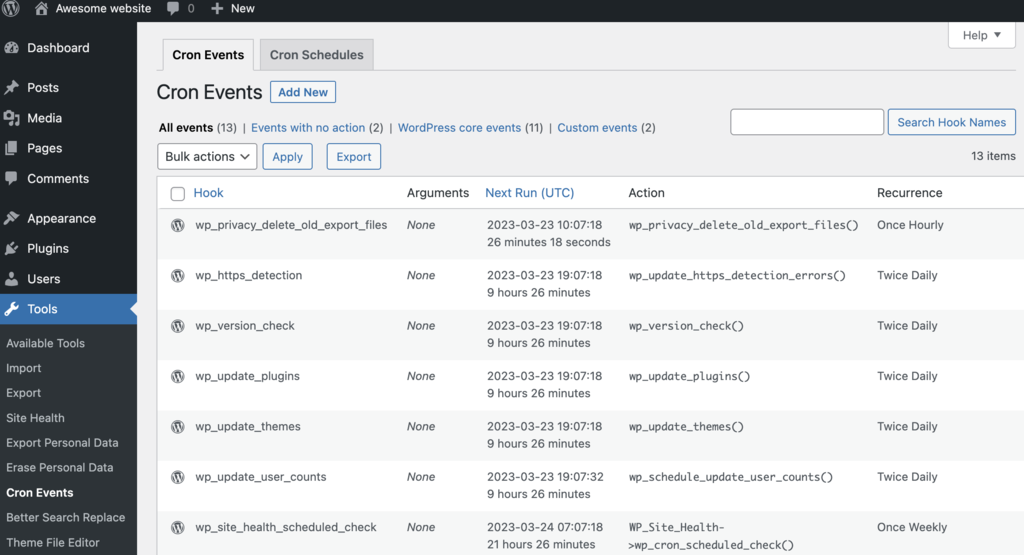
Important Note: It is crucial to refrain from deleting any default WordPress cron jobs, which are often identifiable by a "wp" prefix. Removing these core events can severely disrupt your site's essential functionality and lead to unexpected behavior.
Adding a New Cron Event
With the plugin installed, you can now proceed to create and customize new cron events. Follow these steps to add a new scheduled task:
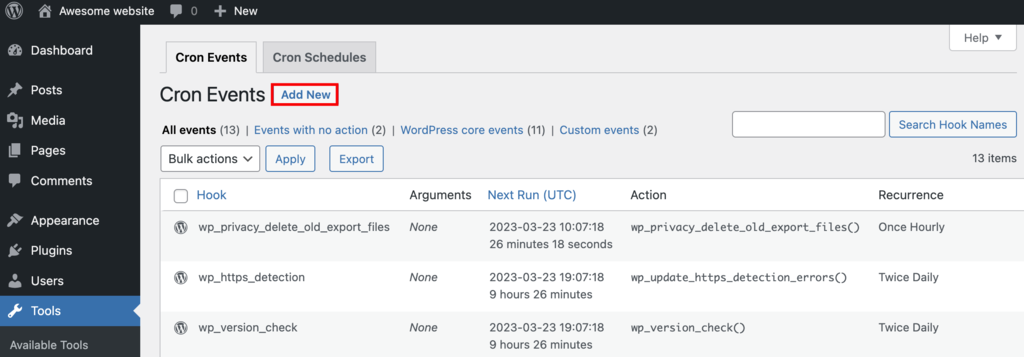
- From the Cron Events sub-menu, locate and click the Add New button, usually found at the top of the page.
- Select the Standard cron event option. You will then need to define a WordPress hook for this new event. Ensure that the hook name adheres to standard PHP naming conventions for consistency and avoid conflicts. Specify the desired run time for the event's first execution and its recurrence interval. The Arguments textbox can typically be left empty unless your specific task requires passing data.
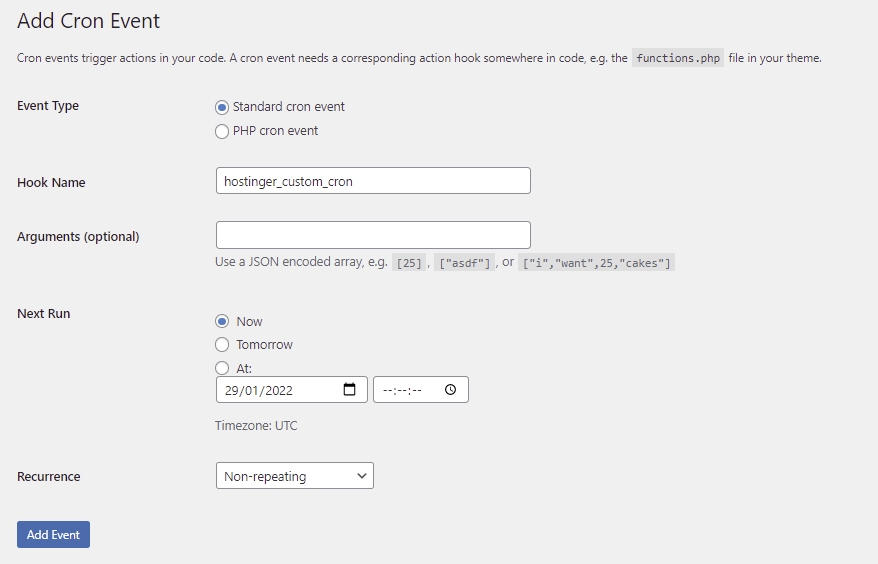
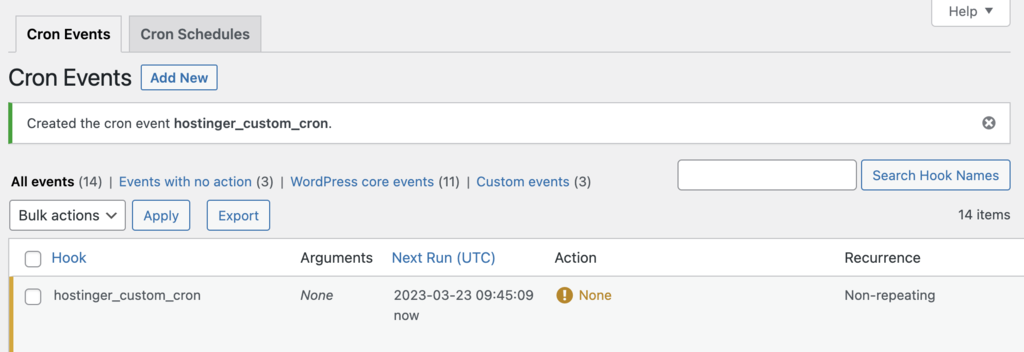
- Click Add Event. If successfully configured, the newly created cron event will appear in the main Cron Events list.
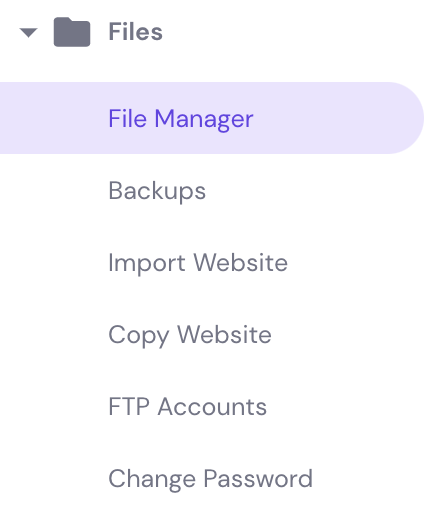
- Once the cron event (with its hook) is defined, the next crucial step is to associate it with an action that will execute when the event is triggered. To do this, access your hosting control panel and open the File Manager, typically found under a "Files" or "Websites" section.
- Navigate to your active theme’s functions.php file, usually located within the theme’s root directory (e.g.,
wp-content/themes/your-theme-name/functions.php). Double-click the file to open it for editing and insert the following code snippet:
add_action( 'your_custom_cron_hook', 'your_custom_cron_function' );
function your_custom_cron_function() {
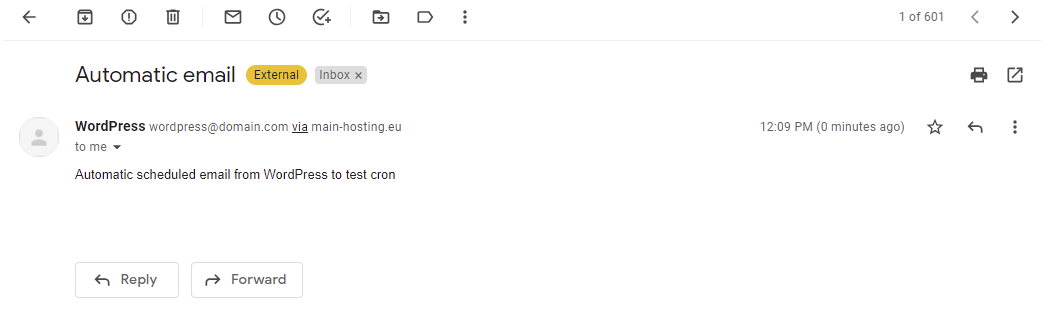
wp_mail( 'recipient@example.com', 'Automated Email Subject', 'This is an automatic scheduled email from WordPress to test the cron event.');
}
In this illustrative example, the wp_mail() function is used to instruct WordPress to send an email when the custom cron event is executed. Remember to replace 'your_custom_cron_hook' with the actual hook name you defined in the plugin, and update 'recipient@example.com' with a valid email address for testing purposes.
Setting Custom Cron Schedules
While most cron management plugins offer a selection of standard time intervals, they also provide the flexibility to define custom scheduling options. This is particularly useful when the default intervals do not precisely meet your task requirements. Here’s how to create a new, custom cron schedule:
- From your WordPress dashboard, go to Settings → Cron Schedules.
- In the Add Cron Schedule section, you will typically find fields to define your new interval. For instance, to create a 10-minute interval, you would set the duration to 600 seconds. Ensure you give your custom interval a descriptive name that adheres to PHP naming conventions.
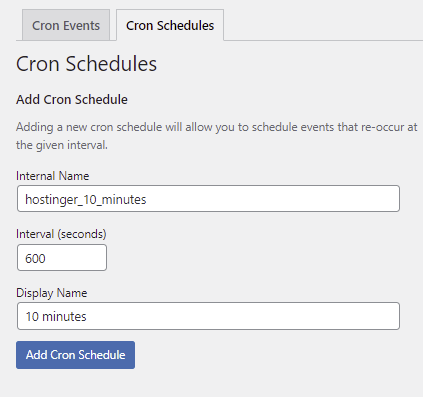
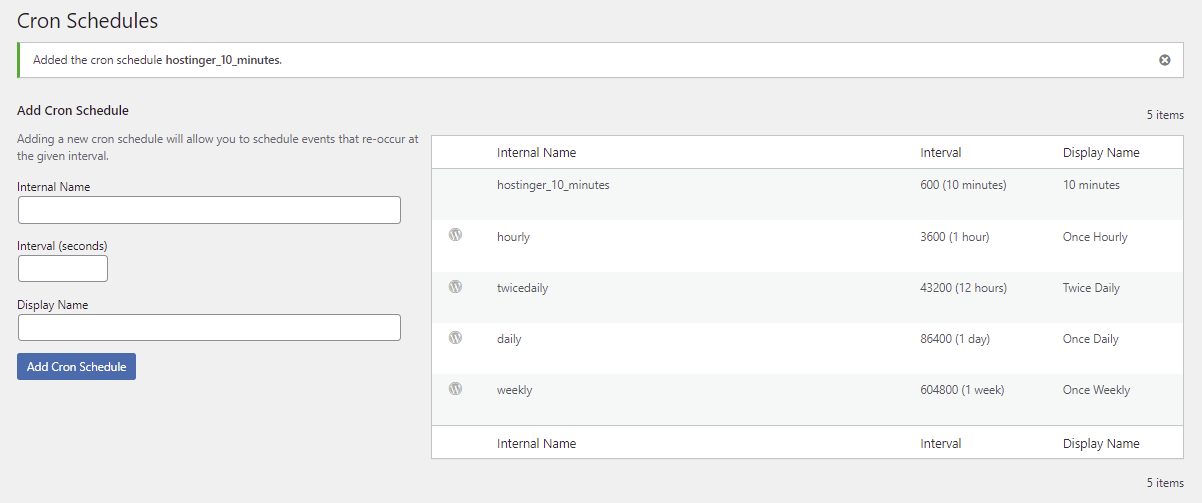
- Click Add Cron Schedule. The newly defined time interval will then be added to the list of available schedules, ready for use with your cron events.
Editing Existing Cron Events
Should you need to adjust the timing or other parameters of an already established cron event, the process is straightforward. This is particularly useful when you've created a custom interval and wish to apply it to an existing task. Here’s how to modify an existing cron event:
- Navigate back to Tools → Cron Events in your WordPress dashboard. Locate the specific cron event you wish to modify and click the Edit option typically displayed below its entry.
- Within the edit screen, open the Recurrence dropdown menu. You can now select your newly created custom interval, such as "10 minutes," or any other available schedule.
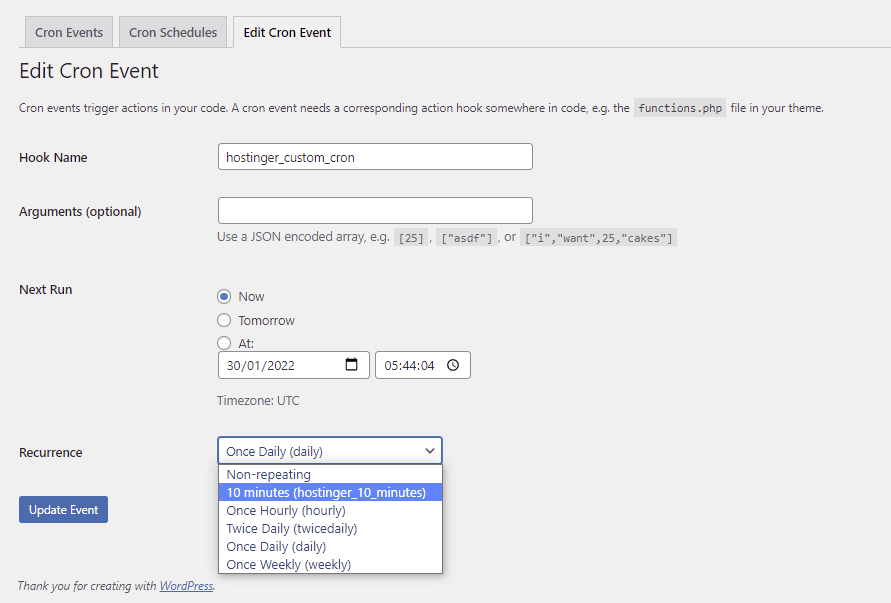
- Finally, click Update Event to save your changes. The cron event will now execute according to its updated schedule.
Setting Up WordPress Cron Jobs with WP-CLI
For those comfortable with command-line interfaces, WP-CLI (WordPress Command Line Interface) offers a robust and efficient alternative for managing WordPress cron jobs. WP-CLI allows you to interact with your WordPress installation directly through text commands, making it an excellent tool for developers and advanced users.
Many managed WordPress hosting plans come with WP-CLI pre-installed, simplifying the setup process. To utilize WP-CLI, you will first need to connect to your hosting account via SSH (Secure Shell). Tools like PuTTY (for Windows) or the built-in terminal (for macOS/Linux) can facilitate this connection.
Once connected via SSH, you can execute various commands to inspect and manage your cron events:
To list all existing cron events scheduled on your WordPress site, use the following command in your terminal:
wp cron event list
This command provides a detailed overview of all scheduled tasks, including their hooks, next run times, and recurrence intervals. To discover other available commands and functionalities related to WP-Cron management via WP-CLI, you can use the help command:
wp help cron
Exploring WP-CLI commands can significantly enhance your ability to diagnose, add, and remove cron events with precision and speed, offering a powerful layer of control over your WordPress site's automated processes.
Implementing a Server-Level Cron Job
While WP-Cron offers convenience, relying solely on it can sometimes introduce performance bottlenecks or be less reliable for critical tasks, especially on sites with fluctuating traffic. WordPress utilizes the wp-cron.php file to manage its scheduled tasks. Although this system ensures cron jobs run irrespective of the operating system, it operates only on page load. This "on-demand" execution can lead to missed schedules on low-traffic sites and create resource strain or even security vulnerabilities on high-traffic sites, potentially conflicting with caching mechanisms. To mitigate these issues and achieve more precise scheduling, many developers opt to disable WP-Cron and implement a server-level (or "real") cron job.
Before configuring a server-level cron, the first essential step is to disable the default WordPress cron functionality to prevent duplicate task execution. To do this, add the following line of code to your wp-config.php file. This line should typically be placed just above the comment that reads "/* That’s all, stop editing! Happy blogging. */":
define( 'DISABLE_WP_CRON', true );
With WP-Cron disabled, the next step involves setting up a server-level cron job to periodically trigger the wp-cron.php file, ensuring that WordPress's core scheduled tasks continue to run. The exact procedure for setting up a server-level cron job can vary significantly depending on your hosting provider or server environment. However, the general approach often involves accessing a "Cron Jobs" section within your hosting control panel.
- Access your hosting control panel (e.g., cPanel, Plesk, or a custom panel) and locate the Cron Jobs interface, typically found under an "Advanced" or "Tools" section.
- Within the cron job setup area, you will usually find a field for the "Command to run." Here, you will add a command that instructs your server to execute the WordPress cron script. A common command structure using
wgetis:
wget -O /dev/null -o /dev/null https://yourdomain.com/wp-cron.php?doing_wp_cron
Important: Replace https://yourdomain.com with the actual URL of your WordPress website.
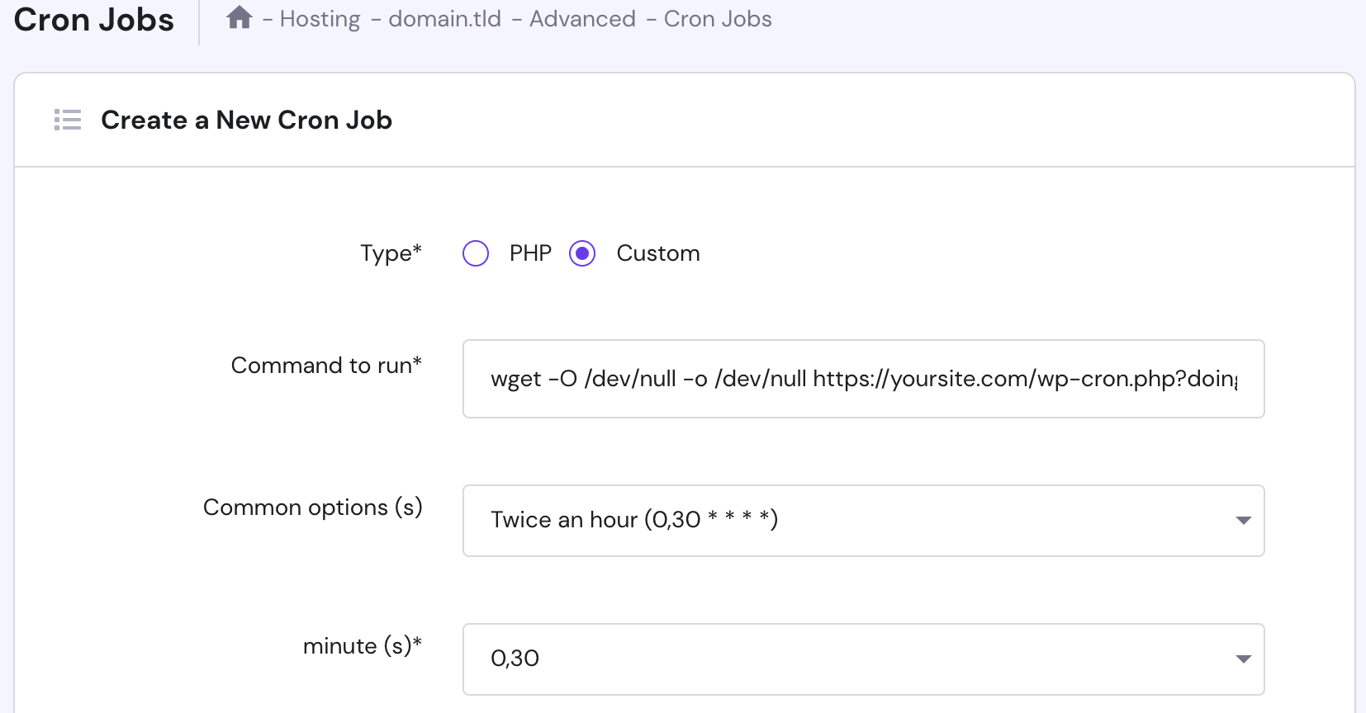 Most control panels provide predefined interval options for cron jobs, allowing you to select how frequently the command should run. A common and recommended starting interval for WordPress core tasks is twice an hour, or every 30 minutes.
Finally, click Save or "Add Cron Job" to implement your new server-level cron job. This ensures that WordPress's background tasks are now triggered reliably by the server, independent of website traffic.
Most control panels provide predefined interval options for cron jobs, allowing you to select how frequently the command should run. A common and recommended starting interval for WordPress core tasks is twice an hour, or every 30 minutes.
Finally, click Save or "Add Cron Job" to implement your new server-level cron job. This ensures that WordPress's background tasks are now triggered reliably by the server, independent of website traffic.
Conclusion
The WordPress cron job system provides a convenient and essential mechanism for automating various tasks at custom time intervals, playing a critical role in maintaining an active and efficient website. While WP-Cron offers ease of use and accessibility, particularly for beginners, it is important to be aware of its inherent disadvantages, such as reliance on page loads and potential performance issues on both low and high-traffic sites. Understanding these nuances and knowing how to effectively utilize this utility—whether through a dedicated plugin, WP-CLI, or by transitioning to a server-level cron job—empowers you to perform administrative tasks more efficiently and ensure the smooth operation of your WordPress installation.
This article has aimed to provide a clear understanding of WordPress cron job functionality and offered practical guidance on its setup and management. By applying these methods, you can optimize your site's automated processes, contributing to better overall performance and user experience.
Frequently Asked Questions About WordPress Cron
What is the difference between WP-Cron and a server-level Cron?
WP-Cron is WordPress's built-in, web-based scheduler that mimics a traditional UNIX cron system. The fundamental difference lies in their trigger mechanisms: WP-Cron events are initiated only when a user visits your WordPress site, causing a page load. In contrast, a true server-level cron (UNIX cron) operates independently of website traffic, running precisely at predefined intervals (e.g., every minute) directly from the server, ensuring more consistent and reliable task execution.
Should I use a server-level Cron or WP-Cron?
For running WordPress's essential core tasks and light-duty automation on low-traffic sites, WP-Cron is generally sufficient and easier to set up. However, if your website experiences significant traffic, or if you need to execute resource-intensive tasks, frequent custom jobs, or require precise timing, transitioning to a server-level cron job is highly recommended. A server-level cron reduces server load by preventing race conditions and ensures tasks run reliably, leading to improved site performance and stability.
How do I stop a cron job in WordPress?
To stop a cron job in WordPress, you have a few options. If using a plugin like WP Crontrol, you can navigate to the "Cron Events" section and delete or disable the specific event. Alternatively, if the cron job was set up via code (e.g., in your theme's functions.php), you would remove the associated wp_schedule_event() or add_action hook. For WP-CLI users, you can delete a specific cron event using its hook name with the following command:
wp cron event delete [hook_name]
Remember to replace [hook_name] with the actual hook of the cron job you wish to remove.
Where can I find cron jobs in WordPress?
You can locate cron jobs in WordPress through several avenues. The most common method for users is via a dedicated cron management plugin, such as WP Crontrol or Advanced Cron Manager, which list all scheduled events in your dashboard. For server-level cron jobs, you would typically find their configurations within your hosting control panel (e.g., cPanel, Plesk) under a "Cron Jobs" or "Scheduled Tasks" section. Programmatically, custom cron schedules and events are often defined in your theme's functions.php file or within custom plugin files using functions like wp_schedule_event().
How do I run a cron job in WordPress?
To manually trigger or set up a cron job in WordPress, several methods are available. Programmatically, you can use the wp_schedule_event() function within your theme's functions.php file or a custom plugin to define new scheduled events. For a more user-friendly approach, plugins like WP Crontrol or Advanced Cron Manager provide intuitive interfaces to create, modify, and even manually run cron jobs directly from your WordPress admin dashboard. For server-level cron jobs, you would configure a command in your hosting control panel to periodically execute the wp-cron.php file, ensuring background tasks are processed reliably.
