
 (1).svg)
 (1).png)


 (1).svg)
.svg)
This comprehensive guide details the various methods for accessing your server or hosting account interfaces, including cPanel, WHM, Webmail, and the Command Line Interface (CLI).
Logging into Your Interfaces
Note: Throughout this document, we use the following examples:
198.51.100.1represents a server’s example IP address.example.comrepresents a server’s example domain address.
To begin, select the interface you wish to access:
- cPanel
- WHM
- Webmail
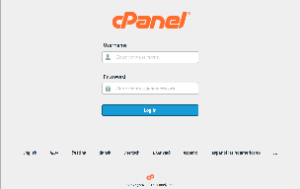
To log in to the cPanel interface, follow these steps:
- Enter your server's IP address or domain name followed by the
2083service port into your web browser. For example:https://198.51.100.1:2083orhttps://example.com:2083. - Enter your cPanel username in the designated Username text box.
- Enter your password in the Password text box.
- Click Log in to access your cPanel dashboard.
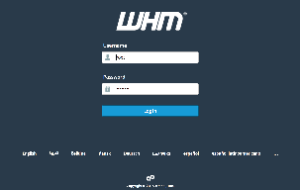
To access the WHM interface, follow these steps:
- Enter your server's IP address or domain name followed by the
2087service port into your web browser. For example:https://198.51.100.1:2087orhttps://example.com:2087. - Enter your WHM username in the Username text box.
- Enter your password in the Password text box.
- Click Log in to proceed to the WHM interface.
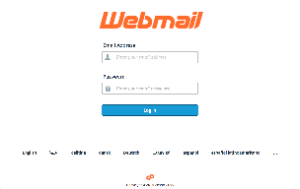
To log in to the Webmail interface, follow these steps:
- Enter your server's IP address or domain name followed by the
2096service port into your web browser. For example:https://198.51.100.1:2096orhttps://example.com:2096. - Enter your full email address in the Email Address text box.
- Enter the password associated with your email account in the Password text box.
- Click Log in to access your Webmail account.
Note: On each login interface, you will find an option below the Log in button to select your preferred locale (language). This allows you to interact with the interface in your chosen language.
Understanding Service URLs
A service URL for accessing interfaces like cPanel, WHM, and Webmail comprises several key sections, each serving a specific purpose in establishing a secure connection to your server.
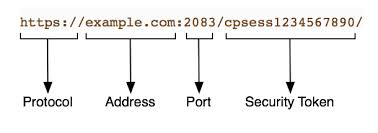
| Section | Description | Example |
|---|---|---|
| Protocol | This indicates the communication method your browser uses to connect with the remote server. Our services utilize the https protocol, which provides secure communication over an encrypted connection. An encrypted SSL connection ensures that your username and password are not transmitted in plain text, protecting your credentials. |
https:// |
| Address | The address specifies the remote server you intend to access and can be either an IP address or a domain name. When using a domain name to access services, it is crucial to ensure that the domain’s Domain Name System (DNS) record has fully propagated across the internet.
|
example.com |
| Port number | This numerical identifier specifies the particular port that the service uses. You must include a port number to successfully access these services. To specify a port, append a colon (:) followed by the port number to the address. |
2083 |
| Security token | A security token is a unique identifier that the server appends to your session’s URL. These tokens are vital for preventing unauthorized access through Cross-Site Request Forgery (XSRF) attacks. Security tokens typically contain the string cpsess followed by a 10-digit number. |
cpsess1234567890 |
For more detailed information regarding connections to various interfaces, you may refer to our documentation on configuring your firewall for these services.
External Authentication Methods
Many hosting providers offer the convenience of accessing cPanel or Webmail using external authentication credentials, such as cPanelID, Google® Accounts, or Facebook®. This feature significantly simplifies your login experience by reducing the number of passwords you need to manage for various services.
Important Considerations:
- You can link one or more external accounts to multiple cPanel, WHM, and reseller accounts.
- If enabled, you must complete two-factor authentication (2FA) for both your identity provider and the server itself.
Enhancing Security with Two-Factor Authentication (2FA)
Two-factor authentication (2FA) adds an essential layer of security to your accounts by requiring an additional verification step during login. When 2FA is enabled, users must provide a unique, time-sensitive six-digit security code generated by an authenticator application to complete the login process.
Note: 2FA supports only one active session per user at a time. If you have multiple browser windows open to any of our interfaces and log out from one, the system will automatically log out all other active sessions for that user.
Detailed Access Guides
Accessing the cPanel Interface
To access your cPanel interface, you will need an active cPanel account. Once you have your account details, navigate to your server's IP address or domain followed by the 2083 port in your web browser. For example:
https://198.51.100.1:2083— Access cPanel securely over an encrypted connection using your IP address.https://example.com:2083— Access cPanel securely over an encrypted connection using your domain name.
You can log in using one of the following methods:
Using Your cPanel Account
To log in with your primary cPanel account credentials, follow these steps:
- Enter your cPanel username in the Username text box.
- Enter your cPanel password in the Password text box. If you have forgotten your password, you may reset it or contact your hosting provider for assistance.
- Click Log in. You will then be directed to the cPanel dashboard.
If your account has two-factor authentication (2FA) enabled, additional steps are required:
- Open your preferred 2FA application on your smartphone or device to generate the six-digit security code.
- Enter the provided six-digit security code into the designated field.
- Click Continue to complete the login.
Using External Authentication for cPanel
To log in using an external identity provider, perform the following actions:
- Select the external authentication identity provider you wish to use from the available options.
- If prompted, you will be redirected to the identity provider’s login page. Enter your authentication credentials for that provider.
- Authorize the provider to log in to the server, if required, by following the on-screen prompts.
The cPanel login interface will then confirm your successful authentication with the external provider.
- If you have previously linked this identity provider to a single cPanel account, the interface will automatically log you in.
- If you have linked the provider to multiple cPanel accounts, a selection interface will appear. From here, you can choose the desired cPanel account or opt to link another cPanel account.
- If the identity provider is not yet associated with any cPanel account, you will see a message similar to this:
Your account is not associated with an existing "cPanel" account. Please log in to connect the account.To link the external account, enter your cPanel username and password and then log in. This action will establish the link between your external account and your cPanel account.
Accessing the WHM Interface
To access the WHM interface, enter your server's IP address or domain name followed by the 2087 port in your web browser. For instance:
https://198.51.100.1:2087— Access WHM securely over an encrypted connection using your IP address.https://example.com:2087— Access WHM securely over an encrypted connection using your domain name.
Note: To log into WHM, you must have either root access or reseller privileges on the server.
You can log in using one of the following methods:
Using Your WHM Account
To log in with your WHM account credentials, follow these steps:
- Enter your WHM username in the Username text box.
- Enter your password in the Password text box.
- Click Log in. The WHM Home interface will then be displayed.
If your account has two-factor authentication (2FA) enabled, proceed with these additional steps:
- Open your preferred 2FA application on your smartphone or device to retrieve the six-digit security code.
- Enter the generated six-digit security code into the designated field.
- Click Continue to proceed with your login.
Using External Authentication for WHM
To log in via an external authentication provider, follow these steps:
- Click the button corresponding to your external authentication identity provider.
- If required, you will be directed to the provider’s login interface. Enter your authentication credentials for that provider.
- Authorize the provider to log in to the server, if necessary, by following the instructions.
The WHM login interface will then confirm your successful authentication with the provider.
- If you have already linked this identity provider to a single WHM account, the interface will log you in automatically.
- If you have linked the provider to multiple WHM accounts, a new interface will appear, allowing you to select the desired WHM account or to link another account.
- If the identity provider is not yet associated with an existing WHM account, you will encounter a message similar to this:
Your account is not associated with an existing "WHM" account. Please log in to connect the account.To link the external account, enter your WHM username and password and then log in to your server. This action will link the external provider to your WHM account.
Logging in with the whmlogin Script
The /usr/local/cpanel/scripts/whmlogin script generates a secure, single-use session login URL for WHM. To access WHM using this method, perform the following steps:
- Utilize SSH to access the server as the
rootuser. - Execute the
/usr/local/cpanel/scripts/whmloginscript. The output will resemble the following example:https://198.51.100.1:2087/cpsess1234567890/login/?session=root%3aAqI0aGGAFWI_Mab_%3acreate_user_session%2c31cd420f0fd6aca696a2890f580f2f0a - Copy and paste the provided URL into your web browser. The WHM Home interface will then appear.
Accessing Your Webmail Interface
You have two primary ways to access your Webmail: directly through your web browser or by logging in via the cPanel interface.
Direct Webmail Access
To access Webmail directly, input your server's IP address or domain name followed by the 2096 port into your preferred web browser. For example:
https://198.51.100.1:2096— Access your Webmail account securely over an encrypted connection using your IP address.https://example.com:2096— Access your Webmail account securely over an encrypted connection using your domain name.
You can log in using one of the following methods:
Using Your Webmail Account
To log in with your Webmail account credentials, follow these steps:
- Enter your full email address (username) in the Username text box.
- Enter your email account's password in the Password text box.
- Click Log in. The Webmail interface will then be displayed.
Using External Authentication for Webmail
To log in using an external authentication provider, follow these steps:
- Click the button corresponding to your desired external authentication identity provider.
- If necessary, you will be redirected to the provider’s login interface. Enter your authentication credentials for that provider.
- Authorize the provider to log in to the server, if required.
The Webmail login interface will then confirm your successful authentication with the provider.
- If you have already linked this provider to a single Webmail account, the interface will automatically log you in.
- If you have linked the provider to multiple Webmail accounts, a new interface will appear, allowing you to select the desired Webmail account or to link another account.
- If the identity provider is not yet associated with an existing Webmail account, you will see a message similar to this:
Your account is not associated with an existing "Webmail" account. Please log in to connect the account.To link the external account, enter your Webmail username and password and then log in. This action will establish the link between the external provider and your Webmail account.
Accessing Webmail from the cPanel Interface
You can also conveniently access Webmail directly from within your cPanel interface by performing these steps:
- Navigate to cPanel’s Email Accounts interface (typically found under cPanel » Home » Email » Email Accounts).
- In the row corresponding to the email account you wish to access, click Check Email in the actions column. This will directly open the Webmail interface for that account.
Command Line Interface (CLI) Access via SSH
For many advanced system administration tasks and certain website management functions, direct access to the server's command line interface (CLI) is necessary. This is typically achieved using SSH (Secure Shell). For comprehensive instructions on how to establish an SSH connection and log in to the command line, please refer to our dedicated documentation on accessing the command line.
Customizing Your Login Interface Locale
The login interface allows you to change its default language, or locale, to better suit your preferences. To do this, simply click the name of your desired locale located at the bottom of the interface. If your language is not immediately visible, click the ... option to view a complete list of all available locales. Once you select a new locale, the login interface will refresh and display in the chosen language.
Important Locale Notes:
- If your browser transmits an
Accept-Languageheader, the login interface will attempt to use the locale that corresponds to your browser's settings. If the requested locale is unavailable, the interface will default to English.- When you change the locale, the interface sets a cookie in your browser that remains active for one year. You will need to reset the locale if you log in from a new browser, clear your browser’s cookies, or after the one-year cookie expiration period.
Troubleshooting Login Security Messages
Occasionally, when attempting to log in to cPanel, WHM, or Webmail, you might encounter a security warning message such as There is a problem with this website's security certificate.
For detailed information and guidance on how to resolve this type of security message, please consult our documentation on automatic hostname SSL certificate replacement.
