
 (1).svg)
 (1).png)


 (1).svg)
.svg)
Effective email management is crucial in today's digital landscape, and cPanel offers robust tools to simplify this process. Configuring email aliases, forwarders, and autoresponders can significantly streamline how individuals and organizations handle their electronic correspondence, especially when managing multiple email addresses or domains. This comprehensive guide provides a step-by-step walkthrough on setting up and utilizing these powerful cPanel features, covering their creation, removal, and advanced functionalities such as autoresponders and domain-wide forwarding.
What Are Email Forwarders?
An email forwarder is a fundamental feature within cPanel designed to automatically redirect incoming emails from one specified email address to another. When an email is sent to the initial address, it is immediately and seamlessly routed to the designated forwarding address, ensuring no message is missed.
Email forwarders offer immense value for anyone managing numerous email accounts and aiming to consolidate their communication streams. Consider, for example, a scenario where you maintain separate email addresses for distinct purposes, such as sales inquiries, technical support, and personal communications. By configuring forwarders, all emails directed to these individual accounts can be channeled into a single, centralized mailbox. This consolidation dramatically simplifies email administration, allowing you to efficiently monitor and respond from one primary account rather than constantly checking several different inboxes. It enhances responsiveness and reduces the administrative burden of email management.
Understanding Email Aliases
While similar to a forwarder, an email alias introduces a crucial distinction: it enables both the receipt and sending of emails using the alias address. In essence, an alias acts as an alternative email address that shares the same inbox, sent items, drafts, and trash folders as your main, primary email account.
Email aliases are particularly advantageous for organizations that require multiple public-facing email addresses for various departmental functions, such as 'info@yourdomain.com' or 'contact@yourdomain.com', without the need to create and manage separate, full-fledged email accounts for each. This approach not only significantly streamlines the overall email management process but also fosters a professional and consistent image in all outbound communications.
Key Benefits of Email Forwarders and Aliases
Utilizing email forwarders and aliases brings several significant advantages, enhancing overall email productivity and organization:
- Enhanced Efficiency: By consolidating incoming and outgoing emails, you can drastically reduce the time spent checking multiple inboxes, allowing for more focused and productive work.
- Improved Organization: These tools help maintain a tidy and structured email environment, minimizing the chances of overlooking critical messages and ensuring timely responses.
- Unmatched Convenience: Facilitate seamless collaboration by easily redirecting specific emails or entire departmental communications to relevant team members or departments as required, ensuring information reaches the right person promptly.
Comprehensive Guide to Creating an Email Forwarder or Alias
The ability to create an email forwarder or alias is a robust functionality that automates the redirection of emails from one address to another. This feature proves exceptionally valuable in numerous situations, such as ensuring that customer inquiries are received by multiple team members simultaneously, or when you wish to manage several email addresses effectively without the burden of monitoring numerous separate inboxes. This section will guide you through the process of setting up an email forwarder or alias within your cPanel interface.
It is important to note that an email forwarder or alias does not store email messages itself. Instead, it acts as a redirector, seamlessly routing incoming messages to a different, designated email address. This characteristic makes it an exceedingly efficient tool for streamlined email management, helping to prevent inbox clutter and ensure timely delivery.
Step 1: Accessing Your cPanel Account
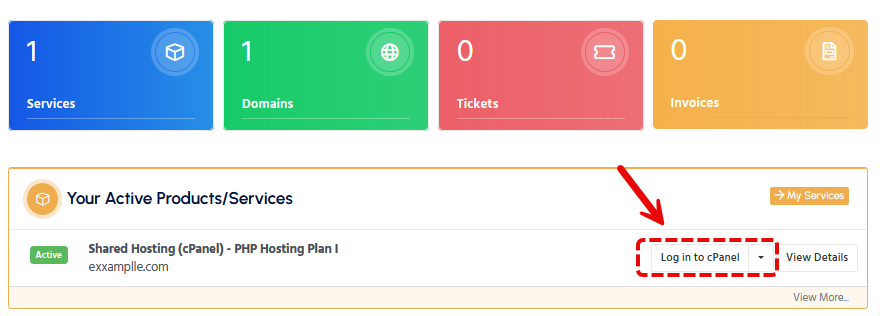
The initial step involves logging into your cPanel account. Typically, you can access your cPanel dashboard directly through your web hosting provider's client area. Once logged in, navigate to the section designated for your hosting services or accounts, where you will find the direct link to log into cPanel. This ensures you have the necessary administrative access to configure email settings.
Step 2: Locating the Email Forwarders Section
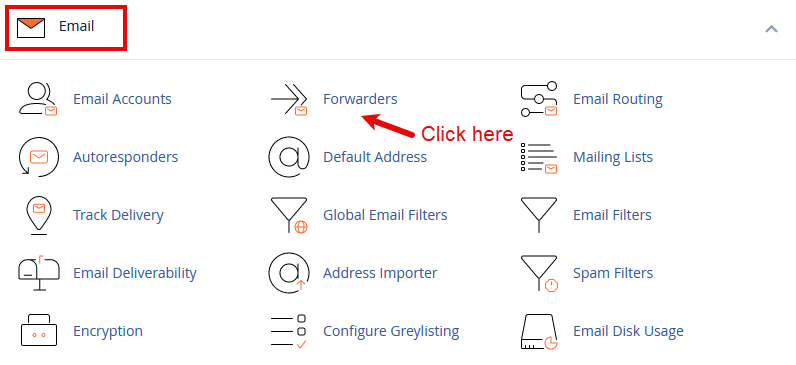
After successfully logging into your cPanel interface, scroll through the main dashboard until you locate the 'Email' section. Within this section, click on the 'Forwarders' option. This action will direct you to the dedicated page where you can view, create, and manage all existing and new email forwarders for your domain.
Step 3: Initiating the Creation of a New Forwarder
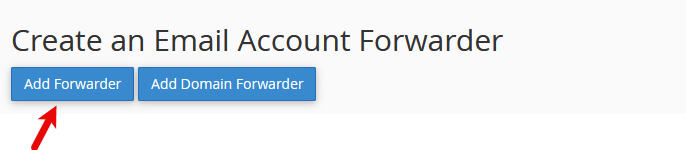
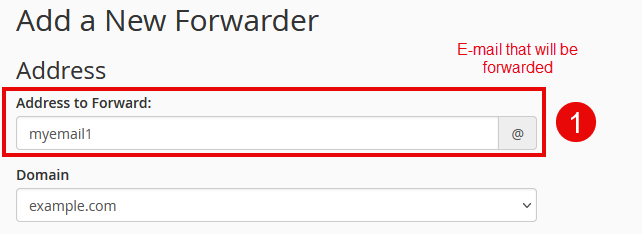
On the 'Forwarders' page, click the 'Add Forwarder' button to begin the setup process. You will then be prompted to specify the email address from which you wish to forward emails. For instance, if your goal is to forward all emails sent to 'info@yourdomain.com', you would simply type "info" into the designated input field and select your domain from the adjacent dropdown menu. This defines the source address for the forwarding rule.
Important Consideration: Before finalizing, verify that the email address for which you are establishing a forwarder does not already exist as a standalone mailbox. If it does, and this is not your explicit intention, emails will be received by both the mailbox and the forwarded destination, potentially leading to confusion or duplicate messages. Ensure your setup aligns with your desired email flow.
Step 4: Defining the Forwarding Destination
Within the 'Destination' field, you are required to enter the email address to which all incoming messages should be redirected. This destination can be any legitimate email address, irrespective of whether it belongs to your domain or an external service provider like Gmail or Outlook. This flexibility allows for broad consolidation of your email communications.
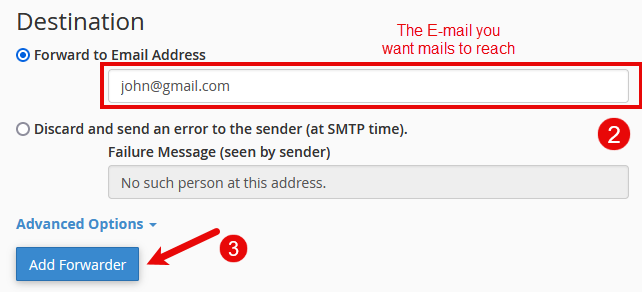
Once the forwarding address has been accurately entered, click the 'Add Forwarder' button to finalize the configuration. Upon successful completion, the newly established forwarder will appear in the list on the 'Forwarders' page, confirming its active status. You have now successfully created an email forwarder or alias, and all emails sent to the original address will henceforth be automatically routed to your specified destination. Following creation, you can review the forwarder's specifics, including its name, the target email address, and available options for tracing or deleting the forwarder.
Important Considerations and Best Practices
Prudent Usage: While email forwarders and aliases are undeniably potent tools for email management, their implementation requires careful consideration. Excessive or poorly managed use can inadvertently result in confusion, missed communications, or even a breach of privacy. Furthermore, it is crucial to ensure that any forwarded emails comply with relevant privacy policies and anti-spam regulations to avoid legal or deliverability issues.
To maximize the benefits and avoid potential pitfalls, consider the following best practices:
- Data Privacy: Always be acutely aware of who will have access to forwarded emails, particularly within a professional or business environment. Safeguarding sensitive information is paramount.
- Spam Filter Avoidance: Configure your forwarding rules thoughtfully to prevent them from inadvertently triggering spam filters. Incorrect setups can cause legitimate, important emails to be flagged as spam or outright blocked, leading to critical communication failures.
- Ongoing Organization: Periodically review and update your email forwarding and alias configurations. Align these settings with your evolving communication requirements to ensure continued efficiency and relevance.
How to Delete an Email Alias in cPanel
Should your communication needs change, you may find it necessary to remove an existing email alias. Follow these clear steps to effectively delete an email alias from your cPanel account:
- Log in to cPanel: Begin by accessing your cPanel dashboard. You will typically do this through your web hosting provider's client portal by entering your username and password.
- Navigate to the Email Section: Once inside cPanel, locate the 'Email' section and then click on the 'Forwarders' option. This area provides access to all your email alias and forwarder configurations.
- Identify the Alias for Deletion: On the 'Forwarders' page, a comprehensive list of all your active email aliases will be displayed. Carefully identify the specific alias you intend to remove.
- Execute the Deletion: Adjacent to the email alias you wish to delete, you will find a 'Delete' option. Click on this option, and a confirmation prompt will appear. Confirm the deletion to proceed.

Critical Warning: It is imperative to understand that once an email alias is deleted, any emails sent to that address will no longer be forwarded or delivered. Before proceeding with deletion, meticulously verify that the alias is no longer required and that its removal will not disrupt critical communication flows.
Upon the successful deletion of an email alias, it is a recommended best practice to confirm that your overall email setup continues to function as anticipated. If the removed alias was previously routing important emails, ensure that all relevant records are updated and that any affected parties are promptly notified of the change to maintain uninterrupted communication. By taking these precautions, you effectively streamline your email management processes.
Setting Up Domain-Wide Email Forwarding
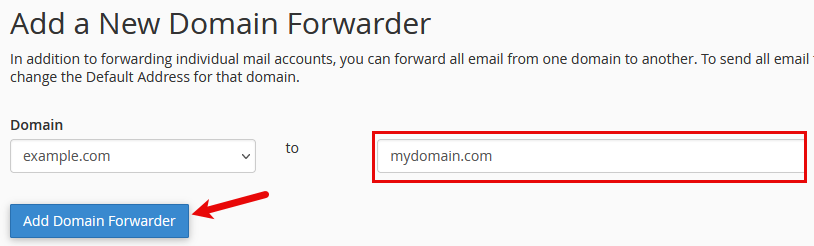
For users overseeing multiple domains, cPanel provides a highly convenient feature to forward all emails from an entire domain to another specified domain. This capability is exceptionally useful for consolidating email communications originating from various domain names into a single, unified inbox, simplifying management significantly. To configure domain-wide email forwarding, follow these steps:
- Within the 'Forwarders' section of your cPanel dashboard, locate and select the 'Domain Forwarders' option.
- You will then be prompted to choose the specific source domain from which you intend to forward all emails.
- Next, enter the target domain name. This is the destination domain where all emails from the source domain will be redirected.
- Finally, confirm your selections to apply the domain-wide forwarding rule. This crucial step ensures that every email sent to any address associated with the original domain will be automatically and consistently redirected to the corresponding address at the designated target domain, maintaining a seamless flow of communication.

Introducing Email Autoresponders
An autoresponder is an automated email message designed to be sent instantaneously in reply to an incoming email. This feature proves exceptionally beneficial for various communication needs, such as providing immediate notification to senders that you are currently out of the office, on vacation, or simply confirming that their message has been successfully received and will be addressed in due course. Autoresponders ensure that senders receive prompt acknowledgment, enhancing professionalism and managing expectations.
Configuring Autoresponders for Email Aliases
Step-by-Step Autoresponder Setup
To effectively configure autoresponders for your email aliases within cPanel, follow these detailed instructions:
- Access cPanel Dashboard: Your initial step involves logging into your cPanel dashboard. This is typically done through your web hosting provider's client area, where you can find the link to your hosting account.
- Navigate to Forwarders: Once inside the cPanel dashboard, locate the 'Email' section and proceed to click on 'Forwarders'. This dedicated area is where you manage and oversee all your existing email aliases.
- Establish or Manage Aliases: If you have not yet done so, you will need to create an email alias by clicking 'Add Forwarder'. Here, you will input the desired alias and specify the email account(s) to which incoming messages for this alias should be forwarded.
Crucial Precaution: It is critically important to ensure that the email alias you are configuring does not forward emails back to the very same account from which the autoresponder is set to reply. Such a configuration would create an infinite mail loop, leading to significant email delivery problems and potential server strain. Always verify that the forwarding and autoresponder destinations are distinct.
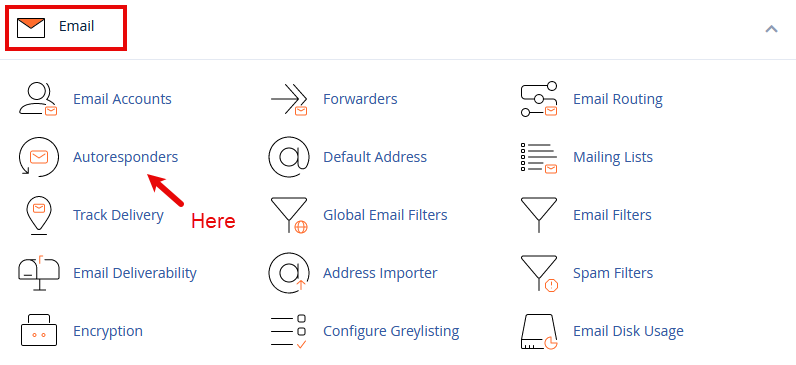
- Access Autoresponders Configuration: Now, transition to the 'Autoresponders' section, which is also found within the 'Email' area of your cPanel. Click on 'Add Autoresponder' to begin the process of setting up a new automated response for your chosen email alias.
- Define Autoresponder Details: In the configuration interface, you may typically leave the 'Character Set' dropdown at its default setting. Proceed to fill in the essential details: the 'Interval' (which dictates how frequently an autoresponse is sent to a recurring sender's address within a specified timeframe), the email address (your alias), the 'From' name, a concise 'Subject' line, and the comprehensive body of your autoresponse message.
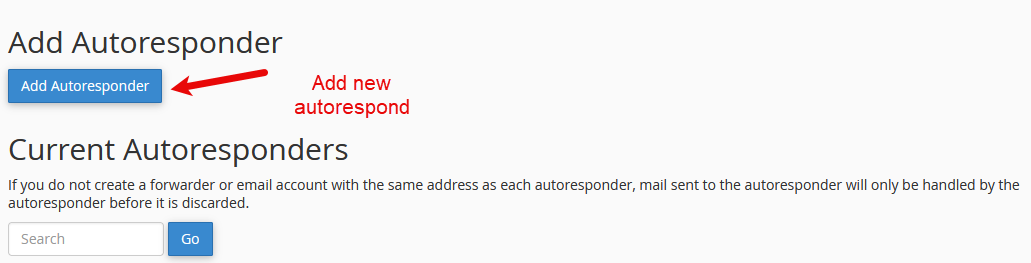
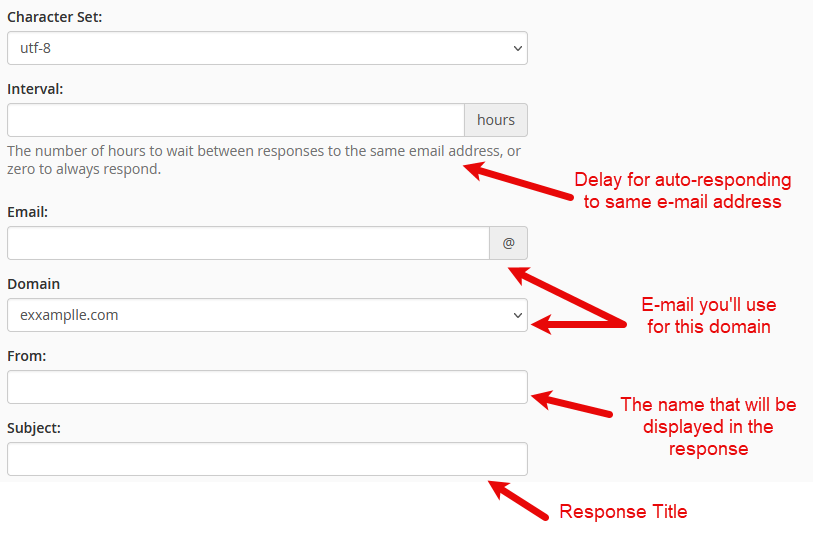
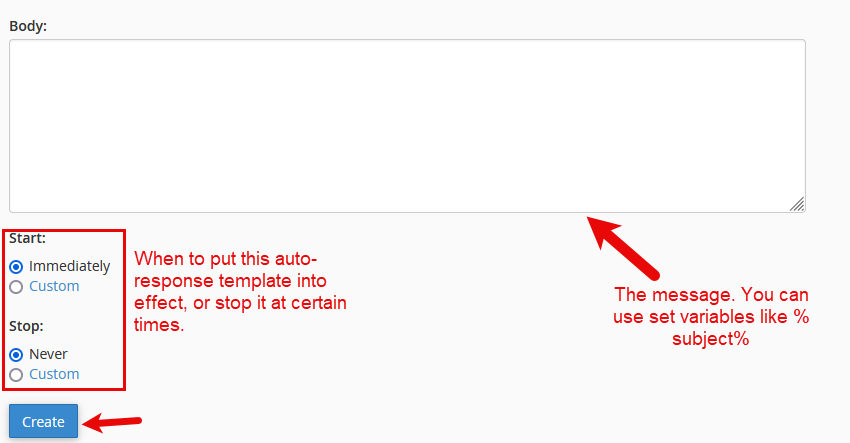
Upon completing these steps, you will have successfully implemented an autoresponder for your email alias. Consequently, any emails directed to your alias will now automatically trigger the configured response, ensuring prompt and consistent communication with your senders.
Leveraging the Email Trace Tool for Diagnostics
The Email Trace tool, a valuable utility within cPanel, is specifically designed to assist users in diagnosing and resolving email delivery issues. It achieves this by furnishing comprehensive, granular details about an email's complete journey, from its point of origin (sender) to its ultimate destination (recipient). This robust tool is indispensable for verifying the operational status of email forwarders and systematically troubleshooting any complications that may emerge during email transmission.
To effectively utilize the Email Trace tool in cPanel, follow these straightforward steps:
- Access your cPanel account by logging in with your credentials.
- Navigate to the 'Email' section on your cPanel dashboard. Within this section, click on either 'Track Delivery' or 'Email Trace', as the naming convention may vary slightly depending on your specific cPanel version.
- On the subsequent page, you will be able to input specific email addresses. This functionality allows you to search for and retrieve detailed status reports for emails sent to or from those particular addresses.
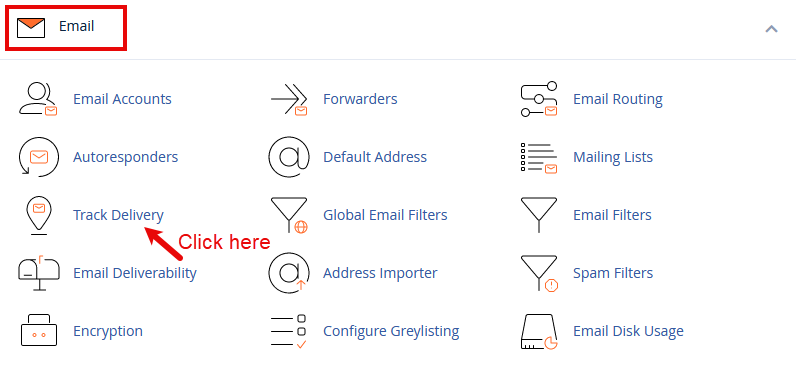
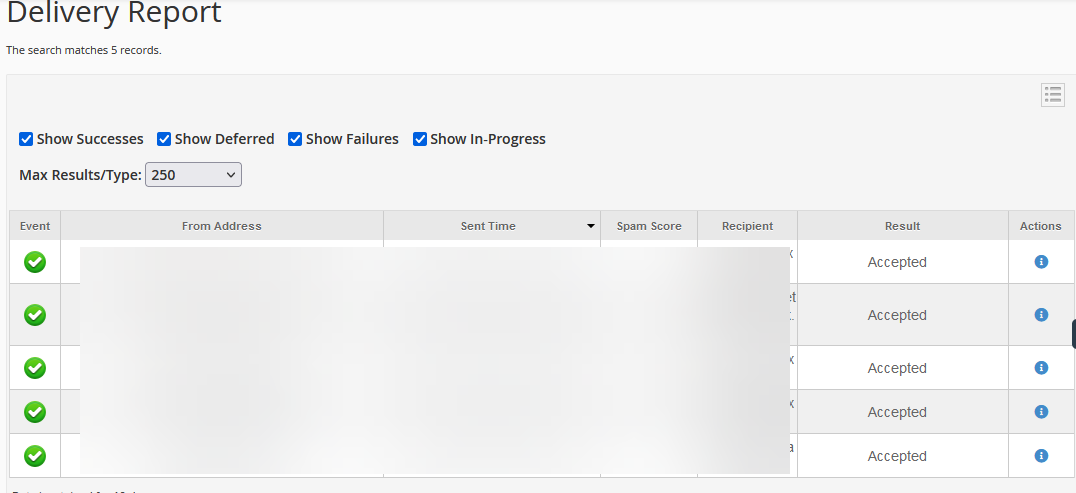
This powerful diagnostic tool is particularly effective for confirming that email forwarders are operating precisely as intended. It provides the means to verify unequivocally whether emails are being successfully redirected to their designated destination addresses, ensuring reliable communication.
Interpreting Email Trace Tool Results
When you leverage the Email Trace tool, you will be provided with comprehensive and meticulously detailed logs. These logs typically encompass crucial information, including:
- Date and Time: The precise timestamp indicating when the email message was processed by the mail server.
- Sender/Recipient Information: Clear identification of the sender of the email and its intended recipient.
- Delivery Status: A critical indicator specifying whether the email was successfully delivered, temporarily deferred (meaning it was delayed but delivery will be reattempted), or outright failed to reach its destination.
Such intricate details are exceptionally valuable for systematically troubleshooting any issues related to email forwarding. For example, if an email destined for a forwarded address is explicitly marked as "failed," this immediate flag allows you to delve deeper into the root cause of the problem and implement a targeted resolution.
Actionable Insight: It is paramount to pay meticulous attention to any log entries that are categorized as "deferred" or "failed." These statuses serve as critical alerts, often indicating underlying issues that can range from transient server problems and temporary network congestion to more significant configuration errors, such as an improperly set up forwarder or an invalid destination address. Prompt investigation of these indicators is essential for maintaining robust email delivery.
Common Troubleshooting Tips for Email Forwarders
Should you encounter any operational difficulties or unexpected behavior with your email forwarders, considering the following troubleshooting advice can help pinpoint and resolve the issues efficiently:
- Verify Forwarder Configuration: Meticulously inspect the email forwarder settings within your cPanel. Confirm that the designated destination email address is absolutely correct and free of any typographical errors.
- Analyze Email Trace Logs: Diligently review the detailed logs provided by the Email Trace tool. Look for specific error messages or status indicators that can offer crucial clues about the nature and origin of the problem.
- Confirm Destination Mailbox Capacity: Ensure that the mailbox intended to receive the forwarded emails is not at its storage capacity limit. A full destination mailbox is a common reason why forwarded messages fail to be delivered successfully.
Critical Alert: The improper configuration of email forwarders carries the significant risk of leading to lost or undelivered communications, which can have serious implications for both personal and business correspondence. Therefore, it is always advisable to thoroughly double-check all your settings and configurations whenever you experience, or even suspect, an issue with email forwarding. Proactive verification ensures the integrity of your email flow.
Conclusion
In summary, the email alias, forwarder, and autoresponder functionalities within cPanel represent exceptionally versatile and powerful tools for achieving highly efficient email management. Whether your objective is to simplify the handling of communications across diverse departments, automate responses to incoming messages, or consolidate emails from several different domains into a single point of access, cPanel furnishes all the essential utilities required. By diligently adhering to the comprehensive steps and best practices detailed throughout this guide, you are empowered to effectively create, manage, and leverage these email features to significantly streamline and enhance your overall communication strategies, ensuring clarity, consistency, and promptness in all your electronic correspondence.
