
 (1).svg)
 (1).png)


 (1).svg)
.svg)
A robust firewall is an indispensable tool for fortifying the security of your Linux server. This dedicated firewall solution empowers administrators to meticulously control network connections, both inbound and outbound, thereby significantly enhancing the overall security posture of the server environment. This guide will walk you through the process of adding and removing firewall rules and policies, implementing country-specific connection blocking, and efficiently replicating firewall configurations across multiple servers through import and export functionalities.
Important Consideration: It is crucial to note that this firewall solution and other system-level firewall management tools (such as
firewalld) both interact with the underlyingiptablesfirewall. Utilizing both tools concurrently can lead to conflicts, potentially closing essential ports required for server operations. For optimal stability and security, it is highly recommended to employ only one firewall management tool at any given time.
Managing Firewall Rules and Policies
The default configuration of this firewall solution comprises both policies and rules, which work in tandem to regulate network traffic:
- Policies: These are broad in scope, designed to affect a wide range of connections to or from the server. For instance, a "System policy for incoming traffic" can be configured to universally block all incoming connections to the server.
- Rules: These possess a narrower scope, specifically governing incoming connections to individual server services, such as SMTP or MySQL/MariaDB.
A key principle of this firewall's operation is that rules take precedence over policies. For example, if a global policy dictates the denial of all incoming traffic, but a specific rule permits incoming traffic from a particular IP address, the rule will override the policy, allowing that specific connection. This hierarchical mechanism provides administrators with precise control to either tighten or relax the security of the server as needed.
For instance, by configuring policies to prohibit all connections to and from the server, with the exception of a few explicitly allowed IP addresses or ports, you can achieve a significantly heightened level of security. However, this approach might inadvertently prevent certain applications from functioning correctly due to stringent network restrictions. Conversely, adopting a strategy where all connections are permitted by default, and then using specific rules to block access to individual services or from particular IP addresses, may result in a less secure server environment but ensures fewer connectivity issues. Experimentation is often necessary to discover the optimal balance between usability and robust security for your specific server needs.
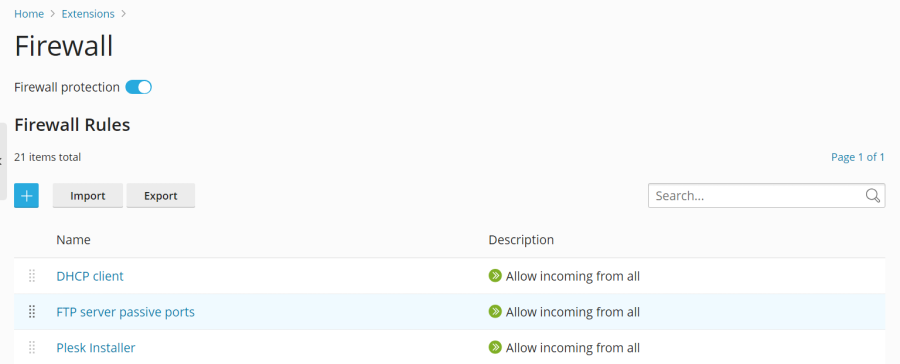
You can manage the firewall configuration through two primary methods:
- Modifying existing policies and rules, including those established by default.
- Creating and subsequently removing custom rules tailored to your specific security requirements.
Modifying an Existing Policy or Rule:
- Log in to the server management platform.
- Navigate to Tools & Settings, then select Firewall (found under the “Security” section).
- Ensure that “Firewall protection” is enabled. If it displays “Disabled,” click the toggle button to change its status to “Enabled.”
- Click on the specific policy or rule you wish to modify.
- Implement the desired changes, then click Save. Following this, click Apply Changes, and finally, click Apply to confirm.
The updated firewall configuration will now be in immediate effect on your server.
Creating a Custom Rule:
- Log in to the server management platform.
- Navigate to Tools & Settings, then select Firewall (found under the “Security” section).
- Ensure that “Firewall protection” is enabled. If it displays “Disabled,” click the toggle button to change its status to “Enabled.”
- Click the
 button to initiate the creation of a new rule.
 - (Optional) Assign a descriptive name to your new rule for easier identification.
- Configure the rule’s parameters according to your needs. For example, to block all incoming connections to the SSH service from a particular IP address (e.g., 198.51.100.1, assuming default SSH port 22 is used), set “Match direction” to “Incoming,” “Action” to “Deny,” “Port” to “TCP 22,” and enter “198.51.100.1” in the “Sources” field.
- Once the rule is configured, click Save, then Apply Changes, and finally, Apply to activate it.
The new custom firewall rule will be applied and will immediately influence network traffic. When creating custom rules, exercise caution to avoid inadvertently blocking connections to ports essential for your server management services. It's also worth noting that if you are utilizing containerization technologies, their inherent firewall rules may not be automatically integrated into this firewall solution.
Removing Custom Rules:
- Log in to the server management platform.
- Navigate to Tools & Settings, then select Firewall (found under the “Security” section).
- Ensure that “Firewall protection” is enabled. If it displays “Disabled,” click the toggle button to change its status to “Enabled.”
- Select one or more custom rules you intend to remove. Only user-defined custom rules can be deleted.
- Click Remove, confirm by clicking Yes, remove, then click Apply Changes, and finally, Apply to finalize the removal.
The firewall configuration will update, and the selected custom rules will no longer be active.
Country Blocking
A powerful feature of this firewall solution is its ability to block network access from or to IP addresses associated with specific countries. This can be particularly useful for mitigating security threats or managing geographic access to your server resources.
Blocking Access from a Specific Country:
- Log in to the server management platform.
- Navigate to Tools & Settings, then select Firewall (found under the “Security” section).
- Ensure that “Firewall protection” is enabled. If it displays “Disabled,” click the toggle button to change its status to “Enabled.”
- Click the button to add a new rule.
- (Optional) Provide a descriptive name for this country-blocking rule.
- Set the “Action” to “Deny.”
- Under the “Sources” field, input the two-letter ISO 3166 country code for each country you wish to block. For example, entering “AF” will block all incoming connections originating from Afghanistan.
- (Optional) To block additional countries, click “Add one more” and repeat the previous step. You can include as many countries as necessary in a single rule.
- Once all desired countries have been added, click Save.
- Finally, click Apply Changes, and then Apply to implement the new country-blocking configuration.
After the firewall configuration has been successfully applied, all incoming connections to your server from the specified blocked country or countries will be automatically denied.
By default, this firewall solution uses the free “IP to Country Lite” database provided by DB-IP for geographical IP lookup. For enhanced accuracy or more extensive features, you have the option to integrate a free or paid database from MaxMind. To do so, you will first need to obtain an appropriate license from MaxMind and receive your unique license key.
Switching to a MaxMind Database:
- Add the following lines to the platform’s main configuration file. To use the free GeoLite2 database, include:
[ext-firewall]
geoipDataSource = maxmind-lite
Or, to utilize the paid GeoIP2 database, use:
[ext-firewall] geoipDataSource = maxmind - Log in to the server via SSH and execute the relevant command to configure the data source. Replace
<enter your license key here>with your actual MaxMind license key:LICENSE_KEY=<enter your license key here> server_management_utility modules/firewall/ipsets --configure --data-source maxmind-lite --forceFor the paid database, use:
LICENSE_KEY=<enter your license key here> server_management_utility modules/firewall/ipsets --configure --data-source maxmind --forceNote: You might encounter a
Set cannot be destroyedwarning during this process; this warning can typically be safely disregarded. - Log in to the server management platform.
- Navigate to Tools & Settings, then select Firewall (found under the “Security” section).
- Click Apply Changes, and then Apply.
After these steps, the MaxMind GeoIP2 or GeoLite2 database will be used by the firewall instead of the default DB-IP GeoLite2. Should the “Apply Changes” button be unavailable, creating a temporary new firewall rule can often trigger its visibility, allowing you to proceed with applying the changes. You may then remove the temporary rule if it is not needed.
To revert to the free database from DB-IP, simply remove the geoipDataSource = maxmind-lite or geoipDataSource = maxmind line from the platform’s main configuration file, and then reapply the firewall configuration through the server management platform interface.
Importing and Exporting Firewall Configuration
For administrators managing multiple Linux servers, replicating a specific firewall configuration from one server to others can be a significant time-saver. The most efficient method for achieving this is by exporting the desired firewall configuration to a file and then importing it onto each target server. This process can be performed both through the graphical user interface (GUI) and via the command-line interface (CLI).
Exporting the Firewall Configuration via the GUI:
- Log in to the server management platform on the server whose firewall configuration you wish to duplicate.
- Navigate to Tools & Settings, then select Firewall (found under the “Security” section).
- Ensure that “Firewall protection” is enabled, then click Apply. If it is already enabled, you may skip this step.
- Click the Export button.
The firewall configuration will be saved as a .json file, typically found in your web browser’s default downloads directory.
Importing the Firewall Configuration via the GUI:
- Log in to the server management platform on a server where you want to apply a copied firewall configuration.
- Navigate to Tools & Settings, then select Firewall (found under the “Security” section).
- Ensure that “Firewall protection” is enabled, then click Apply. If it is already enabled, you may skip this step.
- Click the Import button, and then browse to locate the
.jsonfile that was previously exported from the source server.
The firewall configuration contained within the selected file will be automatically applied to the current server.
Exporting the Firewall Configuration via the CLI:
- Establish an SSH connection to the server from which you intend to copy the firewall configuration.
- Execute the following command to export the firewall configuration to a file:
server_management_tool firewall --export > rules.jsonYou have the flexibility to name the output file as you prefer; “rules.json” is provided as an illustrative example.
The server’s firewall configuration will be saved to the file you specified.
Importing the Firewall Configuration via the CLI:
- Establish an SSH connection to the target server where you wish to import the firewall configuration. For this process, you will need two separate SSH sessions open concurrently.
- In the first SSH session, execute the following command to enable firewall protection. If protection is already active, this step can be bypassed:
server_management_tool firewall --enable - In the second SSH session, run this command to confirm firewall protection. Again, if protection is already active, this step is not necessary:
server_management_tool firewall --confirm - Back in the first SSH session, execute the following command to import and apply the firewall configuration. Replace
<the file's URL or local path>with the actual path or URL of your configuration file:server_management_tool firewall --import -config <the file's URL or local path> && server_management_tool firewall --applyFor example, if your file is on a web server:
server_management_tool firewall --import -config https://example.com/rules.json && server_management_tool firewall --applyOr, if it’s stored locally on the server:
server_management_tool firewall --import -config /tmp/rules.json && server_management_tool firewall --apply - Immediately after applying the new firewall configuration, verify that you can still connect to the server via SSH. If connectivity is successful, proceed to the second SSH session and run the following command to definitively confirm the imported firewall configuration:
server_management_tool firewall --confirmCritical Note: If you fail to confirm the newly imported firewall configuration within 60 seconds of executing the
server_management_tool firewall --applycommand, the changes you made will be automatically rolled back, and the server’s previous firewall configuration will be reinstated to prevent accidental lockout.
Upon successful confirmation, the firewall configuration from the specified file will be fully applied and active on the server.
